手撕Ford-Fulkerson algorithm 学一半的笔记
我明白了,
余量网络 名如其名
比如你f/c=3/5
那么正边2,reverse edge3,加起来是5
在这个你建的新图上找s到t的路径
然后path的最小边权叫delta
给流图的对应path的每条边e都加流 delta,或者 反边减delta (反边的情况)
得到新的流,重复
直到余量网络没有s到t的路径
(最大流-最小割定理也行)
求最小费用流
找个最大流,
然后
建立个新图
比如这条边的性质 容量,代价= 6,3,跑着2的流
那么正向边标4,3
反向标 2,-3
新图上找 负环(负环的代价和为负)
然后min{a_1}
流加上这个
流调整了
重复
直到新图上找不到 负环(负环的代价和为负)
不断调整f得到最大流
我吐了都,要想手撕个算法首先还得理解一些定义
我找了个课件边看边学
https://www.cs.princeton.edu/~wayne/kleinberg-tardos/pdf/07NetworkFlowI.pdf
定义大概就这些

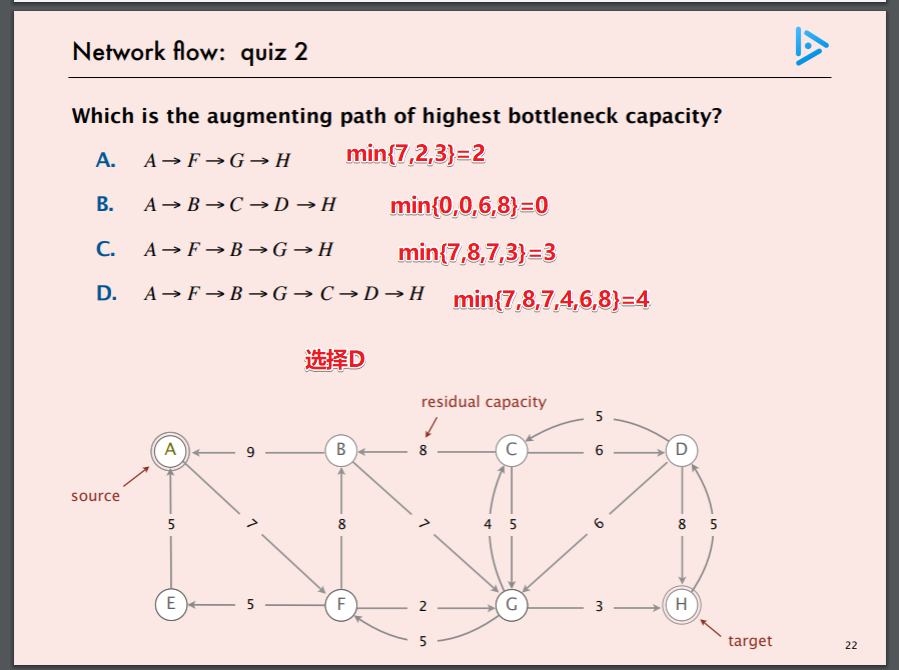
Def. The bottleneck capacity of an augmenting path P is the minimum residual capacity of any edge in P
伪代码

其中,AUGMENT()如下

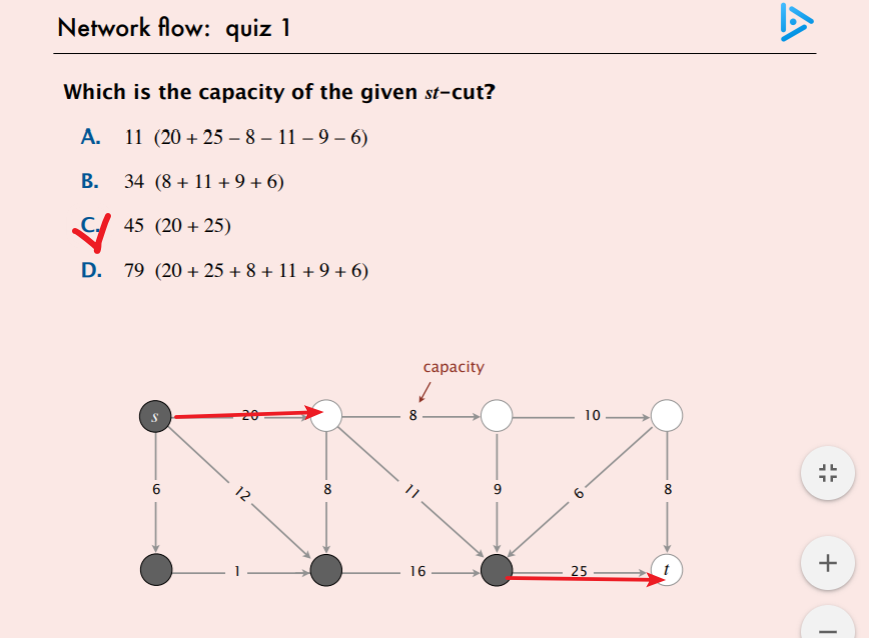
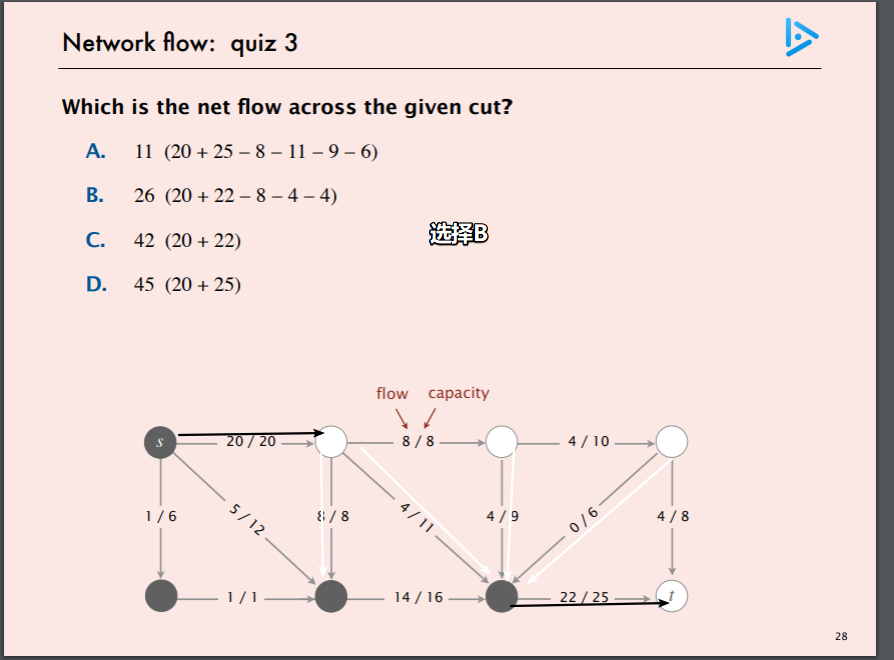
自己做slide里的quiz
搬运别人的代码
// Copyright srcmake 2018.
// C++ Example Ford Fulkerson Algorithm
/* Ford Fulkerson Algorithm:
// 0. Initialize an adjacency matrix to represent our graph.
// 1. Create the residual graph. (Same as the original graph.)
// 2. Create an default parent vector for BFS to store the augmenting path.
// 3. Keep calling BFS to check for an augmenting path (from the source to the sink...
// 4. Find the max flow through the path we found.
// 5. Update the residual capacities of the edges and reverse edges.
// 6. Add this path's flow to our total max flow so far.
*/
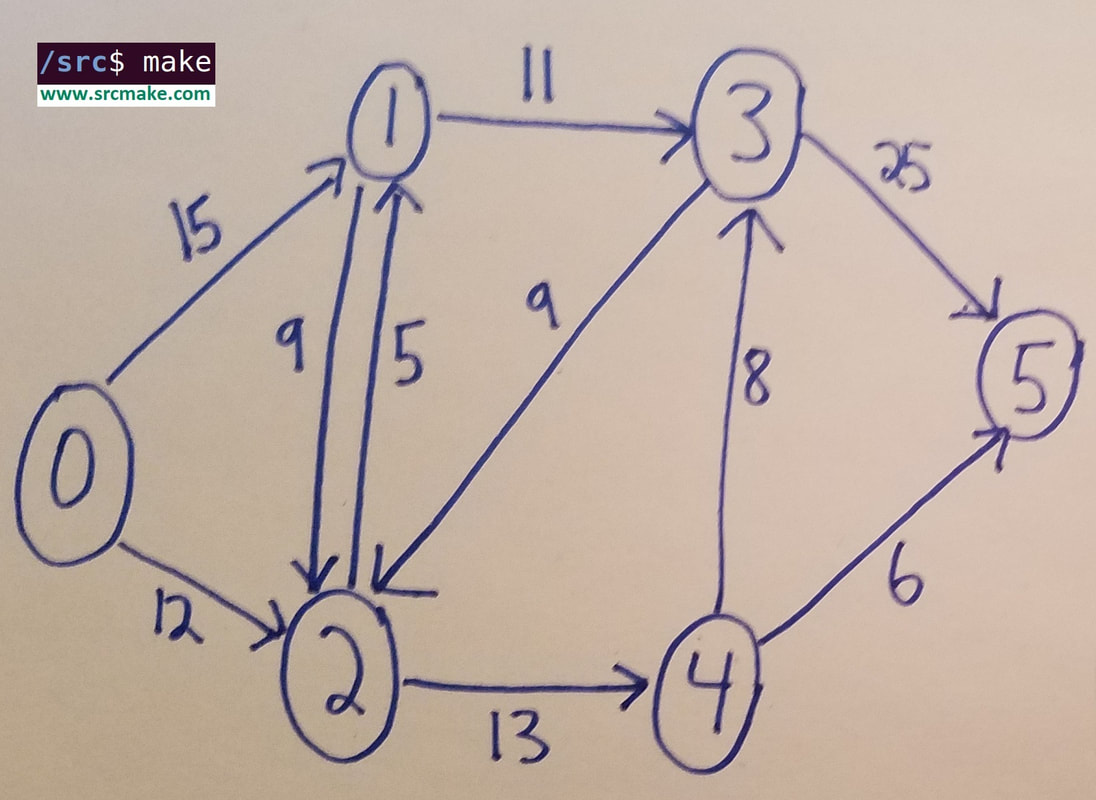
// The example graph: https://www.srcmake.com/uploads/5/3/9/0/5390645/maxflow_1_orig.jpg
#include <iostream>
#include <vector>
#include <queue>
using namespace std;
//////////////////////////////////////////////////////////////////////////////////////////////
// See the picture here: https://www.srcmake.com/uploads/5/3/9/0/5390645/adjmatrix_1_orig.jpg
vector< vector<int> > FormAdjMatrix()
{
// Our adjacency list.
vector< vector<int> > adjMatrix;
const int n = 6;
// Initialize our matrix to all 0s.
for(int i = 0; i < n; i++)
{
vector<int> row;
adjMatrix.push_back(row);
for(int j = 0; j < n; j++)
{
adjMatrix[i].push_back(0);
}
}
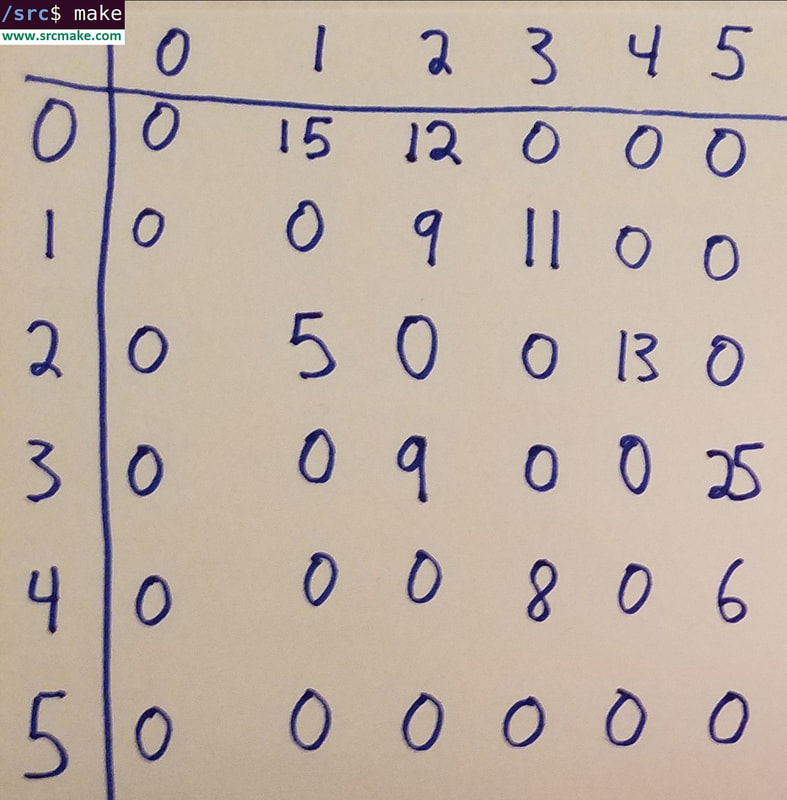
// First number is the vertex, second is the edge capacity.
adjMatrix[0][1] = 15;
adjMatrix[0][2] = 12;
adjMatrix[1][2] = 9;
adjMatrix[1][3] = 11;
adjMatrix[2][1] = 5;
adjMatrix[2][4] = 13;
adjMatrix[3][2] = 9;
adjMatrix[3][5] = 25;
adjMatrix[4][3] = 8;
adjMatrix[4][5] = 6;
// Our graph is now represented as an adjacency list.
return adjMatrix;
}
//////////////////////////////////////////////////////////////////////////////////////////////
//////////////////////////////////////////////////////////////////////////////////////////////
// A special BFS version that returns true if there's a path from source to sink.
bool BFS(vector< vector<int> > &resAdjMatrix, int &source, int &sink, vector<int> &parent)
{
// Create an array for all nodes we visited. Initialized to false.
int n = resAdjMatrix.size();
bool visited[n] = { false };
// Create a queue to check each node.
queue<int> q;
// Push our source into the queue and mark it as visited. It has no parent.
q.push(source);
visited[source] = true;
parent[source] = -1;
// Keep visiting vertices.
while(q.empty() == false)
{
int u = q.front();
q.pop();
// Check all of u's friends.
for(int i = 0; i < n; i++)
{
int v = i;
int capacity = resAdjMatrix[u][v];
// We find a neighbor that hasn't been visited, and the capacity is bigger than 0.
if(visited[v] == false && capacity > 0)
{
// Push the neighbor onto the queue, mark it's parent, and mark it as visited.
q.push(v);
parent[v] = u;
visited[v] = true;
}
}
}
// If the sink got visited, then we found a path to it.
if(visited[sink] == true)
{ return true; }
return false;
}
//////////////////////////////////////////////////////////////////////////////////////////////
//////////////////////////////////////////////////////////////////////////////////////////////
// Use the Ford Fulkerson algorithm. Return the max flow.
int FordFulkerson(vector< vector<int> > &adjMatrix, int &source, int &sink)
{
int maxflow = 0;
// 1. Create the residual graph. (Same as the original graph.)
vector< vector<int> > resAdjMatrix;
int n = adjMatrix.size();
for(int i = 0; i < n; i++)
{
vector<int> row;
resAdjMatrix.push_back(row);
for(int j = 0; j < adjMatrix[i].size(); j++)
{
resAdjMatrix[i].push_back(adjMatrix[i][j]);
}
}
// 2. Create an empty parent array for BFS to store the augmenting path.
vector<int> parent;
for(int i = 0; i < n; i++)
{
parent.push_back(-1);
}
// 3. Keep calling BFS to check for an augmenting path (from the source to the sink...
while(BFS(resAdjMatrix, source, sink, parent) == true)
{
// 4. Find the max flow through the path we just found.
int pathflow = 10000007;
// Go through the path we just found. Iterate through the path.
int v = sink;
while(v != source)
{
int u = parent[v]; // The parent.
// Update the pathflow to this capacity if it's smaller
int capacity = resAdjMatrix[u][v];
pathflow = min(pathflow, capacity);
// Setup for the next edge in the path.
v = u;
}
// 5. Update the residual capacities of the edges and reverse edges.
v = sink;
while(v != source)
{
int u = parent[v]; // The parent.
// Update the capacities.
resAdjMatrix[u][v] -= pathflow;
resAdjMatrix[v][u] += pathflow;
// Setup for the next edge in the path.
v = u;
}
// 6. Add this path's flow to our total max flow so far.
maxflow += pathflow;
}
return maxflow;
}
//////////////////////////////////////////////////////////////////////////////////////////////
//////////////////////////////////////////////////////////////////////////////////////////////
int main()
{
cout << "Program started.\n";
// Create our adjacency list.
vector< vector<int> > adjMatrix = FormAdjMatrix();
// Call FordFulkerson to get the max flow from the source to the sink.
int source = 0;
int sink = 6;
for(int i = 0; i < 6; i++)
{
for(int j = 0; j < 6; j++)
{
int source = i;
int sink = j;
if(i == j) { continue; }
cout << "The max flow from " << source << " to " << sink << " is: ";
cout << FordFulkerson(adjMatrix, source, sink) << endl;
}
cout << endl;
}
cout << "Program ended.\n";
return 0;
}
//////////////////////////////////////////////////////////////////////////////////////////////
手撕Ford-Fulkerson algorithm 学一半的笔记的更多相关文章
- ACM/ICPC 之 网络流入门-Ford Fulkerson与SAP算法(POJ1149-POJ1273)
第一题:按顾客访问猪圈的顺序依次构图(顾客为结点),汇点->第一个顾客->第二个顾客->...->汇点 //第一道网络流 //Ford-Fulkerson //Time:47M ...
- NN入门,手把手教你用Numpy手撕NN(一)
前言 这是一篇包含极少数学推导的NN入门文章 大概从今年4月份起就想着学一学NN,但是无奈平时时间不多,而且空闲时间都拿去做比赛或是看动漫去了,所以一拖再拖,直到这8月份才正式开始NN的学习. 这篇文 ...
- NN入门,手把手教你用Numpy手撕NN(2)
这是一篇包含较少数学推导的NN入门文章 上篇文章中简单介绍了如何手撕一个NN,但其中仍有可以改进的地方,将在这篇文章中进行完善. 误差反向传播 之前的NN计算梯度是利用数值微分法,虽容易实现,但是计算 ...
- NN入门,手把手教你用Numpy手撕NN(三)
NN入门,手把手教你用Numpy手撕NN(3) 这是一篇包含极少数学的CNN入门文章 上篇文章中简单介绍了NN的反向传播,并利用反向传播实现了一个简单的NN,在这篇文章中将介绍一下CNN. CNN C ...
- 编译原理--05 用C++手撕PL/0
前言 目录 01 文法和语言.词法分析复习 02 自顶向下.自底向上的LR分析复习 03 语法制导翻译和中间代码生成复习 04 符号表.运行时存储组织和代码优化复习 05 用C++手撕PL/0 在之前 ...
- 优雅手撕bind函数(面试官常问)
优雅手撕bind函数 前言: 为什么面试官总爱让实现一个bind函数? 他想从bind中知道些什么? 一个小小的bind里面内有玄机? 今天来刨析一下实现一个bind要懂多少相关知识点,也方便我们将零 ...
- 手撕spring核心源码,彻底搞懂spring流程
引子 十几年前,刚工作不久的程序员还能过着很轻松的日子.记得那时候公司里有些开发和测试的女孩子,经常有问题解决不了的,不管什么领域的问题找到我,我都能帮她们解决.但是那时候我没有主动学习技术的意识,只 ...
- Netty实现高性能IOT服务器(Groza)之手撕MQTT协议篇上
前言 诞生及优势 MQTT由Andy Stanford-Clark(IBM)和Arlen Nipper(Eurotech,现为Cirrus Link)于1999年开发,用于监测穿越沙漠的石油管道.目标 ...
- 手撕RPC框架
手撕RPC 使用Netty+Zookeeper+Spring实现简易的RPC框架.阅读本文需要有一些Netty使用基础. 服务信息在网络传输,需要讲服务类进行序列化,服务端使用Spring作为容器.服 ...
- 手撕公司SSO登陆原理
Single Sign-on SSO是老生常谈的话题了,但部分同学对SSO可能掌握的也是云里雾里,一知半解.本次手撕公司的SSO登陆原理,试图以一种简单,流畅的形式为你提供 有用的SSO登陆原理. 按 ...
随机推荐
- pg 窗口函数
窗口函数基于结果集进行计算,将计算出的结果合并到输出的结果集上,并返回多行.使用窗口函数能大幅度简化SQL代码.gaussdb提供内置的窗口函数,例如row_num().rank().lag()等,除 ...
- [2002年NOIP提高组] 均分纸牌
有 N 堆纸牌,编号分别为 1,2,-, N.每堆上有若干张,但纸牌总数必为 N 的倍数.可以在任一堆上取若于张纸牌,然后移动.移牌规则为:在编号为 1 堆上取的纸牌,只能移到编号为 2 的堆上:在编 ...
- ubuntu ssh远程访问出现Permission denied(publickey,password)解决方法
windows上安装SSH服务设置–>应用–>可选功能–>添加功能–>安装 OpenSSH服务器 和 OpenSSH客户端在左下角搜索栏输入服务,将相关SSH服务设置为自动(延 ...
- pycharm开发工具的介绍和使用
pycharm开发工具的介绍和使用 PyCharm是常用的python开发工具之一,分为社区版和专业版,社区版只有基础的python环境,专业版的功能会多很多
- vue项目中axios跨域设置
最近项目中遇到一个问题,测试环境和线上环境需要调同一个接口(接口地址是线上的),本地开发的时候遇到了跨域的问题,刚开始用了fetch解决的,代码如下 方法一 step1:安装包node-fetch,然 ...
- C# WPF 自学 MVVM简单介绍
一.MVVM介绍 MVVM是Model-View-ViewModel(模型-视图-视图模型)的缩写形式 1.View就是用xaml实现的界面,负责与用户交互,接收用户输入,把数据展现给用户. 2.Vi ...
- c++学习9 结构体
一 结构体赋值 结构体赋值的方法有三种,逐个成员赋值,整体赋值和拷贝赋值. 设一个结构体有struck student{ int age;char ch[32]; }: 逐个成员赋值:student ...
- PLC入门笔记7
梯形图与指令表的转换 后缀表达式 开头是MPS 结尾是MPP 中间就是MRD啦!!!! MPS 存入堆栈(将目前累加器的内容存入堆栈.(堆栈指针加一))将当前数据栈顶数据复制一份到辅助栈 栈深度+1 ...
- redis部署集群时出现的问题(redis 版本 6.2.5)
配置 redis 集群时(redis 版本 6.2.5),我使用了同一个 server 端运行3个不同的配置文件. 配置文件中只修改了端口号并打开了 cluster-enable. 脚本运行后什么提示 ...
- 解决office提示您的许可证不是正版的问题
https://blog.csdn.net/d_pcb66/article/details/125339872?spm=1001.2101.3001.6650.4&utm_medium=dis ...