
Mysql 实现数据库读写分离
一、Amoeba 是什么
Amoeba(变形虫)项目,专注 分布式数据库 proxy 开发。座落与Client、DB Server(s)之间。对客户端透明。具有负载均衡、高可用性、sql过滤、读写分离、可路由相关的query到目标数据库、可并发请求多台数据库合并结果。
主要解决:
• 降低 数据切分带来的复杂多数据库结构
• 提供切分规则并降低 数据切分规则 给应用带来的影响
• 降低db 与客户端的连接数
• 读写分离
二、为什么要用Amoeba
目前要实现mysql的主从读写分离,主要有以下几种方案:
1、 通过程序实现,网上很多现成的代码,比较复杂,如果添加从服务器要更改多台服务器的代码。
2、 通过mysql-proxy来实现,由于mysql-proxy的主从读写分离是通过lua脚本来实现,目前lua的脚本的开发跟不上节奏,而写没有完美的现成的脚本,因此导致用于生产环境的话风险比较大,据网上很多人说mysql-proxy的性能不高。
3、 自己开发接口实现,这种方案门槛高,开发成本高,不是一般的小公司能承担得起。
4、 利用阿里巴巴的开源项目Amoeba来实现,具有负载均衡、高可用性、sql过滤、读写分离、可路由相关的query到目标数据库,并且安装配置非常简单。国产的开源软件,应该支持,目前正在使用,不发表太多结论,一切等测试完再发表结论吧,哈哈!

三、Amoeba+Mysql实现数据库读写分离
基本的原理:让“主”数据库处理事务增,删,改(INSERT,UPDATA,DELETE),“从”数据库处理SELECT查询操作。数据库复制被用来把事务性操作导致变更同步到集群中的从数据库
先介绍下部署环境:
amoeba(代理服务器):192.168.220.33
master-mysql:192.168.220.30
slave1-mysql:192.168.220.31
slave2-mysql:192.168.220.32
客户机(本机 win11):192.168.220.2
系统:centOS 7.9
MySQL:5.7
Amoeba:3.0.5 (框架是居于java语言开发)
jdk:1.8
部署MySQL一主多从:
注:做 主从 数据库里数据最好是保持一致
1、主数据库:master-mysql
mysql> show databases;

+--------------------+

| Database           |

+--------------------+

| information_schema |

| mysql              |

| performance_schema |

| sys                |

+--------------------+

4 rows in set (0.00 sec)

mysql>

mysql> grant all on *.* to 'test'@'192.168.220.%' identified by '1234.Com'; #创建授权用户 为amoeba提供登录

Query OK, 0 rows affected, 1 warning (0.00 sec)

mysql>

mysql> grant replication slave on *.* to 'slave'@'192.168.220.%' identified by '1234.Com'; #主从模式

Query OK, 0 rows affected, 1 warning (0.00 sec)

mysql>

mysql> show master status\G;

*************************** 1. row ***************************

             File: mysql-bin.000001 #从库加入主库时 需要配置的二进制文件名

         Position: 154         # 二进制日子 从 pos 154 开始被slave

复制

备份 Binlog_Do_DB: Binlog_Ignore_DB: Executed_Gtid_Set: 1 row in set (0.00 sec) ERROR: No query specified mysql>
2、从数据库:slave1-mysql
mysql> show databases;

+--------------------+

| Database           |

+--------------------+

| information_schema |

| mysql              |

| performance_schema |

| sys                |

+--------------------+

4 rows in set (0.00 sec)

mysql>

mysql> change master to master_host='192.168.220.30',master_user='slave',master_password='1234.Com',,master_log_file='mysql-bin.000001',master_log_pos=154;

Query OK, 0 rows affected, 2 warnings (0.01 sec)

mysql>

mysql> start slave;

Query OK, 0 rows affected (0.01 sec)

mysql> show slave status\G; #查看从库的连接状态,I/O,SQL 都要为 YES

*************************** 1. row ***************************

               Slave_IO_State: Connecting to master

                  Master_Host: 192.168.220.30

                  Master_User: slave

                  Master_Port: 3306

                Connect_Retry: 60

              Master_Log_File: mysql-bin.000001

          Read_Master_Log_Pos: 154

               Relay_Log_File: slave1-relay-bin.000001

                Relay_Log_Pos: 4

        Relay_Master_Log_File: mysql-bin.000001

             Slave_IO_Running: YES

            Slave_SQL_Running: Yes

              Replicate_Do_DB:

       ····················

ERROR:

No query specified
mysql> grant all on *.* to 'test'@'192.168.220.%' identified by '1234.Com'; #创建授权用户 为amoeba提供登录

Query OK, 0 rows affected, 1 warning (0.00 sec)
3、从数据库:slave2-mysql
mysql> show databases;

+--------------------+

| Database           |

+--------------------+

| information_schema |

| mysql              |

| performance_schema |

| sys                |

+--------------------+

4 rows in set (0.00 sec)


mysql>

mysql> change master to master_host='192.168.220.30',master_user='slave',master_password='1234.Com',,master_log_file='mysql-bin.000001',master_log_pos=154;

Query OK, 0 rows affected, 2 warnings (0.01 sec)

mysql>

mysql> start slave;

Query OK, 0 rows affected (0.01 sec)

mysql> show slave status\G; #查看从库的连接状态,I/O,SQL 都要为 YES

*************************** 1. row ***************************

               Slave_IO_State: Connecting to master

                  Master_Host: 192.168.220.30

                  Master_User: slave

                  Master_Port: 3306

                Connect_Retry: 60

              Master_Log_File: mysql-bin.000001

          Read_Master_Log_Pos: 154

               Relay_Log_File: slave1-relay-bin.000001

                Relay_Log_Pos: 4

        Relay_Master_Log_File: mysql-bin.000001

             Slave_IO_Running: YES

            Slave_SQL_Running: Yes

              Replicate_Do_DB:

       ····················

ERROR:

No query specified
mysql> grant all on *.* to 'test'@'192.168.220.%' identified by '1234.Com'; #创建授权用户 为amoeba提供登录

Query OK, 0 rows affected, 1 warning (0.00 sec)
4、主库测试:创建一个测试库并添加创建表和添加数据,查看从库是否同步
mysql> create database test;

Query OK, 1 row affected (0.00 sec)

mysql> use test;

Database changed

mysql> create table test (id int);

Query OK, 0 rows affected (0.01 sec)

mysql> insert into test values (1);

Query OK, 1 row affected (0.00 sec)

mysql> select * from test;

+------+

| id   |

+------+

|    1 |

+------+

1 row in set (0.00 sec)

mysql>
5、slave1 从库测试:
mysql> show databases;

+--------------------+

| Database           |

+--------------------+

| information_schema |

| mysql              |

| performance_schema |

| sys                |

| test               |

+--------------------+

5 rows in set (0.00 sec)

mysql> select * from test.test;

+------+

| id   |

+------+

|    1 |

+------+

1 row in set (0.00 sec)

mysql>
6、slave2 从库测试:
mysql> show databases;

+--------------------+

| Database           |

+--------------------+

| information_schema |

| mysql              |

| performance_schema |

| sys                |

| test               |

+--------------------+

5 rows in set (0.00 sec)

mysql> select * from test.test;

+------+

| id   |

+------+

|    1 |

+------+

1 row in set (0.00 sec)

mysql>
从数据库同步正常,主从数据库部署完成,接下来部署 Amoeba
Amoeba 安装部署
1、安装java环境
先去官网下载:http://www.oracle.com/technetwork/java/javase/downloads/jdk8-downloads-2133151.html
安装
[root@amoeba src]# rpm -ivh jdk-8u111-linux-x64.rpm

Preparing...                ########################################### [100%]

   1:jdk1.8.0_111           ########################################### [100%]

Unpacking JAR files...

    tools.jar...

    plugin.jar...

    javaws.jar...

    deploy.jar...

    rt.jar...

    jsse.jar...

    charsets.jar...

    localedata.jar...
设置Java环境
[root@amoeba src]# vim /etc/profile

#set java environment

JAVA_HOME=/usr/java/jdk1.8.0_111

JRE_HOME=/usr/java/jdk1.8.0_111/jre

CLASS_PATH=.:$JAVA_HOME/lib/dt.jar:$JAVA_HOME/lib/tools.jar:$JRE_HOME/lib

PATH=$PATH:$JAVA_HOME/bin:$JRE_HOME/bin

export JAVA_HOME JRE_HOME CLASS_PATH PATH[root@bogon amoeba]# source /etc/profile
测试是否安装成功
[root@bogon src]# java -version

java version "1.8.0_111"

Java(TM) SE Runtime Environment (build 1.8.0_111-b14)

Java HotSpot(TM) 64-Bit Server VM (build 25.111-b14, mixed mode)
2、安装Amoeba
可以从https://sourceforge.net/projects/amoeba/files/Amoeba%20for%20mysql/3.x/下载最新版本的Amoeba,我这里下载的是amoeba-mysql-3.0.5-RC-distribution.zip。Amoeba安装非常简单,直接解压即可使用,这里将Amoeba解压到/usr/local/amoeba目录下,这样就安装完成了
[root@amoeba amoeba]# pwd

/usr/local/amoeba

[root@amoeba amoeba]# ll

total 48

drwxr-xr-x 2 root root    63 Aug 16 10:24 benchmark

drwxr-xr-x 2 root root   131 Feb 29  2012 bin

-rwxr-xr-x 1 root root  3976 Aug 29  2012 changelogs.txt

drwxr-xr-x 2 root root   243 Aug 16 14:53 conf

drwxr-xr-x 3 root root  4096 Aug 16 10:24 lib

-rwxr-xr-x 1 root root 34520 Aug 29  2012 LICENSE.txt

drwxr-xr-x 2 root root   133 Aug 16 10:25 logs

-rwxr-xr-x 1 root root  2031 Aug 29  2012 README.html

[root@amoeba amoeba]#
3.配置Amoeba(实现读写分离,两个slave“读”负载)
Amoeba的配置文件在本环境下位于:/usr/local/amoeba/conf 目录下,实现读写分离和负载 只需要 dbServers.xml和amoeba.xml 两个文件即可,下面介绍
dbServer.xml
[root@amoeba amoeba]# cd conf/

[root@amoeba conf]# ls

access_list.conf  amoeba.xml    dbServers.xml  functionMap.xml  log4j.xml  ruleFunctionMap.xml

amoeba.dtd        dbserver.dtd  function.dtd   log4j.dtd        rule.dtd   rule.xml

[root@amoeba conf]# cat dbServers.xml

<?xml version="1.0" encoding="gbk"?>

<!DOCTYPE amoeba:dbServers SYSTEM "dbserver.dtd">

<amoeba:dbServers xmlns:amoeba="http://amoeba.meidusa.com/">

        <!--

            Each dbServer needs to be configured into a Pool,

            If you need to configure multiple dbServer with load balancing that can be simplified by the following configuration:

             add attribute with name virtual = "true" in dbServer, but the configuration does not allow the element with name factoryConfig

             such as 'multiPool' dbServer

        -->

    <dbServer name="abstractServer" abstractive="true">

        <factoryConfig class="com.meidusa.amoeba.mysql.net.MysqlServerConnectionFactory">

            <property name="manager">${defaultManager}</property>

            <property name="sendBufferSize">64</property>

            <property name="receiveBufferSize">128</property>

            <!-- mysql port -->

            <property name="port">3306</property>  #设置Amoeba 连接数据库的端口,默认 3306

            <!-- mysql schema -->

            <property name="schema">mysql</property>  #设置 缺省的数据库,我这里使用的MySQL版本为5.7版本,默认是没有test库的,会报所以找不到默认的库,我之前搭建的MySQL版本是5.5是不需要修改的,没注意到这一点

            <!-- mysql user -->

            <property name="user">test</property>  #设置amoeba连接后端数据库服务器的账号和密码,上面已为 test 授权 和设置了密码

            <!--  mysql password -->

            <property name="password">1234.Com</property>

        </factoryConfig>

        <poolConfig class="com.meidusa.amoeba.net.poolable.PoolableObjectPool">

            <property name="maxActive">500</property>  #最大连接数,默认为500

            <property name="maxIdle">500</property>  #最大空闲连接数

            <property name="minIdle">10</property>  #最新空闲连接数

            <property name="minEvictableIdleTimeMillis">600000</property>

            <property name="timeBetweenEvictionRunsMillis">600000</property>

            <property name="testOnBorrow">true</property>

            <property name="testOnReturn">true</property>

            <property name="testWhileIdle">true</property>

        </poolConfig>

    </dbServer>

    <dbServer name="master"  parent="abstractServer">  #设置一个空间名称,可任意命名,这里定义为:master,顾名思义就是为master库创建一个命名空间,后面会用到

        <factoryConfig>

            <!-- mysql ip -->

            <property name="ipAddress">192.168.220.30</property> #设置 master的IP,功能可写

        </factoryConfig>

    </dbServer>

    <dbServer name="slave1"  parent="abstractServer">  #设置slava1 命名空间名称

        <factoryConfig>

            <!-- mysql ip -->

            <property name="ipAddress">192.168.220.31</property> # 设置slave1的IP,功能可写

        </factoryConfig>

    </dbServer>

    <dbServer name="slave2"  parent="abstractServer"> #设置slava2 命名空间名称

        <factoryConfig>

            <!-- mysql ip -->

            <property name="ipAddress">192.168.220.32</property>  #设置 slave的ip,功能可写

        </factoryConfig>

    </dbServer>

    <dbServer name="slaves" virtual="true">  #设置定义一个虚拟的dbserver,实际上相当于一个dbserver组,这里将可读的数据库ip统一放到一个组中,将这个组的名字命名为slaves

        <poolConfig class="com.meidusa.amoeba.server.MultipleServerPool">

            <!-- Load balancing strategy: 1=ROUNDROBIN , 2=WEIGHTBASED , 3=HA-->

            <property name="loadbalance">1</property> #选择调度算法,1表示复制均衡,2表示权重,3表示HA, 这里选择1

            <!-- Separated by commas,such as: server1,server2,server1 -->

            <property name="poolNames">slave1,slave2</property>  #slave组成员,把slave1,slave2 加入成员里,可实现 “读” 负载

        </poolConfig>

    </dbServer>

</amoeba:dbServers>

[root@amoeba conf]#
amoeba.xml
[root@amoeba amoeba]# cd conf/

[root@amoeba conf]# ls

access_list.conf  amoeba.xml    dbServers.xml  functionMap.xml  log4j.xml  ruleFunctionMap.xml

amoeba.dtd        dbserver.dtd  function.dtd   log4j.dtd        rule.dtd   rule.xml

[root@amoeba conf]# cat amoeba.xml

<?xml version="1.0" encoding="gbk"?>

<!DOCTYPE amoeba:configuration SYSTEM "amoeba.dtd">

<amoeba:configuration xmlns:amoeba="http://amoeba.meidusa.com/">

    <proxy>

        <!-- service class must implements com.meidusa.amoeba.service.Service -->

        <service name="Amoeba for Mysql" class="com.meidusa.amoeba.net.ServerableConnectionManager">

            <!-- port -->

            <property name="port">8066</property>  #设置amoeba 今天的端口,默认是8066

            <!-- bind ipAddress -->

            <!--

            <property name="ipAddress">127.0.0.1</property>

             -->

            <property name="manager">${clientConnectioneManager}</property>

            <property name="connectionFactory">

                <bean class="com.meidusa.amoeba.mysql.net.MysqlClientConnectionFactory">

                    <property name="sendBufferSize">128</property>

                    <property name="receiveBufferSize">64</property>

                </bean>

            </property>

            <property name="authenticator">

                <bean class="com.meidusa.amoeba.mysql.server.MysqlClientAuthenticator">

                    <property name="user">amoeba</property>  #提供客服端连接amoeba是需要使用设定的账号,账号密码可任意设置和数据服务器里的密码无关

                    <property name="password">123456</property>

                    <property name="filter">

                        <bean class="com.meidusa.amoeba.server.IPAccessController">

                            <property name="ipFile">${amoeba.home}/conf/access_list.conf</property>

                        </bean>

                    </property>

                </bean>

            </property>

        </service>

        <!-- server class must implements com.meidusa.amoeba.service.Service -->

        <service name="Amoeba Monitor Server" class="com.meidusa.amoeba.monitor.MonitorServer">

            <!-- port -->

            <!--  default value: random number

            <property name="port">9066</property>

            -->

            <!-- bind ipAddress -->

            <property name="ipAddress">127.0.0.1</property>

            <property name="daemon">true</property>

            <property name="manager">${clientConnectioneManager}</property>

            <property name="connectionFactory">

                <bean class="com.meidusa.amoeba.monitor.net.MonitorClientConnectionFactory"></bean>

            </property>

        </service>

        <runtime class="com.meidusa.amoeba.mysql.context.MysqlRuntimeContext">

            <!-- proxy server net IO Read thread size -->

            <property name="readThreadPoolSize">20</property>

            <!-- proxy server client process thread size -->

            <property name="clientSideThreadPoolSize">30</property>

            <!-- mysql server data packet process thread size -->

            <property name="serverSideThreadPoolSize">30</property>

            <!-- per connection cache prepared statement size  -->

            <property name="statementCacheSize">500</property>

            <!-- query timeout( default: 60 second , TimeUnit:second) -->

            <property name="queryTimeout">60</property>

        </runtime>

    </proxy>

    <!--

        Each ConnectionManager will start as thread

        manager responsible for the Connection IO read , Death Detection

    -->

    <connectionManagerList>

        <connectionManager name="clientConnectioneManager" class="com.meidusa.amoeba.net.MultiConnectionManagerWrapper">

            <property name="subManagerClassName">com.meidusa.amoeba.net.ConnectionManager</property>

            <!--

              default value is avaliable Processors

            <property name="processors">5</property>

             -->

        </connectionManager>

        <connectionManager name="defaultManager" class="com.meidusa.amoeba.net.MultiConnectionManagerWrapper">

            <property name="subManagerClassName">com.meidusa.amoeba.net.AuthingableConnectionManager</property>

            <!--

              default value is avaliable Processors

            <property name="processors">5</property>

             -->

        </connectionManager>

    </connectionManagerList>

        <!-- default using file loader -->

    <dbServerLoader class="com.meidusa.amoeba.context.DBServerConfigFileLoader">

        <property name="configFile">${amoeba.home}/conf/dbServers.xml</property>

    </dbServerLoader>

    <queryRouter class="com.meidusa.amoeba.mysql.parser.MysqlQueryRouter">

        <property name="ruleLoader">

            <bean class="com.meidusa.amoeba.route.TableRuleFileLoader">

                <property name="ruleFile">${amoeba.home}/conf/rule.xml</property>

                <property name="functionFile">${amoeba.home}/conf/ruleFunctionMap.xml</property>

            </bean>

        </property>

        <property name="sqlFunctionFile">${amoeba.home}/conf/functionMap.xml</property>

        <property name="LRUMapSize">1500</property>

        <property name="defaultPool">master</property>  #设置amoeba默认是的池,这里设置为master(在dbServers.xml文件中,我们定义了一会master的空间名称以及对应的服务器IP)

        <property name="writePool">master</property>  #设置写的池,master作为主数据库,处理的业务为 增,删,改 都是写操作,所以这设置为master

        <property name="readPool">slaves</property>   #设置读的池  slave 作为从库,负责 查(SELECT,因为我们有两个slave,在定义命名空间时,我们配置了一个slaves组,里面有slave1,slave2两个成员,这样就可以达到 读的负载

        <property name="needParse">true</property>

    </queryRouter>

</amoeba:configuration>
3、启动Amoeba
[root@amoeba ~]# /usr/local/amoeba/bin/launcher &

    at org.codehaus.plexus.classworlds.launcher.Launcher.launchStandard(Launcher.java:329)

    at org.codehaus.plexus.classworlds.launcher.Launcher.launch(Launcher.java:239)

    at org.codehaus.plexus.classworlds.launcher.Launcher.mainWithExitCode(Launcher.java:409)

    at org.codehaus.classworlds.Launcher.mainWithExitCode(Launcher.java:127)

    at org.codehaus.classworlds.Launcher.main(Launcher.java:110)

Caused by: com.meidusa.toolkit.common.bean.util.InitialisationException: default pool required!,defaultPool=writedb invalid

    at com.meidusa.amoeba.route.AbstractQueryRouter.init(AbstractQueryRouter.java:469)

    at com.meidusa.amoeba.context.ProxyRuntimeContext.initAllInitialisableBeans(ProxyRuntimeContext.java:337)

    ... 11 more

 2022-8-16 18:46:37 [INFO] Project Name=Amoeba-MySQL, PID=1577 , System shutdown ....

Java HotSpot(TM) 64-Bit Server VM warning: ignoring option PermSize=16m; support was removed in 8.0

Java HotSpot(TM) 64-Bit Server VM warning: ignoring option MaxPermSize=96m; support was removed in 8.0

2022-8-16 18:50:19 [INFO] Project Name=Amoeba-MySQL, PID=1602 , starting...

log4j:WARN log4j config load completed from file:/usr/local/amoeba/conf/log4j.xml

2022-8-16 18:50:21,668 INFO  context.MysqlRuntimeContext - Amoeba for Mysql current versoin=5.1.45-mysql-amoeba-proxy-3.0.4-BETA

log4j:WARN ip access config load completed from file:/usr/local/amoeba/conf/access_list.conf

2022-8-16 18:50:22,852 INFO  net.ServerableConnectionManager - Server listening on 0.0.0.0/0.0.0.0:8066.
查看端口
[root@amoeba ~]# netstat -anpt | grep java

tcp6       0      0 127.0.0.1:13319         :::*                    LISTEN      21350/java

tcp6       0      0 :::8066                 :::*                    LISTEN      21350/java
4、Amoeba 登录测试(客户端-本机:win11)
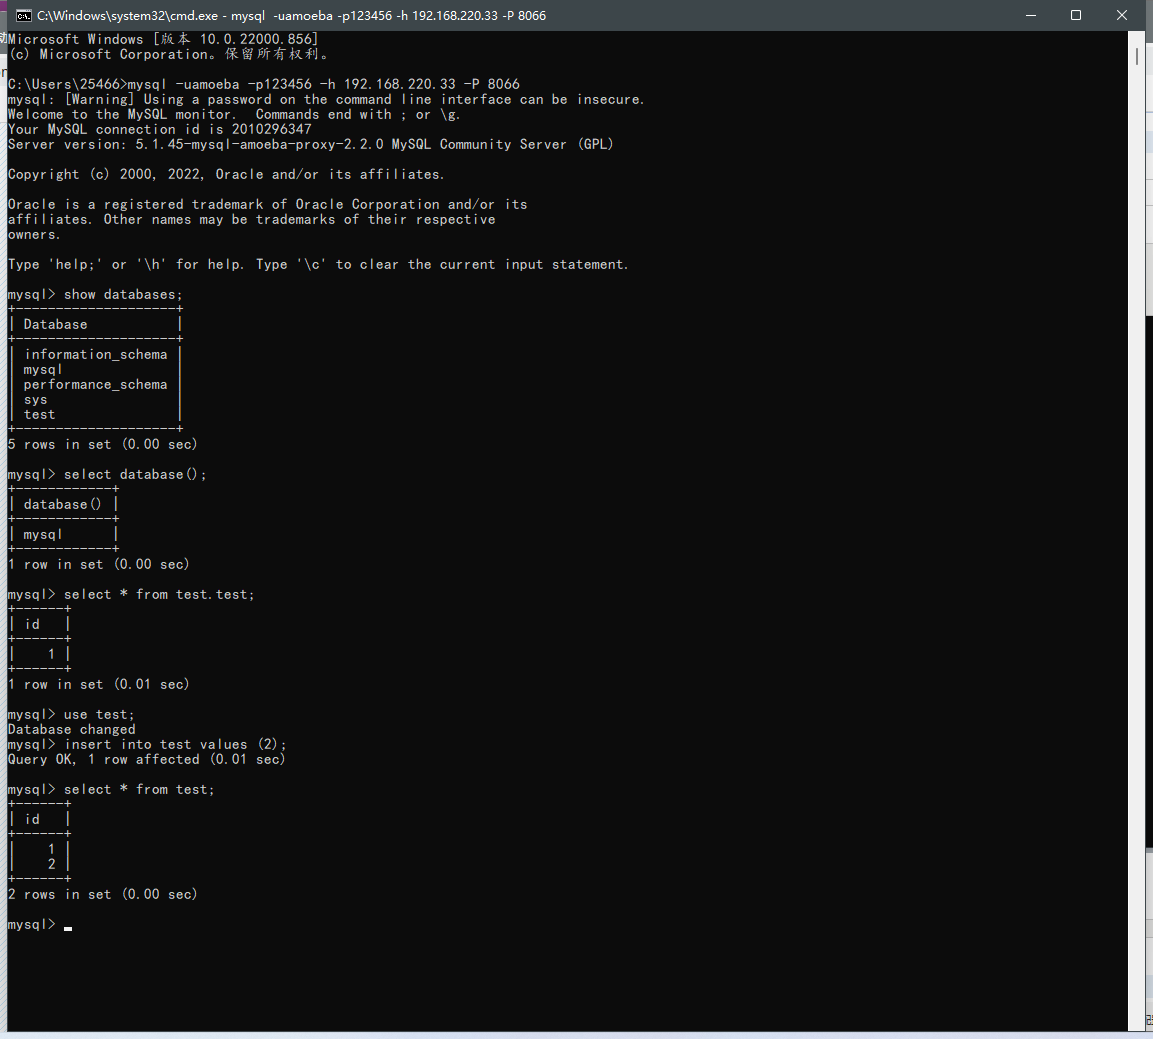
测试结果:登录后 所在的库是“mysql”库,可读取,可写入,到这里数据库读写分离部,负载部署完成!!!
下面就是读写分离的效果测试:
四、测试读写分离,负载效果
1、读写分离测试:
测试1 :mysql-master down机,写入报错,读正常
mysql-master:
[root@mysql_master ~]# systemctl stop mysqld
客服端:
mysql> select * from test;  #可正常查询

+------+

| id   |

+------+

|    1 |

|    2 |

+------+

2 rows in set (0.00 sec)

mysql>

mysql> insert into test values (3);

ERROR 2013 (HY000): Lost connection to MySQL server during query  #写入失败
测试2 :关闭两台slave,读取失败,插入成功
mysql-master
[root@mysql_master ~]# systemctl start mysqld
mysql-slave1
[root@slave1 ~]# systemctl stop mysqld
mysql-slave2
[root@slave2 ~]# systemctl stop mysqld
客服端:
mysql> insert into test values (3);

Query OK, 1 row affected (0.00 sec)

mysql> select * from test;

ERROR 2013 (HY000): Lost connection to MySQL server during query  #查询失败

mysql>
测试3:开启slava1,save2上的mysql,查看数据是否自动同步
mysql-slave1
[root@slave1 ~]# systemctl start mysqld
mysql-slave2
[root@slave2 ~]# systemctl start mysqld
客服端:
mysql> select * from test;

+------+

| id   |

+------+

|    1 |

|    2 |

|    3 |

+------+

4 rows in set (0.00 sec)

mysql>

mysql> insert into test values (4);

Query OK, 1 row affected (0.00 sec)

mysql> select * from test;

+------+

| id   |

+------+

|    1 |

|    2 |

|    3 |

|    4 |

+------+

5 rows in set (0.00 sec)

mysql>
读写分离测试完毕!!!
2、slave “读” 负载测试:
mysql-slave1:在test表插入值:100
[root@slave1 ~]# mysql -uroot -p

Enter password:

mysql>

mysql> select * from test;

+------+

| id   |

+------+

|    1 |

|    2 |

|    3 |

|    4 |

+------+

4 rows in set (0.00 sec)

mysql> insert into test values (100);

Query OK, 1 row affected (0.00 sec)

mysql> select * from test;

+------+

| id   |

+------+

|    1 |

|    2 |

|    3 |

|    4 |

|  100 |

+------+

5 rows in set (0.00 sec)

mysql>
mysql-slave2:在test表插入值:200
[root@slave2 ~]# mysql -uroot -p

Enter password:

mysql>

mysql> select * from test;

+------+

| id   |

+------+

|    1 |

|    2 |

|    3 |

|    4 |

+------+

4 rows in set (0.00 sec)

mysql> insert into test values (200);

Query OK, 1 row affected (0.00 sec)

mysql> select * from test;

+------+

| id   |

+------+

|    1 |

|    2 |

|    3 |

|    4 |

|  200 |

+------+

5 rows in set (0.00 sec)

mysql>
客服端:
mysql> select * from test;

+------+

| id   |

+------+

|    1 |

|    2 |

|    3 |

|    4 |

|  200 |

+------+

5 rows in set (0.00 sec)

mysql> select * from test;

+------+

| id   |

+------+

|    1 |

|    2 |

|    3 |

|    4 |

|  100 |

+------+

5 rows in set (0.00 sec)

mysql> select * from test;

+------+

| id   |

+------+

|    1 |

|    2 |

|    3 |

|    4 |

|  200 |

+------+

5 rows in set (0.00 sec)

mysql> select * from test;

+------+

| id   |

+------+

|    1 |

|    2 |

|    3 |

|    4 |

|  100 |

+------+

5 rows in set (0.00 sec)

mysql>
分别在 slave1,slava2 上对test表插入不同的数据,通过客户端查询 会发现,每一次查询和上一次不同,这里就是完全体系了 “读 ”负载的功能,
五、可能会报错:
在使用amoeba连接数据库时,报错java.lang.Exception: poolName=slaves, no valid pools
到这里 对数据库的高可用架构实验到此结束!!!
Mysql 实现数据库读写分离的更多相关文章
- mysql proxy 数据库读写分离字符集乱码
mysql proxy 数据库读写分离字符集乱码 解决办法 在对应配置后端数据库服务器的配置.cnf中加入如下代码 init-connect='SET NAME UTF8' skip-characte ...
- Amoeba+Mysql实现数据库读写分离
一.Amoeba 是什么 Amoeba(变形虫)项目,专注 分布式数据库 proxy 开发.座落与Client.DB Server(s)之间.对客户端透明.具有负载均衡.高可用性.sql过滤.读写分离 ...
- ProxySQL+Mysql实现数据库读写分离实战
ProxySQL介绍 ProxySQL是一个高性能的MySQL中间件,拥有强大的规则引擎.具有以下特性:http://www.proxysql.com/ 1.连接池,而且是multiplexing 2 ...
- 161220、使用Spring AOP实现MySQL数据库读写分离案例分析
一.前言 分布式环境下数据库的读写分离策略是解决数据库读写性能瓶颈的一个关键解决方案,更是最大限度了提高了应用中读取 (Read)数据的速度和并发量. 在进行数据库读写分离的时候,我们首先要进行数据库 ...
- MySQL+Amoeba实现数据库读写分离
参考:https://www.cnblogs.com/liuyisai/p/6009379.html 一,Amoeba是什么 Amoeba(变形虫)项目,专注 分布式数据库 proxy 开发.座落与C ...
- MySQL数据库读写分离、读负载均衡方案选择
MySQL数据库读写分离.读负载均衡方案选择 一.MySQL Cluster外键所关联的记录在别的分片节点中性能很差对需要进行分片的表需要修改引擎Innodb为NDB因此MySQL Cluster不适 ...
- 170301、使用Spring AOP实现MySQL数据库读写分离案例分析
使用Spring AOP实现MySQL数据库读写分离案例分析 原创 2016-12-29 徐刘根 Java后端技术 一.前言 分布式环境下数据库的读写分离策略是解决数据库读写性能瓶颈的一个关键解决方案 ...
- centos MySQL主从配置 ntsysv chkconfig setup命令 配置MySQL 主从 子shell MySQL备份 kill命令 pid文件 discuz!论坛数据库读写分离 双主搭建 mysql.history 第二十九节课
centos MySQL主从配置 ntsysv chkconfig setup命令 配置MySQL 主从 子shell MySQL备份 kill命令 pid文件 discuz!论坛数 ...
- 使用Spring AOP实现MySQL数据库读写分离案例分析
一.前言 分布式环境下数据库的读写分离策略是解决数据库读写性能瓶颈的一个关键解决方案,更是最大限度了提高了应用中读取 (Read)数据的速度和并发量. 在进行数据库读写分离的时候,我们首先要进行数据库 ...
随机推荐
- 网心云在PVE下三种磁盘IO模式(No cache,Write through,Write back)选择与优化指南
---------------------------------------------------------------------------------------------------- ...
- vue2和vue3生命周期的区别
概念 首先,我们了解一下"生命周期"这个词.通俗的来说,生命周期就是一个事务从出生到消失的过程.例如,一个人从出生到去世.在vue中,vue的生命周期是指,从创建vue对象到销毁v ...
- 【前端面试】(三)JavaScript相等(==)和全等(===)运算符的区别
视频链接: JavaScript相等()和全等(=)运算符的区别 - Web前端工程师面试题讲解 参考链接: JavaScript == 与 === 区别 区别 对于string.number 等基础 ...
- windows server2012R2 上 .net core IIS 部署--应用程序池 自动停止
在windows server2016安装部署.NET CORE时,只需要将.net core应用程序池设置无托管,然后对应你项目的版本安装一个dotnet-hosting-2.2.6-win.exe ...
- NC16597 [NOIP2011]聪明的质监员
NC16597 [NOIP2011]聪明的质监员 题目 题目描述 小T 是一名质量监督员,最近负责检验一批矿产的质量.这批矿产共有 \(n\) 个矿石,从 \(1\) 到 \(n\) 逐一编号,每个矿 ...
- NC16783 [NOIP1998]拼数
NC16783 [NOIP1998]拼数 题目 题目描述 设有 \(n\) 个正整数(\(n ≤ 20\)),将它们联接成一排,组成一个最大的多位整数. 例如:\(n=3\) 时,\(3\) 个整数 ...
- 【跟着大佬学JavaScript】之节流
前言 js的典型的场景 监听页面的scroll事件 拖拽事件 监听鼠标的 mousemove 事件 ... 这些事件会频繁触发会影响性能,如果使用节流,降低频次,保留了用户体验,又提升了执行速度,节省 ...
- labview从入门到出家4--用事件结构实现运算功能
使用事件结构可以快速定位响应界面的操作事件,如按下,拖动,双击的事件.基本上我们所要实现的所有功能,都可以通过条件结构+事件结构去实现,比如后面进阶篇将会讲到的状态机就是通过条件结构和事件结构组成的. ...
- 跟HR在大群吵架是什么体验?
原创不易,求分享.求一键三连 昨天跟HR负责人在公司大群吵了一架,先说结论:我输了... 事情原委是,老板在周一司庆上聊嗨了,说了一句:我觉得打卡没用,建议取消打卡. 下来后老板在公司论坛发了一个问题 ...
- docker快速安装openvas
项目地址 1.更换国内docker源 2.docker run -d -p 443:443 -e PUBLIC_HOSTNAME=此处填你宿主机IP --name openvas mikesplain ...