Diffusers中基于Stable Diffusion的哪些图像操作
基于Stable Diffusion的哪些图像操作们:
- Text-To-Image generation:
StableDiffusionPipeline - Image-to-Image text guided generation:
StableDiffusionImg2ImgPipeline - In-painting:
StableDiffusionInpaintPipeline - text-guided image super-resolution:
StableDiffusionUpscalePipeline - generate variations from an input image:
StableDiffusionImageVariationPipeline - image editing by following text instructions:
StableDiffusionInstructPix2PixPipeline - ......
辅助函数
import requests

from PIL import Image

from io import BytesIO

def show_images(imgs, rows=1, cols=3):

    assert len(imgs) == rows*cols

    w_ori, h_ori = imgs[0].size

    for img in imgs:

        w_new, h_new = img.size

        if w_new != w_ori or h_new != h_ori:

            w_ori = max(w_ori, w_new)

            h_ori = max(h_ori, h_new)

    grid = Image.new('RGB', size=(cols*w_ori, rows*h_ori))

    grid_w, grid_h = grid.size

    for i, img in enumerate(imgs):

        grid.paste(img, box=(i%cols*w_ori, i//cols*h_ori))

    return grid

def download_image(url):

    response = requests.get(url)

    return Image.open(BytesIO(response.content)).convert("RGB")
Text-To-Image
根据文本生成图像,在diffusers使用StableDiffusionPipeline实现,必要输入为prompt,示例代码:
from diffusers import StableDiffusionPipeline

image_pipe = StableDiffusionPipeline.from_pretrained("CompVis/stable-diffusion-v1-4")

device = "cuda"

image_pipe.to(device)

prompt = ["a photograph of an astronaut riding a horse"] * 3

out_images = image_pipe(prompt).images

for i, out_image in enumerate(out_images):

    out_image.save("astronaut_rides_horse" + str(i) + ".png")
示例输出:
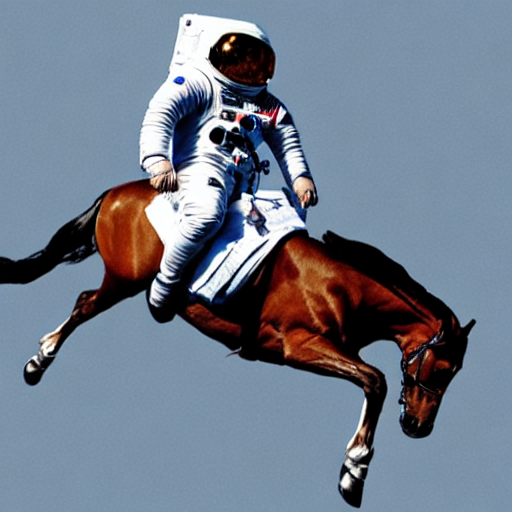
Image-To-Image
根据文本prompt和原始图像,生成新的图像。在diffusers中使用StableDiffusionImg2ImgPipeline类实现,可以看到,pipeline的必要输入有两个:prompt和init_image。示例代码:
import torch
from diffusers import StableDiffusionImg2ImgPipeline
device = "cuda"
model_id_or_path = "runwayml/stable-diffusion-v1-5"
pipe = StableDiffusionImg2ImgPipeline.from_pretrained(model_id_or_path, torch_dtype=torch.float16)
pipe = pipe.to(device)
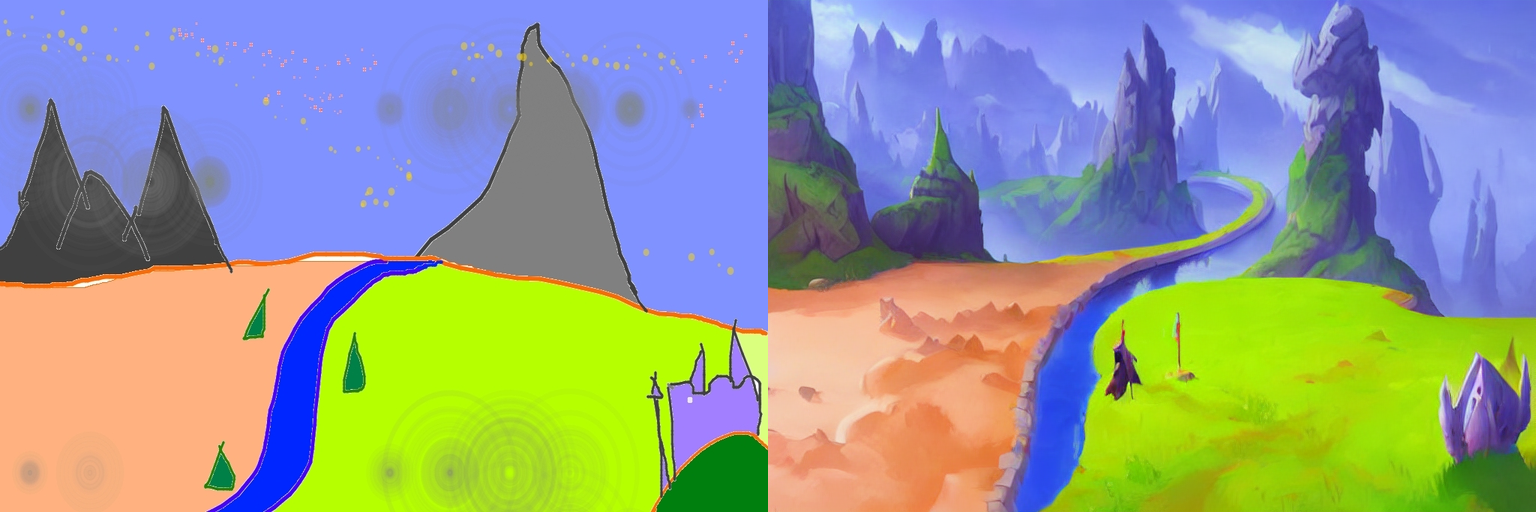
url = "https://raw.githubusercontent.com/CompVis/stable-diffusion/main/assets/stable-samples/img2img/sketch-mountains-input.jpg"
init_image = download_image(url)
init_image = init_image.resize((768, 512))
prompt = "A fantasy landscape, trending on artstation"
images = pipe(prompt=prompt, image=init_image, strength=0.75, guidance_scale=7.5).images
grid_img = show_images([init_image, images[0]], 1, 2)
grid_img.save("fantasy_landscape.png")
示例输出:
In-painting
给定一个mask图像和一句提示,可编辑给定图像的特定部分。使用StableDiffusionInpaintPipeline来实现,输入包含三部分:原始图像,mask图像和一个prompt,
示例代码:
from diffusers import StableDiffusionInpaintPipeline

img_url = "https://raw.githubusercontent.com/CompVis/latent-diffusion/main/data/inpainting_examples/overture-creations-5sI6fQgYIuo.png"

mask_url = "https://raw.githubusercontent.com/CompVis/latent-diffusion/main/data/inpainting_examples/overture-creations-5sI6fQgYIuo_mask.png"

init_image = download_image(img_url).resize((512, 512))

mask_image = download_image(mask_url).resize((512, 512))

pipe = StableDiffusionInpaintPipeline.from_pretrained("runwayml/stable-diffusion-inpainting", torch_dtype=torch.float16)

pipe = pipe.to("cuda")

prompt = "Face of a yellow cat, high resolution, sitting on a park bench"

images = pipe(prompt=prompt, image=init_image, mask_image=mask_image).images

grid_img = show_images([init_image, mask_image, images[0]], 1, 3)

grid_img.save("overture-creations.png")
示例输出:

Upscale
对低分辨率图像进行超分辨率,使用StableDiffusionUpscalePipeline来实现,必要输入为prompt和低分辨率图像(low-resolution image),示例代码:
from diffusers import StableDiffusionUpscalePipeline
# load model and scheduler
model_id = "stabilityai/stable-diffusion-x4-upscaler"
pipeline = StableDiffusionUpscalePipeline.from_pretrained(model_id, torch_dtype=torch.float16, cache_dir="./models/")
pipeline = pipeline.to("cuda")
# let's download an image
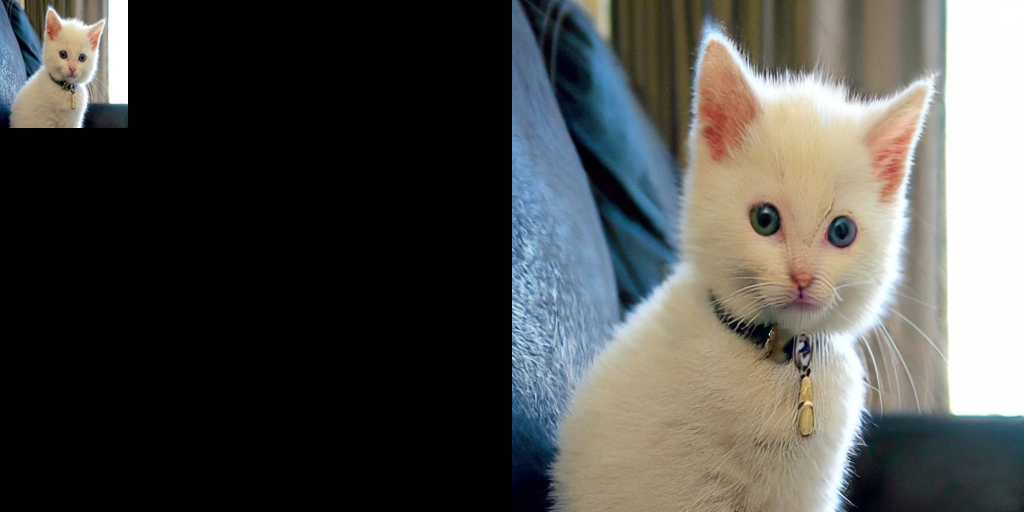
url = "https://huggingface.co/datasets/hf-internal-testing/diffusers-images/resolve/main/sd2-upscale/low_res_cat.png"
low_res_img = download_image(url)
low_res_img = low_res_img.resize((128, 128))
prompt = "a white cat"
upscaled_image = pipeline(prompt=prompt, image=low_res_img).images[0]
grid_img = show_images([low_res_img, upscaled_image], 1, 2)
grid_img.save("a_white_cat.png")
print("low_res_img size: ", low_res_img.size)
print("upscaled_image size: ", upscaled_image.size)
示例输出,默认将一个128 x 128的小猫图像超分为一个512 x 512的:
默认是将原始尺寸的长和宽均放大四倍,即:
input: 128 x 128 ==> output: 512 x 512

input: 64 x 256 ==> output: 256 x 1024

...
个人感觉,prompt没有起什么作用,随便写吧。
关于此模型的详情,参考。
Instruct-Pix2Pix
根据输入的指令prompt对图像进行编辑,使用StableDiffusionInstructPix2PixPipeline来实现,必要输入包括prompt和image,示例代码如下:
import torch
from diffusers import StableDiffusionInstructPix2PixPipeline
model_id = "timbrooks/instruct-pix2pix"
pipe = StableDiffusionInstructPix2PixPipeline.from_pretrained(model_id, torch_dtype=torch.float16, cache_dir="./models/")
pipe = pipe.to("cuda")
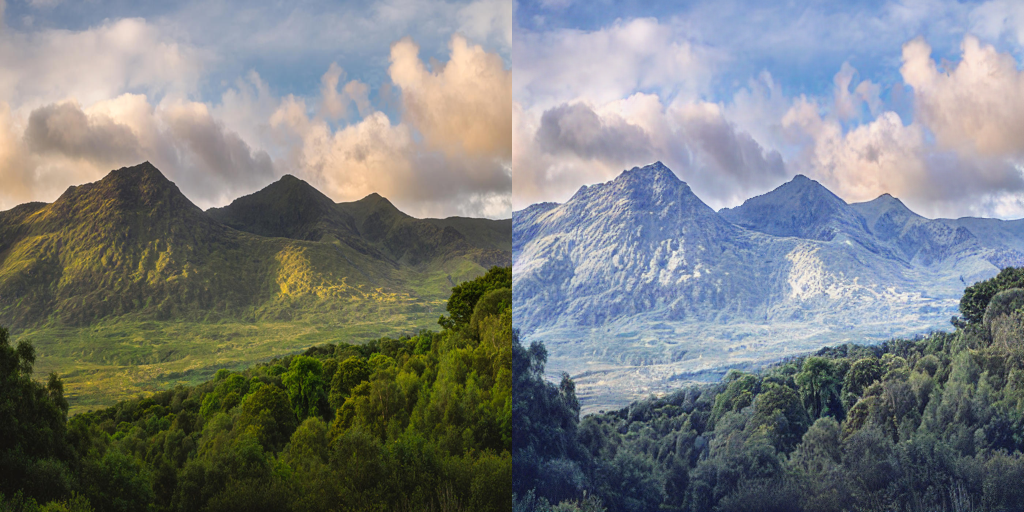
url = "https://huggingface.co/datasets/diffusers/diffusers-images-docs/resolve/main/mountain.png"
image = download_image(url)
prompt = "make the mountains snowy"
images = pipe(prompt, image=image, num_inference_steps=20, image_guidance_scale=1.5, guidance_scale=7).images
grid_img = show_images([image, images[0]], 1, 2)
grid_img.save("snowy_mountains.png")
示例输出:
Diffusers中基于Stable Diffusion的哪些图像操作的更多相关文章
- 基于Docker安装的Stable Diffusion使用CPU进行AI绘画
基于Docker安装的Stable Diffusion使用CPU进行AI绘画 由于博主的电脑是为了敲代码考虑买的,所以专门买的高U低显,i9配核显,用Stable Diffusion进行AI绘画的话倒 ...
- AI绘画提示词创作指南:DALL·E 2、Midjourney和 Stable Diffusion最全大比拼 ⛵
作者:韩信子@ShowMeAI 深度学习实战系列:https://www.showmeai.tech/tutorials/42 自然语言处理实战系列:https://www.showmeai.tech ...
- 使用 LoRA 进行 Stable Diffusion 的高效参数微调
LoRA: Low-Rank Adaptation of Large Language Models 是微软研究员引入的一项新技术,主要用于处理大模型微调的问题.目前超过数十亿以上参数的具有强能力的大 ...
- C# 中使用Word文档对图像进行操作
C# 中使用Word文档对图像进行操作 Download Files: ImageOperationsInWord.zip 简介 在这篇文章中我们可以学到在C#程序中使用一个Word文档对图像的各种操 ...
- 基于Xilinx FPGA的视频图像采集系统
本篇要分享的是基于Xilinx FPGA的视频图像采集系统,使用摄像头采集图像数据,并没有用到SDRAM/DDR.这个工程使用的是OV7670 30w像素摄像头,用双口RAM做存储,显示窗口为320x ...
- OpenCV_基于局部自适应阈值的图像二值化
在图像处理应用中二值化操作是一个很常用的处理方式,例如零器件图片的处理.文本图片和验证码图片中字符的提取.车牌识别中的字符分割,以及视频图像中的运动目标检测中的前景分割,等等. 较为常用的图像二值化方 ...
- 基于Jittor框架实现LSGAN图像生成对抗网络
基于Jittor框架实现LSGAN图像生成对抗网络 生成对抗网络(GAN, Generative Adversarial Networks )是一种深度学习模型,是近年来复杂分布上无监督学习最具前景的 ...
- 跟我学Python图像处理丨基于灰度三维图的图像顶帽运算和黑帽运算
摘要:本篇文章结合灰度三维图像讲解图像顶帽运算和图像黑猫运算,通过Python调用OpenCV函数实现. 本文分享自华为云社区<[Python图像处理] 十三.基于灰度三维图的图像顶帽运算和黑帽 ...
- [OpenCV实战]20 使用OpenCV实现基于增强相关系数最大化的图像对齐
目录 1 背景 1.1 彩色摄影的一个简短而不完整的历史 1.2 OpenCV中的运动模型 2 使用增强相关系数最大化(ECC)的图像对齐 2.1 findTransformECC在OpenCV中的示 ...
- 从 GPT2 到 Stable Diffusion:Elixir 社区迎来了 Hugging Face
上周,Elixir 社区向大家宣布,Elixir 语言社区新增从 GPT2 到 Stable Diffusion 的一系列神经网络模型.这些模型得以实现归功于刚刚发布的 Bumblebee 库.Bum ...
随机推荐
- Permanently added the RSA host key for IP address '192.30.253.113' to the list of known hosts.
$git push origin master 报错: Warning: Permanently added the RSA host key for IP address '192.30.253.1 ...
- editorial 专栏
社论 22.10.1 solution for pl_er 密码是我的名字的拼音 全小写无空格 社论 22.10.2 solution for Simu. 密码是联考密码 社论 22.10.4 sol ...
- 【Kafka】Quota配额命令、文档相关概念
一.多租赁模式基于 Zookeeper和 kafka-configs.sh 管理所有用户 1.步骤 l 基于zookeeper,实现用户管理 l 配置broker认证信息,并进行平滑更新 l 配置cl ...
- C#深拷贝方法
概述 为什么要用到深拷贝呢?比如我们建了某个类Person,并且实例化出一个对象,然后,突然需要把这个对象复制一遍,并且复制出来的对象要跟之前的一模一样,来看下我们一般会怎么做. 方法一(利用反射实现 ...
- 解决RockyLinux和Centos Stream 9中firefox无法播放HTML视频问题
如题在测试两种centos后续系统时,发现firefox无法播放HTML视频问题.经过一番折腾找到了解决的办法,具体解决如下: 首先下载VLC $sudo yum install vlc 而后重启浏览 ...
- 08-通用Service接口
MP也为我们提供了Service层的实现,我们只需要编写一个接口,继承IService, 并创建一个接口实现类继承ServiceImpl,即可使用 基本使用 改造前 定义接口 public inter ...
- 【转载】VFP编写DLL,并调用
1. 编制DLL文件 ,保存为Temp.prg Define Class vfptools As Session OlePublic Procedure Add As Integer Lp ...
- 结合商业项目深入理解Go知识点
这篇文章比较硬核,爆肝5千字,把之前整理的知识点都串起来了.建议先收藏,慢慢看. 前言 上一篇文章 #[Go WEB进阶实战]开源的电商前后台API系统 很受大家欢迎,有好多小伙伴私信我问题:&quo ...
- ssm——springMVC整理
目录 1.概念 1.1.什么是SpringMVC 1.2.B/S架构 1.3.MVC结构 1.4.Spring MVC常用名词 1.5.常用注解 1.6.rest和restfull 1.7.Reque ...
- 【JVM故障问题排查心得】「内存诊断系列」Xmx和Xms的大小是小于Docker容器以及Pod的大小的,为啥还是会出现OOMKilled?
为什么我设置的大小关系没有错,还会OOMKilled? 这种问题常发生在JDK8u131或者JDK9版本之后所出现在容器中运行JVM的问题:在大多数情况下,JVM将一般默认会采用宿主机Node节点的内 ...