1.shell编程之变量的高级用法
1.1.变量替换
变量替换的六种形式

实例:非贪婪和贪婪的区别
从头部删除
[root@VM_0_9_centos shell_learn]# var_1="i love you,do you love me"

[root@VM_0_9_centos shell_learn]# echo $var_1

i love you,do you love me

[root@VM_0_9_centos shell_learn]# var1=${var_1#*ov}

[root@VM_0_9_centos shell_learn]# echo $var1

e you,do you love me

[root@VM_0_9_centos shell_learn]# var2=${var_1##*ov}

[root@VM_0_9_centos shell_learn]# echo $var2

e me

[root@VM_0_9_centos shell_learn]#
从尾部删除
[root@VM_0_9_centos shell_learn]# var_1="i love you,do you love me"

[root@VM_0_9_centos shell_learn]# echo $var_1

i love you,do you love me

[root@VM_0_9_centos shell_learn]# var3=${var_1%ov*}

[root@VM_0_9_centos shell_learn]# echo $var3

i love you,do you l

[root@VM_0_9_centos shell_learn]# var4=${var_1%%ov*}

[root@VM_0_9_centos shell_learn]# echo $var4

i l

[root@VM_0_9_centos shell_learn]#
字符串替换,把bin替换成大写的BIN,单斜线和双斜线的区别
[root@VM_0_9_centos shell_learn]# echo $PATH

/usr/local/sbin:/usr/local/bin:/usr/sbin:/usr/bin:/root/bin

[root@VM_0_9_centos shell_learn]#

[root@VM_0_9_centos shell_learn]# var5=${PATH/bin/BIN}

[root@VM_0_9_centos shell_learn]# echo $var5

/usr/local/sBIN:/usr/local/bin:/usr/sbin:/usr/bin:/root/bin

[root@VM_0_9_centos shell_learn]#

[root@VM_0_9_centos shell_learn]# var6=${PATH//bin//BIN}

[root@VM_0_9_centos shell_learn]# echo $var6

/usr/local/s/BIN:/usr/local//BIN:/usr/s/BIN:/usr//BIN:/root//BIN

[root@VM_0_9_centos shell_learn]#
1.2.字符串处理
计算字符串长度
方法一
${#string}
方法二
string有空格,则必须加双引号
expr length "$string"
实例
[root@VM_0_9_centos shell_learn]# var1="hello world"

[root@VM_0_9_centos shell_learn]# len=${#var1}

[root@VM_0_9_centos shell_learn]# echo $len

11

[root@VM_0_9_centos shell_learn]# len2=`expr length "$var1"`

[root@VM_0_9_centos shell_learn]# echo $len2

11

[root@VM_0_9_centos shell_learn]#
获取子串在字符串中的索引位置
expr index $string $substring
实例
[root@VM_0_9_centos shell_learn]# var1="quickstart is a app"

[root@VM_0_9_centos shell_learn]# index=`expr index "$var1" start`

[root@VM_0_9_centos shell_learn]# echo $index

6

[root@VM_0_9_centos shell_learn]# index2=`expr index "$var1" uniq`

[root@VM_0_9_centos shell_learn]# echo $index2

1

[root@VM_0_9_centos shell_learn]# index3=`expr index "$var1" cnk`

[root@VM_0_9_centos shell_learn]# echo $index3

4

[root@VM_0_9_centos shell_learn]#
会把子串分割成一个一个字符,index是最先找到的那个字符的位置。
计算子串长度
expr match $string substr
实例
[root@VM_0_9_centos shell_learn]# var1="quickstart is a app"

[root@VM_0_9_centos shell_learn]# len=`expr match "$var1" quic`

[root@VM_0_9_centos shell_learn]# echo $len

4

[root@VM_0_9_centos shell_learn]# len=`expr match "$var1" app`

[root@VM_0_9_centos shell_learn]# echo $len

0

[root@VM_0_9_centos shell_learn]# len=`expr match "$var1" quic.*`

[root@VM_0_9_centos shell_learn]# echo $len

19

[root@VM_0_9_centos shell_learn]#
必须从开头匹配才可以
抽取子串

实例
[root@VM_0_9_centos shell_learn]# var1="kafka hadoop yarn mapreduce"

[root@VM_0_9_centos shell_learn]# sub1=${var1:10}

[root@VM_0_9_centos shell_learn]# echo $sub1

op yarn mapreduce

[root@VM_0_9_centos shell_learn]# sub2=${var1:10:5}

[root@VM_0_9_centos shell_learn]# echo $sub2

op ya

[root@VM_0_9_centos shell_learn]# sub3=${var1: -5}

[root@VM_0_9_centos shell_learn]# echo $sub3

educe

[root@VM_0_9_centos shell_learn]# sub4=${var1:(-6)}

[root@VM_0_9_centos shell_learn]# echo $sub4

reduce

[root@VM_0_9_centos shell_learn]# sub5=${var1: -5:3}

[root@VM_0_9_centos shell_learn]# echo $sub5

edu

[root@VM_0_9_centos shell_learn]# sub6=`expr substr "$var1" 10 5`

[root@VM_0_9_centos shell_learn]# echo $sub6

oop y

[root@VM_0_9_centos shell_learn]#
注意:使用expr索引是从1开始计算,使用${string:position},索引从0开始计算。
1.3.字符串处理完整脚本

思路分析
1.将不同的功能模块划分,并编写函数

    function print_tips

    function len_of_string

    function del_hadoop

    function rep_hadoop_mapreduce_first

    function rep_hadoop_maapreduce_all

2.实现第一步所定义的功能函数

3.程序主流程的设计
vim example.sh
#!/bin/bash

string="Bigdata process framework is Hadoop,Hadoop is an open source project"

function print_tips

{

    echo "******************************"

    echo "(1)打印string长度"

    echo "(2)删除字符串中所有的Hadoop"

    echo "(3)替换第一个Hadoop为Mapreduce"

    echo "(4)替换全部Hadoop为Mapreduce"

    echo "*******************************"

}

function len_of_string

{

    echo "${#string}"

}

function del_hadoop

{

    echo "${string//Hadoop/}"

}

function rep_hadoop_mapreduce_first

{

    echo "${string/Hadoop/Mapreduce}"

}

function rep_hadoop_mapreduce_all

{

        echo "${string//Hadoop/Mapreduce}"

}

while true

do

    echo "[string=$string]"

    echo

    print_tips

    read -p "Pls input your choice(1|2|3|4|q|Q): " choice

    case $choice in

        1)

            len_of_string

            ;;

        2)

            del_hadoop

            ;;

        3)

            rep_hadoop_mapreduce_first

            ;;

        4)

            rep_hadoop_mapreduce_all

            ;;

        q|Q)

            exit

            ;;

        *)

            echo "Error,input only in {1|2|3|4|q|Q|}"

            ;;

    esac

done
sh example.sh

1.4.命令替换
语法格式
方法一:

`command`

方法二:

$(command)
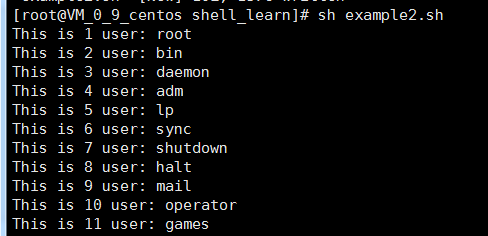
实例一:获取系统所有的用户并输出
cat /etc/passwd | cut -d ":" -f 1
vim example2.sh
#!/bin/bash

#

index=1

for user in `cat /etc/passwd | cut -d ":" -f 1`

do

    echo "This is $index user: $user"

    index=$(($index+1))

done
结果

实例二:根据当前当前时间计算今年和明年
$(());两个括号主要用来进行整数运算
[root@VM_0_9_centos shell_learn]# date

Wed Jun 26 21:58:04 CST 2019

[root@VM_0_9_centos shell_learn]# date +%Y

2019

[root@VM_0_9_centos shell_learn]# echo "This is $(date +%Y) year"

This is 2019 year

[root@VM_0_9_centos shell_learn]# echo "This is $(($(date +%Y) + 1)) year"

This is 2020 year

[root@VM_0_9_centos shell_learn]#
实例三:根据当前时间获取今年还剩下多少星期和已经过了多少星期
[root@VM_0_9_centos shell_learn]# date +%j

177

[root@VM_0_9_centos shell_learn]# echo "This yaer have passed $(date +%j) days"

This yaer have passed 177 days

[root@VM_0_9_centos shell_learn]# echo "This yaer have passed $(($(date +%j)/7)) weeks"

This yaer have passed 25 weeks

[root@VM_0_9_centos shell_learn]# echo "今年还剩下$(((365 - $(date +%j))/7))星期"

今年还剩下26星期

[root@VM_0_9_centos shell_learn]#
实例四:判断nginx进程是否存在,若不存在则自动拉起该进程
[root@VM_0_9_centos shell_learn]# ps -ef |grep nginx

root      6658     1  0 22:33 ?        00:00:00 nginx: master process /usr/sbin/nginx

nginx     6659  6658  0 22:33 ?        00:00:00 nginx: worker process

root      6891   501  0 22:35 pts/0    00:00:00 grep --color=auto nginx

[root@VM_0_9_centos shell_learn]# ps -ef |grep nginx |grep -v grep |wc -l

2

[root@VM_0_9_centos shell_learn]# systemctl stop nginx

[root@VM_0_9_centos shell_learn]#

[root@VM_0_9_centos shell_learn]# ps -ef |grep nginx |grep -v grep |wc -l

0

[root@VM_0_9_centos shell_learn]# sh example3.sh

[root@VM_0_9_centos shell_learn]#

[root@VM_0_9_centos shell_learn]# ps -ef |grep nginx |grep -v grep |wc -l

2

[root@VM_0_9_centos shell_learn]#
vim example3.sh
如果nginx的进程个数为0,则拉起该进程
#!/bin.bash

#

nginx_process_num=$(ps -ef | grep nginx | grep -v grep | wc -l)

if [ $nginx_process_num -eq 0 ];then

    systemctl start nginx

fi
1.5.有类型变量
declare和typeset命令
- declare和typeset命令两者等价
- declare和typeset命令都是用来定义变量类型的

取消申明的变量
declare +r

declare +i

declare +a

declare +x
实例一:-r 将变量设为只读
[root@VM_0_9_centos shell_learn]# var1="hello world"

[root@VM_0_9_centos shell_learn]# var1="hello python"

[root@VM_0_9_centos shell_learn]# echo $var1

hello python

[root@VM_0_9_centos shell_learn]# declare -r var1

[root@VM_0_9_centos shell_learn]# var1="hello go"

-bash: var1: readonly variable

[root@VM_0_9_centos shell_learn]#
实例二:-i 将变量设为整数
shell中如果不声明,默认当做字符串处理
[root@VM_0_9_centos shell_learn]# num1=10

[root@VM_0_9_centos shell_learn]# num2=$num1+20

[root@VM_0_9_centos shell_learn]# echo $num2

10+20

[root@VM_0_9_centos shell_learn]# declare -i num2

[root@VM_0_9_centos shell_learn]# num2=$num1+20

[root@VM_0_9_centos shell_learn]# echo $num2

30

[root@VM_0_9_centos shell_learn]#
实例三:-a 将变量定义为数组
定义数组
[root@VM_0_9_centos shell_learn]# declare -a array

[root@VM_0_9_centos shell_learn]# array=("jones" "mike" "kobe" "jordan")
输出数组所有的内容
[root@VM_0_9_centos shell_learn]# echo ${array[@]}

jones mike kobe jordan
第一个元素
[root@VM_0_9_centos shell_learn]# echo ${array[0]}

jones
数组长度
[root@VM_0_9_centos shell_learn]# echo ${#array[@]}

4
删除元素
[root@VM_0_9_centos shell_learn]# unset array
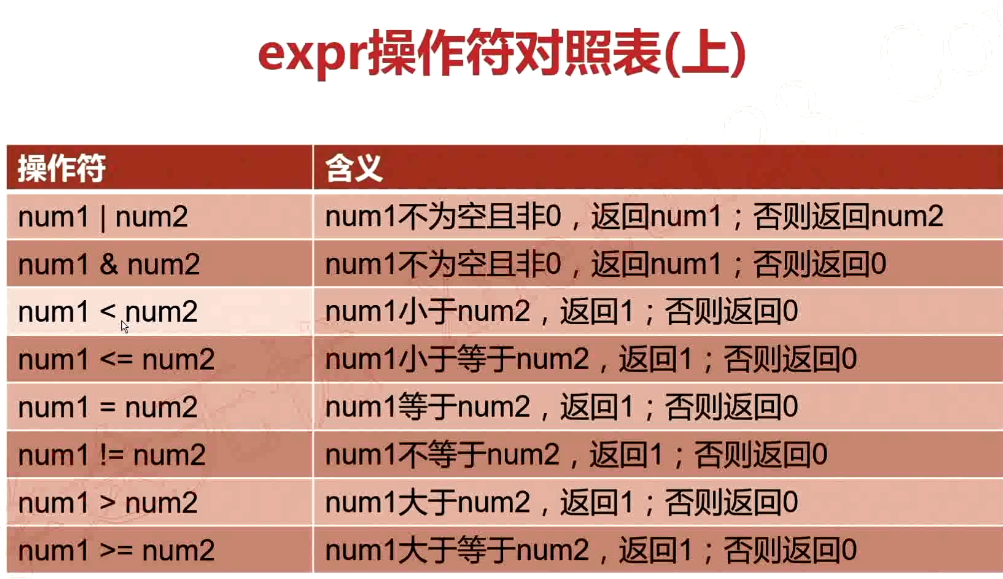
1.6.Bash数学运算之expr
语法格式


需要加转义字符“\”
[root@VM_0_9_centos shell_learn]# num1=30

[root@VM_0_9_centos shell_learn]# num2=40

[root@VM_0_9_centos shell_learn]# expr $num1 \> $num2

0

[root@VM_0_9_centos shell_learn]# expr $num1 \< $num2

1

[root@VM_0_9_centos shell_learn]# expr $num1 + $num2

70

[root@VM_0_9_centos shell_learn]# expr $num1 - $num2

-10

[root@VM_0_9_centos shell_learn]# expr $num1 * $num2

expr: syntax error

[root@VM_0_9_centos shell_learn]# expr $num1 \* $num2

1200
1.7.Bash数学运算之bc
bc是bash内建的运算器,支持浮点数运算。内建变量scale可以设置,默认为0.
[root@VM_0_9_centos ~]# echo "23+35" | bc

58

[root@VM_0_9_centos ~]# echo "23.3+35" | bc

58.3

[root@VM_0_9_centos ~]# echo "scale=3;23.3/3.5" | bc

6.657

[root@VM_0_9_centos ~]#
1.shell编程之变量的高级用法的更多相关文章
- (转)轻松掌握shell编程中数组的常见用法及示例
缘起:在老男孩进行linux培训shell编程教学中,发现不少水平不错的网友及同学对数组仍然很迷糊,下面就给大家分享下数组的用法小例子,希望能给大家一点帮助.其实SHELL的数组很简单,好用.我们学习 ...
- Linux学习——shell编程之变量
shell编程之变量:Linux shell编程基础中的变量. 包括Bash变量的分类和各变量的详细使用,如:用户自定义变量.环境变量.语系变量.位置参数变量和预定义变量. 1:什么是Bash变量? ...
- shell 变量的高级用法
变量删除和替换 案例:从头开始匹配,将符合最短的数据删除 (#) variable_1="I love you, Do you love me" echo $variable_1 ...
- Linux —— Shell编程之变量赋值和引用
Linux的shell编程是一种非常成熟的编程语言,它支持各种类型的变量.有三种主要的变量类型:环境变量.内部变量和用户变量. 环境变量(environment variable)是系统环境的一部分, ...
- shell中echo基础及高级用法详解-渐入佳境
--作者:飞翔的小胖猪 --创建时间:2021年2月19日 1.1 基础用法 echo命令用来输出文本,在shell脚本中用来输出提示信息用的比较多. 单引号:原样输出所有的内容,不用转义就能输出特殊 ...
- Linux编程 21 shell编程(环境变量,用户变量,命令替换)
一.概述 这篇介绍shell的变量使用,跟其实语言一样,都有声明变量,使用变量,在shell中变量允许你临时地将信息存储中shell脚本中,以便和脚本的其他命令一起使用. 1.1 环境变量 在前面章节 ...
- Shell编程-02-Shell变量
目录 什么是Shell变量 变量类型 环境变量初始化及其对应文件的生效顺序 什么是Shell变量 在初等数学数学方程式中,我们会经常碰到类似于这样的方程式:y=x+1 ,等号左右两边的x和y称 ...
- Linux Shell编程、变量、控制语句
为什么要学习Shell编程 1)Linux运维工程师在进行服务器集群管理时,需要编写Shell程序来进行服务器管理. 2)对于JavaEE和Python程序员来说,工作的需要,你的老大会要求你编写一些 ...
- Shell编程之变量进阶
一.变量知识进阶 1.特殊的位置参数变量 实例1:测试$n(n为1...15) [root@codis-178 ~]# cat p.sh echo $1 [root@codis-178 ~]# sh ...
随机推荐
- redis和memcached的优缺点及区别
1. 使用redis有哪些好处? (1) 速度快,因为数据存在内存中,类似于HashMap,HashMap的优势就是查找和操作的时间复杂度都是O(1) (2) 支持丰富数据类型,支持string,li ...
- python基础——14(shelve/shutil/random/logging模块/标准流)
一.标准流 1.1.标准输入流 res = sys.stdin.read(3) 可以设置读取的字节数 print(res) res = sys.stdin.readline() print(res) ...
- php expat+DOM+SimpleXML XML读取
XML 文件 将在我们的例子中使用下面的 XML 文件: <?xml version="1.0" encoding="ISO-8859-1"?> & ...
- Ribbitmq
rittbiMQ: 连接远程rabbitmq server sudo rabbitmqctl addser mihon mihon123 sudo rabbitmqctl set_permission ...
- Java-构造一个字符串
实用StringBuffer构造字符串 package com.tj; public class MyClass implements Cloneable { public static void m ...
- HTML与XML的区别
什么是HTML HTML的全拼是Hypertext Markup Language, 中文也就是超文本链接标示语言.HTML(HyperTextMark-upLanguage)即超文本标记语言,是WW ...
- ecplise建立模拟器,安装apk文件
方法一,把所要安装的apk,例xxx.apk拷贝到sdk下的adb的路径下,也就是和adb在同一个文件夹,比如我的是D:\Program Files\Android\sdk\platform-tool ...
- LINQ-进行数据转换
一.将多个输入联接到一个输出序列中 可以使用 LINQ 查询创建包含元素的输出序列,这些元素来自多个输入序列. 以下示例演示如何组合两个内存中数据结构,但相同的原则可应用于组合来自 XML 或 SQL ...
- 洛谷P3393 逃离僵尸岛
题目描述 小a住的国家被僵尸侵略了!小a打算逃离到该国唯一的国际空港逃出这个国家. 该国有N个城市,城市之间有道路相连.一共有M条双向道路.保证没有自环和重边. K个城市已经被僵尸控制了,如果贸然闯入 ...
- ftrace用法
ftrace官方文档在kernel/Documentation/trace/ftrace.txt文件中. 使用ftrace接口之前,如果系统没有自动挂载debugfs文件系统,则要先手动挂载. # m ...
