JDK源码那些事儿之HashMap.TreeNode
前面几篇文章已经讲解过HashMap内部实现以及红黑树的基础知识,今天这篇文章就讲解之前HashMap中未讲解的红黑树操作部分,如果没了解红黑树,请去阅读前面的两篇文章,能更好的理解本章所讲解的红黑树源码操作,全文默认读者已经了解红黑树的相关知识,接下来,就以HashMap.TreeNode来说明红黑树的源码操作。
前言
jdk版本:1.8
以HashMap.TreeNode为例是因为之前HashMap的红黑树操作在文章省略了,这里进行一个解释,其实源码里并不是只有这个地方用红黑树结构,但是总体上都大同小异,故只说明这一部分就好,举一反三的能力相信各位都应该拥有。
类定义
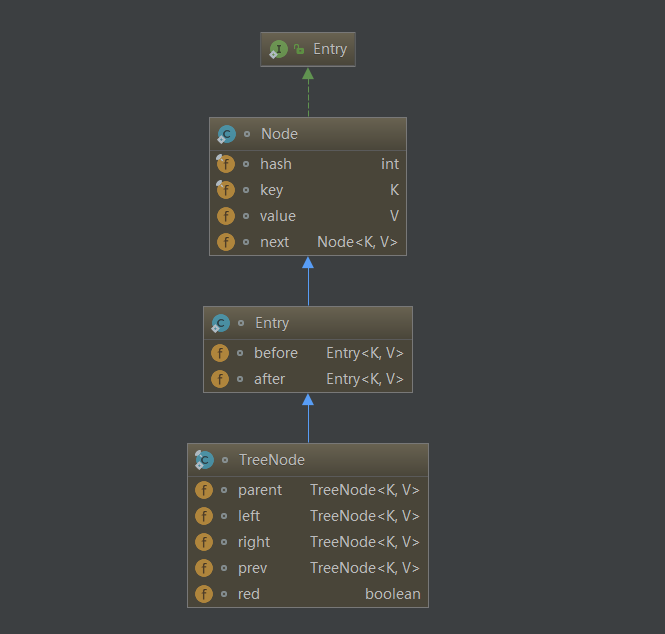
static final class TreeNode<K,V> extends LinkedHashMap.Entry<K,V>
继承LinkedHashMap.Entry,追溯源头可以到HashMap.Node,下面图展示了对应的结构关系:
属性
    /**

     * 父节点

     */

    TreeNode<K,V> parent;  // red-black tree links

    /**

     * 左子节点

     */

    TreeNode<K,V> left;

    /**

     * 右子节点

     */

    TreeNode<K,V> right;

    /**

     * 指向前一个节点

     */

    TreeNode<K,V> prev;    // needed to unlink next upon deletion

    /**

     * 是否是红色节点

     */

    boolean red;
以上的属性都是为了满足红黑树特性而设置
构造方法
    /**

     * 构造方法直接调用的父类方法

     * 最终还是HashMap.Node的构造方法,调用代码下面也列出来了

     */

    TreeNode(int hash, K key, V val, Node<K,V> next) {

        super(hash, key, val, next);

    }

    /**

     * HashMap.Node subclass for normal LinkedHashMap entries.

     */

    static class Entry<K,V> extends HashMap.Node<K,V> {

        Entry<K,V> before, after;

        Entry(int hash, K key, V value, Node<K,V> next) {

            super(hash, key, value, next);

        }

    }

    Node(int hash, K key, V value, Node<K,V> next) {

        this.hash = hash;

        this.key = key;

        this.value = value;

        this.next = next;

    }
Node和TreeNode相同的构造方法
重要方法
root
实现上非常简单,不断向上遍历,找到父节点为空的节点即为根节点
    /**

     * 返回根节点TreeNode

     */

    final TreeNode<K,V> root() {

        for (TreeNode<K,V> r = this, p;;) {

            if ((p = r.parent) == null)

                return r;

            r = p;

        }

    }
moveRootToFront
从注释中也能看出当前方法的含义,确保根节点是bin桶(数组tab的其中一个元素)中的第一个节点,如果不是,则进行操作,将根节点放到tab数组上,这个跟HashMap结构有关,数组(链表+红黑树),在进行树化,结构调整时,根节点可能会变化,原有数组tab对应索引指向的树节点需要进行改变,指向新的根节点,这里注意下,移动时不是修改红黑树是修改的链表结构,prev和next属性
    /**

     * Ensures that the given root is the first node of its bin.

     */

    static <K,V> void moveRootToFront(Node<K,V>[] tab, TreeNode<K,V> root) {

        int n;

        if (root != null && tab != null && (n = tab.length) > 0) {

            // 找到当前树所在的bin桶位置(即数组tab的位置)

            int index = (n - 1) & root.hash;

            // 将tab[index]的树节点记录下来为first

            TreeNode<K,V> first = (TreeNode<K,V>)tab[index];

            // root没有落在tab数组上,修改为root在tab数组上

            if (root != first) {

                Node<K,V> rn;

                // 这里即替换掉tab[index]指向的原有节点,可以理解成现在指向root节点

                tab[index] = root;

                // rp为root指向的前一个节点

                TreeNode<K,V> rp = root.prev;

                // rn为root的后一个节点

                // 将root前后节点关联

                if ((rn = root.next) != null)

                    ((TreeNode<K,V>)rn).prev = rp;

                if (rp != null)

                    rp.next = rn;

                // first 和 root 节点进行关联,first的前一个节点为root

                if (first != null)

                    first.prev = root;

                // 修改root的链表属性

                root.next = first;

                root.prev = null;

            }

            // 检查红黑树一致性

            assert checkInvariants(root);

        }

    }
find
从当前节点开始使用给定的hash和key查找到对应的节点,只会判断当前节点为根节点的局部树结构。这里复习下整个HashMap查找过程,通过(length - 1) & hash 判断bin桶位置(数组中的位置),这里不是hash值相等,注意再判断该位置处是什么类型,链表还是红黑树,链表类型,循环next遍历,直到key值相等。红黑树类型 递归左右子树遍历,直到key值相等。
        /**

         * Finds the node starting at root p with the given hash and key.

         * The kc argument caches comparableClassFor(key) upon first use

         * comparing keys.

         * kc : key class

         */

        final TreeNode<K,V> find(int h, Object k, Class<?> kc) {

            TreeNode<K,V> p = this;

            do {

                // ph:p的hash值

                int ph, dir; K pk;

                TreeNode<K,V> pl = p.left, pr = p.right, q;

                // 查找节点hash值小于p的hash值,搜索左子树

                if ((ph = p.hash) > h)

                    p = pl;

                // 查找节点hash值大于p的hash值,搜索右子树

                else if (ph < h)

                    p = pr;

                // key值相同,说明就是此p节点

                else if ((pk = p.key) == k || (k != null && k.equals(pk)))

                    return p;

                // 若hash相等但key不等,向左右子树非空的一侧移动

                else if (pl == null)

                    p = pr;

                else if (pr == null)

                    p = pl;

                // 左右两边都不为空

                // 判断kc是否是k实现的可比较的类,是就比较k和pk的值,k<pk向左子树移动否则向右子树移动

                // hash相等,key不等,使用key实现的compareTo判断大小

                else if ((kc != null ||

                          (kc = comparableClassFor(k)) != null) &&

                         (dir = compareComparables(kc, k, pk)) != 0)

                    p = (dir < 0) ? pl : pr;

                // 上面所有情况依旧不能判断左右,就先递归判断右子树,看是否匹配上,匹配上就赋右子树,否则左子树

                else if ((q = pr.find(h, k, kc)) != null)

                    return q;

                else

                    p = pl;

            } while (p != null);

            return null;

        }
tieBreakOrder
比较两个对象的大小,返回值只能大于0或小于0,不能为0,因为需要插入节点是放在左子树还是右子树,这里在两个对象都不为空时,先比较两个对象的类名按字符串规则比较,如果类名比较不出来或者为空则调用native方法去比较hashcode值,相等时返回-1
    static int tieBreakOrder(Object a, Object b) {

        int d;

        if (a == null || b == null ||

            (d = a.getClass().getName().

             compareTo(b.getClass().getName())) == 0)

            d = (System.identityHashCode(a) <= System.identityHashCode(b) ?

                 -1 : 1);

        return d;

    }
treeify
以当前TreeNode为初始节点,循环处理链表上的每个节点,每次插入树节点都要进行平衡处理,保证红黑树的平衡。
    /**

     * Forms tree of the nodes linked from this node.

     * @return root of tree

     */

    final void treeify(Node<K,V>[] tab) {

        TreeNode<K,V> root = null;

        // this当前TreeNode,一般应该以树的根节点为初始值,根据链表进行遍历

        for (TreeNode<K,V> x = this, next; x != null; x = next) {

            next = (TreeNode<K,V>)x.next;

            x.left = x.right = null;

            // 首次root为空 当前节点先设置为root 节点颜色为黑色

            if (root == null) {

                x.parent = null;

                x.red = false;

                root = x;

            }

            // root节点设置之后开始将链表节点依次插入处理,x=x.next插入root为根节点的红黑树,循环处理

            else {

                K k = x.key;

                int h = x.hash;

                Class<?> kc = null;

                for (TreeNode<K,V> p = root;;) {

                    int dir, ph;

                    K pk = p.key;

                    // 比较hash值判断处于左右子树哪侧

                    if ((ph = p.hash) > h)

                        // 节点处于p左子树下

                        dir = -1;

                    else if (ph < h)

                        // 节点处于p右子树下

                        dir = 1;

                    else if ((kc == null &&

                              (kc = comparableClassFor(k)) == null) ||

                             (dir = compareComparables(kc, k, pk)) == 0)

                        // hash值相等根据compareTo判断,判断不出来继续执行tieBreakOrder判断

                        dir = tieBreakOrder(k, pk);

                    // x的父节点设置为xp

                    TreeNode<K,V> xp = p;

                    // 左右节点为空,说明可以将新增节点插入

                    // 非空,继续循环子树,p指向左子树或右子树,继续循环判断直到为空的节点

                    if ((p = (dir <= 0) ? p.left : p.right) == null) {

                        x.parent = xp;

                        if (dir <= 0)

                            xp.left = x;

                        else

                            xp.right = x;

                        // 插入后需进行平衡保证红黑树特性

                        root = balanceInsertion(root, x);

                        break;

                    }

                }

            }

        }

        // root位置可能会在调整中变更,这里需调用确保根节点落在tab数组上

        moveRootToFront(tab, root);

    }
untreeify
将树转换为链表结构,将TreeNode转化为Node,改变next指向即可
    /**

     * Returns a list of non-TreeNodes replacing those linked from

     * this node.

     */

    final Node<K,V> untreeify(HashMap<K,V> map) {

        // hd是链表首节点,tl是链表尾节点

        Node<K,V> hd = null, tl = null;

        for (Node<K,V> q = this; q != null; q = q.next) {

            Node<K,V> p = map.replacementNode(q, null);

            if (tl == null)

                hd = p;

            else

                tl.next = p;

            tl = p;

        }

        return hd;

    }

    Node<K,V> replacementNode(Node<K,V> p, Node<K,V> next) {

        return new Node<>(p.hash, p.key, p.value, next);

    }
putTreeVal
在红黑树结构中的putVal操作,先判断节点应该存在的位置,循环判断左右子树,找到应该存在的位置。若该位置为空,相当于原本无值,插入节点,然后进行平衡,桶位置调整。若该位置有值且相等,则直接返回,不需要插入操作。
    /**

     * Tree version of putVal.

     */

    final TreeNode<K,V> putTreeVal(HashMap<K,V> map, Node<K,V>[] tab,

                                   int h, K k, V v) {

        Class<?> kc = null;

        boolean searched = false;

        // 获取根节点

        TreeNode<K,V> root = (parent != null) ? root() : this;

        // 循环遍历,类似find方法

        for (TreeNode<K,V> p = root;;) {

            int dir, ph; K pk;

            if ((ph = p.hash) > h)

                dir = -1;

            else if (ph < h)

                dir = 1;

            else if ((pk = p.key) == k || (k != null && k.equals(pk)))

                return p;

            else if ((kc == null &&

                      (kc = comparableClassFor(k)) == null) ||

                     (dir = compareComparables(kc, k, pk)) == 0) {

                if (!searched) {

                    // 递归左右子树进行查找是否已经存在

                    // 只需判断一次即可,第二次不再执行

                    TreeNode<K,V> q, ch;

                    searched = true;

                    if (((ch = p.left) != null &&

                         (q = ch.find(h, k, kc)) != null) ||

                        ((ch = p.right) != null &&

                         (q = ch.find(h, k, kc)) != null))

                        return q;

                }

                // 上面都比较不出来,通过这个方法比较出来

                dir = tieBreakOrder(k, pk);

            }

            // 判断当前插入位置是否为空,为空才插入,非空则继续判断,根据dir判断是左还是右子树

            TreeNode<K,V> xp = p;

            if ((p = (dir <= 0) ? p.left : p.right) == null) {

                Node<K,V> xpn = xp.next;

                TreeNode<K,V> x = map.newTreeNode(h, k, v, xpn);

                if (dir <= 0)

                    xp.left = x;

                else

                    xp.right = x;

                xp.next = x;

                x.parent = x.prev = xp;

                if (xpn != null)

                    ((TreeNode<K,V>)xpn).prev = x;

                // balanceInsertion 插入调整平衡

                // moveRootToFront 确保root节点落在tab数组上为首节点

                moveRootToFront(tab, balanceInsertion(root, x));

                return null;

            }

        }

    }
removeTreeNode
删除树节点操作,movable:判断是否需要调整root节点(放置在tab上),在HashMap里removeNode方法中使用,对应的删除节点进行调用,具体自行查看源码部分。其实,想下,删除操作相当于将链表节点之间的关联重新梳理,修正两部分,第一部分是链表的关系修正,第二部分是树的关系修正,然后自平衡操作即可。
    final void removeTreeNode(HashMap<K,V> map, Node<K,V>[] tab,boolean movable) {

        int n;

        // 判断非空

        if (tab == null || (n = tab.length) == 0)

            return;

        // 计算当前树节点所在的桶的位置(tab索引位置)

        int index = (n - 1) & hash;

        TreeNode<K,V> first = (TreeNode<K,V>)tab[index], root = first, rl;

        // succ指向当前删除节点的后一个节点,pred指向当前删除节点的前一个节点

        TreeNode<K,V> succ = (TreeNode<K,V>)next, pred = prev;

        if (pred == null)

            // 前一个节点为空,说明删除的节点为根节点,first和tab[index]需指向删除节点的后一个节点

            tab[index] = first = succ;

        else

            // 前一个节点不为空,则前一个节点的后一个节点为succ(删除之后的关联)

            pred.next = succ;

        if (succ != null)

            // 后一个节点不为空,则后一个节点的前一个节点为pred,构建关联

            succ.prev = pred;

        if (first == null)

            // first为空则表明当前桶内无节点,直接return

            return;

        if (root.parent != null)

            // 目前的root节点有父类,需要调整

            root = root.root();

        if (root == null || root.right == null ||

            (rl = root.left) == null || rl.left == null) {

            // 根自身或者左右儿子其中一个为空或左子树的子树为空需转换为链表结构

            // 考虑到红黑树特性,这几种情况下,节点较少,进行树向链表的转化

            tab[index] = first.untreeify(map);  // too small

            return;

        }

        // p指向删除的节点

        // 上面修正链表的关系,下面修正树中的关系

        TreeNode<K,V> p = this, pl = left, pr = right, replacement;

        // 删除节点的左右子树都不为空,参考红黑树删除4种情况

        if (pl != null && pr != null) {

            TreeNode<K,V> s = pr, sl;

            while ((sl = s.left) != null) // find successor

                // 寻找右子树中最左的叶结点作为后继节点,s指向后继节点

                s = sl;

            // 交换后继节点和删除节点的颜色,从这里开始在后继节点上进行删除处理

            boolean c = s.red; s.red = p.red; p.red = c; // swap colors

            TreeNode<K,V> sr = s.right;

            TreeNode<K,V> pp = p.parent;

            if (s == pr) { // p was s's direct parent

                // s是p的右儿子,直接父子关系,交换p和s的位置

                // 改变两节点的指向,相当于交换值

                p.parent = s;

                s.right = p;

            }

            else {

                TreeNode<K,V> sp = s.parent;

                // 删除节点的父节点指向其后继节点的父节点

                if ((p.parent = sp) != null) {

                    // 判断s是左子节点还是右子节点,s父节点一侧指向删除节点p

                    if (s == sp.left)

                        sp.left = p;

                    else

                        sp.right = p;

                }

                if ((s.right = pr) != null)

                    // s右节点指向原本p的右节点,不为空,原p右子节点的父节点指向s

                    pr.parent = s;

            }

            // 修改p的左节点为空,因为现在p已经在后继节点上

            p.left = null;

            // 两个if是调整p和s交换后节点的指向关系

            if ((p.right = sr) != null)

                sr.parent = p;

            if ((s.left = pl) != null)

                pl.parent = s;

            if ((s.parent = pp) == null)

                // p的父亲成为s的父亲,为空说明是根节点,root指向s

                root = s;

            else if (p == pp.left)

                // p的父亲的左儿子原为p,现为s

                pp.left = s;

            else

                // 否则右儿子为s

                pp.right = s;

            // 若s结点有右儿子(s没有左儿子,因为s是后继节点),则replacement为这个右儿子否则为p

            // replacement相当于p和后继节点s交换后,删除s位置取代其位置的节点,参考红黑树删除过程理解

            if (sr != null)

                replacement = sr;

            else

                replacement = p;

        }

        // 删除节点的左右子树一侧为空,参考红黑树删除4种情况

        // 若p的左右儿子为空,则replacement为非空的一方,否则为p自己

        else if (pl != null)

            replacement = pl;

        else if (pr != null)

            replacement = pr;

        else

            replacement = p;

        // replacement不为p,即不为叶子节点(相当于之前所讲的红黑树中有两个NIL节点的节点)

        // 处理连接关系

        if (replacement != p) {

            TreeNode<K,V> pp = replacement.parent = p.parent;

            if (pp == null)

                root = replacement;

            else if (p == pp.left)

                pp.left = replacement;

            else

                pp.right = replacement;

            // 移除p节点

            p.left = p.right = p.parent = null;

        }

        // 红黑树自平衡调节,如果为红色,则不需要进行调整,否则需要自平衡调整,后面会对这个方法进行分析

        TreeNode<K,V> r = p.red ? root : balanceDeletion(root, replacement);

        // 后继节点无子节点,直接移除p节点即能保持平衡

        if (replacement == p) {  // detach

            TreeNode<K,V> pp = p.parent;

            p.parent = null;

            if (pp != null) {

                if (p == pp.left)

                    pp.left = null;

                else if (p == pp.right)

                    pp.right = null;

            }

        }

        if (movable)

            // 调整root使其落在tab数组上

            moveRootToFront(tab, r);

    }
split
拆分,在HashMap.resize方法中调用 ((TreeNode<K,V>)e).split(this, newTab, j, oldCap)。在扩容之后,红黑树和链表因为扩容的原因导致原本在一个数组元素下的Node节点分为高低位两部分(参考HashMap.resize链表部分的改变,是相同的),请查看HashMap的文章自行回顾,低位树即当前位置,高位树则在新扩容的tab上
    final void split(HashMap<K,V> map, Node<K,V>[] tab, int index, int bit) {

        TreeNode<K,V> b = this;

        // Relink into lo and hi lists, preserving order

        // 分成高位树和低位树,头尾节点先声明

        TreeNode<K,V> loHead = null, loTail = null;

        TreeNode<K,V> hiHead = null, hiTail = null;

        int lc = 0, hc = 0;

        // 循环处理节点

        for (TreeNode<K,V> e = b, next; e != null; e = next) {

            next = (TreeNode<K,V>)e.next;

            e.next = null;

            // 这里bit代表扩容的二进制位(数值是扩容前的容量大小),不明白的也请参考之前的HashMap讲解文章

            if ((e.hash & bit) == 0) {

                // 0说明在低位树,即原位置

                if ((e.prev = loTail) == null)

                    // 首节点设置

                    loHead = e;

                else

                    // 链表next设置

                    loTail.next = e;

                loTail = e;

                ++lc;

            }

            else {

                // 同上,主要是在高位树上处理

                if ((e.prev = hiTail) == null)

                    hiHead = e;

                else

                    hiTail.next = e;

                hiTail = e;

                ++hc;

            }

        }

        // 对高低位树进行处理,将数组节点指向树根节点或者链表首节点

        if (loHead != null) {

            if (lc <= UNTREEIFY_THRESHOLD)

                // 拆分之后节点小于非树化阈值,转成链表结构

                tab[index] = loHead.untreeify(map);

            else {

                tab[index] = loHead;

                // 高位树为空则表示节点全部留在了低位树,不需要进行树化操作,已经树化过了

                if (hiHead != null) // (else is already treeified)

                    loHead.treeify(tab);

            }

        }

        if (hiHead != null) {

            if (hc <= UNTREEIFY_THRESHOLD)

                tab[index + bit] = hiHead.untreeify(map);

            else {

                // 高位所处的位置为原本位置+旧数组的大小即bit

                tab[index + bit] = hiHead;

                if (loHead != null)

                    hiHead.treeify(tab);

            }

        }

    }
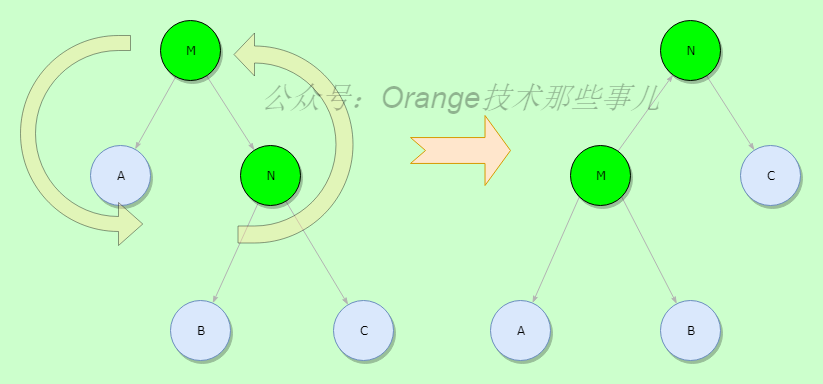
rotateLeft
左旋操作,参考红黑树讲解中的图来理解,自己动手画一画也能明白,右旋操作类似,不再多说
    static <K,V> TreeNode<K,V> rotateLeft(TreeNode<K,V> root,

                                          TreeNode<K,V> p) {

        TreeNode<K,V> r, pp, rl;

        // r代表M的右子节点N,先决条件,p(M),r(N)不能为空

        if (p != null && (r = p.right) != null) {

            // r的左子节点成为p的右子节点,即B成为M的右子节点

            if ((rl = p.right = r.left) != null)

                // r的左子节点父节点指向p,即修改B父节点指向M

                rl.parent = p;

            // p的父节点成为r的父节点,即N父节点为原M的父节点

            if ((pp = r.parent = p.parent) == null)

                // r的父节点为空,则r为root节点,设置为黑色,即N父节点为空,N设置为根节点

                (root = r).red = false;

            // 原p节点是左子树,即M是左子树

            else if (pp.left == p)

                // 现调整后修改N父节点左子指向N

                pp.left = r;

            else

                // r的父节点的右子节点需重设,即调整后修改N父节点右子指向N

                pp.right = r;

            // p和r的位置关系修改,即M与N的关系重设

            r.left = p;

            p.parent = r;

        }

        return root;

    }
balanceInsertion
插入节点之后进行平衡调整,x为新添加的节点,root为树的根节点,返回根节点。
    static <K,V> TreeNode<K,V> balanceInsertion(TreeNode<K,V> root,

                                            TreeNode<K,V> x) {

        // 根据红黑树属性插入的节点默认设置为红色

        x.red = true;

        // 通过循环进行调整,从叶子到根节点进行局部调整

        for (TreeNode<K,V> xp, xpp, xppl, xppr;;) {

            // x的父节点为空,说明x节点为根节点,将颜色置为黑即可

            // 符合插入节点第一种情况

            if ((xp = x.parent) == null) {

                x.red = false;

                return x;

            }

            // x父节点为黑色或者x的祖父节点为空

            // 符合插入节点第二种情况

            else if (!xp.red || (xpp = xp.parent) == null)

                return root;

            // 下面情况中x的颜色都为红色,因为上边已经判断过黑色

            // x的父节点为x祖父节点的左儿子,插入情况下三四种情况需要区分左还是右

            if (xp == (xppl = xpp.left)) {

                // x祖父右儿子,即x的叔叔不为空,且为红色

                // 符合插入节点第三种情况

                if ((xppr = xpp.right) != null && xppr.red) {

                    // x的叔叔修改为黑色

                    xppr.red = false;

                    // x的父节点修改为黑色

                    xp.red = false;

                    // x的祖父节点修改为红色

                    xpp.red = true;

                    // x指向x的祖父节点,以祖父节点循环继续向上调整,相当于xpp是插入节点

                    x = xpp;

                }

                else {

                    // x的叔叔是黑色且x是右儿子,相当于在树的“内部”

                    // 符合插入节点第四种情况的第一种状态

                    if (x == xp.right) {

                        // 以x父节点进行左旋

                        root = rotateLeft(root, x = xp);

                        xpp = (xp = x.parent) == null ? null : xp.parent;

                    }

                    // 这里处理第二种状态,相当于在树的“外部”

                    if (xp != null) {

                        // x的父节点改为黑色,x的祖父节点改为红色后对x的祖父节点进行右旋转

                        xp.red = false;

                        if (xpp != null) {

                            xpp.red = true;

                            root = rotateRight(root, xpp);

                        }

                    }

                }

            }

            // x的父节点为x祖父节点的右儿子

            // 下面跟上边类似,对称关系

            else {

                if (xppl != null && xppl.red) {

                    xppl.red = false;

                    xp.red = false;

                    xpp.red = true;

                    x = xpp;

                }

                else {

                    if (x == xp.left) {

                        root = rotateRight(root, x = xp);

                        xpp = (xp = x.parent) == null ? null : xp.parent;

                    }

                    if (xp != null) {

                        xp.red = false;

                        if (xpp != null) {

                            xpp.red = true;

                            root = rotateLeft(root, xpp);

                        }

                    }

                }

            }

        }

    }
balanceDeletion
删除节点后自平衡操作,x是删除节点的替换节点,注意下
    static <K,V> TreeNode<K,V> balanceDeletion(TreeNode<K,V> root,TreeNode<K,V> x) {

        // 循环操作,平衡局部之后继续判断调整

        for (TreeNode<K,V> xp, xpl, xpr;;)  {

            // 删除节点为空或x为根节点直接返回,平衡调整完毕x=root

            if (x == null || x == root)

                return root;

            // 删除后x父节点为空,说明x为根节点,x置为黑色,红黑树平衡

            // 参考红黑树删除文章中的3种情况中的第一种情况,整棵树的根节点需要将根节点置黑

            else if ((xp = x.parent) == null) {

                // xp为空 x为根节点,x置为黑色

                x.red = false;

                return x;

            }

            // x为红色,原节点必为黑色,变色操作即可满足红黑树特性达到平衡

            // 参考红黑树删除文章中的3种情况中的第二种情况

            else if (x.red) {

                x.red = false;

                return root;

            }

            // 区分x为左子节点还是右子节点

            else if ((xpl = xp.left) == x) {

                // x的叔叔为红色

                // 符合3种情况中的第三种情况中的第二种情况

                if ((xpr = xp.right) != null && xpr.red) {

                    // 先进行变色,然后进行左旋操作,xpr指向xp新的右子

                    xpr.red = false;

                    xp.red = true;

                    root = rotateLeft(root, xp);

                    xpr = (xp = x.parent) == null ? null : xp.right;

                }

                // x的兄弟为空

                if (xpr == null)

                    // x指向x的父节点,继续以x父节点调整平衡

                    x = xp;

                else {

                    TreeNode<K,V> sl = xpr.left, sr = xpr.right;

                    // 符合3种情况中的第三种情况中的第三种情况

                    if ((sr == null || !sr.red) &&

                        (sl == null || !sl.red)) {

                        // sr,sl两个兄弟都是黑色,x的兄弟设置为红色,x指向x的父节点继续向上循环调整平衡

                        xpr.red = true;

                        x = xp;

                    }

                    else {

                        // 符合3种情况中的第三种情况中的第五种情况

                        if (sr == null || !sr.red) {

                            // sr为空或者为黑色

                            if (sl != null)

                                // sl非空说明为红色,设置为黑色

                                sl.red = false;

                            // x的兄弟设置为红色

                            xpr.red = true;

                            // 右旋

                            root = rotateRight(root, xpr);

                            xpr = (xp = x.parent) == null ?

                                null : xp.right;

                        }

                        // 符合3种情况中的第三种情况中的第六种情况

                        if (xpr != null) {

                            // xpr颜色设置

                            xpr.red = (xp == null) ? false : xp.red;

                            if ((sr = xpr.right) != null)

                                // xpr 右孩子设置为黑色

                                sr.red = false;

                        }

                        if (xp != null) {

                            xp.red = false;

                            // 左旋操作

                            root = rotateLeft(root, xp);

                        }

                        x = root;

                    }

                }

            }

            // 和上边是对称操作

            else { // symmetric

                if (xpl != null && xpl.red) {

                    xpl.red = false;

                    xp.red = true;

                    root = rotateRight(root, xp);

                    xpl = (xp = x.parent) == null ? null : xp.left;

                }

                if (xpl == null)

                    x = xp;

                else {

                    TreeNode<K,V> sl = xpl.left, sr = xpl.right;

                    if ((sl == null || !sl.red) &&

                        (sr == null || !sr.red)) {

                        xpl.red = true;

                        x = xp;

                    }

                    else {

                        if (sl == null || !sl.red) {

                            if (sr != null)

                                sr.red = false;

                            xpl.red = true;

                            root = rotateLeft(root, xpl);

                            xpl = (xp = x.parent) == null ?

                                null : xp.left;

                        }

                        if (xpl != null) {

                            xpl.red = (xp == null) ? false : xp.red;

                            if ((sl = xpl.left) != null)

                                sl.red = false;

                        }

                        if (xp != null) {

                            xp.red = false;

                            root = rotateRight(root, xp);

                        }

                        x = root;

                    }

                }

            }

        }

    }
checkInvariants
对整棵树进行红黑树一致性的检查 目前仅在检查root是否落在table上时调用,满足红黑树的特性以及节点指向的正确性
    static <K,V> boolean checkInvariants(TreeNode<K,V> t) {

        TreeNode<K,V> tp = t.parent, tl = t.left, tr = t.right,

            tb = t.prev, tn = (TreeNode<K,V>)t.next;

        // t的前一个节点的后一个节点应为t

        if (tb != null && tb.next != t)

            return false;

        // tn的后一个节点的前一个节点应为t

        if (tn != null && tn.prev != t)

            return false;

        // t的父节点的左子节点或右子节点应为t

        if (tp != null && t != tp.left && t != tp.right)

            return false;

        // t的左子节点的父节点应为t并且 t的左子节点hash值小于t的hash值

        if (tl != null && (tl.parent != t || tl.hash > t.hash))

            return false;

        // t的右子节点的父节点应为t并且 t的右子节点hash值大于t的hash值

        if (tr != null && (tr.parent != t || tr.hash < t.hash))

            return false;

        // t和t的子节点不能同时是红色,红黑树特性

        if (t.red && tl != null && tl.red && tr != null && tr.red)

            return false;

        // 左子节点递归检查

        if (tl != null && !checkInvariants(tl))

            return false;

        // 右子节点递归检查

        if (tr != null && !checkInvariants(tr))

            return false;

        return true;

    }
总结
至此,关于TreeNode的代码讲解部分已经完成,类似的源码TreeMap等使用红黑树结构的类基本操作都是类似源码,可以自行查看,重要的部分在于插入和删除是如何做到的,在之后如何进行自平衡操作的,希望对各位读者有所帮助
JDK源码那些事儿之HashMap.TreeNode的更多相关文章
- JDK源码那些事儿之我眼中的HashMap
源码部分从HashMap说起是因为笔者看了很多遍这个类的源码部分,同时感觉网上很多都是粗略的介绍,有些可能还不正确,最后只能自己看源码来验证理解,写下这篇文章一方面是为了促使自己能深入,另一方面也是给 ...
- JDK源码那些事儿之并发ConcurrentHashMap上篇
前面已经说明了HashMap以及红黑树的一些基本知识,对JDK8的HashMap也有了一定的了解,本篇就开始看看并发包下的ConcurrentHashMap,说实话,还是比较复杂的,笔者在这里也不会过 ...
- JDK源码那些事儿之红黑树基础下篇
说到HashMap,就一定要说到红黑树,红黑树作为一种自平衡二叉查找树,是一种用途较广的数据结构,在jdk1.8中使用红黑树提升HashMap的性能,今天就来说一说红黑树,上一讲已经给出插入平衡的调整 ...
- JDK源码那些事儿之浅析Thread上篇
JAVA中多线程的操作对于初学者而言是比较难理解的,其实联想到底层操作系统时我们可能会稍微明白些,对于程序而言最终都是硬件上运行二进制指令,然而,这些又太过底层,今天来看一下JAVA中的线程,浅析JD ...
- JDK源码那些事儿之并发ConcurrentHashMap下篇
上一篇文章已经就ConcurrentHashMap进行了部分说明,介绍了其中涉及的常量和变量的含义,有些部分需要结合方法源码来理解,今天这篇文章就继续讲解并发ConcurrentHashMap 前言 ...
- JDK源码那些事儿之常用的ArrayList
前面已经讲解集合中的HashMap并且也对其中使用的红黑树结构做了对应的说明,这次就来看下简单一些的另一个集合类,也是日常经常使用到的ArrayList,整体来说,算是比较好理解的集合了,一起来看下 ...
- JDK源码阅读(4):HashMap类阅读笔记
HashMap public class HashMap<K, V> extends AbstractMap<K, V> implements Map<K, V>, ...
- JDK源码那些事儿之ConcurrentLinkedDeque
非阻塞队列ConcurrentLinkedQueue我们已经了解过了,既然是Queue,那么是否有其双端队列实现呢?答案是肯定的,今天就继续说一说非阻塞双端队列实现ConcurrentLinkedDe ...
- JDK源码那些事儿之ConcurrentLinkedQueue
阻塞队列的实现前面已经讲解完毕,今天我们继续了解源码中非阻塞队列的实现,接下来就看一看ConcurrentLinkedQueue非阻塞队列是怎么完成操作的 前言 JDK版本号:1.8.0_171 Co ...
随机推荐
- 优化apk的odex处理
前文讲到了apk的反编译流程,但在有的情况下会出现apk的资源文件和代码文件分开的情况,这种情况会出现如下目录结构,并且在apk文件里面并没有dex文件. 所需工具 smali.jar和baksmal ...
- js修改css属性值
推荐用dom.style.setProperty('属性','属性值'); 例如: $("#id")[0].style.setProperty('margin-top','1px' ...
- opencv 直方图
1.简介 对输入图像进行直方图均衡化处理,提升后续对象检测的准确率在OpenCV人脸检测的代码演示中已经很常见.此外对医学影像图像与卫星遥感图像也经常通过直方图均衡化来提升图像质量. 图像直方图均衡化 ...
- TypeScript symbol类型
自ECMAScript 2015(ES6)起,symbol成为了一种新的原生类型,就像基本类型number和string一样. ⒈介绍及使用方式 TypeScript中使用symbol类型和JavaS ...
- Feign【首次请求失败】
当feign和ribbon整合hystrix之后,可能会出现首次调用失败的问题,出现原因分析如下: hystrix默认的超时时间是1秒,如果接口请求响应超过这个时间,将会执行fallback,spri ...
- LC 173. Binary Search Tree Iterator
题目描述 Implement an iterator over a binary search tree (BST). Your iterator will be initialized with t ...
- 使用Laravel 和 Vue 构建一个简单的SPA
本教程是作者自己在学习Laravel和Vue时的一些总结,有问题欢迎指正. Laravel是PHP的一个框架,Vue是前端页面的框架,这两个框架如何结合起来构建一个SPA(Single Page Ap ...
- Python中datetime库的用法
datetime模块用于是date和time模块的合集,datetime有两个常量,MAXYEAR和MINYEAR,分别是9999和1. datetime模块定义了5个类,分别是 1.datetime ...
- CSPS2019游记
Day1: T1:格雷码?看一眼感觉是结论题,但是没头绪推不出来,硬刚40min想到$\oplus$切了. 但是没写unsigned挂了五分... T2:全场爆切人均50的题,就我一个写挂了35pts ...
- (二十二)JSP基础语法
一.基础语法 1.1 JSP表达式 JSP脚本表达式(expression)用于将程序数据输出到客户端 语法:<%= 变量或表达式 %> 1 <body> 2 5+3=< ...