学Shiro完结版-4
第十四章 SSL——《跟我学Shiro》
对于SSL的支持,Shiro只是判断当前url是否需要SSL登录,如果需要自动重定向到https进行访问。
首先生成数字证书,生成证书到D:\localhost.keystore
使用JDK的keytool命令,生成证书(包含证书/公钥/私钥)到D:\localhost.keystore:
keytool -genkey -keystore "D:\localhost.keystore" -alias localhost -keyalg RSA
输入密钥库口令:
再次输入新口令:
您的名字与姓氏是什么?
[Unknown]: localhost
您的组织单位名称是什么?
您的组织名称是什么?
[Unknown]:
您所在的城市或区域名称是什么?
[Unknown]: beijing
您所在的省/市/自治区名称是什么?
[Unknown]: beijing
该单位的双字母国家/地区代码是什么?
[Unknown]: cn
CN=localhost, OU= L=beijing, ST=beijing, C=cn是否正确
?
[否]: y
输入 <localhost> 的密钥口令
(如果和密钥库口令相同, 按回车):
再次输入新口令:
通过如上步骤,生成证书到D:\ localhost.keystore;
然后设置tomcat下的server.xml
此处使用了apache-tomcat-7.0.40版本,打开conf/server.xml,找到:
- <!--
- <Connector port="8443" protocol="HTTP/1.1" SSLEnabled="true"
- maxThreads="150" scheme="https" secure="true"
- clientAuth="false" sslProtocol="TLS" />
- -->
替换为
- <Connector port="8443" protocol="HTTP/1.1" SSLEnabled="true"
- maxThreads="150" scheme="https" secure="true"
- clientAuth="false" sslProtocol="TLS"
- keystoreFile="D:\localhost.keystore" keystorePass="123456"/>
keystorePass就是生成keystore时设置的密码。
添加SSL到配置文件(spring-shiro-web.xml)
此处使用了和十三章一样的代码:
- <bean id="sslFilter" class="org.apache.shiro.web.filter.authz.SslFilter">
- <property name="port" value="8443"/>
- </bean>
- <bean id="shiroFilter" class="org.apache.shiro.spring.web.ShiroFilterFactoryBean">
- ……
- <property name="filters">
- <util:map>
- <entry key="authc" value-ref="formAuthenticationFilter"/>
- <entry key="ssl" value-ref="sslFilter"/>
- </util:map>
- </property>
- <property name="filterChainDefinitions">
- <value>
- /login.jsp = ssl,authc
- /logout = logout
- /authenticated.jsp = authc
- /** = user
- </value>
- </property>
- </bean>
SslFilter默认端口是443,此处使用了8443;“/login.jsp = ssl,authc”表示访问登录页面时需要走SSL。
测试
最后把shiro-example-chapter14打成war包(mvn:package),放到tomcat下的webapps中,启动服务器测试,如访问localhost:9080/chapter14/,会自动跳转到https://localhost:8443/chapter14/login.jsp。
如果使用Maven Jetty插件,可以直接如下插件配置:
- <plugin>
- <groupId>org.mortbay.jetty</groupId>
- <artifactId>jetty-maven-plugin</artifactId>
- <version>8.1.8.v20121106</version>
- <configuration>
- <webAppConfig>
- <contextPath>/${project.build.finalName}</contextPath>
- </webAppConfig>
- <connectors>
- <connector implementation="org.eclipse.jetty.server.nio.SelectChannelConnector">
- <port>8080</port>
- </connector>
- <connector implementation="org.eclipse.jetty.server.ssl.SslSocketConnector">
- <port>8443</port>
- <keystore>${project.basedir}/localhost.keystore</keystore>
- <password>123456</password>
- <keyPassword>123456</keyPassword>
- </connector>
- </connectors>
- </configuration>
- </plugin>
第十五章 单点登录——《跟我学Shiro》
Shiro 1.2开始提供了Jasig CAS单点登录的支持,单点登录主要用于多系统集成,即在多个系统中,用户只需要到一个中央服务器登录一次即可访问这些系统中的任何一个,无须多次登录。此处我们使用Jasig CAS v4.0.0-RC3版本:
https://github.com/Jasig/cas/tree/v4.0.0-RC3
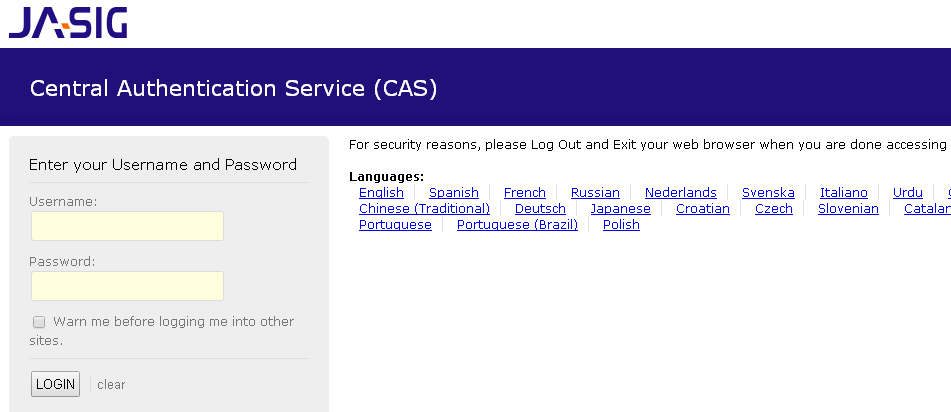
Jasig CAS单点登录系统分为服务器端和客户端,服务器端提供单点登录,多个客户端(子系统)将跳转到该服务器进行登录验证,大体流程如下:
1、访问客户端需要登录的页面http://localhost:9080/ client/,此时会跳到单点登录服务器https://localhost:8443/ server/login?service=https://localhost:9443/ client/cas;
2、如果此时单点登录服务器也没有登录的话,会显示登录表单页面,输入用户名/密码进行登录;
3、登录成功后服务器端会回调客户端传入的地址:https://localhost:9443/client/cas?ticket=ST-1-eh2cIo92F9syvoMs5DOg-cas01.example.org,且带着一个ticket;
4、客户端会把ticket提交给服务器来验证ticket是否有效;如果有效服务器端将返回用户身份;
5、客户端可以再根据这个用户身份获取如当前系统用户/角色/权限信息。
本章使用了和《第十四章 SSL》一样的数字证书。
服务器端
我们使用了Jasig CAS服务器v4.0.0-RC3版本,可以到其官方的github下载:https://github.com/Jasig/cas/tree/v4.0.0-RC3下载,然后将其cas-server-webapp模块封装到shiro-example-chapter15-server模块中,具体请参考源码。
1、数字证书使用和《第十四章 SSL》一样的数字证书,即将localhost.keystore拷贝到shiro-example-chapter15-server模块根目录下;
2、在pom.xml中添加Jetty Maven插件,并添加SSL支持:
- <plugin>
- <groupId>org.mortbay.jetty</groupId>
- <artifactId>jetty-maven-plugin</artifactId>
- <version>8.1.8.v20121106</version>
- <configuration>
- <webAppConfig>
- <contextPath>/${project.build.finalName}</contextPath>
- </webAppConfig>
- <connectors>
- <connector implementation="org.eclipse.jetty.server.nio.SelectChannelConnector">
- <port>8080</port>
- </connector>
- <connector implementation="org.eclipse.jetty.server.ssl.SslSocketConnector">
- <port>8443</port>
- <keystore>${project.basedir}/localhost.keystore</keystore>
- <password>123456</password>
- <keyPassword>123456</keyPassword>
- </connector>
- </connectors>
- </configuration>
- </plugin>
3、修改src/main/webapp/WEB-INF/deployerConfigContext.xml,找到primaryAuthenticationHandler,然后添加一个账户:
- <entry key="zhang" value="123"/>
其也支持如JDBC查询,可以自己定制;具体请参考文档。
4、mvn jetty:run启动服务器测试即可:
访问https://localhost:8443/chapter15-server/login将弹出如下登录页面:
输入用户名/密码,如zhang/123,将显示登录成功页面:
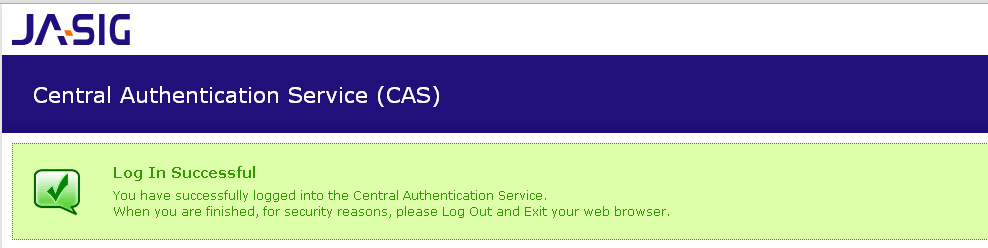
到此服务器端的简单配置就完成了。
客户端
1、首先使用localhost.keystore导出数字证书(公钥)到D:\localhost.cer
- keytool -export -alias localhost -file D:\localhost.cer -keystore D:\localhost.keystore
2、因为CAS client需要使用该证书进行验证,需要将证书导入到JDK中:
- cd D:\jdk1.7.0_21\jre\lib\security
- keytool -import -alias localhost -file D:\localhost.cer -noprompt -trustcacerts -storetype jks -keystore cacerts -storepass 123456
如果导入失败,可以先把security 目录下的cacerts删掉;
3、按照服务器端的Jetty Maven插件的配置方式配置Jetty插件;
4、在shiro-example-chapter15-client模块中导入shiro-cas依赖,具体请参考其pom.xml;
5、自定义CasRealm:
- public class MyCasRealm extends CasRealm {
- private UserService userService;
- public void setUserService(UserService userService) {
- this.userService = userService;
- }
- @Override
- protected AuthorizationInfo doGetAuthorizationInfo(PrincipalCollection principals) {
- String username = (String)principals.getPrimaryPrincipal();
- SimpleAuthorizationInfo authorizationInfo = new SimpleAuthorizationInfo();
- authorizationInfo.setRoles(userService.findRoles(username));
- authorizationInfo.setStringPermissions(userService.findPermissions(username));
- return authorizationInfo;
- }
- }
CasRealm根据CAS服务器端返回的用户身份获取相应的角色/权限信息。
6、spring-shiro-web.xml配置:
- <bean id="casRealm" class="com.github.zhangkaitao.shiro.chapter13.realm.MyCasRealm">
- <property name="userService" ref="userService"/>
- ……
- <property name="casServerUrlPrefix" value="https://localhost:8443/chapter14-server"/>
- <property name="casService" value="https://localhost:9443/chapter14-client/cas"/>
- </bean>
casServerUrlPrefix:是CAS Server服务器端地址;
casService:是当前应用CAS服务URL,即用于接收并处理登录成功后的Ticket的;
如果角色/权限信息是由服务器端提供的话,我们可以直接使用CasRealm:
- <bean id="casRealm" class="org.apache.shiro.cas.CasRealm">
- ……
- <property name="defaultRoles" value="admin,user"/>
- <property name="defaultPermissions" value="user:create,user:update"/>
- <property name="roleAttributeNames" value="roles"/>
- <property name="permissionAttributeNames" value="permissions"/>
- <property name="casServerUrlPrefix" value="https://localhost:8443/chapter14-server"/>
- <property name="casService" value="https://localhost:9443/chapter14-client/cas"/>
- </bean>
defaultRoles/ defaultPermissions:默认添加给所有CAS登录成功用户的角色和权限信息;
roleAttributeNames/ permissionAttributeNames:角色属性/权限属性名称,如果用户的角色/权限信息是从服务器端返回的(即返回的CAS Principal中除了Principal之外还有如一些Attributes),此时可以使用roleAttributeNames/ permissionAttributeNames得到Attributes中的角色/权限数据;请自行查询CAS获取用户更多信息。
- <bean id="casFilter" class="org.apache.shiro.cas.CasFilter">
- <property name="failureUrl" value="/casFailure.jsp"/>
- </bean>
CasFilter类似于FormAuthenticationFilter,只不过其验证服务器端返回的CAS Service Ticket。
- <bean id="shiroFilter" class="org.apache.shiro.spring.web.ShiroFilterFactoryBean">
- <property name="securityManager" ref="securityManager"/>
- <property name="loginUrl" value="https://localhost:8443/chapter14-server/login?service=https://localhost:9443/chapter14-client/cas"/>
- <property name="successUrl" value="/"/>
- <property name="filters">
- <util:map>
- <entry key="cas" value-ref="casFilter"/>
- </util:map>
- </property>
- <property name="filterChainDefinitions">
- <value>
- /casFailure.jsp = anon
- /cas = cas
- /logout = logout
- /** = user
- </value>
- </property>
- </bean>
loginUrl:https://localhost:8443/chapter15-server/login表示服务端端登录地址,登录成功后跳转到?service参数对于的地址进行客户端验证及登录;
“/cas=cas”:即/cas地址是服务器端回调地址,使用CasFilter获取Ticket进行登录。
7、测试,输入http://localhost:9080/chapter15-client地址进行测试即可,可以使用如Chrome开这debug观察网络请求的变化。
如果遇到以下异常,一般是证书导入错误造成的,请尝试重新导入,如果还是不行,有可能是运行应用的JDK和安装数字证书的JDK不是同一个造成的:
Caused by: sun.security.validator.ValidatorException: PKIX path building failed: sun.security.provider.certpath.SunCertPathBuilderException: unable to find valid certification path to requested target
at sun.security.validator.PKIXValidator.doBuild(PKIXValidator.java:385)
at sun.security.validator.PKIXValidator.engineValidate(PKIXValidator.java:292)
at sun.security.validator.Validator.validate(Validator.java:260)
at sun.security.ssl.X509TrustManagerImpl.validate(X509TrustManagerImpl.java:326)
at sun.security.ssl.X509TrustManagerImpl.checkTrusted(X509TrustManagerImpl.java:231)
at sun.security.ssl.X509TrustManagerImpl.checkServerTrusted(X509TrustManagerImpl.java:126)
at sun.security.ssl.ClientHandshaker.serverCertificate(ClientHandshaker.java:1323)
... 67 more
Caused by: sun.security.provider.certpath.SunCertPathBuilderException: unable to find valid certification path to requested target
at sun.security.provider.certpath.SunCertPathBuilder.engineBuild(SunCertPathBuilder.java:196)
at java.security.cert.CertPathBuilder.build(CertPathBuilder.java:268)
at sun.security.validator.PKIXValidator.doBuild(PKIXValidator.java:380)
... 73 more
第十六章 综合实例——《跟我学Shiro》
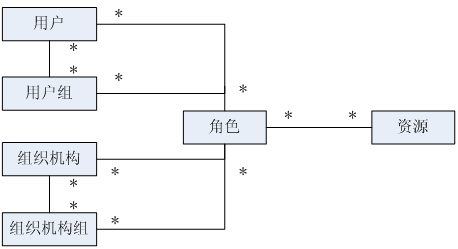
简单的实体关系图
简单数据字典
用户(sys_user)
|
名称 |
类型 |
长度 |
描述 |
|
id |
bigint |
编号 主键 |
|
|
username |
varchar |
100 |
用户名 |
|
password |
varchar |
100 |
密码 |
|
salt |
varchar |
50 |
盐 |
|
role_ids |
varchar |
100 |
角色列表 |
|
locked |
bool |
账户是否锁定 |
组织机构(sys_organization)
|
名称 |
类型 |
长度 |
描述 |
|
id |
bigint |
编号 主键 |
|
|
name |
varchar |
100 |
组织机构名 |
|
priority |
int |
显示顺序 |
|
|
parent_id |
bigint |
父编号 |
|
|
parent_ids |
varchar |
100 |
父编号列表 |
|
available |
bool |
是否可用 |
资源(sys_resource)
|
名称 |
类型 |
长度 |
描述 |
|
id |
bigint |
编号 主键 |
|
|
name |
varchar |
100 |
资源名称 |
|
type |
varchar |
50 |
资源类型, |
|
priority |
int |
显示顺序 |
|
|
parent_id |
bigint |
父编号 |
|
|
parent_ids |
varchar |
100 |
父编号列表 |
|
permission |
varchar |
100 |
权限字符串 |
|
available |
bool |
是否可用 |
角色(sys_role)
|
名称 |
类型 |
长度 |
描述 |
|
id |
bigint |
编号 主键 |
|
|
role |
varchar |
100 |
角色名称 |
|
description |
varchar |
100 |
角色描述 |
|
resource_ids |
varchar |
100 |
授权的资源 |
|
available |
bool |
是否可用 |
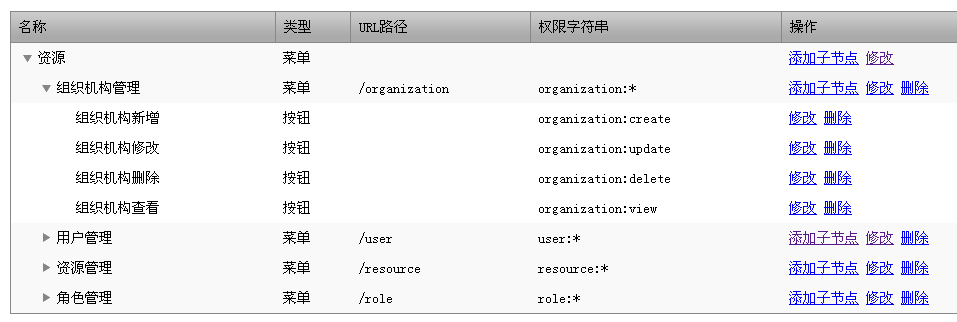
资源:表示菜单元素、页面按钮元素等;菜单元素用来显示界面菜单的,页面按钮是每个页面可进行的操作,如新增、修改、删除按钮;使用type来区分元素类型(如menu表示菜单,button代表按钮),priority是元素的排序,如菜单显示顺序;permission表示权限;如用户菜单使用user:*;也就是把菜单授权给用户后,用户就拥有了user:*权限;如用户新增按钮使用user:create,也就是把用户新增按钮授权给用户后,用户就拥有了user:create权限了;available表示资源是否可用,如菜单显示/不显示。
角色:role表示角色标识符,如admin,用于后台判断使用;description表示角色描述,如超级管理员,用于前端显示给用户使用;resource_ids表示该角色拥有的资源列表,即该角色拥有的权限列表(显示角色),即角色是权限字符串集合;available表示角色是否可用。
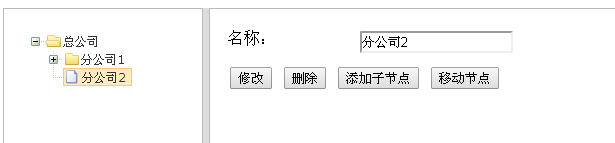
组织机构:name表示组织机构名称,priority是组织机构的排序,即显示顺序;available表示组织机构是否可用。
用户:username表示用户名;password表示密码;salt表示加密密码的盐;role_ids表示用户拥有的角色列表,可以通过角色再获取其权限字符串列表;locked表示用户是否锁定。
此处如资源、组织机构都是树型结构:
|
id |
name |
parent_id |
parent_ids |
|
1 |
总公司 |
0 |
0/ |
|
2 |
山东分公司 |
1 |
0/1/ |
|
3 |
河北分公司 |
1 |
0/1/ |
|
4 |
济南分公司 |
2 |
0/1/2/ |
parent_id表示父编号,parent_ids表示所有祖先编号;如0/1/2/表示其祖先是2、1、0;其中根节点父编号为0。
为了简单性,如用户-角色,角色-资源关系直接在实体(用户表中的role_ids,角色表中的resource_ids)里完成的,没有建立多余的关系表,如要查询拥有admin角色的用户时,建议建立关联表,否则就没必要建立了。在存储关系时如role_ids=1,2,3,;多个之间使用逗号分隔。
用户组、组织机构组本实例没有实现,即可以把一组权限授权给这些组,组中的用户/组织机构就自动拥有这些角色/权限了;另外对于用户组可以实现一个默认用户组,如论坛,不管匿名/登录用户都有查看帖子的权限。
更复杂的权限请参考我的《JavaEE项目开发脚手架》:http://github.com/zhangkaitao/es。
表/数据SQL
具体请参考
sql/ shiro-schema.sql (表结构)
sql/ shiro-data.sql (初始数据)
默认用户名/密码是admin/123456。
实体
具体请参考com.github.zhangkaitao.shiro.chapter16.entity包下的实体,此处就不列举了。
DAO
具体请参考com.github.zhangkaitao.shiro.chapter16.dao包下的DAO接口及实现。
Service
具体请参考com.github.zhangkaitao.shiro.chapter16.service包下的Service接口及实现。以下是出了基本CRUD之外的关键接口:
- public interface ResourceService {
- Set<String> findPermissions(Set<Long> resourceIds); //得到资源对应的权限字符串
- List<Resource> findMenus(Set<String> permissions); //根据用户权限得到菜单
- }
- public interface RoleService {
- Set<String> findRoles(Long... roleIds); //根据角色编号得到角色标识符列表
- Set<String> findPermissions(Long[] roleIds); //根据角色编号得到权限字符串列表
- }
- public interface UserService {
- public void changePassword(Long userId, String newPassword); //修改密码
- public User findByUsername(String username); //根据用户名查找用户
- public Set<String> findRoles(String username);// 根据用户名查找其角色
- public Set<String> findPermissions(String username);// 根据用户名查找其权限
- }
Service实现请参考源代码,此处就不列举了。
UserRealm实现
- public class UserRealm extends AuthorizingRealm {
- @Autowired private UserService userService;
- protected AuthorizationInfo doGetAuthorizationInfo(PrincipalCollection principals) {
- String username = (String)principals.getPrimaryPrincipal();
- SimpleAuthorizationInfo authorizationInfo = new SimpleAuthorizationInfo();
- authorizationInfo.setRoles(userService.findRoles(username));
- authorizationInfo.setStringPermissions(userService.findPermissions(username));
- System.out.println(userService.findPermissions(username));
- return authorizationInfo;
- }
- protected AuthenticationInfo doGetAuthenticationInfo(AuthenticationToken token) throws AuthenticationException {
- String username = (String)token.getPrincipal();
- User user = userService.findByUsername(username);
- if(user == null) {
- throw new UnknownAccountException();//没找到帐号
- }
- if(Boolean.TRUE.equals(user.getLocked())) {
- throw new LockedAccountException(); //帐号锁定
- }
- return new SimpleAuthenticationInfo(
- user.getUsername(), //用户名
- user.getPassword(), //密码
- ByteSource.Util.bytes(user.getCredentialsSalt()),//salt=username+salt
- getName() //realm name
- );
- }
- }
此处的UserRealm和《第六章Realm及相关对象》中的UserRealm类似,通过UserService获取帐号及角色/权限信息。
Web层控制器
- @Controller
- public class IndexController {
- @Autowired
- private ResourceService resourceService;
- @Autowired
- private UserService userService;
- @RequestMapping("/")
- public String index(@CurrentUser User loginUser, Model model) {
- Set<String> permissions = userService.findPermissions(loginUser.getUsername());
- List<Resource> menus = resourceService.findMenus(permissions);
- model.addAttribute("menus", menus);
- return "index";
- }
- }
IndexController中查询菜单在前台界面显示,请参考相应的jsp页面;
- @Controller
- public class LoginController {
- @RequestMapping(value = "/login")
- public String showLoginForm(HttpServletRequest req, Model model) {
- String exceptionClassName = (String)req.getAttribute("shiroLoginFailure");
- String error = null;
- if(UnknownAccountException.class.getName().equals(exceptionClassName)) {
- error = "用户名/密码错误";
- } else if(IncorrectCredentialsException.class.getName().equals(exceptionClassName)) {
- error = "用户名/密码错误";
- } else if(exceptionClassName != null) {
- error = "其他错误:" + exceptionClassName;
- }
- model.addAttribute("error", error);
- return "login";
- }
- }
LoginController用于显示登录表单页面,其中shiro authc拦截器进行登录,登录失败的话会把错误存到shiroLoginFailure属性中,在该控制器中获取后来显示相应的错误信息。
- @RequiresPermissions("resource:view")
- @RequestMapping(method = RequestMethod.GET)
- public String list(Model model) {
- model.addAttribute("resourceList", resourceService.findAll());
- return "resource/list";
- }
在控制器方法上使用@RequiresPermissions指定需要的权限信息,其他的都是类似的,请参考源码。
Web层标签库
com.github.zhangkaitao.shiro.chapter16.web.taglib.Functions提供了函数标签实现,有根据编号显示资源/角色/组织机构名称,其定义放在src/main/webapp/tld/zhang-functions.tld。
Web层异常处理器
- @ControllerAdvice
- public class DefaultExceptionHandler {
- @ExceptionHandler({UnauthorizedException.class})
- @ResponseStatus(HttpStatus.UNAUTHORIZED)
- public ModelAndView processUnauthenticatedException(NativeWebRequest request, UnauthorizedException e) {
- ModelAndView mv = new ModelAndView();
- mv.addObject("exception", e);
- mv.setViewName("unauthorized");
- return mv;
- }
- }
如果抛出UnauthorizedException,将被该异常处理器截获来显示没有权限信息。
Spring配置——spring-config.xml
定义了context:component-scan来扫描除web层的组件、dataSource(数据源)、事务管理器及事务切面等;具体请参考配置源码。
Spring配置——spring-config-cache.xml
定义了spring通用cache,使用ehcache实现;具体请参考配置源码。
Spring配置——spring-config-shiro.xml
定义了shiro相关组件。
- <bean id="userRealm" class="com.github.zhangkaitao.shiro.chapter16.realm.UserRealm">
- <property name="credentialsMatcher" ref="credentialsMatcher"/>
- <property name="cachingEnabled" value="false"/>
- </bean>
userRealm组件禁用掉了cache,可以参考https://github.com/zhangkaitao/es/tree/master/web/src/main/java/com/sishuok/es/extra/aop实现自己的cache切面;否则需要在修改如资源/角色等信息时清理掉缓存。
- <bean id="sysUserFilter"
- class="com.github.zhangkaitao.shiro.chapter16.web.shiro.filter.SysUserFilter"/>
sysUserFilter用于根据当前登录用户身份获取User信息放入request;然后就可以通过request获取User。
- <property name="filterChainDefinitions">
- <value>
- /login = authc
- /logout = logout
- /authenticated = authc
- /** = user,sysUser
- </value>
- </property>
如上是shiroFilter的filterChainDefinitions定义。
Spring MVC配置——spring-mvc.xml
定义了spring mvc相关组件。
- <mvc:annotation-driven>
- <mvc:argument-resolvers>
- <bean class="com.github.zhangkaitao.shiro.chapter16
- .web.bind.method.CurrentUserMethodArgumentResolver"/>
- </mvc:argument-resolvers>
- </mvc:annotation-driven>
此处注册了一个@CurrentUser参数解析器。如之前的IndexController,从request获取shiro sysUser拦截器放入的当前登录User对象。
Spring MVC配置——spring-mvc-shiro.xml
定义了spring mvc相关组件。
- <aop:config proxy-target-class="true"></aop:config>
- <bean class="org.apache.shiro.spring.security
- .interceptor.AuthorizationAttributeSourceAdvisor">
- <property name="securityManager" ref="securityManager"/>
- </bean>
定义aop切面,用于代理如@RequiresPermissions注解的控制器,进行权限控制。
web.xml配置文件
定义Spring ROOT上下文加载器、ShiroFilter、及SpringMVC拦截器。具体请参考源码。
JSP页面
- <shiro:hasPermission name="user:create">
- <a href="${pageContext.request.contextPath}/user/create">用户新增</a><br/>
- </shiro:hasPermission>
使用shiro标签进行权限控制。具体请参考源码。
系统截图
访问http://localhost:8080/chapter16/;
首先进入登录页面,输入用户名/密码(默认admin/123456)登录:
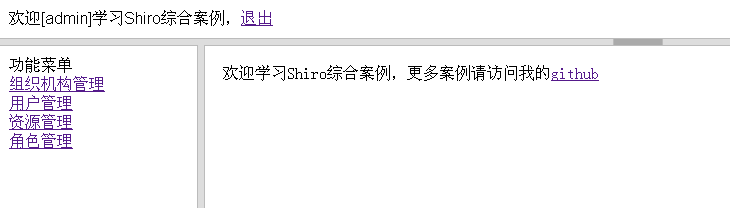
登录成功后到达整个页面主页,并根据当前用户权限显示相应的菜单,此处菜单比较简单,没有树型结构显示
然后就可以进行一些操作,如组织机构维护、用户修改、资源维护、角色授权
第十七章 OAuth2集成——《跟我学Shiro》
目前很多开放平台如新浪微博开放平台都在使用提供开放API接口供开发者使用,随之带来了第三方应用要到开放平台进行授权的问题,OAuth就是干这个的,OAuth2是OAuth协议的下一个版本,相比OAuth1,OAuth2整个授权流程更简单安全了,但不兼容OAuth1,具体可以到OAuth2官网http://oauth.net/2/查看,OAuth2协议规范可以参考http://tools.ietf.org/html/rfc6749。目前有好多参考实现供选择,可以到其官网查看下载。
本文使用Apache Oltu,其之前的名字叫Apache Amber ,是Java版的参考实现。使用文档可参考https://cwiki.apache.org/confluence/display/OLTU/Documentation。
OAuth角色
资源拥有者(resource owner):能授权访问受保护资源的一个实体,可以是一个人,那我们称之为最终用户;如新浪微博用户zhangsan;
资源服务器(resource server):存储受保护资源,客户端通过access token请求资源,资源服务器响应受保护资源给客户端;存储着用户zhangsan的微博等信息。
授权服务器(authorization server):成功验证资源拥有者并获取授权之后,授权服务器颁发授权令牌(Access Token)给客户端。
客户端(client):如新浪微博客户端weico、微格等第三方应用,也可以是它自己的官方应用;其本身不存储资源,而是资源拥有者授权通过后,使用它的授权(授权令牌)访问受保护资源,然后客户端把相应的数据展示出来/提交到服务器。“客户端”术语不代表任何特定实现(如应用运行在一台服务器、桌面、手机或其他设备)。
OAuth2协议流程
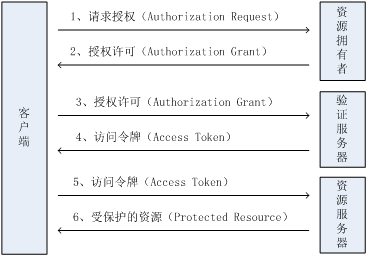
1、客户端从资源拥有者那请求授权。授权请求可以直接发给资源拥有者,或间接的通过授权服务器这种中介,后者更可取。
2、客户端收到一个授权许可,代表资源服务器提供的授权。
3、客户端使用它自己的私有证书及授权许可到授权服务器验证。
4、如果验证成功,则下发一个访问令牌。
5、客户端使用访问令牌向资源服务器请求受保护资源。
6、资源服务器会验证访问令牌的有效性,如果成功则下发受保护资源。
更多流程的解释请参考OAuth2的协议规范http://tools.ietf.org/html/rfc6749。
服务器端
本文把授权服务器和资源服务器整合在一起实现。
POM依赖
此处我们使用apache oltu oauth2服务端实现,需要引入authzserver(授权服务器依赖)和resourceserver(资源服务器依赖)。
- <dependency>
- <groupId>org.apache.oltu.oauth2</groupId>
- <artifactId>org.apache.oltu.oauth2.authzserver</artifactId>
- <version>0.31</version>
- </dependency>
- <dependency>
- <groupId>org.apache.oltu.oauth2</groupId>
- <artifactId>org.apache.oltu.oauth2.resourceserver</artifactId>
- <version>0.31</version>
- </dependency>
其他的请参考pom.xml。
数据字典
用户(oauth2_user)
|
名称 |
类型 |
长度 |
描述 |
|
id |
bigint |
10 |
编号 主键 |
|
username |
varchar |
100 |
用户名 |
|
password |
varchar |
100 |
密码 |
|
salt |
varchar |
50 |
盐 |
客户端(oauth2_client)
|
名称 |
类型 |
长度 |
描述 |
|
id |
bigint |
10 |
编号 主键 |
|
client_name |
varchar |
100 |
客户端名称 |
|
client_id |
varchar |
100 |
客户端id |
|
client_secret |
varchar |
100 |
客户端安全key |
用户表存储着认证/资源服务器的用户信息,即资源拥有者;比如用户名/密码;客户端表存储客户端的的客户端id及客户端安全key;在进行授权时使用。
表及数据SQL
具体请参考
sql/ shiro-schema.sql (表结构)
sql/ shiro-data.sql (初始数据)
默认用户名/密码是admin/123456。
实体
具体请参考com.github.zhangkaitao.shiro.chapter17.entity包下的实体,此处就不列举了。
DAO
具体请参考com.github.zhangkaitao.shiro.chapter17.dao包下的DAO接口及实现。
Service
具体请参考com.github.zhangkaitao.shiro.chapter17.service包下的Service接口及实现。以下是出了基本CRUD之外的关键接口:
- public interface UserService {
- public User createUser(User user);// 创建用户
- public User updateUser(User user);// 更新用户
- public void deleteUser(Long userId);// 删除用户
- public void changePassword(Long userId, String newPassword); //修改密码
- User findOne(Long userId);// 根据id查找用户
- List<User> findAll();// 得到所有用户
- public User findByUsername(String username);// 根据用户名查找用户
- }
- public interface ClientService {
- public Client createClient(Client client);// 创建客户端
- public Client updateClient(Client client);// 更新客户端
- public void deleteClient(Long clientId);// 删除客户端
- Client findOne(Long clientId);// 根据id查找客户端
- List<Client> findAll();// 查找所有
- Client findByClientId(String clientId);// 根据客户端id查找客户端
- Client findByClientSecret(String clientSecret);//根据客户端安全KEY查找客户端
- }
- public interface OAuthService {
- public void addAuthCode(String authCode, String username);// 添加 auth code
- public void addAccessToken(String accessToken, String username); // 添加 access token
- boolean checkAuthCode(String authCode); // 验证auth code是否有效
- boolean checkAccessToken(String accessToken); // 验证access token是否有效
- String getUsernameByAuthCode(String authCode);// 根据auth code获取用户名
- String getUsernameByAccessToken(String accessToken);// 根据access token获取用户名
- long getExpireIn();//auth code / access token 过期时间
- public boolean checkClientId(String clientId);// 检查客户端id是否存在
- public boolean checkClientSecret(String clientSecret);// 坚持客户端安全KEY是否存在
- }
此处通过OAuthService实现进行auth code和access token的维护。
后端数据维护控制器
具体请参考com.github.zhangkaitao.shiro.chapter17.web.controller包下的IndexController、LoginController、UserController和ClientController,其用于维护后端的数据,如用户及客户端数据;即相当于后台管理。
授权控制器AuthorizeController
- @Controller
- public class AuthorizeController {
- @Autowired
- private OAuthService oAuthService;
- @Autowired
- private ClientService clientService;
- @RequestMapping("/authorize")
- public Object authorize(Model model, HttpServletRequest request)
- throws URISyntaxException, OAuthSystemException {
- try {
- //构建OAuth 授权请求
- OAuthAuthzRequest oauthRequest = new OAuthAuthzRequest(request);
- //检查传入的客户端id是否正确
- if (!oAuthService.checkClientId(oauthRequest.getClientId())) {
- OAuthResponse response = OAuthASResponse
- .errorResponse(HttpServletResponse.SC_BAD_REQUEST)
- .setError(OAuthError.TokenResponse.INVALID_CLIENT)
- .setErrorDescription(Constants.INVALID_CLIENT_DESCRIPTION)
- .buildJSONMessage();
- return new ResponseEntity(
- response.getBody(), HttpStatus.valueOf(response.getResponseStatus()));
- }
- Subject subject = SecurityUtils.getSubject();
- //如果用户没有登录,跳转到登陆页面
- if(!subject.isAuthenticated()) {
- if(!login(subject, request)) {//登录失败时跳转到登陆页面
- model.addAttribute("client",
- clientService.findByClientId(oauthRequest.getClientId()));
- return "oauth2login";
- }
- }
- String username = (String)subject.getPrincipal();
- //生成授权码
- String authorizationCode = null;
- //responseType目前仅支持CODE,另外还有TOKEN
- String responseType = oauthRequest.getParam(OAuth.OAUTH_RESPONSE_TYPE);
- if (responseType.equals(ResponseType.CODE.toString())) {
- OAuthIssuerImpl oauthIssuerImpl = new OAuthIssuerImpl(new MD5Generator());
- authorizationCode = oauthIssuerImpl.authorizationCode();
- oAuthService.addAuthCode(authorizationCode, username);
- }
- //进行OAuth响应构建
- OAuthASResponse.OAuthAuthorizationResponseBuilder builder =
- OAuthASResponse.authorizationResponse(request,
- HttpServletResponse.SC_FOUND);
- //设置授权码
- builder.setCode(authorizationCode);
- //得到到客户端重定向地址
- String redirectURI = oauthRequest.getParam(OAuth.OAUTH_REDIRECT_URI);
- //构建响应
- final OAuthResponse response = builder.location(redirectURI).buildQueryMessage();
- //根据OAuthResponse返回ResponseEntity响应
- HttpHeaders headers = new HttpHeaders();
- headers.setLocation(new URI(response.getLocationUri()));
- return new ResponseEntity(headers, HttpStatus.valueOf(response.getResponseStatus()));
- } catch (OAuthProblemException e) {
- //出错处理
- String redirectUri = e.getRedirectUri();
- if (OAuthUtils.isEmpty(redirectUri)) {
- //告诉客户端没有传入redirectUri直接报错
- return new ResponseEntity(
- "OAuth callback url needs to be provided by client!!!", HttpStatus.NOT_FOUND);
- }
- //返回错误消息(如?error=)
- final OAuthResponse response =
- OAuthASResponse.errorResponse(HttpServletResponse.SC_FOUND)
- .error(e).location(redirectUri).buildQueryMessage();
- HttpHeaders headers = new HttpHeaders();
- headers.setLocation(new URI(response.getLocationUri()));
- return new ResponseEntity(headers, HttpStatus.valueOf(response.getResponseStatus()));
- }
- }
- private boolean login(Subject subject, HttpServletRequest request) {
- if("get".equalsIgnoreCase(request.getMethod())) {
- return false;
- }
- String username = request.getParameter("username");
- String password = request.getParameter("password");
- if(StringUtils.isEmpty(username) || StringUtils.isEmpty(password)) {
- return false;
- }
- UsernamePasswordToken token = new UsernamePasswordToken(username, password);
- try {
- subject.login(token);
- return true;
- } catch (Exception e) {
- request.setAttribute("error", "登录失败:" + e.getClass().getName());
- return false;
- }
- }
- }
如上代码的作用:
1、首先通过如http://localhost:8080/chapter17-server/authorize
?client_id=c1ebe466-1cdc-4bd3-ab69-77c3561b9dee&response_type=code&redirect_uri=http://localhost:9080/chapter17-client/oauth2-login访问授权页面;
2、该控制器首先检查clientId是否正确;如果错误将返回相应的错误信息;
3、然后判断用户是否登录了,如果没有登录首先到登录页面登录;
4、登录成功后生成相应的auth code即授权码,然后重定向到客户端地址,如http://localhost:9080/chapter17-client/oauth2-login?code=52b1832f5dff68122f4f00ae995da0ed;在重定向到的地址中会带上code参数(授权码),接着客户端可以根据授权码去换取access token。
访问令牌控制器AccessTokenController
- @RestController
- public class AccessTokenController {
- @Autowired
- private OAuthService oAuthService;
- @Autowired
- private UserService userService;
- @RequestMapping("/accessToken")
- public HttpEntity token(HttpServletRequest request)
- throws URISyntaxException, OAuthSystemException {
- try {
- //构建OAuth请求
- OAuthTokenRequest oauthRequest = new OAuthTokenRequest(request);
- //检查提交的客户端id是否正确
- if (!oAuthService.checkClientId(oauthRequest.getClientId())) {
- OAuthResponse response = OAuthASResponse
- .errorResponse(HttpServletResponse.SC_BAD_REQUEST)
- .setError(OAuthError.TokenResponse.INVALID_CLIENT)
- .setErrorDescription(Constants.INVALID_CLIENT_DESCRIPTION)
- .buildJSONMessage();
- return new ResponseEntity(
- response.getBody(), HttpStatus.valueOf(response.getResponseStatus()));
- }
- // 检查客户端安全KEY是否正确
- if (!oAuthService.checkClientSecret(oauthRequest.getClientSecret())) {
- OAuthResponse response = OAuthASResponse
- .errorResponse(HttpServletResponse.SC_UNAUTHORIZED)
- .setError(OAuthError.TokenResponse.UNAUTHORIZED_CLIENT)
- .setErrorDescription(Constants.INVALID_CLIENT_DESCRIPTION)
- .buildJSONMessage();
- return new ResponseEntity(
- response.getBody(), HttpStatus.valueOf(response.getResponseStatus()));
- }
- String authCode = oauthRequest.getParam(OAuth.OAUTH_CODE);
- // 检查验证类型,此处只检查AUTHORIZATION_CODE类型,其他的还有PASSWORD或REFRESH_TOKEN
- if (oauthRequest.getParam(OAuth.OAUTH_GRANT_TYPE).equals(
- GrantType.AUTHORIZATION_CODE.toString())) {
- if (!oAuthService.checkAuthCode(authCode)) {
- OAuthResponse response = OAuthASResponse
- .errorResponse(HttpServletResponse.SC_BAD_REQUEST)
- .setError(OAuthError.TokenResponse.INVALID_GRANT)
- .setErrorDescription("错误的授权码")
- .buildJSONMessage();
- return new ResponseEntity(
- response.getBody(), HttpStatus.valueOf(response.getResponseStatus()));
- }
- }
- //生成Access Token
- OAuthIssuer oauthIssuerImpl = new OAuthIssuerImpl(new MD5Generator());
- final String accessToken = oauthIssuerImpl.accessToken();
- oAuthService.addAccessToken(accessToken,
- oAuthService.getUsernameByAuthCode(authCode));
- //生成OAuth响应
- OAuthResponse response = OAuthASResponse
- .tokenResponse(HttpServletResponse.SC_OK)
- .setAccessToken(accessToken)
- .setExpiresIn(String.valueOf(oAuthService.getExpireIn()))
- .buildJSONMessage();
- //根据OAuthResponse生成ResponseEntity
- return new ResponseEntity(
- response.getBody(), HttpStatus.valueOf(response.getResponseStatus()));
- } catch (OAuthProblemException e) {
- //构建错误响应
- OAuthResponse res = OAuthASResponse
- .errorResponse(HttpServletResponse.SC_BAD_REQUEST).error(e)
- .buildJSONMessage();
- return new ResponseEntity(res.getBody(), HttpStatus.valueOf(res.getResponseStatus()));
- }
- }
- }
如上代码的作用:
1、首先通过如http://localhost:8080/chapter17-server/accessToken,POST提交如下数据:client_id= c1ebe466-1cdc-4bd3-ab69-77c3561b9dee& client_secret= d8346ea2-6017-43ed-ad68-19c0f971738b&grant_type=authorization_code&code=828beda907066d058584f37bcfd597b6&redirect_uri=http://localhost:9080/chapter17-client/oauth2-login访问;
2、该控制器会验证client_id、client_secret、auth code的正确性,如果错误会返回相应的错误;
3、如果验证通过会生成并返回相应的访问令牌access token。
资源控制器UserInfoController
- @RestController
- public class UserInfoController {
- @Autowired
- private OAuthService oAuthService;
- @RequestMapping("/userInfo")
- public HttpEntity userInfo(HttpServletRequest request) throws OAuthSystemException {
- try {
- //构建OAuth资源请求
- OAuthAccessResourceRequest oauthRequest =
- new OAuthAccessResourceRequest(request, ParameterStyle.QUERY);
- //获取Access Token
- String accessToken = oauthRequest.getAccessToken();
- //验证Access Token
- if (!oAuthService.checkAccessToken(accessToken)) {
- // 如果不存在/过期了,返回未验证错误,需重新验证
- OAuthResponse oauthResponse = OAuthRSResponse
- .errorResponse(HttpServletResponse.SC_UNAUTHORIZED)
- .setRealm(Constants.RESOURCE_SERVER_NAME)
- .setError(OAuthError.ResourceResponse.INVALID_TOKEN)
- .buildHeaderMessage();
- HttpHeaders headers = new HttpHeaders();
- headers.add(OAuth.HeaderType.WWW_AUTHENTICATE,
- oauthResponse.getHeader(OAuth.HeaderType.WWW_AUTHENTICATE));
- return new ResponseEntity(headers, HttpStatus.UNAUTHORIZED);
- }
- //返回用户名
- String username = oAuthService.getUsernameByAccessToken(accessToken);
- return new ResponseEntity(username, HttpStatus.OK);
- } catch (OAuthProblemException e) {
- //检查是否设置了错误码
- String errorCode = e.getError();
- if (OAuthUtils.isEmpty(errorCode)) {
- OAuthResponse oauthResponse = OAuthRSResponse
- .errorResponse(HttpServletResponse.SC_UNAUTHORIZED)
- .setRealm(Constants.RESOURCE_SERVER_NAME)
- .buildHeaderMessage();
- HttpHeaders headers = new HttpHeaders();
- headers.add(OAuth.HeaderType.WWW_AUTHENTICATE,
- oauthResponse.getHeader(OAuth.HeaderType.WWW_AUTHENTICATE));
- return new ResponseEntity(headers, HttpStatus.UNAUTHORIZED);
- }
- OAuthResponse oauthResponse = OAuthRSResponse
- .errorResponse(HttpServletResponse.SC_UNAUTHORIZED)
- .setRealm(Constants.RESOURCE_SERVER_NAME)
- .setError(e.getError())
- .setErrorDescription(e.getDescription())
- .setErrorUri(e.getUri())
- .buildHeaderMessage();
- HttpHeaders headers = new HttpHeaders();
- headers.add(OAuth.HeaderType.WWW_AUTHENTICATE, 、
- oauthResponse.getHeader(OAuth.HeaderType.WWW_AUTHENTICATE));
- return new ResponseEntity(HttpStatus.BAD_REQUEST);
- }
- }
- }
如上代码的作用:
1、首先通过如http://localhost:8080/chapter17-server/userInfo? access_token=828beda907066d058584f37bcfd597b6进行访问;
2、该控制器会验证access token的有效性;如果无效了将返回相应的错误,客户端再重新进行授权;
3、如果有效,则返回当前登录用户的用户名。
Spring配置文件
具体请参考resources/spring*.xml,此处只列举spring-config-shiro.xml中的shiroFilter的filterChainDefinitions属性:
- <property name="filterChainDefinitions">
- <value>
- / = anon
- /login = authc
- /logout = logout
- /authorize=anon
- /accessToken=anon
- /userInfo=anon
- /** = user
- </value>
- </property>
对于oauth2的几个地址/authorize、/accessToken、/userInfo都是匿名可访问的。
其他源码请直接下载文档查看。
服务器维护
访问localhost:8080/chapter17-server/,登录后进行客户端管理和用户管理。
客户端管理就是进行客户端的注册,如新浪微博的第三方应用就需要到新浪微博开发平台进行注册;用户管理就是进行如新浪微博用户的管理。
对于授权服务和资源服务的实现可以参考新浪微博开发平台的实现:
http://open.weibo.com/wiki/授权机制说明
http://open.weibo.com/wiki/微博API
客户端
客户端流程:如果需要登录首先跳到oauth2服务端进行登录授权,成功后服务端返回auth code,然后客户端使用auth code去服务器端换取access token,最好根据access token获取用户信息进行客户端的登录绑定。这个可以参照如很多网站的新浪微博登录功能,或其他的第三方帐号登录功能。
POM依赖
此处我们使用apache oltu oauth2客户端实现。
- <dependency>
- <groupId>org.apache.oltu.oauth2</groupId>
- <artifactId>org.apache.oltu.oauth2.client</artifactId>
- <version>0.31</version>
- </dependency>
其他的请参考pom.xml。
OAuth2Token
类似于UsernamePasswordToken和CasToken;用于存储oauth2服务端返回的auth code。
- public class OAuth2Token implements AuthenticationToken {
- private String authCode;
- private String principal;
- public OAuth2Token(String authCode) {
- this.authCode = authCode;
- }
- //省略getter/setter
- }
OAuth2AuthenticationFilter
该filter的作用类似于FormAuthenticationFilter用于oauth2客户端的身份验证控制;如果当前用户还没有身份验证,首先会判断url中是否有code(服务端返回的auth code),如果没有则重定向到服务端进行登录并授权,然后返回auth code;接着OAuth2AuthenticationFilter会用auth code创建OAuth2Token,然后提交给Subject.login进行登录;接着OAuth2Realm会根据OAuth2Token进行相应的登录逻辑。
- public class OAuth2AuthenticationFilter extends AuthenticatingFilter {
- //oauth2 authc code参数名
- private String authcCodeParam = "code";
- //客户端id
- private String clientId;
- //服务器端登录成功/失败后重定向到的客户端地址
- private String redirectUrl;
- //oauth2服务器响应类型
- private String responseType = "code";
- private String failureUrl;
- //省略setter
- protected AuthenticationToken createToken(ServletRequest request, ServletResponse response) throws Exception {
- HttpServletRequest httpRequest = (HttpServletRequest) request;
- String code = httpRequest.getParameter(authcCodeParam);
- return new OAuth2Token(code);
- }
- protected boolean isAccessAllowed(ServletRequest request, ServletResponse response, Object mappedValue) {
- return false;
- }
- protected boolean onAccessDenied(ServletRequest request, ServletResponse response) throws Exception {
- String error = request.getParameter("error");
- String errorDescription = request.getParameter("error_description");
- if(!StringUtils.isEmpty(error)) {//如果服务端返回了错误
- WebUtils.issueRedirect(request, response, failureUrl + "?error=" + error + "error_description=" + errorDescription);
- return false;
- }
- Subject subject = getSubject(request, response);
- if(!subject.isAuthenticated()) {
- if(StringUtils.isEmpty(request.getParameter(authcCodeParam))) {
- //如果用户没有身份验证,且没有auth code,则重定向到服务端授权
- saveRequestAndRedirectToLogin(request, response);
- return false;
- }
- }
- //执行父类里的登录逻辑,调用Subject.login登录
- return executeLogin(request, response);
- }
- //登录成功后的回调方法 重定向到成功页面
- protected boolean onLoginSuccess(AuthenticationToken token, Subject subject, ServletRequest request, ServletResponse response) throws Exception {
- issueSuccessRedirect(request, response);
- return false;
- }
- //登录失败后的回调
- protected boolean onLoginFailure(AuthenticationToken token, AuthenticationException ae, ServletRequest request,
- ServletResponse response) {
- Subject subject = getSubject(request, response);
- if (subject.isAuthenticated() || subject.isRemembered()) {
- try { //如果身份验证成功了 则也重定向到成功页面
- issueSuccessRedirect(request, response);
- } catch (Exception e) {
- e.printStackTrace();
- }
- } else {
- try { //登录失败时重定向到失败页面
- WebUtils.issueRedirect(request, response, failureUrl);
- } catch (IOException e) {
- e.printStackTrace();
- }
- }
- return false;
- }
- }
该拦截器的作用:
1、首先判断有没有服务端返回的error参数,如果有则直接重定向到失败页面;
2、接着如果用户还没有身份验证,判断是否有auth code参数(即是不是服务端授权之后返回的),如果没有则重定向到服务端进行授权;
3、否则调用executeLogin进行登录,通过auth code创建OAuth2Token提交给Subject进行登录;
4、登录成功将回调onLoginSuccess方法重定向到成功页面;
5、登录失败则回调onLoginFailure重定向到失败页面。
OAuth2Realm
- public class OAuth2Realm extends AuthorizingRealm {
- private String clientId;
- private String clientSecret;
- private String accessTokenUrl;
- private String userInfoUrl;
- private String redirectUrl;
- //省略setter
- public boolean supports(AuthenticationToken token) {
- return token instanceof OAuth2Token; //表示此Realm只支持OAuth2Token类型
- }
- protected AuthorizationInfo doGetAuthorizationInfo(PrincipalCollection principals) {
- SimpleAuthorizationInfo authorizationInfo = new SimpleAuthorizationInfo();
- return authorizationInfo;
- }
- protected AuthenticationInfo doGetAuthenticationInfo(AuthenticationToken token) throws AuthenticationException {
- OAuth2Token oAuth2Token = (OAuth2Token) token;
- String code = oAuth2Token.getAuthCode(); //获取 auth code
- String username = extractUsername(code); // 提取用户名
- SimpleAuthenticationInfo authenticationInfo =
- new SimpleAuthenticationInfo(username, code, getName());
- return authenticationInfo;
- }
- private String extractUsername(String code) {
- try {
- OAuthClient oAuthClient = new OAuthClient(new URLConnectionClient());
- OAuthClientRequest accessTokenRequest = OAuthClientRequest
- .tokenLocation(accessTokenUrl)
- .setGrantType(GrantType.AUTHORIZATION_CODE)
- .setClientId(clientId).setClientSecret(clientSecret)
- .setCode(code).setRedirectURI(redirectUrl)
- .buildQueryMessage();
- //获取access token
- OAuthAccessTokenResponse oAuthResponse =
- oAuthClient.accessToken(accessTokenRequest, OAuth.HttpMethod.POST);
- String accessToken = oAuthResponse.getAccessToken();
- Long expiresIn = oAuthResponse.getExpiresIn();
- //获取user info
- OAuthClientRequest userInfoRequest =
- new OAuthBearerClientRequest(userInfoUrl)
- .setAccessToken(accessToken).buildQueryMessage();
- OAuthResourceResponse resourceResponse = oAuthClient.resource(
- userInfoRequest, OAuth.HttpMethod.GET, OAuthResourceResponse.class);
- String username = resourceResponse.getBody();
- return username;
- } catch (Exception e) {
- throw new OAuth2AuthenticationException(e);
- }
- }
- }
此Realm首先只支持OAuth2Token类型的Token;然后通过传入的auth code去换取access token;再根据access token去获取用户信息(用户名),然后根据此信息创建AuthenticationInfo;如果需要AuthorizationInfo信息,可以根据此处获取的用户名再根据自己的业务规则去获取。
Spring shiro配置(spring-config-shiro.xml)
- <bean id="oAuth2Realm"
- class="com.github.zhangkaitao.shiro.chapter18.oauth2.OAuth2Realm">
- <property name="cachingEnabled" value="true"/>
- <property name="authenticationCachingEnabled" value="true"/>
- <property name="authenticationCacheName" value="authenticationCache"/>
- <property name="authorizationCachingEnabled" value="true"/>
- <property name="authorizationCacheName" value="authorizationCache"/>
- <property name="clientId" value="c1ebe466-1cdc-4bd3-ab69-77c3561b9dee"/>
- <property name="clientSecret" value="d8346ea2-6017-43ed-ad68-19c0f971738b"/>
- <property name="accessTokenUrl"
- value="http://localhost:8080/chapter17-server/accessToken"/>
- <property name="userInfoUrl" value="http://localhost:8080/chapter17-server/userInfo"/>
- <property name="redirectUrl" value="http://localhost:9080/chapter17-client/oauth2-login"/>
- </bean>
此OAuth2Realm需要配置在服务端申请的clientId和clientSecret;及用于根据auth code换取access token的accessTokenUrl地址;及用于根据access token换取用户信息(受保护资源)的userInfoUrl地址。
- <bean id="oAuth2AuthenticationFilter"
- class="com.github.zhangkaitao.shiro.chapter18.oauth2.OAuth2AuthenticationFilter">
- <property name="authcCodeParam" value="code"/>
- <property name="failureUrl" value="/oauth2Failure.jsp"/>
- </bean>
此OAuth2AuthenticationFilter用于拦截服务端重定向回来的auth code。
- <bean id="shiroFilter" class="org.apache.shiro.spring.web.ShiroFilterFactoryBean">
- <property name="securityManager" ref="securityManager"/>
- <property name="loginUrl" value="http://localhost:8080/chapter17-server/authorize?client_id=c1ebe466-1cdc-4bd3-ab69-77c3561b9dee&response_type=code&redirect_uri=http://localhost:9080/chapter17-client/oauth2-login"/>
- <property name="successUrl" value="/"/>
- <property name="filters">
- <util:map>
- <entry key="oauth2Authc" value-ref="oAuth2AuthenticationFilter"/>
- </util:map>
- </property>
- <property name="filterChainDefinitions">
- <value>
- / = anon
- /oauth2Failure.jsp = anon
- /oauth2-login = oauth2Authc
- /logout = logout
- /** = user
- </value>
- </property>
- </bean>
此处设置loginUrl为http://localhost:8080/chapter17-server/authorize
?client_id=c1ebe466-1cdc-4bd3-ab69-77c3561b9dee&response_type=code&redirect_uri=http://localhost:9080/chapter17-client/oauth2-login";其会自动设置到所有的AccessControlFilter,如oAuth2AuthenticationFilter;另外/oauth2-login = oauth2Authc表示/oauth2-login地址使用oauth2Authc拦截器拦截并进行oauth2客户端授权。
测试
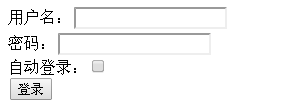
1、首先访问http://localhost:9080/chapter17-client/,然后点击登录按钮进行登录,会跳到如下页面:
2、输入用户名进行登录并授权;
3、如果登录成功,服务端会重定向到客户端,即之前客户端提供的地址http://localhost:9080/chapter17-client/oauth2-login?code=473d56015bcf576f2ca03eac1a5bcc11,并带着auth code过去;
4、客户端的OAuth2AuthenticationFilter会收集此auth code,并创建OAuth2Token提交给Subject进行客户端登录;
5、客户端的Subject会委托给OAuth2Realm进行身份验证;此时OAuth2Realm会根据auth code换取access token,再根据access token获取受保护的用户信息;然后进行客户端登录。
到此OAuth2的集成就完成了,此处的服务端和客户端相对比较简单,没有进行一些异常检测,请参考如新浪微博进行相应API及异常错误码的设计。
第十八章 并发登录人数控制——《跟我学Shiro》
在某些项目中可能会遇到如每个账户同时只能有一个人登录或几个人同时登录,如果同时有多人登录:要么不让后者登录;要么踢出前者登录(强制退出)。比如spring security就直接提供了相应的功能;Shiro的话没有提供默认实现,不过可以很容易的在Shiro中加入这个功能。
示例代码基于《第十六章 综合实例》完成,通过Shiro Filter机制扩展KickoutSessionControlFilter完成。
首先来看看如何配置使用(spring-config-shiro.xml)
kickoutSessionControlFilter用于控制并发登录人数的
- <bean id="kickoutSessionControlFilter"
- class="com.github.zhangkaitao.shiro.chapter18.web.shiro.filter.KickoutSessionControlFilter">
- <property name="cacheManager" ref="cacheManager"/>
- <property name="sessionManager" ref="sessionManager"/>
- <property name="kickoutAfter" value="false"/>
- <property name="maxSession" value="2"/>
- <property name="kickoutUrl" value="/login?kickout=1"/>
- </bean>
cacheManager:使用cacheManager获取相应的cache来缓存用户登录的会话;用于保存用户—会话之间的关系的;
sessionManager:用于根据会话ID,获取会话进行踢出操作的;
kickoutAfter:是否踢出后来登录的,默认是false;即后者登录的用户踢出前者登录的用户;
maxSession:同一个用户最大的会话数,默认1;比如2的意思是同一个用户允许最多同时两个人登录;
kickoutUrl:被踢出后重定向到的地址;
shiroFilter配置
- <bean id="shiroFilter" class="org.apache.shiro.spring.web.ShiroFilterFactoryBean">
- <property name="securityManager" ref="securityManager"/>
- <property name="loginUrl" value="/login"/>
- <property name="filters">
- <util:map>
- <entry key="authc" value-ref="formAuthenticationFilter"/>
- <entry key="sysUser" value-ref="sysUserFilter"/>
- <entry key="kickout" value-ref="kickoutSessionControlFilter"/>
- </util:map>
- </property>
- <property name="filterChainDefinitions">
- <value>
- /login = authc
- /logout = logout
- /authenticated = authc
- /** = kickout,user,sysUser
- </value>
- </property>
- </bean>
此处配置除了登录等之外的地址都走kickout拦截器进行并发登录控制。
测试
此处因为maxSession=2,所以需要打开3个浏览器(需要不同的浏览器,如IE、Chrome、Firefox),分别访问http://localhost:8080/chapter18/进行登录;然后刷新第一次打开的浏览器,将会被强制退出,如显示下图:
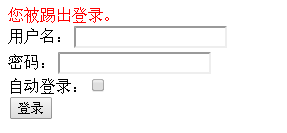
KickoutSessionControlFilter核心代码:
- protected boolean onAccessDenied(ServletRequest request, ServletResponse response) throws Exception {
- Subject subject = getSubject(request, response);
- if(!subject.isAuthenticated() && !subject.isRemembered()) {
- //如果没有登录,直接进行之后的流程
- return true;
- }
- Session session = subject.getSession();
- String username = (String) subject.getPrincipal();
- Serializable sessionId = session.getId();
- //TODO 同步控制
- Deque<Serializable> deque = cache.get(username);
- if(deque == null) {
- deque = new LinkedList<Serializable>();
- cache.put(username, deque);
- }
- //如果队列里没有此sessionId,且用户没有被踢出;放入队列
- if(!deque.contains(sessionId) && session.getAttribute("kickout") == null) {
- deque.push(sessionId);
- }
- //如果队列里的sessionId数超出最大会话数,开始踢人
- while(deque.size() > maxSession) {
- Serializable kickoutSessionId = null;
- if(kickoutAfter) { //如果踢出后者
- kickoutSessionId = deque.removeFirst();
- } else { //否则踢出前者
- kickoutSessionId = deque.removeLast();
- }
- try {
- Session kickoutSession =
- sessionManager.getSession(new DefaultSessionKey(kickoutSessionId));
- if(kickoutSession != null) {
- //设置会话的kickout属性表示踢出了
- kickoutSession.setAttribute("kickout", true);
- }
- } catch (Exception e) {//ignore exception
- }
- }
- //如果被踢出了,直接退出,重定向到踢出后的地址
- if (session.getAttribute("kickout") != null) {
- //会话被踢出了
- try {
- subject.logout();
- } catch (Exception e) { //ignore
- }
- saveRequest(request);
- WebUtils.issueRedirect(request, response, kickoutUrl);
- return false;
- }
- return true;
- }
此处使用了Cache缓存用户名—会话id之间的关系;如果量比较大可以考虑如持久化到数据库/其他带持久化的Cache中;另外此处没有并发控制的同步实现,可以考虑根据用户名获取锁来控制,减少锁的粒度。
第十九章 动态URL权限控制——《跟我学Shiro》
用过Spring Security的朋友应该比较熟悉对URL进行全局的权限控制,即访问URL时进行权限匹配;如果没有权限直接跳到相应的错误页面。Shiro也支持类似的机制,不过需要稍微改造下来满足实际需求。不过在Shiro中,更多的是通过AOP进行分散的权限控制,即方法级别的;而通过URL进行权限控制是一种集中的权限控制。本章将介绍如何在Shiro中完成动态URL权限控制。
本章代码基于《第十六章 综合实例》,请先了解相关数据模型及基本流程后再学习本章。
表及数据SQL
请运行shiro-example-chapter19/sql/ shiro-schema.sql 表结构
请运行shiro-example-chapter19/sql/ shiro-schema.sql 数据
实体
具体请参考com.github.zhangkaitao.shiro.chapter19包下的实体。
- public class UrlFilter implements Serializable {
- private Long id;
- private String name; //url名称/描述
- private String url; //地址
- private String roles; //所需要的角色,可省略
- private String permissions; //所需要的权限,可省略
- }
表示拦截的URL和角色/权限之间的关系,多个角色/权限之间通过逗号分隔,此处还可以扩展其他的关系,另外可以加如available属性表示是否开启该拦截。
DAO
具体请参考com.github.zhangkaitao.shiro.chapter19.dao包下的DAO接口及实现。
Service
具体请参考com.github.zhangkaitao.shiro.chapter19.service包下的Service接口及实现。
- public interface UrlFilterService {
- public UrlFilter createUrlFilter(UrlFilter urlFilter);
- public UrlFilter updateUrlFilter(UrlFilter urlFilter);
- public void deleteUrlFilter(Long urlFilterId);
- public UrlFilter findOne(Long urlFilterId);
- public List<UrlFilter> findAll();
- }
基本的URL拦截的增删改查实现。
- @Service
- public class UrlFilterServiceImpl implements UrlFilterService {
- @Autowired
- private ShiroFilerChainManager shiroFilerChainManager;
- @Override
- public UrlFilter createUrlFilter(UrlFilter urlFilter) {
- urlFilterDao.createUrlFilter(urlFilter);
- initFilterChain();
- return urlFilter;
- }
- //其他方法请参考源码
- @PostConstruct
- public void initFilterChain() {
- shiroFilerChainManager.initFilterChains(findAll());
- }
- }
UrlFilterServiceImpl在进行新增、修改、删除时会调用initFilterChain来重新初始化Shiro的URL拦截器链,即同步数据库中的URL拦截器定义到Shiro中。此处也要注意如果直接修改数据库是不会起作用的,因为只要调用这几个Service方法时才同步。另外当容器启动时会自动回调initFilterChain来完成容器启动后的URL拦截器的注册。
ShiroFilerChainManager
- @Service
- public class ShiroFilerChainManager {
- @Autowired private DefaultFilterChainManager filterChainManager;
- private Map<String, NamedFilterList> defaultFilterChains;
- @PostConstruct
- public void init() {
- defaultFilterChains =
- new HashMap<String, NamedFilterList>(filterChainManager.getFilterChains());
- }
- public void initFilterChains(List<UrlFilter> urlFilters) {
- //1、首先删除以前老的filter chain并注册默认的
- filterChainManager.getFilterChains().clear();
- if(defaultFilterChains != null) {
- filterChainManager.getFilterChains().putAll(defaultFilterChains);
- }
- //2、循环URL Filter 注册filter chain
- for (UrlFilter urlFilter : urlFilters) {
- String url = urlFilter.getUrl();
- //注册roles filter
- if (!StringUtils.isEmpty(urlFilter.getRoles())) {
- filterChainManager.addToChain(url, "roles", urlFilter.getRoles());
- }
- //注册perms filter
- if (!StringUtils.isEmpty(urlFilter.getPermissions())) {
- filterChainManager.addToChain(url, "perms", urlFilter.getPermissions());
- }
- }
- }
- }
1、init:Spring容器启动时会调用init方法把在spring配置文件中配置的默认拦截器保存下来,之后会自动与数据库中的配置进行合并。
2、initFilterChains:UrlFilterServiceImpl会在Spring容器启动或进行增删改UrlFilter时进行注册URL拦截器到Shiro。
拦截器及拦截器链知识请参考《第八章 拦截器机制》,此处再介绍下Shiro拦截器的流程:
AbstractShiroFilter //如ShiroFilter/ SpringShiroFilter都继承该Filter
doFilter //Filter的doFilter
doFilterInternal //转调doFilterInternal
executeChain(request, response, chain) //执行拦截器链
FilterChain chain = getExecutionChain(request, response, origChain) //使用原始拦截器链获取新的拦截器链
chain.doFilter(request, response) //执行新组装的拦截器链
getExecutionChain(request, response, origChain) //获取拦截器链流程
FilterChainResolver resolver = getFilterChainResolver(); //获取相应的FilterChainResolver
FilterChain resolved = resolver.getChain(request, response, origChain); //通过FilterChainResolver根据当前请求解析到新的FilterChain拦截器链
默认情况下如使用ShiroFilterFactoryBean创建shiroFilter时,默认使用PathMatchingFilterChainResolver进行解析,而它默认是根据当前请求的URL获取相应的拦截器链,使用Ant模式进行URL匹配;默认使用DefaultFilterChainManager进行拦截器链的管理。
PathMatchingFilterChainResolver默认流程:
- public FilterChain getChain(ServletRequest request, ServletResponse response, FilterChain originalChain) {
- //1、首先获取拦截器链管理器
- FilterChainManager filterChainManager = getFilterChainManager();
- if (!filterChainManager.hasChains()) {
- return null;
- }
- //2、接着获取当前请求的URL(不带上下文)
- String requestURI = getPathWithinApplication(request);
- //3、循环拦截器管理器中的拦截器定义(拦截器链的名字就是URL模式)
- for (String pathPattern : filterChainManager.getChainNames()) {
- //4、如当前URL匹配拦截器名字(URL模式)
- if (pathMatches(pathPattern, requestURI)) {
- //5、返回该URL模式定义的拦截器链
- return filterChainManager.proxy(originalChain, pathPattern);
- }
- }
- return null;
- }
默认实现有点小问题:
如果多个拦截器链都匹配了当前请求URL,那么只返回第一个找到的拦截器链;后续我们可以修改此处的代码,将多个匹配的拦截器链合并返回。
DefaultFilterChainManager内部使用Map来管理URL模式-拦截器链的关系;也就是说相同的URL模式只能定义一个拦截器链,不能重复定义;而且如果多个拦截器链都匹配时是无序的(因为使用map.keySet()获取拦截器链的名字,即URL模式)。
FilterChainManager接口:
- public interface FilterChainManager {
- Map<String, Filter> getFilters(); //得到注册的拦截器
- void addFilter(String name, Filter filter); //注册拦截器
- void addFilter(String name, Filter filter, boolean init); //注册拦截器
- void createChain(String chainName, String chainDefinition); //根据拦截器链定义创建拦截器链
- void addToChain(String chainName, String filterName); //添加拦截器到指定的拦截器链
- void addToChain(String chainName, String filterName, String chainSpecificFilterConfig) throws ConfigurationException; //添加拦截器(带有配置的)到指定的拦截器链
- NamedFilterList getChain(String chainName); //获取拦截器链
- boolean hasChains(); //是否有拦截器链
- Set<String> getChainNames(); //得到所有拦截器链的名字
- FilterChain proxy(FilterChain original, String chainName); //使用指定的拦截器链代理原始拦截器链
- }
此接口主要三个功能:注册拦截器,注册拦截器链,对原始拦截器链生成代理之后的拦截器链,比如
- <bean id="shiroFilter" class="org.apache.shiro.spring.web.ShiroFilterFactoryBean">
- ……
- <property name="filters">
- <util:map>
- <entry key="authc" value-ref="formAuthenticationFilter"/>
- <entry key="sysUser" value-ref="sysUserFilter"/>
- </util:map>
- </property>
- <property name="filterChainDefinitions">
- <value>
- /login = authc
- /logout = logout
- /authenticated = authc
- /** = user,sysUser
- </value>
- </property>
- </bean>
filters属性定义了拦截器;filterChainDefinitions定义了拦截器链;如/**就是拦截器链的名字;而user,sysUser就是拦截器名字列表。
之前说过默认的PathMatchingFilterChainResolver和DefaultFilterChainManager不能满足我们的需求,我们稍微扩展了一下:
CustomPathMatchingFilterChainResolver
- public class CustomPathMatchingFilterChainResolver
- extends PathMatchingFilterChainResolver {
- private CustomDefaultFilterChainManager customDefaultFilterChainManager;
- public void setCustomDefaultFilterChainManager(
- CustomDefaultFilterChainManager customDefaultFilterChainManager) {
- this.customDefaultFilterChainManager = customDefaultFilterChainManager;
- setFilterChainManager(customDefaultFilterChainManager);
- }
- public FilterChain getChain(ServletRequest request, ServletResponse response, FilterChain originalChain) {
- FilterChainManager filterChainManager = getFilterChainManager();
- if (!filterChainManager.hasChains()) {
- return null;
- }
- String requestURI = getPathWithinApplication(request);
- List<String> chainNames = new ArrayList<String>();
- for (String pathPattern : filterChainManager.getChainNames()) {
- if (pathMatches(pathPattern, requestURI)) {
- chainNames.add(pathPattern);
- }
- }
- if(chainNames.size() == 0) {
- return null;
- }
- return customDefaultFilterChainManager.proxy(originalChain, chainNames);
- }
- }
和默认的PathMatchingFilterChainResolver区别是,此处得到所有匹配的拦截器链,然后通过调用CustomDefaultFilterChainManager.proxy(originalChain, chainNames)进行合并后代理。
CustomDefaultFilterChainManager
- public class CustomDefaultFilterChainManager extends DefaultFilterChainManager {
- private Map<String, String> filterChainDefinitionMap = null;
- private String loginUrl;
- private String successUrl;
- private String unauthorizedUrl;
- public CustomDefaultFilterChainManager() {
- setFilters(new LinkedHashMap<String, Filter>());
- setFilterChains(new LinkedHashMap<String, NamedFilterList>());
- addDefaultFilters(true);
- }
- public Map<String, String> getFilterChainDefinitionMap() {
- return filterChainDefinitionMap;
- }
- public void setFilterChainDefinitionMap(Map<String, String> filterChainDefinitionMap) {
- this.filterChainDefinitionMap = filterChainDefinitionMap;
- }
- public void setCustomFilters(Map<String, Filter> customFilters) {
- for(Map.Entry<String, Filter> entry : customFilters.entrySet()) {
- addFilter(entry.getKey(), entry.getValue(), false);
- }
- }
- public void setDefaultFilterChainDefinitions(String definitions) {
- Ini ini = new Ini();
- ini.load(definitions);
- Ini.Section section = ini.getSection(IniFilterChainResolverFactory.URLS);
- if (CollectionUtils.isEmpty(section)) {
- section = ini.getSection(Ini.DEFAULT_SECTION_NAME);
- }
- setFilterChainDefinitionMap(section);
- }
- public String getLoginUrl() {
- return loginUrl;
- }
- public void setLoginUrl(String loginUrl) {
- this.loginUrl = loginUrl;
- }
- public String getSuccessUrl() {
- return successUrl;
- }
- public void setSuccessUrl(String successUrl) {
- this.successUrl = successUrl;
- }
- public String getUnauthorizedUrl() {
- return unauthorizedUrl;
- }
- public void setUnauthorizedUrl(String unauthorizedUrl) {
- this.unauthorizedUrl = unauthorizedUrl;
- }
- @PostConstruct
- public void init() {
- Map<String, Filter> filters = getFilters();
- if (!CollectionUtils.isEmpty(filters)) {
- for (Map.Entry<String, Filter> entry : filters.entrySet()) {
- String name = entry.getKey();
- Filter filter = entry.getValue();
- applyGlobalPropertiesIfNecessary(filter);
- if (filter instanceof Nameable) {
- ((Nameable) filter).setName(name);
- }
- addFilter(name, filter, false);
- }
- }
- Map<String, String> chains = getFilterChainDefinitionMap();
- if (!CollectionUtils.isEmpty(chains)) {
- for (Map.Entry<String, String> entry : chains.entrySet()) {
- String url = entry.getKey();
- String chainDefinition = entry.getValue();
- createChain(url, chainDefinition);
- }
- }
- }
- protected void initFilter(Filter filter) {
- //ignore
- }
- public FilterChain proxy(FilterChain original, List<String> chainNames) {
- NamedFilterList configured = new SimpleNamedFilterList(chainNames.toString());
- for(String chainName : chainNames) {
- configured.addAll(getChain(chainName));
- }
- return configured.proxy(original);
- }
- private void applyGlobalPropertiesIfNecessary(Filter filter) {
- applyLoginUrlIfNecessary(filter);
- applySuccessUrlIfNecessary(filter);
- applyUnauthorizedUrlIfNecessary(filter);
- }
- private void applyLoginUrlIfNecessary(Filter filter) {
- //请参考源码
- }
- private void applySuccessUrlIfNecessary(Filter filter) {
- //请参考源码
- }
- private void applyUnauthorizedUrlIfNecessary(Filter filter) {
- //请参考源码
- }
- }
1、CustomDefaultFilterChainManager:调用其构造器时,会自动注册默认的拦截器;
2、loginUrl、successUrl、unauthorizedUrl:分别对应登录地址、登录成功后默认跳转地址、未授权跳转地址,用于给相应拦截器的;
3、filterChainDefinitionMap:用于存储如ShiroFilterFactoryBean在配置文件中配置的拦截器链定义,即可以认为是默认的静态拦截器链;会自动与数据库中加载的合并;
4、setDefaultFilterChainDefinitions:解析配置文件中传入的字符串拦截器链配置,解析为相应的拦截器链;
5、setCustomFilters:注册我们自定义的拦截器;如ShiroFilterFactoryBean的filters属性;
6、init:初始化方法,Spring容器启动时会调用,首先其会自动给相应的拦截器设置如loginUrl、successUrl、unauthorizedUrl;其次根据filterChainDefinitionMap构建默认的拦截器链;
7、initFilter:此处我们忽略实现initFilter,因为交给spring管理了,所以Filter的相关配置会在Spring配置中完成;
8、proxy:组合多个拦截器链为一个生成一个新的FilterChain代理。
Web层控制器
请参考com.github.zhangkaitao.shiro.chapter19.web.controller包,相对于第十六章添加了UrlFilterController用于UrlFilter的维护。另外,移除了控制器方法上的权限注解,而是使用动态URL拦截进行控制。
Spring配置——spring-config-shiro.xml
- <bean id="filterChainManager"
- class="com.github.zhangkaitao.shiro.spring.CustomDefaultFilterChainManager">
- <property name="loginUrl" value="/login"/>
- <property name="successUrl" value="/"/>
- <property name="unauthorizedUrl" value="/unauthorized.jsp"/>
- <property name="customFilters">
- <util:map>
- <entry key="authc" value-ref="formAuthenticationFilter"/>
- <entry key="sysUser" value-ref="sysUserFilter"/>
- </util:map>
- </property>
- <property name="defaultFilterChainDefinitions">
- <value>
- /login = authc
- /logout = logout
- /unauthorized.jsp = authc
- /** = user,sysUser
- </value>
- </property>
- </bean>
filterChainManager是我们自定义的CustomDefaultFilterChainManager,注册相应的拦截器及默认的拦截器链。
- <bean id="filterChainResolver"
- class="com.github.zhangkaitao.shiro.spring.CustomPathMatchingFilterChainResolver">
- <property name="customDefaultFilterChainManager" ref="filterChainManager"/>
- </bean>
filterChainResolver是自定义的CustomPathMatchingFilterChainResolver,使用上边的filterChainManager进行拦截器链的管理。
- <bean id="shiroFilter" class="org.apache.shiro.spring.web.ShiroFilterFactoryBean">
- <property name="securityManager" ref="securityManager"/>
- </bean>
shiroFilter不再定义filters及filterChainDefinitions,而是交给了filterChainManager进行完成。
- <bean class="org.springframework.beans.factory.config.MethodInvokingFactoryBean">
- <property name="targetObject" ref="shiroFilter"/>
- <property name="targetMethod" value="setFilterChainResolver"/>
- <property name="arguments" ref="filterChainResolver"/>
- </bean>
最后把filterChainResolver注册给shiroFilter,其使用它进行动态URL权限控制。
其他配置和第十六章一样,请参考第十六章。
测试
1、首先执行shiro-data.sql初始化数据。
2、然后再URL管理中新增如下数据:
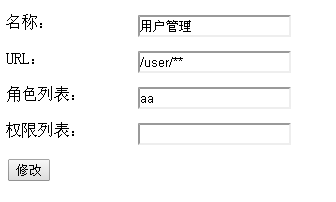
3、访问http://localhost:8080/chapter19/user时要求用户拥有aa角色,此时是没有的所以会跳转到未授权页面;
4、添加aa角色然后授权给用户,此时就有权限访问http://localhost:8080/chapter19/user。
实际项目可以在此基础上进行扩展。
第二十章 无状态Web应用集成——《跟我学Shiro》
在一些环境中,可能需要把Web应用做成无状态的,即服务器端无状态,就是说服务器端不会存储像会话这种东西,而是每次请求时带上相应的用户名进行登录。如一些REST风格的API,如果不使用OAuth2协议,就可以使用如REST+HMAC认证进行访问。HMAC(Hash-based Message Authentication Code):基于散列的消息认证码,使用一个密钥和一个消息作为输入,生成它们的消息摘要。注意该密钥只有客户端和服务端知道,其他第三方是不知道的。访问时使用该消息摘要进行传播,服务端然后对该消息摘要进行验证。如果只传递用户名+密码的消息摘要,一旦被别人捕获可能会重复使用该摘要进行认证。解决办法如:
1、每次客户端申请一个Token,然后使用该Token进行加密,而该Token是一次性的,即只能用一次;有点类似于OAuth2的Token机制,但是简单些;
2、客户端每次生成一个唯一的Token,然后使用该Token加密,这样服务器端记录下这些Token,如果之前用过就认为是非法请求。
为了简单,本文直接对请求的数据(即全部请求的参数)生成消息摘要,即无法篡改数据,但是可能被别人窃取而能多次调用。解决办法如上所示。
服务器端
对于服务器端,不生成会话,而是每次请求时带上用户身份进行认证。
服务控制器
- @RestController
- public class ServiceController {
- @RequestMapping("/hello")
- public String hello1(String[] param1, String param2) {
- return "hello" + param1[0] + param1[1] + param2;
- }
- }
当访问/hello服务时,需要传入param1、param2两个请求参数。
加密工具类
com.github.zhangkaitao.shiro.chapter20.codec.HmacSHA256Utils:
- //使用指定的密码对内容生成消息摘要(散列值)
- public static String digest(String key, String content);
- //使用指定的密码对整个Map的内容生成消息摘要(散列值)
- public static String digest(String key, Map<String, ?> map)
对Map生成消息摘要主要用于对客户端/服务器端来回传递的参数生成消息摘要。
Subject工厂
- public class StatelessDefaultSubjectFactory extends DefaultWebSubjectFactory {
- public Subject createSubject(SubjectContext context) {
- //不创建session
- context.setSessionCreationEnabled(false);
- return super.createSubject(context);
- }
- }
通过调用context.setSessionCreationEnabled(false)表示不创建会话;如果之后调用Subject.getSession()将抛出DisabledSessionException异常。
StatelessAuthcFilter
类似于FormAuthenticationFilter,但是根据当前请求上下文信息每次请求时都要登录的认证过滤器。
- public class StatelessAuthcFilter extends AccessControlFilter {
- protected boolean isAccessAllowed(ServletRequest request, ServletResponse response, Object mappedValue) throws Exception {
- return false;
- }
- protected boolean onAccessDenied(ServletRequest request, ServletResponse response) throws Exception {
- //1、客户端生成的消息摘要
- String clientDigest = request.getParameter(Constants.PARAM_DIGEST);
- //2、客户端传入的用户身份
- String username = request.getParameter(Constants.PARAM_USERNAME);
- //3、客户端请求的参数列表
- Map<String, String[]> params =
- new HashMap<String, String[]>(request.getParameterMap());
- params.remove(Constants.PARAM_DIGEST);
- //4、生成无状态Token
- StatelessToken token = new StatelessToken(username, params, clientDigest);
- try {
- //5、委托给Realm进行登录
- getSubject(request, response).login(token);
- } catch (Exception e) {
- e.printStackTrace();
- onLoginFail(response); //6、登录失败
- return false;
- }
- return true;
- }
- //登录失败时默认返回401状态码
- private void onLoginFail(ServletResponse response) throws IOException {
- HttpServletResponse httpResponse = (HttpServletResponse) response;
- httpResponse.setStatus(HttpServletResponse.SC_UNAUTHORIZED);
- httpResponse.getWriter().write("login error");
- }
- }
获取客户端传入的用户名、请求参数、消息摘要,生成StatelessToken;然后交给相应的Realm进行认证。
StatelessToken
- public class StatelessToken implements AuthenticationToken {
- private String username;
- private Map<String, ?> params;
- private String clientDigest;
- //省略部分代码
- public Object getPrincipal() { return username;}
- public Object getCredentials() { return clientDigest;}
- }
用户身份即用户名;凭证即客户端传入的消息摘要。
StatelessRealm
用于认证的Realm。
- public class StatelessRealm extends AuthorizingRealm {
- public boolean supports(AuthenticationToken token) {
- //仅支持StatelessToken类型的Token
- return token instanceof StatelessToken;
- }
- protected AuthorizationInfo doGetAuthorizationInfo(PrincipalCollection principals) {
- //根据用户名查找角色,请根据需求实现
- String username = (String) principals.getPrimaryPrincipal();
- SimpleAuthorizationInfo authorizationInfo = new SimpleAuthorizationInfo();
- authorizationInfo.addRole("admin");
- return authorizationInfo;
- }
- protected AuthenticationInfo doGetAuthenticationInfo(AuthenticationToken token) throws AuthenticationException {
- StatelessToken statelessToken = (StatelessToken) token;
- String username = statelessToken.getUsername();
- String key = getKey(username);//根据用户名获取密钥(和客户端的一样)
- //在服务器端生成客户端参数消息摘要
- String serverDigest = HmacSHA256Utils.digest(key, statelessToken.getParams());
- //然后进行客户端消息摘要和服务器端消息摘要的匹配
- return new SimpleAuthenticationInfo(
- username,
- serverDigest,
- getName());
- }
- private String getKey(String username) {//得到密钥,此处硬编码一个
- if("admin".equals(username)) {
- return "dadadswdewq2ewdwqdwadsadasd";
- }
- return null;
- }
- }
此处首先根据客户端传入的用户名获取相应的密钥,然后使用密钥对请求参数生成服务器端的消息摘要;然后与客户端的消息摘要进行匹配;如果匹配说明是合法客户端传入的;否则是非法的。这种方式是有漏洞的,一旦别人获取到该请求,可以重复请求;可以考虑之前介绍的解决方案。
Spring配置——spring-config-shiro.xml
- <!-- Realm实现 -->
- <bean id="statelessRealm"
- class="com.github.zhangkaitao.shiro.chapter20.realm.StatelessRealm">
- <property name="cachingEnabled" value="false"/>
- </bean>
- <!-- Subject工厂 -->
- <bean id="subjectFactory"
- class="com.github.zhangkaitao.shiro.chapter20.mgt.StatelessDefaultSubjectFactory"/>
- <!-- 会话管理器 -->
- <bean id="sessionManager" class="org.apache.shiro.session.mgt.DefaultSessionManager">
- <property name="sessionValidationSchedulerEnabled" value="false"/>
- </bean>
- <!-- 安全管理器 -->
- <bean id="securityManager" class="org.apache.shiro.web.mgt.DefaultWebSecurityManager">
- <property name="realm" ref="statelessRealm"/>
- <property name="subjectDAO.sessionStorageEvaluator.sessionStorageEnabled"
- value="false"/>
- <property name="subjectFactory" ref="subjectFactory"/>
- <property name="sessionManager" ref="sessionManager"/>
- </bean>
- <!-- 相当于调用SecurityUtils.setSecurityManager(securityManager) -->
- <bean class="org.springframework.beans.factory.config.MethodInvokingFactoryBean">
- <property name="staticMethod"
- value="org.apache.shiro.SecurityUtils.setSecurityManager"/>
- <property name="arguments" ref="securityManager"/>
- </bean>
sessionManager通过sessionValidationSchedulerEnabled禁用掉会话调度器,因为我们禁用掉了会话,所以没必要再定期过期会话了。
- <bean id="statelessAuthcFilter"
- class="com.github.zhangkaitao.shiro.chapter20.filter.StatelessAuthcFilter"/>
每次请求进行认证的拦截器。
- <!-- Shiro的Web过滤器 -->
- <bean id="shiroFilter" class="org.apache.shiro.spring.web.ShiroFilterFactoryBean">
- <property name="securityManager" ref="securityManager"/>
- <property name="filters">
- <util:map>
- <entry key="statelessAuthc" value-ref="statelessAuthcFilter"/>
- </util:map>
- </property>
- <property name="filterChainDefinitions">
- <value>
- /**=statelessAuthc
- </value>
- </property>
- </bean>
所有请求都将走statelessAuthc拦截器进行认证。
其他配置请参考源代码。
SpringMVC学习请参考:
5分钟构建spring web mvc REST风格HelloWorld
http://jinnianshilongnian.iteye.com/blog/1996071
跟我学SpringMVC
http://www.iteye.com/blogs/subjects/kaitao-springmvc
客户端
此处使用SpringMVC提供的RestTemplate进行测试。请参考如下文章进行学习:
Spring MVC测试框架详解——客户端测试
http://jinnianshilongnian.iteye.com/blog/2007180
Spring MVC测试框架详解——服务端测试
http://jinnianshilongnian.iteye.com/blog/2004660
此处为了方便,使用内嵌jetty服务器启动服务端:
- public class ClientTest {
- private static Server server;
- private RestTemplate restTemplate = new RestTemplate();
- @BeforeClass
- public static void beforeClass() throws Exception {
- //创建一个server
- server = new Server(8080);
- WebAppContext context = new WebAppContext();
- String webapp = "shiro-example-chapter20/src/main/webapp";
- context.setDescriptor(webapp + "/WEB-INF/web.xml"); //指定web.xml配置文件
- context.setResourceBase(webapp); //指定webapp目录
- context.setContextPath("/");
- context.setParentLoaderPriority(true);
- server.setHandler(context);
- server.start();
- }
- @AfterClass
- public static void afterClass() throws Exception {
- server.stop(); //当测试结束时停止服务器
- }
- }
在整个测试开始之前开启服务器,整个测试结束时关闭服务器。
测试成功情况
- @Test
- public void testServiceHelloSuccess() {
- String username = "admin";
- String param11 = "param11";
- String param12 = "param12";
- String param2 = "param2";
- String key = "dadadswdewq2ewdwqdwadsadasd";
- MultiValueMap<String, String> params = new LinkedMultiValueMap<String, String>();
- params.add(Constants.PARAM_USERNAME, username);
- params.add("param1", param11);
- params.add("param1", param12);
- params.add("param2", param2);
- params.add(Constants.PARAM_DIGEST, HmacSHA256Utils.digest(key, params));
- String url = UriComponentsBuilder
- .fromHttpUrl("http://localhost:8080/hello")
- .queryParams(params).build().toUriString();
- ResponseEntity responseEntity = restTemplate.getForEntity(url, String.class);
- Assert.assertEquals("hello" + param11 + param12 + param2, responseEntity.getBody());
- }
对请求参数生成消息摘要后带到参数中传递给服务器端,服务器端验证通过后访问相应服务,然后返回数据。
测试失败情况
- @Test
- public void testServiceHelloFail() {
- String username = "admin";
- String param11 = "param11";
- String param12 = "param12";
- String param2 = "param2";
- String key = "dadadswdewq2ewdwqdwadsadasd";
- MultiValueMap<String, String> params = new LinkedMultiValueMap<String, String>();
- params.add(Constants.PARAM_USERNAME, username);
- params.add("param1", param11);
- params.add("param1", param12);
- params.add("param2", param2);
- params.add(Constants.PARAM_DIGEST, HmacSHA256Utils.digest(key, params));
- params.set("param2", param2 + "1");
- String url = UriComponentsBuilder
- .fromHttpUrl("http://localhost:8080/hello")
- .queryParams(params).build().toUriString();
- try {
- ResponseEntity responseEntity = restTemplate.getForEntity(url, String.class);
- } catch (HttpClientErrorException e) {
- Assert.assertEquals(HttpStatus.UNAUTHORIZED, e.getStatusCode());
- Assert.assertEquals("login error", e.getResponseBodyAsString());
- }
- }
在生成请求参数消息摘要后,篡改了参数内容,服务器端接收后进行重新生成消息摘要发现不一样,报401错误状态码。
到此,整个测试完成了,需要注意的是,为了安全性,请考虑本文开始介绍的相应解决方案。
学Shiro完结版-4的更多相关文章
- 跟我学Shiro目录贴
转发地址:https://www.iteye.com/blog/jinnianshilongnian-2018398 扫一扫,关注我的公众号 购买地址 历经三个月左右时间,<跟我学Shiro&g ...
- 【知识整理】这可能是最好的RxJava 2.x 教程(完结版)
为什么要学 RxJava? 提升开发效率,降低维护成本一直是开发团队永恒不变的宗旨.近两年来国内的技术圈子中越来越多的开始提及 RxJava ,越来越多的应用和面试中都会有 RxJava ,而就目前的 ...
- 第十七章 OAuth2集成——《跟我学Shiro》
目录贴:跟我学Shiro目录贴 目前很多开放平台如新浪微博开放平台都在使用提供开放API接口供开发者使用,随之带来了第三方应用要到开放平台进行授权的问题,OAuth就是干这个的,OAuth2是OAut ...
- 第一章 Shiro简介——《跟我学Shiro》(转)
目录贴:跟我学Shiro目录贴 1.1 简介 Apache Shiro是Java的一个安全框架.目前,使用Apache Shiro的人越来越多,因为它相当简单,对比Spring Security,可 ...
- 跟开涛老师学shiro -- 编码/加密
在涉及到密码存储问题上,应该加密/生成密码摘要存储,而不是存储明文密码.比如之前的600w csdn账号泄露对用户可能造成很大损失,因此应加密/生成不可逆的摘要方式存储. 5.1 编码/解码 Shir ...
- 跟开涛老师学shiro -- INI配置
之前章节我们已经接触过一些INI配置规则了,如果大家使用过如spring之类的IoC/DI容器的话,Shiro提供的INI配置也是非常类似的,即可以理解为是一个IoC/DI容器,但是区别在于它从一个根 ...
- 跟开涛老师学shiro -- 授权
授权,也叫访问控制,即在应用中控制谁能访问哪些资源(如访问页面/编辑数据/页面操作等).在授权中需了解的几个关键对象:主体(Subject).资源(Resource).权限(Permission).角 ...
- 跟开涛老师学shiro -- 身份验证
身份验证,即在应用中谁能证明他就是他本人.一般提供如他们的身份ID一些标识信息来表明他就是他本人,如提供身份证,用户名/密码来证明. 在shiro中,用户需要提供principals (身份)和cre ...
- 跟开涛老师学shiro -- shiro简介
1.1 简介 Apache Shiro是Java的一个安全框架.目前,使用Apache Shiro的人越来越多,因为它相当简单,对比Spring Security,可能没有Spring Securi ...
- 【转】Android 开发规范(完结版)
摘要 1 前言 2 AS 规范 3 命名规范 4 代码样式规范 5 资源文件规范 6 版本统一规范 7 第三方库规范 8 注释规范 9 测试规范 10 其他的一些规范 1 前言 为了有利于项目维护.增 ...
随机推荐
- Qt Creator快捷键记录
Ctrl + K:代码格式化(先选中要格式化的代码) F4:在头文件和源文件之间切换 Ctrl+/:注释和取消注释 F2:在声明和实现之间切换 Ctrl+K:打开定位器(locator),搜索文件名 ...
- CUDA编程学习 (2)——CUDA并行性模型
1. 基于 kernel 的 SPMD 并行编程 1.1 向量加法 kernel(device 代码) // Device Code // Compute vector sum C = A + B / ...
- 基于Java+SpringBoot心理测评心理测试系统功能实现一
一.前言介绍: 1.1 项目摘要 心理测评和心理测试系统在当代社会中扮演着越来越重要的角色.随着心理健康问题日益受到重视,心理测评和心理测试系统作为评估个体心理状态.诊断心理问题.制定心理治疗方案的工 ...
- Quartz集群增强版_01.集群及缺火处理(ClusterMisfireHandler)
Quartz集群增强版_01.集群及缺火处理(ClusterMisfireHandler) 转载请著名出处 https://www.cnblogs.com/funnyzpc/p/18542452 主要 ...
- (系列十一)Vue3框架中路由守卫及请求拦截(实现前后端交互)
说明 该文章是属于OverallAuth2.0系列文章,每周更新一篇该系列文章(从0到1完成系统开发). 该系统文章,我会尽量说的非常详细,做到不管新手.老手都能看懂. 说明:OverallAuth2 ...
- 域渗透之初识LM&NTLM认证过程
目录 前言 LM Hash NTLM Hash Windows本地认证 LSASS进程 Mimikatz抓取明文密码 Windows网络认证 Net NTLM NTLMv1 & NTLMv2 ...
- 加密 DB2 Universal Database 中的数据值
在本文中,我们演示了 IBM DB2 Universal Database Version 7.2 中新的加密函数如何提供简单方式来加密敏感数据. 评论: Bruce BenfieldIBM Ric ...
- PHP开源项目之YOURLS
YOURLS是一个开源的PHP的程序,可以利用它来构建属于自己的URL缩短服务,YOURLS还可以集成到WordPress博客中使用. YOURLS 的主要功能: 公开的(Public 任何人都可以用 ...
- Mybatis【5】-- Mybatis多种增删改查那些你会了么?
前面我们学会了Mybatis如何配置数据库以及创建SqlSession,那怎么写呢?crud怎么写? 代码直接放在Github仓库[https://github.com/Damaer/Mybatis- ...
- 零基础学习人工智能—Python—Pytorch学习(十)
前言 本文的内容是来自教程视频的第十五集,个人感觉,这个教程是有点虎头蛇尾,就是前面开始的教程,是非常惊人的好,但到这里,就有点水了,可以说就是把代码一铺,然后简单介绍一遍,很多细节都没有讲,所以,我 ...