
使用ASP.NET WEB API构建基于REST风格的服务实战系列教程(一)——使用EF6构建数据库及模型
系列导航地址http://www.cnblogs.com/fzrain/p/3490137.html
使用Entity Framework Code First模式构建数据库对象
已经决定使用EF CodeFirst来创建数据库了,因此我们使用POCO类(“Plain Old CLR Objects)来定义我们的Model。我们通过写标准的.NET类来定义适合我们API的领域模型。那些POCO类就会为我们创建数据库。
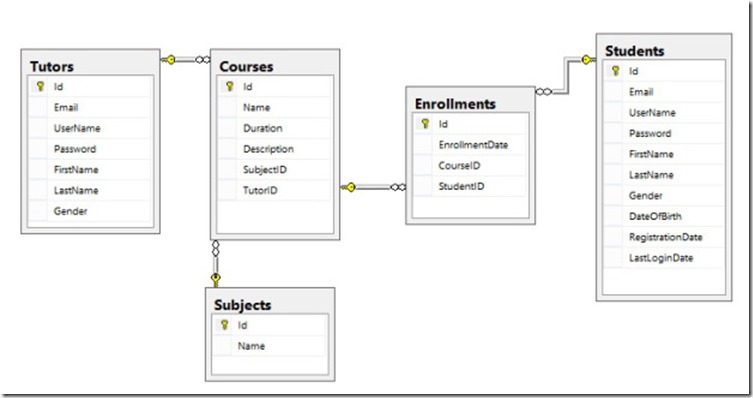
我们的培训系统数据库比较简单,首先我们需要有学生”Students”,导师”Tutors”,除此之外我们还需要定义课程”Courses”以及科目”Subjects”。在我们的系统中,我们允许每个学生去报名参加不同的课程
下图是我们数据库建立后的结果,我在这里列出来的目的是为了帮助大家更好的理解接下来创建的POCO类(图不是很清晰,凑合看吧):
第一步:创建一个空的类库项目
打开VS,创建一个空的类库项目
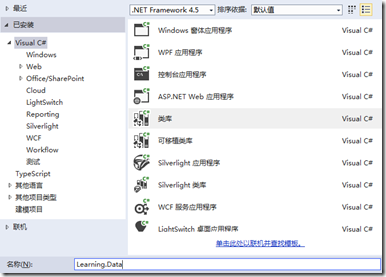
.NET Framewok版本的话我用的事4.5的,选4.0的也行
第二步:使用NuGet添加Entity Framework的引用
右击引用->管理NuGet程序包->右上角输入Entity Framework,选择安装。装好之后就应该是这么一个样子:
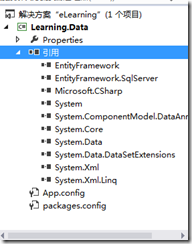
这里用的是Entity Framework6,因为这个版本支持了枚举类型,在这次的项目里也有涉及
第三步:创建Model
前面已经说了,到目前为止我们还没有数据库。因此我们需要写标准的.NET类来定义领域模型并帮我们生成数据库
新建一个Entities文件夹并创建5个类(“Student”,“Course”,“Subject”,“Tutor”,“Enrollment”),这几个简单的实体类将为我们创建数据库
public class Course

    {

        public Course()

        {

            Enrollments = new List<Enrollment>();

            CourseTutor = new Tutor();

            CourseSubject = new Subject();

        }

        public int Id { get; set; }

        public string Name { get; set; }

        public Double Duration { get; set; }

        public string Description { get; set; }

        public Tutor CourseTutor { get; set; }

        public Subject CourseSubject { get; set; }

        public ICollection<Enrollment> Enrollments { get; set; }

    }

 public class Enrollment

    {

        public Enrollment()

        {

            Student = new Student();

            Course = new Course();

        }

        public int Id { get; set; }

        public DateTime EnrollmentDate { get; set; }

        public Student Student { get; set; }

        public Course Course { get; set; }

    }

 public class Student

    {

        public Student()

        {

            Enrollments = new List<Enrollment>();

        }

        public int Id { get; set; }

        public string Email { get; set; }

        public string UserName { get; set; }

        public string Password { get; set; }

        public string FirstName { get; set; }

        public string LastName { get; set; }

        public Gender Gender { get; set; }

        public DateTime DateOfBirth { get; set; }

        public DateTime? RegistrationDate { get; set; }

        public DateTime? LastLoginDate { get; set; }

        public ICollection<Enrollment> Enrollments { get; set; }

    }

  public class Subject

    {

        public Subject()

        {

            Courses = new List<Course>();

        }

        public int Id { get; set; }

        public string Name { get; set; }

        public ICollection<Course> Courses;

    }

 public class Tutor

    {

        public Tutor()

        {

            Courses = new List<Course>();

        }

        public int Id { get; set; }

        public string Email { get; set; }

        public string UserName { get; set; }

        public string Password { get; set; }

        public string FirstName { get; set; }

        public string LastName { get; set; }

        public Gender Gender { get; set; }

        public ICollection<Course> Courses;

    }
不难发现,上面我们创建的Model并没有从任何基类继承,也没有打任何attributes。有哪些标准的话会使我们的数据访问拥有更好的延展性,这样的话我们就可以专心地去处理业务而不用过多地考虑数据的持久化。
Entity framework Code First默认使用一种叫“约定大于配置”的方式来为我们创建数据库(通过POCO类映射数据库的表,字段的数据类型,外键等)。在一些简单的应用程序中来说是非常好用的。但在我们的项目中将使用Fluent API配置我们自定义的数据库生成规则——“配置覆盖约定”
第四步:应用自定义映射规则
当我们决定使用配置来覆盖默认规则时,我们可以为每张表的字段配置数据类型,是否可空,表与表之间外键关系,主键以及标识列等等。
于是乎我们创建一个“Mappers”文件夹,新建5个继承自System.Data.Entity.ModelConfiguration.EntityTypeConfiguration<T>的类。分别命名为: “CourseMapper”, “EnrollmentMapper”, “StudentMapper”, “SubjectMapper”, and “TutorMapper”
class CourseMapper : EntityTypeConfiguration<Course>

    {

        public CourseMapper()

        {

            this.ToTable("Courses");

            this.HasKey(c => c.Id);

            this.Property(c => c.Id).HasDatabaseGeneratedOption(DatabaseGeneratedOption.Identity);

            this.Property(c => c.Id).IsRequired();

            this.Property(c => c.Name).IsRequired();

            this.Property(c => c.Name).HasMaxLength();

            this.Property(c => c.Duration).IsRequired();

            this.Property(c => c.Description).IsOptional();

            this.Property(c => c.Description).HasMaxLength();

            this.HasRequired(c => c.CourseSubject).WithMany().Map(s => s.MapKey("SubjectID"));

            this.HasRequired(c => c.CourseTutor).WithMany().Map(t => t.MapKey("TutorID"));

        }

    }

  class EnrollmentMapper : EntityTypeConfiguration<Enrollment>

    {

        public EnrollmentMapper()

        {

            this.ToTable("Enrollments");

            this.HasKey(e => e.Id);

            this.Property(e => e.Id).HasDatabaseGeneratedOption(DatabaseGeneratedOption.Identity);

            this.Property(e => e.Id).IsRequired();

            this.Property(e => e.EnrollmentDate).IsRequired();

            this.Property(e => e.EnrollmentDate).HasColumnType("smalldatetime");

            this.HasOptional(e => e.Student).WithMany(e => e.Enrollments).Map(s => s.MapKey("StudentID")).WillCascadeOnDelete(false);

            this.HasOptional(e => e.Course).WithMany(e => e.Enrollments).Map(c => c.MapKey("CourseID")).WillCascadeOnDelete(false);

        }

    }

 class StudentMapper : EntityTypeConfiguration<Student>

    {

        public StudentMapper()

        {

            this.ToTable("Students");

            this.HasKey(s => s.Id);

            this.Property(s => s.Id).HasDatabaseGeneratedOption(DatabaseGeneratedOption.Identity);

            this.Property(s => s.Id).IsRequired();

            this.Property(s => s.Email).IsRequired();

            this.Property(s => s.Email).HasMaxLength();

            this.Property(s => s.Email).IsUnicode(false);

            this.Property(s => s.UserName).IsRequired();

            this.Property(s => s.UserName).HasMaxLength();

            this.Property(s => s.UserName).IsUnicode(false);

            this.Property(s => s.Password).IsRequired();

            this.Property(s => s.Password).HasMaxLength();

            this.Property(s => s.FirstName).IsRequired();

            this.Property(s => s.FirstName).HasMaxLength();

            this.Property(s => s.LastName).IsRequired();

            this.Property(s => s.LastName).HasMaxLength();

            this.Property(s => s.Gender).IsOptional();

            this.Property(s => s.DateOfBirth).IsRequired();

            this.Property(s => s.DateOfBirth).HasColumnType("smalldatetime");

            this.Property(s => s.RegistrationDate).IsOptional();

            this.Property(s => s.RegistrationDate).HasColumnType("smalldatetime");

            this.Property(s => s.LastLoginDate).IsOptional();

            this.Property(s => s.LastLoginDate).HasColumnType("smalldatetime");

        }

    }

  class SubjectMapper : EntityTypeConfiguration<Subject>

    {

        public SubjectMapper()

        {

            this.ToTable("Subjects");

            this.HasKey(s => s.Id);

            this.Property(s => s.Id).HasDatabaseGeneratedOption(DatabaseGeneratedOption.Identity);

            this.Property(s => s.Id).IsRequired();

            this.Property(s => s.Name).IsRequired();

            this.Property(s => s.Name).HasMaxLength();

        }

    }

  class TutorMapper : EntityTypeConfiguration<Tutor>

    {

        public TutorMapper()

        {

            this.ToTable("Tutors");

            this.HasKey(s => s.Id);

            this.Property(s => s.Id).HasDatabaseGeneratedOption(DatabaseGeneratedOption.Identity);

            this.Property(s => s.Id).IsRequired();

            this.Property(s => s.Email).IsRequired();

            this.Property(s => s.Email).HasMaxLength();

            this.Property(s => s.Email).IsUnicode(false);

            this.Property(s => s.UserName).IsRequired();

            this.Property(s => s.UserName).HasMaxLength();

            this.Property(s => s.UserName).IsUnicode(false);

            this.Property(s => s.Password).IsRequired();

            this.Property(s => s.Password).HasMaxLength();

            this.Property(s => s.FirstName).IsRequired();

            this.Property(s => s.FirstName).HasMaxLength();

            this.Property(s => s.LastName).IsRequired();

            this.Property(s => s.LastName).HasMaxLength();

            this.Property(s => s.Gender).IsOptional();

        }

    }
看看上面的代码,不难发现我们为每个POCO类属性(数据类型,是否为空,主键标识,外键关系)都做了配置。这些配置最终会影响我们数据库中表的创建。
关于具体Fluent API的配置方法,可以参考:http://www.cnblogs.com/hyl8218/archive/2011/10/10/2205240.html
第五步:创建Context类来实现数据持久化
现在我们要创建一个LearningContext类继承自System.Data.Entity.DbContext:
public class LearningContext : DbContext

    {

        public LearningContext() :

            base("eLearningConnection")

        {

            Configuration.ProxyCreationEnabled = false;

            Configuration.LazyLoadingEnabled = false;

            Database.SetInitializer(new MigrateDatabaseToLatestVersion<LearningContext, LearningContextMigrationConfiguration>());

        }

        public DbSet<Course> Courses { get; set; }

        public DbSet<Enrollment> Enrollments { get; set; }

        public DbSet<Student> Students { get; set; }

        public DbSet<Subject> Subjects { get; set; }

        public DbSet<Tutor> Tutors { get; set; }

        protected override void OnModelCreating(DbModelBuilder modelBuilder)

        {

            modelBuilder.Configurations.Add(new StudentMapper());

            modelBuilder.Configurations.Add(new SubjectMapper());

            modelBuilder.Configurations.Add(new TutorMapper());

            modelBuilder.Configurations.Add(new CourseMapper());

            modelBuilder.Configurations.Add(new EnrollmentMapper());

            base.OnModelCreating(modelBuilder);

        }

    }
这个LearningContext类主要有三大任务
1.把我们定义的POCO类作为DBSet的属性对外公开,这意味着每一个POCO类都将被转化为数据库中的表
2.重写OnModelCreating方法将我们为POCO类自定义的映射规则添加到DbModelBuilder配置中
3.在LearningContext的构造函数中我们做了2件事:
(1)将ProxyCreationEnabled和LazyLoadingEnabled 2个属性设为false(默认都是true)。延迟加载(LazyLoading)主要是指当对象间的关联配置成导航属性暴露给外界的时候,那么这个属性的会在用到它的时候(在前台foreach的时候)才加载,那么极有可能成为性能杀手,我们项目中希望立即加载。而ProxyCreation是配合LazyLoading一起用的,因此当我们把这两个属性值设为false时,那么“LearningContext”就不会去加载导航属性除非调用了“Include”方法(下一章会有演示)。
(2)为数据库配置初始化和迁移策略,如果模型的属性被改变(添加了新的属性),就把数据库迁移到最新版本。为了实现这个功能,我们新建一个类LearningContextMigrationConfiguration继承自System.Data.Entity.Migrations.DbMigrationsConfiguration<TContext>
class LearningContextMigrationConfiguration : DbMigrationsConfiguration<LearningContext>

    {

        public LearningContextMigrationConfiguration()

        {

            this.AutomaticMigrationsEnabled = true;

            this.AutomaticMigrationDataLossAllowed = true;

        }

#if DEBUG

        protected override void Seed(LearningContext context)

        {

            new LearningDataSeeder(context).Seed();

        }

#endif

    }
LearningContextMigrationConfiguration这个类主要有2个任务:
(1)在构造函数中,我们设置AutomaticMigrationsEnabled 属性为true,那么就意味着EF会为我们自动迁移数据库而不考虑版本问题。同时我们把AutomaticMigrationDataLossAllowed属性也设为true但这样做在开发环境中是很危险的,因为如果这个属性设为false时,一旦数据库在自动迁移时发生数据丢失,那么就会抛出一个异常。但在这次的系列中我们确保没问题。
(2)重写Seed方法来为我们的数据库添加初始数据,这个函数在我们应用程序每次启动时执行。“LearningDataSeeder”这个类主要用于提供需要的数据,具体代码在本章结束时提供。
本章总结
到目前为止,我们已经把用于创建数据库的Model和配置都实现了。在这个时候我们应该想一想:数据访问层是否已经完成?当我们使用Web Api操作的时候是否方便 快捷 高效?我们是否应该对已有的数据访问层再做一次封装?。。。 因此下一章我们将使用“Repository”模式应用在我们的项目中。
随堂代码:http://yun.baidu.com/share/link?shareid=1763536438&uk=17559114
使用ASP.NET WEB API构建基于REST风格的服务实战系列教程(一)——使用EF6构建数据库及模型的更多相关文章
- ASP.NET Web Api构建基于REST风格的服务实战系列教程
使用ASP.NET Web Api构建基于REST风格的服务实战系列教程[十]——使用CacheCow和ETag缓存资源 系列导航地址http://www.cnblogs.com/fzrain/p/3 ...
- 使用ASP.NET Web Api构建基于REST风格的服务实战系列教程【开篇】【持续更新中。。。】
最近发现web api很火,园内也有各种大神已经在研究,本人在asp.net官网上看到一个系列教程,原文地址:http://bitoftech.net/2013/11/25/detailed-tuto ...
- 使用ASP.NET Web Api构建基于REST风格的服务实战系列教程【九】——API变了,客户端怎么办?
系列导航地址http://www.cnblogs.com/fzrain/p/3490137.html 前言 一旦我们将API发布之后,消费者就会开始使用并和其他的一些数据混在一起.然而,当新的需求出现 ...
- 使用ASP.NET Web Api构建基于REST风格的服务实战系列教程【八】——Web Api的安全性
系列导航地址http://www.cnblogs.com/fzrain/p/3490137.html 前言 这一篇文章我们主要来探讨一下Web Api的安全性,到目前为止所有的请求都是走的Http协议 ...
- [转]使用ASP.NET Web Api构建基于REST风格的服务实战系列教程【八】——Web Api的安全性
本文转自:http://www.cnblogs.com/fzrain/p/3552423.html 系列导航地址http://www.cnblogs.com/fzrain/p/3490137.html ...
- 使用ASP.NET Web Api构建基于REST风格的服务实战系列教程【二】——使用Repository模式构建数据库访问层
系列导航地址http://www.cnblogs.com/fzrain/p/3490137.html 前言 在数据访问层应用Repository模式来隔离对领域对象的细节操作是很有意义的.它位于映射层 ...
- 使用ASP.NET Web Api构建基于REST风格的服务实战系列教程【五】——在Web Api中实现Http方法(Put,Post,Delete)
系列导航地址http://www.cnblogs.com/fzrain/p/3490137.html 前言 在Web Api中,我们对资源的CRUD操作都是通过相应的Http方法来实现——Post(新 ...
- 使用ASP.NET Web Api构建基于REST风格的服务实战系列教程【六】——实现资源间的关联
系列导航地址http://www.cnblogs.com/fzrain/p/3490137.html 前言 这一篇文章主要介绍一下资源间的关联——例如在学生和课程之间就存在这样的关联:每一个课程都会有 ...
- 使用ASP.NET Web Api构建基于REST风格的服务实战系列教程【外传】——Attribute Routing
系列导航地址http://www.cnblogs.com/fzrain/p/3490137.html 题外话:由于这个技术点是新学的,并不属于原系列,但借助了原系列的项目背景,故命名外传系列,以后也可 ...
随机推荐
- MongoDB学习笔记~客户端命令行的使用
回到目录 当我们从MongoDB网站下载安装包之后,它会伴随有一系列的工具,服务器程序mongod是我们耳熟能详的了,客户端mongo和性能检测mongostat我们可能就没有用过了,今天主要是介绍一 ...
- 弹窗样式 idialog,purebox,artdialog4.1.2,jquery.alert.v1.2
<script src="<?php echo $imgurl;?>/tools/media/js/jquery.iDialog.js"></scri ...
- OpenSessionInViewFilter配置和作用
Spring为我们解决Hibernate的Session的关闭与开启问题. Hibernate 允许对关联对象.属性进行延迟加载,但是必须保证延迟加载的操作限于同一个 Hibernate Sessio ...
- 报表开发导出各种格式文件的API
文件输出的多样性,准确性和稳定性对于我们常用的报表软件来说很重要.报表的输入是指从报表的模板文件(XML格式的)创建WorkBook对象,输出则指将报表保存为各种格式文件,比如Pdf.Excel.Wo ...
- BZOJ3130: [Sdoi2013]费用流[最大流 实数二分]
3130: [Sdoi2013]费用流 Time Limit: 10 Sec Memory Limit: 128 MBSec Special JudgeSubmit: 960 Solved: 5 ...
- USACO2.4 The Tamworth Two[模拟]
题目描述 两只牛逃跑到了森林里.农夫John开始用他的专家技术追捕这两头牛.你的任务是模拟他们的行为(牛和John). 追击在10x10的平面网格内进行.一个格子可以是: 一个障碍物, 两头牛(它们总 ...
- python SQLAlchemy
这里我们记录几个python SQLAlchemy的使用例子: 如何对一个字段进行自增操作 user = session.query(User).with_lockmode('update').get ...
- php-设置关键词高亮的字符串处理函数
/** * 设置关键词高亮的字符串处理函数 * @param [string] $str [要高亮的字符串] * @param array $word_arr [关键词] */function set ...
- Ubuntu14.04下配置固定IP
实验室需要构建静态网站作为个人知识管理工具,每个人要求都有属于自己的静态网站进行知识积累和交流.但是实验室的路由有时候会关闭,重启后给每台机器重新分配ip,因此为了方便访问每台主机,需要设置静态ip. ...
- [转载]一张图看懂开源许可协议,开源许可证GPL、BSD、MIT、Mozilla、Apache和LGPL的区别
本文转载自:http://blog.csdn.net/testcs_dn/article/details/38496107 开源许可证GPL.BSD.MIT.Mozilla.Apache和LGPL的区 ...