部署redis5.0.3
一、准备环境
1、下载
# wget http://download.redis.io/releases/redis-5.0.3.tar.gz
[root@localhost ~]# wget http://download.redis.io/releases/redis-5.0.3.tar.gz

---- ::--  http://download.redis.io/releases/redis-5.0.3.tar.gz

Resolving download.redis.io (download.redis.io)... 109.74.203.151

Connecting to download.redis.io (download.redis.io)|109.74.203.151|:... connected.

HTTP request sent, awaiting response...  OK

Length:  (1.9M) [application/x-gzip]

Saving to: 'redis-5.0.3.tar.gz'

%[============================================================================================================================>] ,,    751KB/s   in .5s

-- :: ( KB/s) - 'redis-5.0.3.tar.gz' saved [/]

[root@localhost ~]# ls

redis-5.0..tar.gz
2、解压
[root@localhost ~]# tar xzf redis-5.0..tar.gz

[root@localhost ~]#

[root@localhost ~]# ls

anaconda-ks.cfg  redis-5.0.  redis-5.0..tar.gz

[root@localhost ~]#

[root@localhost ~]# cd redis-5.0.

[root@localhost redis-5.0.]#

[root@localhost redis-5.0.]# ls

-RELEASENOTES  CONTRIBUTING  deps     Makefile   README.md   runtest          runtest-sentinel  src    utils

BUGS             COPYING       INSTALL  MANIFESTO  redis.conf  runtest-cluster  sentinel.conf     tests
3、yum安装gcc依赖
# yum install gcc -y
4、编译
# make
[root@localhost redis-5.0.]# make

……………………

……………………

Hint: It's a good idea to run 'make test' ;)

make[]: Leaving directory `/root/redis-5.0./src'
5、简单启动
进入到解压后的 src 目录,通过如下命令启动Redis:
# ./redis-server
[root@localhost redis-5.0.]# ls

-RELEASENOTES  CONTRIBUTING  deps     Makefile   README.md   runtest          runtest-sentinel  src    utils

BUGS             COPYING       INSTALL  MANIFESTO  redis.conf  runtest-cluster  sentinel.conf     tests

[root@localhost redis-5.0.]#

[root@localhost redis-5.0.]# cd src/

[root@localhost src]#

[root@localhost src]# ./redis-server

:C  Mar  ::12.145 # oO0OoO0OoO0Oo Redis is starting oO0OoO0OoO0Oo

:C  Mar  ::12.145 # Redis version=5.0., bits=, commit=, modified=, pid=, just started

:C  Mar  ::12.145 # Warning: no config file specified, using the default config. In order to specify a config file use ./redis-server /path/to/redis.conf

:M  Mar  ::12.147 * Increased maximum number of open files to  (it was originally set to ).

                _._

           _.-``__ ''-._

      _.-``    `.  `_.  ''-._           Redis 5.0. (/)  bit

  .-`` .-```.  ```\/    _.,_ ''-._

 (    '      ,       .-`  | `,    )     Running in standalone mode

 |`-._`-...-` __...-.``-._|'` _.-'|     Port:

 |    `-._   `._    /     _.-'    |     PID: 6788

  `-._    `-._  `-./  _.-'    _.-'

 |`-._`-._    `-.__.-'    _.-'_.-'|

 |    `-._`-._        _.-'_.-'    |           http://redis.io

  `-._    `-._`-.__.-'_.-'    _.-'

 |`-._`-._    `-.__.-'    _.-'_.-'|

 |    `-._`-._        _.-'_.-'    |

  `-._    `-._`-.__.-'_.-'    _.-'

      `-._    `-.__.-'    _.-'

          `-._        _.-'

              `-.__.-'

:M  Mar  ::12.151 # WARNING: The TCP backlog setting of  cannot be enforced because /proc/sys/net/core/somaxconn is set to the lower value of .

:M  Mar  ::12.151 # Server initialized

:M  Mar  ::12.151 # WARNING overcommit_memory is set to ! Background save may fail under low memory condition. To fix this issue add 'vm.overcommit_memory = 1' to /etc/sysctl.conf and then reboot or run the command 'sysctl vm.overcommit_memory=1' for this to take effect.

:M  Mar  ::12.151 # WARNING you have Transparent Huge Pages (THP) support enabled in your kernel. This will create latency and memory usage issues with Redis. To fix this issue run the command 'echo never > /sys/kernel/mm/transparent_hugepage/enabled' as root, and add it to your /etc/rc.local in order to retain the setting after a reboot. Redis must be restarted after THP is disabled.

:M  Mar  ::12.152 * Ready to accept connections
新打开一个窗口页进行简单的交互
可以使用内置的客户端与Redis进行交互:
# ./redis-cli
[root@localhost src]# ./redis-cli

127.0.0.1:> set foo bar

OK

127.0.0.1:> get foo

"bar"

127.0.0.1:>
二、正常安装
以下两个选项任选其一进行 (推荐选择默认安装)
- 安装命令 (默认安装目录是/usr/local/bin/)
# make install
[root@localhost redis-5.0.]# make install

cd src && make install

make[]: Entering directory `/root/redis-5.0./src'

    CC Makefile.dep

make[]: Leaving directory `/root/redis-5.0./src'

make[]: Entering directory `/root/redis-5.0./src'

Hint: It's a good idea to run 'make test' ;)

    INSTALL install

    INSTALL install

    INSTALL install

    INSTALL install

    INSTALL install

make[]: Leaving directory `/root/redis-5.0./src'

[root@localhost redis-5.0.]#
查看安装目录
# ll /usr/local/bin/redis-*
[root@localhost redis-5.0.]# ll /usr/local/bin/redis-*

-rwxr-xr-x.  root root  Mar  : /usr/local/bin/redis-benchmark

-rwxr-xr-x.  root root  Mar  : /usr/local/bin/redis-check-aof

-rwxr-xr-x.  root root  Mar  : /usr/local/bin/redis-check-rdb

-rwxr-xr-x.  root root  Mar  : /usr/local/bin/redis-cli

lrwxrwxrwx.  root root       Mar  : /usr/local/bin/redis-sentinel -> redis-server

-rwxr-xr-x.  root root  Mar  : /usr/local/bin/redis-server

[root@localhost redis-5.0.]#
- 指定redis安装目录
# make install PREFIX=/usr/local/redis
配置文件
配置文件在redis-5.0.3目录下,文件名是 redis.conf
根据你的安装目录,将配置文件拷贝至对应的目录,比如拷贝到 /root/目录下,命令如下:
[root@localhost redis-5.0.]# ls

-RELEASENOTES  CONTRIBUTING  deps     Makefile   README.md   runtest          runtest-sentinel  src    utils

BUGS             COPYING       INSTALL  MANIFESTO  redis.conf  runtest-cluster  sentinel.conf     tests

[root@localhost redis-5.0.]#

[root@localhost redis-5.0.]# cp redis.conf /root/

[root@localhost redis-5.0.]#

[root@localhost redis-5.0.]# cd

[root@localhost ~]#

[root@localhost ~]# ls

anaconda-ks.cfg  redis-5.0.  redis-5.0..tar.gz  redis.conf

[root@localhost ~]#
三、正常启动
启动redis命令和效果如下,默认是前台启动,按 ctrl+c 停止
# redis-server /root/redis-5.0.3/redis.conf
[root@localhost ~]# redis-server /root/redis-5.0./redis.conf

:C  Mar  ::14.612 # oO0OoO0OoO0Oo Redis is starting oO0OoO0OoO0Oo

:C  Mar  ::14.612 # Redis version=5.0., bits=, commit=, modified=, pid=, just started

:C  Mar  ::14.612 # Configuration loaded

:M  Mar  ::14.614 * Increased maximum number of open files to  (it was originally set to ).

                _._

           _.-``__ ''-._

      _.-``    `.  `_.  ''-._           Redis 5.0. (/)  bit

  .-`` .-```.  ```\/    _.,_ ''-._

 (    '      ,       .-`  | `,    )     Running in standalone mode

 |`-._`-...-` __...-.``-._|'` _.-'|     Port:

 |    `-._   `._    /     _.-'    |     PID: 6991

  `-._    `-._  `-./  _.-'    _.-'

 |`-._`-._    `-.__.-'    _.-'_.-'|

 |    `-._`-._        _.-'_.-'    |           http://redis.io

  `-._    `-._`-.__.-'_.-'    _.-'

 |`-._`-._    `-.__.-'    _.-'_.-'|

 |    `-._`-._        _.-'_.-'    |

  `-._    `-._`-.__.-'_.-'    _.-'

      `-._    `-.__.-'    _.-'

          `-._        _.-'

              `-.__.-'

:M  Mar  ::14.617 # WARNING: The TCP backlog setting of  cannot be enforced because /proc/sys/net/core/somaxconn is set to the lower value of .

:M  Mar  ::14.617 # Server initialized

:M  Mar  ::14.617 # WARNING overcommit_memory is set to ! Background save may fail under low memory condition. To fix this issue add 'vm.overcommit_memory = 1' to /etc/sysctl.conf and then reboot or run the command 'sysctl vm.overcommit_memory=1' for this to take effect.

:M  Mar  ::14.617 # WARNING you have Transparent Huge Pages (THP) support enabled in your kernel. This will create latency and memory usage issues with Redis. To fix this issue run the command 'echo never > /sys/kernel/mm/transparent_hugepage/enabled' as root, and add it to your /etc/rc.local in order to retain the setting after a reboot. Redis must be restarted after THP is disabled.

:M  Mar  ::14.617 * Ready to accept connections
后台启动
后台启动需要修改配置文件 (大概在136行 ),将daemonize no 改为 daemonize yes

重启启动,效果如下
# redis-server /root/redis-5.0.3/redis.conf
[root@localhost ~]# redis-server /root/redis-5.0./redis.conf

:C  Mar  ::35.264 # oO0OoO0OoO0Oo Redis is starting oO0OoO0OoO0Oo

:C  Mar  ::35.264 # Redis version=5.0., bits=, commit=, modified=, pid=, just started

:C  Mar  ::35.264 # Configuration loaded
查看redis服务进程
# ps aux | grep redis
[root@localhost ~]# ps aux | grep redis

root         0.2  0.4    ?        Ssl  :   : redis-server 127.0.0.1:

root         0.0  0.0     pts/    S+   :   : grep --color=auto redis

[root@localhost ~]#
本地客户端交互
[root@localhost ~]# redis-cli

127.0.0.1:> keys *

(empty list or set)

127.0.0.1:> set foo bar

OK

127.0.0.1:> get foo

"bar"

127.0.0.1:> exit

[root@localhost ~]#
远程客户端连接
直接使用客户端加参数 redis-cli -h <ip> 进行远程连接
[root@localhost ~]# redis-cli -h 192.168.2.88

Could not connect to Redis at 192.168.2.88:: Connection refused
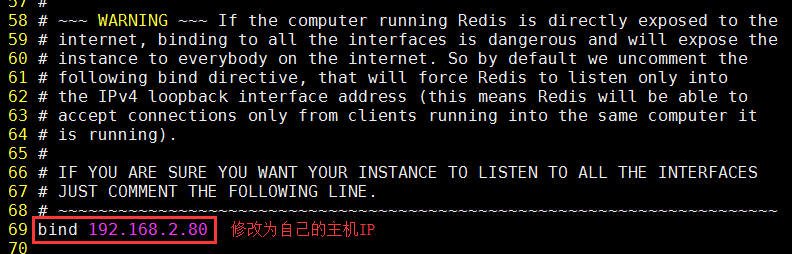
默认配置会报错,连接被拒绝,需要修改配置文件 redis.conf
默认配置,69行默认绑定了本机地址,注释此配置或修改为自己的IP
# vi redis-5.0.3/redis.conf
redis-5.0.3 默认开启保护模式,protected-mode yes,修改为 protected-mode no

重新启动
# redis-server /root/redis-5.0.3/redis.conf
[root@localhost ~]# redis-server /root/redis-5.0./redis.conf

:C  Mar  ::06.700 # oO0OoO0OoO0Oo Redis is starting oO0OoO0OoO0Oo

:C  Mar  ::06.700 # Redis version=5.0., bits=, commit=, modified=, pid=, just started

:C  Mar  ::06.700 # Configuration loaded

[root@localhost ~]#
关闭redis服务
[root@localhost ~]# redis-cli shutdown

[root@localhost ~]#

[root@localhost ~]# ps aux | grep redis

root         0.0  0.0     pts/    S+   :   : grep --color=auto redis

[root@localhost ~]#
四、Redis配置文件详解
主要用到的配置文件如下:
#设置节点的IP
bind 127.0.0.1 192.168.2.211
#redis-5.0.3 默认开启保护模式,protected-mode yes,修改为 protected-mode no
protected-mode no

#redis端口号

port

#redis后台运行
#设置后台启动

daemonize yes

#设置连接节点的密码

requirepass

#aof模式持久化文件的名字(appendonly默认是no,yes就是打开aof持久化)

appendfilename "appendonly.aof"

#打开aof持久化

appendonly yes

#pidfile文件对应redis_6379.pid

pidfile /var/run/redis_6379.pid
参考博客:
https://blog.csdn.net/weixin_39979119/article/details/86632582
https://blog.csdn.net/litte_frog/article/details/83278047
Redis配置文件详解
https://www.cnblogs.com/pqchao/p/6558688.html
end
部署redis5.0.3的更多相关文章
- 单机部署redis5.0集群环境
#安装rediscd redis-5.0.0makemake install #部署集群mkdir redis_clustermkdir -p redis_cluster/{7000,7001,700 ...
- 多机部署redis5.0集群环境
redis5.0集群部署 一.集群介绍 Redis 集群是一个可以在多个 Redis 节点之间进行数据共享的设施(installation). Redis 集群不支持那些需要同时处理多个键的 Redi ...
- redis-5.0.3集群搭建
首先部署redis-5.0.3,请参考我的另一篇文章 https://www.cnblogs.com/djlsunshine/p/10592174.html 启动redis服务 # redis-ser ...
- redis-5.0.5 集群部署
之前写过一套基于redis-4.0.6版本的测试集群部署 https://www.cnblogs.com/mrice/p/10730309.html 最近生产环境需要部署一套redis-5.0.5版本 ...
- Redis5.0.8 Cluster集群部署
目录 一.Redis Cluster简介 二.部署 三.创建主库 一.Redis Cluster简介 Redis Cluster集群是一种去中心化的高可用服务,其内置的sentinel功能可以提供高可 ...
- Redis5.0 3台主机三主三从部署Cluster集群
1.下载安装 [root@ip101 redis-5.0.4]# pwd /opt/app/redis-5.0.4 [root@ip101 redis-5.0.4]# ls 00-RELEASENOT ...
- 基于.NetCore的Redis5.0.3(最新版)快速入门、源码解析、集群搭建与SDK使用【原创】
1.[基础]redis能带给我们什么福利 Redis(Remote Dictionary Server)官网:https://redis.io/ Redis命令:https://redis.io/co ...
- Redis-5.0.0集群配置
版本:redis-5.0.0 参考:http://redis.io/topics/cluster-tutorial. 集群部署交互式命令行工具:https://github.com/eyjian/re ...
- Cloud Native Weekly | 华为云抢先发布Redis5.0,红帽宣布收购混合云提供商 NooBaa
1——华为云抢先发布Redis5.0 2——DigitalOcean K8s服务正式上线 3——红帽宣布收购混合云提供商 NooBaa 4——微软发布多项 Azure Kubernetes 服务更新 ...
随机推荐
- 《DSP using MATLAB》Problem 6.6
代码: %% ++++++++++++++++++++++++++++++++++++++++++++++++++++++++++++++++++++++++++++++++ %% Output In ...
- 静态代码块 2.构造代码块3.构造方法的执行顺序是1>2>3;明白他们是干嘛的就理解了。
1.静态代码块 2.构造代码块3.构造方法的执行顺序是1>2>3;明白他们是干嘛的就理解了.1.静态代码块:是在类的加载过程的第三步初始化的时候进行的,主要目的是给类变量赋予初始值.2.构 ...
- 利用 httpmodule 强制所有页面使用同一基类
public class OMSPageChecker : IHttpModule { public void Dispose() { } public void Init(HttpApplicati ...
- day43 数据库学习 转自egon 老师博客 单表查询和多表查询
一 单表查询的语法 SELECT 字段1,字段2... FROM 表名 WHERE 条件 GROUP BY field HAVING 筛选 ORDER BY field LIMIT 限制条数 二 关键 ...
- 重写( override)and 重载(overload)
重写override:是子类对父类的允许访问的方法的实现过程的重新编写,名字,返回值和形参都不能改变,即外壳不变,内心更改 重载overload:同一个类里面的方法,名字相同而参数不同,返回值可以相同 ...
- c/c++ 获取数组长度
在C/C++中并没有提供直接获取数组长度的函数 c/c++ 获取数组长度其中一种方法是使用sizeof(array) / sizeof(array[0]). 在C语言中习惯上在使用时都把它定义成一个宏 ...
- C166 结构按字节访问的设置
PACK Compiler Directive Home » Compiling Programs » Directives » Reference » PACK Abbreviation None. ...
- 洛谷 4383 [八省联考2018]林克卡特树lct——树形DP+带权二分
题目:https://www.luogu.org/problemnew/show/P4383 关于带权二分:https://www.cnblogs.com/flashhu/p/9480669.html ...
- plsql远程访问数据库 解决ora-12541:TNS:无监听程序
今天在windows server 2012上安装了一个oracle 11g的数据库,但是安装 完成以后发现在我的机器上访问数据库出现错误,ora-12541:TNS:无监听程序. 后来查询了很多资料 ...
- 大数据离线分析平台 用户数据Etl
Etl目标 解析我们收集的日志数据,将解析后的数据保存到hbase中.这里选择hbase来存储数据的主要原因就是: hbase的宽表结构设计适合我们的这样多种数据格式的数据存储(不同event有不同 ...