[React] 11 - Redux: redux
Ref: Redux中文文档
Ref: React 讀書會 - B團 - Level 19 Redux 深入淺出
Ref: React+Redux 分享會
Ruan Yifeng, Redux 架构: 教程一(有代码)、教程二、教程三
课前阅读
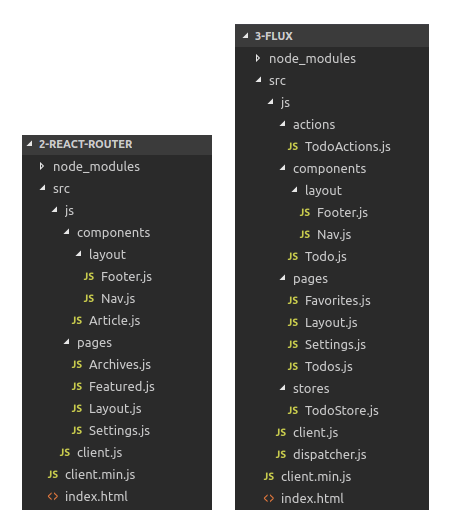
(1) 首先,复习 Flux:[React] 07 - Flux: react communicates with mongodb
- 原始方案中,pages目录下其实也是组件的效果;
- 右边的flux pattern到底带来了什么?
详见Flux章节和链接。
(2) 之后,让我们开始对 Redux 认真学习。

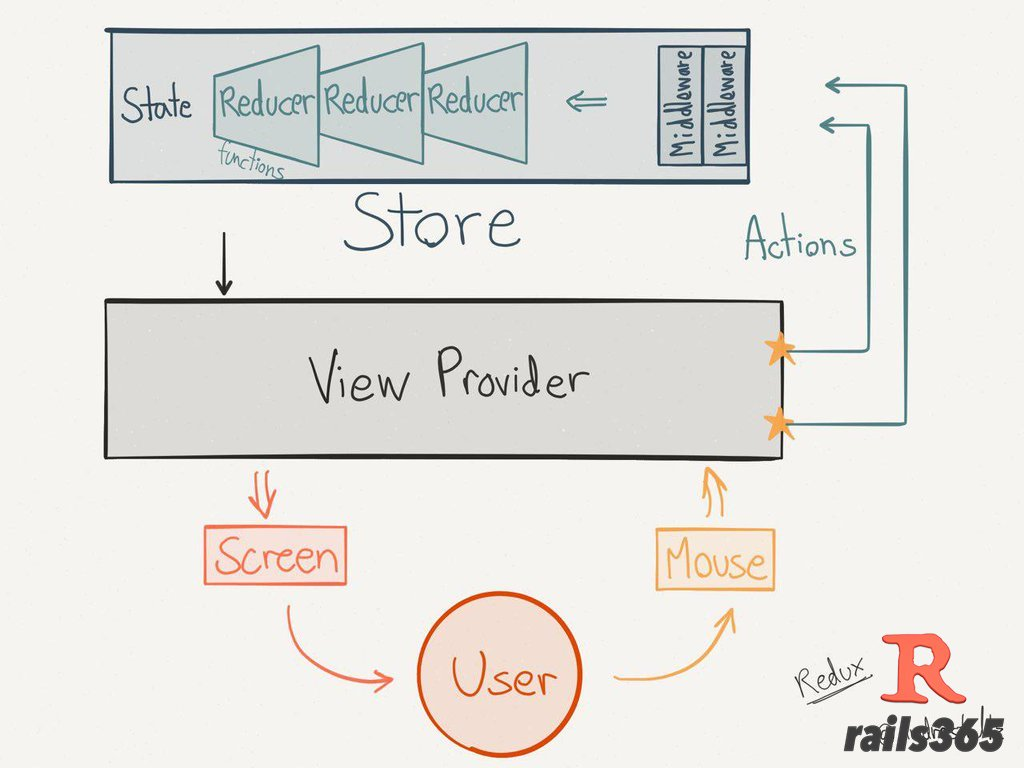
2015年,Redux 出现,将 Flux 与函数式编程结合一起,很短时间内就成为了最热门的前端架构。
* 是什么?
- actions
- components
- constants
- reducers
- store
管理数据的状态容器,单独的js库。
* 解决什么问题?
A如何把参数传给B?react的单向流不好处理。
或者,使用嵌入式写法,比如A触发事件,B监听事件。
但嵌入式写法不推荐。
- React两大不利之处,
- 代码结构
- 组件之间的通信
- 从需求角度看,
- 用户的使用方式复杂
- 不同身份的用户有不同的使用方式(比如普通用户和管理员)
- 多个用户之间可以协作
- 与服务器大量交互,或者使用了WebSocket
- View要从多个来源获取数据
- 从组件角度看,
- 某个组件的状态,需要共享
- 某个状态需要在任何地方都可以拿到
- 一个组件需要改变全局状态
- 一个组件需要改变另一个组件的状态
原理解剖
一、基本步骤
第一步,从老阮开始。设计一个如下的"加减计数器"。

[1] ----------------------------------------------------------------------------------------------------------------------------------------> Store & State
两个重要的功能:
(1)创建唯一的一个store。
(2)获取该store里面的state。
import { createStore } from 'redux';

const store = createStore(reducer);      // 1.接受另一个函数作为参数,返回新生成的 Store 对象
const state = store.getState();         // 2.得到当前时刻的State,一个state对应一个view
Jeff: 在flux中的state计算问题放在了reducer中,reducer与store通过createStore()维持关系。
[2] ----------------------------------------------------------------------------------------------------------------------------------------> Action
用户操作 on view --> action --> state
# 想要的结果

const action = {

  type:    'ADD_TODO',          // Action的名称,是必须的;Action本身是个对象

  payload: 'Learn Redux'         // Action的货物,不是必须的;

};
使用 Action Creator,避免全部“手写定义”带来的麻烦,返回以上的结果。
const ADD_TODO = '添加 TODO';

function addTodo(text) {

  return {

    type: ADD_TODO,

    text

  }

}

const action = addTodo('Learn Redux');
[3] ----------------------------------------------------------------------------------------------------------------------------------------> store.dispatch()
通过store.dispatch (...),view 发出 action (参数) to store.
store.dispatch({

  type   : 'ADD_TODO',

  payload: 'Learn Redux'

});

或者,对象通过函数生成:
store.dispatch(                 // <--- 推荐
 addTodo('Learn Redux')
);
[4] ----------------------------------------------------------------------------------------------------------------------------------------> Reducer
Store 收到 Action 以后,必须给出一个新的 State,View 才能发生变化。
Reducer:新State 的计算过程,based on old state。
const defaultState = 0;

const reducer = (state = defaultState, action) => {

  /**
   * reducer 函数里面不能改变 State,必须返回一个全新的对象
   */

  switch (action.type) {

    case 'ADD':

      return state + action.payload;

    default:

      return state;

  }

};
....................................................

const state = reducer(1, {

  type: 'ADD',

  payload: 2

});
因为createStore(reducer),每当store.dispatch发送过来一个新的 Action,就会自动调用 Reducer,得到新的 State。
reducer 作为参数,为 "action们" 提供趁手的工具。
const actions = [

  { type: 'ADD', payload: 0 },

  { type: 'ADD', payload: 1 },

  { type: 'ADD', payload: 2 }

];


/**
  * action是数据,打算使用reducer这个工具来处理,最后返回一个新的状态
  */

const total = actions.reduce(reducer, 0);   // 3
另外:最好把 State 对象设成只读,这样你没法改变它,要得到新的 State,唯一办法就是生成一个新对象。
// State 是一个对象

function reducer(state, action) {

  return Object.assign({}, state, { thingToChange });

  // 或者

  return { ...state, ...newState };

}

// State 是一个数组

function reducer(state, action) {

  return [...state, newItem];

}
[5] ---------------------------------------------------------------------------------------------------------------------------------------- listener
store改变,提醒 listener,触发view改变。
解除 listener 竟然是利用其"返回值"。
let unsubscribe = store.subscribe(() =>

  console.log(store.getState())

);

unsubscribe();
二、Store 的实现
Store 提供了三个方法:
- store.getState() [1]
- store.dispatch() [3]
- store.subscribe() [5]
store 的三个部分,如下:
import { createStore } from 'redux';

let { subscribe, dispatch, getState } = createStore(reducer);
let store                  = createStore(todoApp, window.STATE_FROM_SERVER)
                                                            // 第二个参数表示:整个应用的状态初始值,会覆盖 Reducer 函数的默认初始值
【createStore内部实现暂不深究】
三、Reducer 的拆分
- 原始版本:Switch 写法,各种情况都在一个函数中
三种 Action 分别改变 State 的三个属性。
const chatReducer = (state = defaultState, action = {}) => {

  const { type, payload } = action;

  switch (type) {
............................................................. ADD_CHAT:chatLog属性

    case ADD_CHAT:

      return Object.assign({}, state, {

        chatLog: state.chatLog.concat(payload)

      });
............................................................. CHANGE_STATUS:statusMessage属性

    case CHANGE_STATUS:

      return Object.assign({}, state, {

        statusMessage: payload

      });
............................................................. CHANGE_USERNAME:userName属性

    case CHANGE_USERNAME:

      return Object.assign({}, state, {

        userName: payload

      });

    default: return state;

  }

};
- 拆分版本:Reducer 函数中的 "switch部分" 被拆成了三个小函数,每一个负责生成对应的属性
const chatReducer = (state = defaultState, action = {}) => {

  return {

    chatLog:       chatLog(state.chatLog, action),              // 函数名字重复也碍眼,参数也不太想多写

    statusMessage: statusMessage(state.statusMessage, action),

    userName:      userName(state.userName, action)

  }

};
理由: 这种拆分与 React 应用的结构相吻合:一个 React 根组件由很多子组件构成。这就是说,子组件与子 Reducer 完全可以对应。
- 专业拆分:使用
combineReducers方法,专门用于拆分
这种写法有一个前提,就是 State 的属性名必须与子 Reducer 同名。
import { combineReducers } from 'redux';


/**
 * 先找个地儿,定义各个子 Reducer 函数,
 * 然后用这个方法,将它们合成一个大的 Reducer
 */
const chatReducer = combineReducers({

  chatLog,

  statusMessage,

  userName

})

export default todoApp;
- Reducer文件:把所有子 Reducer 放在一个文件里面,然后统一引入
import { combineReducers } from 'redux'

import * as reducers from './reducers'

const reducer = combineReducers(reducers)
实例分析
一、流程梳理
怎么改变状态?
如何触发界面更新?
这些都是Store的活儿!
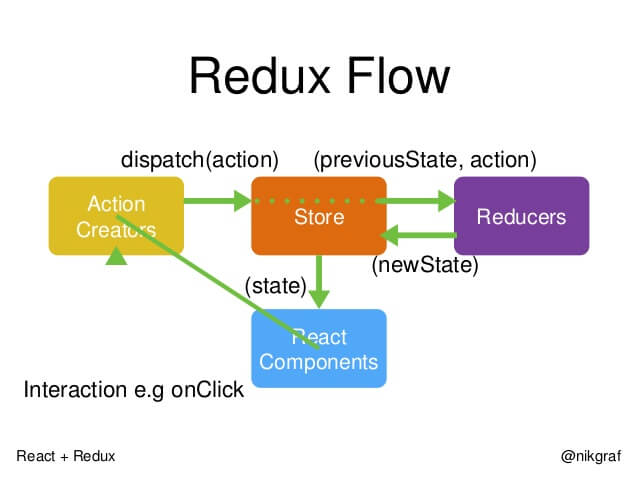
* 首先,用户发出 Action --> store。
store.dispatch(action);
* 然后,Store 自动调用 Reducer,并且传入两个参数:[当前 State] & [收到的 Action],返回新的 State 。
let nextState = todoApp(previousState, action); // 产生新状态
* State 一旦有变化,Store 就会调用监听函数。
/* 设置监听函数 */

store.subscribe(listener);
/* 如果使用的是 React,出发方式如下 */
function listerner() {
let newState = store.getState(); // 获得新状态
component.setState(newState); // 根据新状态更新界面
}
二、代码分析
Clicked: 3 times + - Increment if odd Increment async
- index.js之主页面
const render = () => ReactDOM.render(

  /* 自定义Counter控件的使用 */

  <Counter

    value      ={store.getState()}                             # 获得new state

    onIncrement={() => store.dispatch({ type: 'INCREMENT' })}

    onDecrement={() => store.dispatch({ type: 'DECREMENT' })}

  />,

  rootEl

)
- reducer之代码
在复杂的情况下,state会是如何?这里的例子有点过于简单,没有表现。
export default (state = 0, action) => {                         # 产生新状态

  switch (action.type) {

    case 'INCREMENT':

      return state + 1

    case 'DECREMENT':

      return state - 1

    default:

      return state

  }

}
- Counter控件的实现
class Counter extends Component {

  constructor(props) {

    super(props);

    this.incrementAsync = this.incrementAsync.bind(this);

    this.incrementIfOdd = this.incrementIfOdd.bind(this);

  }


  ////////////////////////////////////////////////////////

  incrementIfOdd() {

    if (this.props.value % 2 !== 0) {

      this.props.onIncrement()

    }

  }

  incrementAsync() {

    setTimeout(this.props.onIncrement, 1000)

  }


  ////////////////////////////////////////////////////////

  render() {

    const { value, onIncrement, onDecrement } = this.props

    return (

      <p>

        Clicked: {value} times

        {' '}

        <button onClick={onIncrement}>

          +

        </button>

        {' '}

        <button onClick={onDecrement}>

          -

        </button>

        {' '}

        <button onClick={this.incrementIfOdd}>

          Increment if odd

        </button>

        {' '}

        <button onClick={this.incrementAsync}>

          Increment async

        </button>

      </p>

    )

  }

}
[React] 11 - Redux: redux的更多相关文章
- React躬行记(11)——Redux基础
Redux是一个可预测的状态容器,不但融合了函数式编程思想,还严格遵循了单向数据流的理念.Redux继承了Flux的架构思想,并在此基础上进行了精简.优化和扩展,力求用最少的API完成最主要的功能,它 ...
- Flux --> Redux --> Redux React 入门
本文的目的很简单,介绍Redux相关概念用法 及其在React项目中的基本使用 假设你会一些ES6.会一些React.有看过Redux相关的文章,这篇入门小文应该能帮助你理一下相关的知识 一般来说,推 ...
- React,关于redux的一点小见解
最近项目做多页面应用使用到了,react + webpack + redux + antd去构建多页面的应用,本地开发用express去模拟服务端程序(个人觉得可以换成dva).所以在这里吐槽一下我自 ...
- 在React中使用Redux
这是Webpack+React系列配置过程记录的第六篇.其他内容请参考: 第一篇:使用webpack.babel.react.antdesign配置单页面应用开发环境 第二篇:使用react-rout ...
- Flux --> Redux --> Redux React 基础实例教程
本文的目的很简单,介绍Redux相关概念用法 及其在React项目中的基本使用 假设你会一些ES6.会一些React.有看过Redux相关的文章,这篇入门小文应该能帮助你理一下相关的知识 一般来说,推 ...
- react系列(五)在React中使用Redux
上一篇展示了Redux的基本使用,可以看到Redux非常简单易用,不限于React,也可以在Angular.Vue等框架中使用,只要需要Redux的设计思想的地方,就可以使用它. 这篇主要讲解在Rea ...
- Flux --> Redux --> Redux React 入门 基础实例使用
本文的目的很简单,介绍Redux相关概念用法 及其在React项目中的基本使用 假设你会一些ES6.会一些React.有看过Redux相关的文章,这篇入门小文应该能帮助你理一下相关的知识 一般来说,推 ...
- [RN] React Native 使用 Redux 比较详细和深刻的教程
React Native 使用 Redux 比较详细和深刻的教程 React Native 使用 Redux https://www.jianshu.com/p/06fc18cef56a http:/ ...
- React Hooks +React Context vs Redux
React Hooks +React Context vs Redux https://blog.logrocket.com/use-hooks-and-context-not-react-and-r ...
随机推荐
- js实现截取或查找字符串中的子字符串
获取 答案: var string0="sss.sscdyfasdfdgfg";//sscdy获取 ,); 答案是采用substr方法. 定义和用法:substr方法用于返回一个从 ...
- ELASTIC 动态修改配置API
工作中使用ELASTIC,我们常有需要修改的配置项,但有时又不想重启elastic,这时候就需要elasticsearch内置的修改集群配置API上场了. 这个API非常的简单. curl -XPUT ...
- 数据结构笔记1_求第k个最大者
参考的文章有: http://www.cnblogs.com/CCBB/archive/2009/06/01/1493971.html http://www.cnblogs.com/zhangchao ...
- reac-native环境搭建
转载链接:http://www.ncloud.hk/%E6%8A%80%E6%9C%AF%E5%88%86%E4%BA%AB/react-native%E7%8E%AF%E5%A2%83%E6%90% ...
- JVM Debugger Memory View for IntelliJ IDEA
Posted on August 19, 2016 by Andrey Cheptsov Every day we try to find new ways to improve developer ...
- WebMagic编译时提示Failure to transfer org.apache.maven.plugins:maven-surefire-plugin:pom:2.18的解决方法
问题描述: 从http://git.oschina.net/flashsword20/webmagic 下载最新代码,按照http://webmagic.io/docs/zh/posts/ch3 ...
- awstats日志分析
nginx日志格式设定,去掉如下行#号 #vim /usr/local/nginx/conf/nginx.conf log_format access '$remote_addr -$remote_u ...
- CCNA实验3.单臂路由器
拓扑图: 一.交换机配置 通过路由器子接口的方式实现vlan之间的路由. conf t vlan 10 vlan 20 int f0/1 switchport access vlan 10 int f ...
- ANTLR flex/bison
https://stackoverflow.com/questions/29971097/how-to-create-ast-with-antlr4 这个很值得仔细看 https://github.c ...
- sublime text 3-right click context menu
dd a system wide windows explorer button " Edit with Sublime" similar to how Notepad++ doe ...