python 模块和模块sys.argv
In [5]: import os

In [6]: os.__file__

Out[6]: '/usr/local/lib/python2.7/os.pyc'

In [7]: import random

In [8]: random.__file__

Out[8]: '/usr/local/lib/python2.7/random.pyc'

In [9]: ll /usr/local/lib/python2.7/ |head

total 12276

-rw-r--r--  1 root  18619 Sep 23 07:20 _abcoll.py

-rw-r--r--  1 root  26098 Sep 23 07:20 _abcoll.pyc

-rw-r--r--  1 root  26098 Sep 23 07:21 _abcoll.pyo

-rw-r--r--  1 root   7145 Sep 23 07:20 abc.py

-rw-r--r--  1 root   6187 Sep 23 07:20 abc.pyc

-rw-r--r--  1 root   6131 Sep 23 07:21 abc.pyo

-rw-r--r--  1 root  34547 Sep 23 07:20 aifc.py

-rw-r--r--  1 root  30740 Sep 23 07:20 aifc.pyc

-rw-r--r--  1 root  30740 Sep 23 07:21 aifc.pyo
##############制作简单的模块#############
vim sendmsg.py

#!/usr/local/bin/python3

# -*- coding:utf-8 -*-

def test1():

    print('---test1---')

[root@master module]# vim main.py

#!/usr/local/bin/python3

# -*- coding:utf-8 -*-

import sendmsg

sendmsg.test1

[root@master module]# python3 main.py

---test1---

[root@master module]# ll

total 16

-rw-r--r-- 1 root root   82 Oct 16 10:15 main.py

drwxr-xr-x 2 root root 4096 Oct 16 10:16 __pycache__

-rw-r--r-- 1 root root   87 Oct 16 10:13 sendmsg.py

-rw-r--r-- 1 root root  260 Oct 16 10:15 sendmsg.pyc
[root@master module]# tree

.

├── main.py

├── __pycache__

│   └── sendmsg.cpython-35.pyc

├── sendmsg.py

└── sendmsg.pyc

1 directory, 4 files

You have new mail in /var/spool/mail/root

[root@master module]# pwd

/home/weixin/module
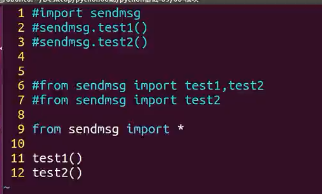
提示:尽量少使用*号
############################包和模块的概念#################
简单点就是:.py 文件就是模块
包:在一个文件夹里面有py文件,又有__init__.py文件的就是包
[root@master bao]# ll

total 4

drwxr-xr-x 2 root root 4096 Oct 16 14:27 Testmsg     ##这是一个目录

[root@master bao]# tree

.

└── Testmsg

    ├── __init__.py

    ├── recevemsg.py

    └── sendmsg.py

备注:##在python3会认为Testmsg这就是一个包,在没有__init__.py文件的情况下,可以import Testmsg 成功,但是无法使用里面的模块;python2则一定要有
       __init__.py文件的情况下,才可以import Testmsg 成功,但是也无法使用里面的模块。

__init__.py 文件只要在import Testmsg 就会被执行;
怎么使用模块呢????
[root@master Testmsg]# vim __init__.py

#!/usr/local/bin/python3

# -*- coding:utf-8 -*-

from . import recevemsg

from . import sendmsg

[root@master bao]# ipython

In [1]: import Testmsg

In [2]: Testmsg.recevemsg.rmsg()

---recevemmessage---

In [3]: Testmsg.sendmsg.smsg()

---sendmessage---

[root@master bao]# python3

Python 3.5.4 (default, Oct  7 2017, 12:39:20)

[GCC 4.4.7 20120313 (Red Hat 4.4.7-17)] on linux

Type "help", "copyright", "credits" or "license" for more information.

>>> import Testmsg

>>> Testmsg.sendmsg.smsg()

---sendmessage---

>>> Testmsg.recevemsg.rmsg()

---recevemmessage---
>>> Testmsg.__file__
'/home/weixin/module/bao/Testmsg/__init__.py'
>>> import os
>>> os.__file__
'/usr/local/lib/python3.5/os.py'
###################发布自己的模块####################
[root@master 01-发布模块]# ll

total 12-rw-r--r-- 1 root root  162 Oct 16 16:02 setup.py

drwxr-xr-x 3 root root 4096 Oct 16 16:00 Testmsg

[root@master 01-发布模块]# pwd

/home/weixin/module/01-发布模块
[root@master 01-发布模块]# tree Testmsg/
Testmsg/
├── __init__.py
├── __init__.pyc
├── __pycache__
│ ├── __init__.cpython-35.pyc
│ ├── recevemsg.cpython-35.pyc
│ └── sendmsg.cpython-35.pyc
├── recevemsg.py
├── recevemsg.pyc
├── sendmsg.py
└── sendmsg.pyc
[root@master 01-发布模块]# cat setup.py #这个文件需要创建,并加入如下内容
from distutils.core import setup
setup(name="fush",version="1.0",description="fush’s module",author="fush",py_modules=["Testmsg.sendmsg",'Testmsg.recevemsg'])
备注:py_modules=["Testmsg.sendmsg",'Testmsg.recevemsg'] Testmsg 是包名也就是文件夹,sendmsg和recevemsg 是模块名
最后执行:
[root@master 01-发布模块]# python3 setup.py build
running build
running build_py
creating build
creating build/lib
creating build/lib/Testmsg
copying Testmsg/__init__.py -> build/lib/Testmsg
copying Testmsg/sendmsg.py -> build/lib/Testmsg
copying Testmsg/recevemsg.py -> build/lib/Testmsg
此时:
[root@master 01-发布模块]# tree
.
├── build
│ └── lib
│ └── Testmsg
│ ├── __init__.py
│ ├── recevemsg.py
│ └── sendmsg.py
├── setup.py
└── Testmsg
├── __init__.py
├── __init__.pyc
├── __pycache__
│ ├── __init__.cpython-35.pyc
│ ├── recevemsg.cpython-35.pyc
│ └── sendmsg.cpython-35.pyc
├── recevemsg.py
├── recevemsg.pyc
├── sendmsg.py
└── sendmsg.pyc
再执行:
[root@master 01-发布模块]# python3 setup.py sdist
running sdist
running check
warning: check: missing required meta-data: url
warning: check: missing meta-data: if 'author' supplied, 'author_email' must be supplied too
warning: sdist: manifest template 'MANIFEST.in' does not exist (using default file list)
warning: sdist: standard file not found: should have one of README, README.txt
writing manifest file 'MANIFEST'
creating fush-1.0
creating fush-1.0/Testmsg
making hard links in fush-1.0...
hard linking setup.py -> fush-1.0
hard linking Testmsg/__init__.py -> fush-1.0/Testmsg
hard linking Testmsg/recevemsg.py -> fush-1.0/Testmsg
hard linking Testmsg/sendmsg.py -> fush-1.0/Testmsg
creating dist
Creating tar archive
removing 'fush-1.0' (and everything under it)
此时:
[root@master 01-发布模块]# tree
.
├── build
│ └── lib
│ └── Testmsg
│ ├── __init__.py
│ ├── recevemsg.py
│ └── sendmsg.py
├── dist
│ └── fush-1.0.tar.gz
├── MANIFEST
├── setup.py
└── Testmsg
├── __init__.py
├── __init__.pyc
├── __pycache__
│ ├── __init__.cpython-35.pyc
│ ├── recevemsg.cpython-35.pyc
│ └── sendmsg.cpython-35.pyc
├── recevemsg.py
├── recevemsg.pyc
├── sendmsg.py
└── sendmsg.pyc
再接下来(模拟下载模块安装):
[root@master 01-发布模块]# ll
total 20
drwxr-xr-x 3 root root 4096 Oct 16 16:02 build
drwxr-xr-x 2 root root 4096 Oct 16 16:09 dist
-rw-r--r-- 1 root root 112 Oct 16 16:09 MANIFEST
-rw-r--r-- 1 root root 162 Oct 16 16:02 setup.py
drwxr-xr-x 3 root root 4096 Oct 16 16:00 Testmsg
You have new mail in /var/spool/mail/root
[root@master 01-发布模块]# cd dist/
[root@master dist]# ll
total 4
-rw-r--r-- 1 root root 602 Oct 16 16:09 fush-1.0.tar.gz
[root@master dist]# cp ./fush-1.0.tar.gz ~/
[root@master dist]# cd
[root@master ~]# ll
total 236
-rw-------. 1 root root 1096 May 31 2016 anaconda-ks.cfg
-rw-r--r-- 1 root root 602 Oct 16 16:17 fush-1.0.tar.gz
-rw-r--r-- 1 root root 0 Oct 6 23:11 fush.txt
-rw-r--r--. 1 root root 9795 May 31 2016 install.log
-rw-r--r--. 1 root root 3091 May 31 2016 install.log.syslog
drwxr-xr-x 2 root root 4096 Oct 16 11:32 log
drwxr-xr-x 2 root root 4096 Oct 7 04:47 tool
-rw-r--r-- 1 root root 201676 Sep 26 22:08 wc.jar
-rw-r--r-- 1 root root 333 Oct 10 14:33 存放家具oop.py
[root@master ~]# tar xf fush-1.0.tar.gz
[root@master ~]# ll
total 240
-rw-------. 1 root root 1096 May 31 2016 anaconda-ks.cfg
drwxr-xr-x 3 root root 4096 Oct 16 16:09 fush-1.0
-rw-r--r-- 1 root root 602 Oct 16 16:17 fush-1.0.tar.gz
-rw-r--r-- 1 root root 0 Oct 6 23:11 fush.txt
-rw-r--r--. 1 root root 9795 May 31 2016 install.log
-rw-r--r--. 1 root root 3091 May 31 2016 install.log.syslog
drwxr-xr-x 2 root root 4096 Oct 16 11:32 log
drwxr-xr-x 2 root root 4096 Oct 7 04:47 tool
-rw-r--r-- 1 root root 201676 Sep 26 22:08 wc.jar
-rw-r--r-- 1 root root 333 Oct 10 14:33 存放家具oop.py
[root@master ~]# tree fush-1.0 ##跟之前制作的内容是一样的,只有PKG-INFO是多出来的
fush-1.0
├── PKG-INFO
├── setup.py
└── Testmsg
├── __init__.py
├── recevemsg.py
└── sendmsg.py
1 directory, 5 files
[root@master ~]# cat fush-1.0/PKG-INFO
Metadata-Version: 1.0
Name: fush
Version: 1.0
Summary: fush’s module
Home-page: UNKNOWN
Author: fush
Author-email: UNKNOWN
License: UNKNOWN
Description: UNKNOWN
Platform: UNKNOWN
最后安装:
[root@master ~]# cd fush-1.0
[root@master fush-1.0]# ll
total 12
-rw-r--r-- 1 root root 181 Oct 16 16:09 PKG-INFO
-rw-r--r-- 1 root root 162 Oct 16 16:02 setup.py
drwxr-xr-x 2 root root 4096 Oct 16 16:09 Testmsg
[root@master fush-1.0]# python3 setup.py install
running install
running build
running build_py
creating build
creating build/lib
creating build/lib/Testmsg
copying Testmsg/__init__.py -> build/lib/Testmsg
copying Testmsg/sendmsg.py -> build/lib/Testmsg
copying Testmsg/recevemsg.py -> build/lib/Testmsg
running install_lib
creating /usr/local/lib/python3.5/site-packages/Testmsg
copying build/lib/Testmsg/__init__.py -> /usr/local/lib/python3.5/site-packages/Testmsg
copying build/lib/Testmsg/sendmsg.py -> /usr/local/lib/python3.5/site-packages/Testmsg
copying build/lib/Testmsg/recevemsg.py -> /usr/local/lib/python3.5/site-packages/Testmsg
byte-compiling /usr/local/lib/python3.5/site-packages/Testmsg/__init__.py to __init__.cpython-35.pyc
byte-compiling /usr/local/lib/python3.5/site-packages/Testmsg/sendmsg.py to sendmsg.cpython-35.pyc
byte-compiling /usr/local/lib/python3.5/site-packages/Testmsg/recevemsg.py to recevemsg.cpython-35.pyc
running install_egg_info
Writing /usr/local/lib/python3.5/site-packages/fush-1.0-py3.5.egg-info
测试:
[root@master ~]# python3
>>> import Testmsg
>>> Testmsg.sendmsg.smsg()
---sendmessage---
>>> from Testmsg import sendmsg
>>> sendmsg.smsg()
---sendmessage---
这样就OK 了。
#########模块的导入先后顺序##################
我们import module 的时候,python 是怎么查找的呢?
In [2]: import sys

In [3]: sys.path

Out[3]:

['',

 '/usr/local/bin',

 '/usr/local/lib/python27.zip',

 '/usr/local/lib/python2.7',

 '/usr/local/lib/python2.7/plat-linux2',

 '/usr/local/lib/python2.7/lib-tk',

 '/usr/local/lib/python2.7/lib-old',

 '/usr/local/lib/python2.7/lib-dynload',

 '/usr/local/lib/python2.7/site-packages',

 '/usr/local/lib/python2.7/site-packages/IPython/extensions',

 '/root/.ipython']

以上就是路劲,默认从当前路径找,然后从上/usr/local/bin到下开始找,由于这是一个列表,所以我们可以使用sys.path.append() 来添加路径;

例如:sys.path.append('/home/weixin')

In [4]: sys.path.append('/home/weixin')

In [5]: sys.path

Out[5]:

['',

 '/usr/local/bin',

 '/usr/local/lib/python27.zip',

 '/usr/local/lib/python2.7',

 '/usr/local/lib/python2.7/plat-linux2',

 '/usr/local/lib/python2.7/lib-tk',

 '/usr/local/lib/python2.7/lib-old',

 '/usr/local/lib/python2.7/lib-dynload',

 '/usr/local/lib/python2.7/site-packages',

 '/usr/local/lib/python2.7/site-packages/IPython/extensions',

 '/root/.ipython',

 '/home/weixin']
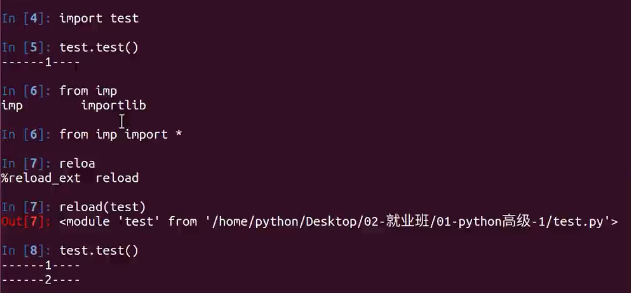
################模块重新导入##########
###############sys.argv###############
#!/usr/local/bin/python3

# -*- coding:utf-8 -*-

import sys

print(sys.argv)

print(sys.argv[0])

print(sys.argv[1])

print(sys.argv[2])

[root@master weixin]# python sysargv.py fush tt uu

['sysargv.py', 'fush', 'tt', 'uu']                    ##sys.argv

sysargv.py                                            ##sys.agrv[0]

fush                                                  ##sys.argv[1]

tt                                                    ##sys.argv[2]
python 模块和模块sys.argv的更多相关文章
- Python踩坑之 sys.argv[-1]代表什么
平台:win10+python 3.7.0 一.sys说明: sys.argv这个函数是我们写python脚本中最常用的一个函数. sys是Python的一个「标准库」,也就是官方出的「模块」,是「S ...
- python 函数学习之sys.argv[1]
一.sys 模块 sys是Python的一个「标准库」,也就是官方出的「模块」,是「System」的简写,封装了一些系统的信息和接口. 官方的文档参考:https://docs.python.org/ ...
- Python命令行参数sys.argv[]
学习C语言的时候就没弄明白命令行参数的用法,在学习Pyton 的时候又遇到了命令行参数,在这里稍微学习了一下,稍微明白了一些在这里做个记录方便后面回顾复习. Sys.argv[]是用来获取命令行参数的 ...
- Python学习日记(八)—— 模块一(sys、os、hashlib、random、time、RE)
模块,用一砣代码实现了某个功能的代码集合. 类似于函数式编程和面向过程编程,函数式编程则完成一个功能,其他代码用来调用即可,提供了代码的重用性和代码间的耦合.而对于一个复杂的功能来,可能需要多个函数才 ...
- day18 python模块 random time sys os模块
day18 python 一.random模块 取随机整数 import random print(random.randint(1,2)) #顾头顾尾 p ...
- python关于操作文件的相关模块(os,sys,shutil,subprocess,configparser)
一:os模块 os模块提供了许多允许你程序与操作系统直接交互的功能 功能 说明 os.getcwd() 获取当前工作目录,即当前python脚本工作的目录路径 os.chdir("dirna ...
- python之常见模块(time,datetime,random,os,sys,json,pickle)
目录 time 为什么要有time模块,time模块有什么用?(自己总结) 1. 记录某一项操作的时间 2. 让某一块代码逻辑延迟执行 时间的形式 时间戳形式 格式化时间 结构化时间 时间转化 总结: ...
- python sys.argv[]
sys.argv[]是用来获取命令行参数的,是一个由该脚本自身路径和其它输入的参数组成的List.sys.argv[0]表示代码本身文件路径. 这里,当我们执行python using_sys.py ...
- Python的sys.argv使用说明
刚开始使用这个参数的时候,很不明白其含义.网上搜索很多都是贴的官网上面的一则实例,说看懂,就明白.可是,我看不懂.现在在回头看这个参数使用,并不是很麻烦. 举几个小例子就明白了. 创建一个脚本,内容如 ...
随机推荐
- iphone越狱-------平刷回越狱前(未越狱)状态
众所周知,iPhone采用了沙盒机制,应用之间不能任意的访问,所以很多机友在拿到iPhone后,往往选择进行越狱,但是有时候,越狱的手机有的时候在安全.性能.流畅性等方面表现并不如意,所以只好寻求重新 ...
- C 标准库 - <limits.h>
C 标准库 - <limits.h> 简介 limits.h 头文件决定了各种变量类型的各种属性.定义在该头文件中的宏限制了各种变量类型(比如 char.int 和 long)的值. 这些 ...
- Adam:大规模分布式机器学习框架
引子 转载请注明:http://blog.csdn.net/stdcoutzyx/article/details/46676515 又是好久没写博客,记得有一次看Ng大神的訪谈录,假设每周读三篇论文, ...
- Android自己定义View的实现方法
转载请注明出处:http://blog.csdn.net/guolin_blog/article/details/17357967 不知不觉中,带你一步步深入了解View系列的文章已经写到第四篇了.回 ...
- 数据结构与算法系列----AC自己主动机
一:概念 首先简要介绍一下AC自己主动机:Aho-Corasick automation,该算法在1975年产生于贝尔实验室,是著名的多模匹配算法之中的一个.一个常见的样例就是给出n个单词,再给出一段 ...
- 【转载】Web Service和WCF的到底有什么区别
[1]Web Service:严格来说是行业标准,也就是Web Service 规范,也称作WS-*规范,既不是框架,也不是技术. 它有一套完成的规范体系标准,而且在持续不断的更新完善中. 它使用XM ...
- Hadoop学习笔记(一)——Hadoop体系结构
HDFS和MapReduce是Hadoop的两大核心. 整个Hadoop体系结构主要是通过HDFS来实现分布式存储的底层支持的,而且通过MapReduce来实现分布式并行任务处理的程序支持. 一.HD ...
- 谈谈 T 型人才
谈谈 T 型人才 昨天的图片发模糊了,正好我把这个话题展开聊一聊吧.这个话题是关于复合型人才的,我把它称作 T 型人才. 「全栈」工程师 前一段时间,「全栈」工程师的概念很火,不过大多数时候,「全 ...
- Excel表格数据导入Mysql数据库的方法
1.使用Navicat 连接需要导入的数据库. 2.excel 列的名字最好和数据库的名字一致,便于我们直观的查看好理解. 第一步,先创建好表,和准备好对应的excel文件.在Navicat 中选 ...
- 压力测试工具ab,wrk,locust简介
ab 无疑是目前最常见的压力测试工具.其典型用法如下: shell> ab -k -c 100 -t 10 http://domain/path 其中,参数「c」表示的是并发, 参数「t」表示的 ...