Spring Boot(二):数据库操作
本文主要讲解如何通过spring boot来访问数据库,本文会演示三种方式来访问数据库,第一种是JdbcTemplate,第二种是JPA,第三种是Mybatis。之前已经提到过,本系列会以一个博客系统作为讲解的基础,所以本文会讲解文章的存储和访问(但不包括文章的详情),因为最终的实现是通过MyBatis来完成的,所以,对于JdbcTemplate和JPA只做简单演示,MyBatis部分会完整实现对文章的增删改查。
一、准备工作
在演示这几种方式之前,需要先准备一些东西。第一个就是数据库,本系统是采用MySQL实现的,我们需要先创建一个student的表:
DROP TABLE IF EXISTS `student`;

CREATE TABLE `student` (

  `id` varchar(10) NOT NULL,

  `name` varchar(10) default NULL,

  `age` varchar(10) default NULL,

  `schoolName` varchar(55) default NULL,

  `createTime` datetime default NULL,

  PRIMARY KEY  (`id`)

) ENGINE=InnoDB DEFAULT CHARSET=utf8;
后续的演示会对这个表进行增删改查。另外配置文件使用properties配置,即application.properties(你也可以使用application.yml配置文件,没什么太大的区别,如果对ymal不熟悉,有兴趣也可以查一下,比较简单)。
spring.datasource.url=jdbc:mysql://localhost:3306/databasezfy?useUnicode=true&characterEncoding=UTF-8&useSSL=false

spring.datasource.driverClassName=com.mysql.jdbc.Driver

spring.datasource.username=root

spring.datasource.password=123456
最后,我们还需要建立与数据库对应的POJO类,代码如下:
public class Student implements Serializable{

    private static final long serialVersionUID = 5465872778586910807L;

    private String id;

    private String name;

    private String age;

    private String schoolName;

    private Date createTime;

}
好了,需要准备的工作就这些,现在开始实现数据库的操作。
二、与JdbcTemplate集成
首先,我们先通过JdbcTemplate来访问数据库,这里只演示数据的插入,上一篇文章中我们已经提到过,Spring boot提供了许多的starter来支撑不同的功能,要支持JdbcTemplate我们需要引入下面的starter和连接mysql的驱动:
<dependency>

    <groupId>org.springframework.boot</groupId>

    <artifactId>spring-boot-starter-jdbc</artifactId>

</dependency>

<dependency>

    <groupId>mysql</groupId>

    <artifactId>mysql-connector-java</artifactId>

    <version>5.1.34</version>

</dependency>
现在我们就可以通过JdbcTemplate来实现数据的插入了:
public interface StudentDao {

    int insertStudent(Student student);

}
@Repository

public class StudentDaoImpl implements StudentDao{

    @Autowired

    private NamedParameterJdbcTemplate jdbcTemplate;

    @Override

    public int insertStudent(Student student) {

        String sql = "insert into student (id,name,age,schoolName,createTime) values (:id,:name,:age,:schoolName,:createTime)";

        Map map = new HashMap();

        map.put("id",student.getId());

        map.put("name",student.getName());

        map.put("age",student.getAge());

        map.put("schoolName",student.getSchoolName());

        map.put("createTime",student.getCreateTime());

        int result = jdbcTemplate.update(sql, map);

        return result;

    }

}
我们通过JUnit来测试上面的代码:
@RunWith(SpringJUnit4ClassRunner.class)

@SpringBootTest(classes = DemoApplication.class)

public class StudentDaoTest {

    @Autowired

    private StudentDao studentDao;

    @Test

    public void testInsert(){

        Student student = new Student();

        student.setId("1");

        student.setName("zs");

        student.setAge("10");

        student.setSchoolName("一中");

        student.setCreateTime(new Date());

        studentDao.insertStudent(student);

    }

}
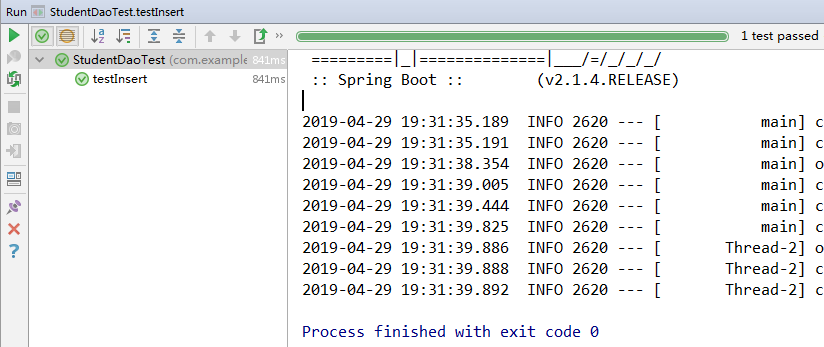
测试结果:test passed
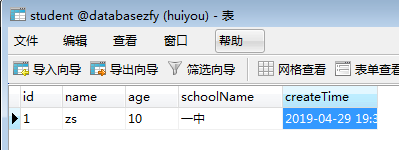
表中也插入了一条数据:
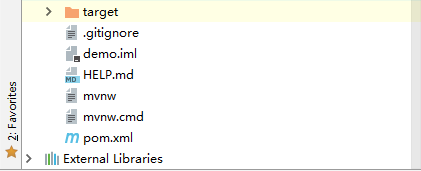
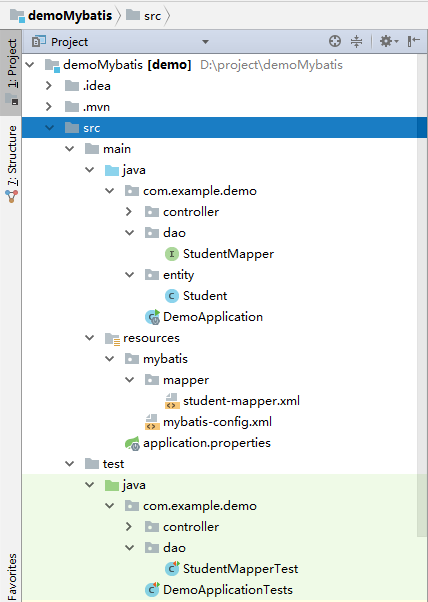
目录结构:

三、与JPA集成
JPA是Java Persistence API的简称,中文名Java持久层API,是JDK 5.0注解或XML描述对象-关系表的映射关系,并将运行期的实体对象持久化到数据库中。
现在我们开始讲解如何通过JPA的方式来实现数据库的操作。还是跟JdbcTemplate类似,首先,我们需要引入对应的starter:
<dependency>

       <groupId>org.springframework.boot</groupId>

       <artifactId>spring-boot-starter-data-jpa</artifactId>

</dependency>
然后我们需要对POJO类增加Entity的注解,并指定表名(如果不指定,默认的表名为student),然后需要指定表主键ID所在的get方法,这些都是JPA的知识,与Spring boot无关,如果不熟悉的话可以看下JPA的知识点,注意注解所在的包,别引错包。
@Entity

@Table(name = "student")

public class Student implements Serializable {

    private static final long serialVersionUID = 5465872778586910807L;

    private String id;

    private String name;

    private String age;

    private String schoolName;

    private Date createTime;

    @Id

    public String getId() {

        return id;

    }

    .................................

    .................................

}
最后,我们需要继承JpaRepository这个类,这里我们实现了两个查询方法,第一个是符合JPA命名规范的查询(方法名写的时候会有提示),JPA会自动帮我们完成查询语句的生成,另一种方式是我们自己实现JPQL(JPA支持的一种类SQL的查询),这里举例使用第一种的查询
public interface StudentRepository extends JpaRepository<Student,String>{

    public Student findStudentById(String id);

}
JpaRepository<Student,String>中的参数表明实体和主键类型。
好了,我们可以再测试一下上面的代码:
@RunWith(SpringJUnit4ClassRunner.class)

@SpringBootTest(classes = DemoApplication.class)

public class StudentRepositoryTest {

    @Autowired

    private StudentRepository studentRepository;

    @Test

    public void testQuery(){

        Student studentById = studentRepository.findStudentById("1");

        System.out.println(studentById);

    }

}
测试结果:报错
Caused by: com.mysql.jdbc.exceptions.jdbc4.MySQLSyntaxErrorException: Unknown column 'student0_.create_time' in 'field list'

    at sun.reflect.NativeConstructorAccessorImpl.newInstance0(Native Method)

    at sun.reflect.NativeConstructorAccessorImpl.newInstance(NativeConstructorAccessorImpl.java:62)

    at sun.reflect.DelegatingConstructorAccessorImpl.newInstance(DelegatingConstructorAccessorImpl.java:45)

    at java.lang.reflect.Constructor.newInstance(Constructor.java:423)

    at com.mysql.jdbc.Util.handleNewInstance(Util.java:377)

    at com.mysql.jdbc.Util.getInstance(Util.java:360)
原因:类的属性,表字段命名是驼峰命名法(createTime),Spring data jpa 在操作表的时候,生成的sql语句中却是create_time, 表字段不对照,解决方法参见:jpa数据库表实体命名规则 Unknown column 'user0_.create_time' in 'field list',生成的sql语句时无修改命名,即在application.properties配置文件中加入
spring.jpa.hibernate.naming.physical-strategy=org.hibernate.boot.model.naming.PhysicalNamingStrategyStandardImpl
spring.datasource.url=jdbc:mysql://localhost:3306/databasezfy?useUnicode=true&characterEncoding=UTF-8&useSSL=false

spring.datasource.driverClassName=com.mysql.jdbc.Driver

spring.datasource.username=root

spring.datasource.password=123456

spring.jpa.hibernate.naming.physical-strategy=org.hibernate.boot.model.naming.PhysicalNamingStrategyStandardImpl
在测试一下:test passed

四、与MyBatis集成
最后,我们再看看如何通过MyBatis来实现数据库的访问。同样我们还是要引入starter:
<dependency>

      <groupId>org.mybatis.spring.boot</groupId>

      <artifactId>mybatis-spring-boot-starter</artifactId>

      <version>1.1.1</version>

</dependency>
由于该starter不是spring boot官方提供的,所以版本号于Spring boot不一致,需要手动指定。
MyBatis一般可以通过XML或者注解的方式来指定操作数据库的SQL,个人比较偏向于XML,所以,本文中也只演示了通过XML的方式来访问数据库。首先,我们需要配置mapper的目录。我们在application.properties中进行配置:
spring.datasource.url=jdbc:mysql://localhost:3306/databasezfy?useUnicode=true&characterEncoding=UTF-8&useSSL=false

spring.datasource.driverClassName=com.mysql.jdbc.Driver

spring.datasource.username=root

spring.datasource.password=123456

mybatis.config-locations=mybatis/mybatis-config.xml

mybatis.mapper-locations=mybatis/mapper/*.xml
这里配置主要包括两个部分,一个是mybatis自身的一些配置,例如基本类型的别名,是否支持缓存。第二个是指定mapper文件的位置。这个配置也可以通过 Java configuration来实现,由于篇幅的问题,我这里就不详述了,有兴趣的朋友可以自己实现一下。
配置完后,我们先编写mapper对应的接口:
@Service

public interface StudentMapper {

    public int insertStudent(Student student);

}
该接口暂时只定义了一个方法,即插入操作。这是一个接口,并且和JPA类似,可以不用实现类。接下来我们编写XML文件:
<?xml version="1.0" encoding="UTF-8"?>

<!DOCTYPE mapper PUBLIC "-//mybatis.org//DTD Mapper 3.0//EN"

        "http://mybatis.org/dtd/mybatis-3-mapper.dtd">

<mapper namespace="com.example.demo.dao.StudentMapper">

    <sql id="base_column">

      id,name,age,schoolName,createTime

    </sql>

    <insert id="insertStudent" parameterType="com.example.demo.entity.Student">

        INSERT INTO

        student(<include refid="base_column"/>)

        VALUES

        (#{id},#{name},#{age},#{schoolName},#{createTime})

    </insert>

</mapper>
好了,与MyBatis的集成也完成了,我们再测试一下:
@RunWith(SpringJUnit4ClassRunner.class)

@SpringBootTest(classes = DemoApplication.class)

public class StudentMapperTest {

    @Autowired

    private StudentMapper studentMapper;

    @Test

    public void testInsert() {

        Student student = new Student();

        student.setId("2");

        student.setName("ls");

        student.setAge("11");

        student.setSchoolName("erzhong");

        student.setCreateTime(new Date());

        studentMapper.insertStudent(student);

    }

}
测试一下,会发现报错
org.springframework.beans.factory.UnsatisfiedDependencyException: Error creating bean with name 'com.example.demo.dao.StudentMapperTest': Unsatisfied dependency expressed through field 'studentMapper'; nested exception is org.springframework.beans.factory.NoSuchBeanDefinitionException: No qualifying bean of type 'com.example.demo.dao.StudentMapper' available: expected at least 1 bean which qualifies as autowire candidate. Dependency annotations: {@org.springframework.beans.factory.annotation.Autowired(required=true)}

    at org.springframework.beans.factory.annotation.AutowiredAnnotationBeanPostProcessor$AutowiredFieldElement.inject(AutowiredAnnotationBeanPostProcessor.java:596) ~[spring-beans-5.1.6.RELEASE.jar:5.1.6.RELEASE]

    at org.springframework.beans.factory.annotation.InjectionMetadata.inject(InjectionMetadata.java:90) ~[spring-beans-5.1.6.RELEASE.jar:5.1.6.RELEASE]
No qualifying bean of type 'com.example.demo.dao.StudentMapper' available,也就是说StudentMapperTest中依赖的StudentMapper unavaliable,即找不到StudentMapper类。所以在启动DemoApplication需要扫描StudentMapper类,加上@MapperScan注解扫描j将*Mapper扫描进来。@MapperScan注解
@SpringBootApplication

@MapperScan("com.example.demo.dao")

public class DemoApplication {

    public static void main(String[] args) {

        SpringApplication.run(DemoApplication.class, args);

    }

}
在测试一下:

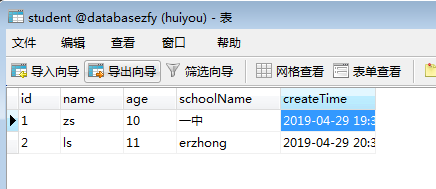
插入成功:
捋一下StudentMapperTest整个插入操作执行的过程:
①加载Application这个类,扫描com.example.demo.dao包下的所有Mapper
②这样就可以通过@Autowired注解引入StudentMapper,执行insertStudent方
③通过配置文件application.properties中的mybatis.mapper-locations=mybatis/mapper/*.xml定位到*.xml文件,最后通过nameSpace即StudentMapper所在的路径(com.example.demo.dao.StudentMapper)和SQL语句中的id即方法名(insertStudent)唯一标识对应的SQL语句。
附上目录结构:
五、总结
本文演示Spring boot与JdbcTemplate、JPA以及MyBatis的集成,整体上来说配置都比较简单,以前做过相关配置的同学应该感觉比较明显,Spring boot确实在这方面给我们提供了很大的帮助。后续的文章中我们只会使用MyBatis这一种方式来进行数据库的操作。
参考资料:
Spring Boot(二):数据库操作的更多相关文章
- Spring Boot学习——数据库操作及事务管理
本文讲解使用Spring-Data-Jpa操作数据库. JPA定义了一系列对象持久化的标准. 一.在项目中使用Spring-Data-Jpa 1. 配置文件application.properties ...
- spring boot访问数据库
1. Spring JAP 基本使用说明: Spring boot 访问数据库基本上都是通过Spring JPA封装的Bean作为API的,Spring JPA 将访问数据库通过封装,只要你的类实现了 ...
- Spring Boot(二十):使用spring-boot-admin对spring-boot服务进行监控
Spring Boot(二十):使用spring-boot-admin对spring-boot服务进行监控 Spring Boot Actuator提供了对单个Spring Boot的监控,信息包含: ...
- Spring Boot 二十个注解
Spring Boot 二十个注解 占据无力拥有的东西是一种悲哀. Cold on the outside passionate on the insede. 背景:Spring Boot 注解的强大 ...
- Spring Boot中快速操作Mongodb
Spring Boot中快速操作Mongodb 在Spring Boot中集成Mongodb非常简单,只需要加入Mongodb的Starter包即可,代码如下: <dependency> ...
- Spring Boot MyBatis 数据库集群访问实现
Spring Boot MyBatis 数据库集群访问实现 本示例主要介绍了Spring Boot程序方式实现数据库集群访问,读库轮询方式实现负载均衡.阅读本示例前,建议你有AOP编程基础.mybat ...
- spring boot由浅入深(二)spring boot基本命令及操作
一 spring常见注解 @RestController和@RequestMapping说明: @RestController.这被称为一个构造型(stereotype)注解.它为阅读代码的人们提供建 ...
- spring boot(二):web综合开发
上篇文章介绍了Spring boot初级教程:spring boot(一):入门篇,方便大家快速入门.了解实践Spring boot特性:本篇文章接着上篇内容继续为大家介绍spring boot的其它 ...
- Spring boot实现数据库读写分离
背景 数据库配置主从之后,如何在代码层面实现读写分离? 用户自定义设置数据库路由 Spring boot提供了AbstractRoutingDataSource根据用户定义的规则选择当前的数据库,这样 ...
随机推荐
- Python3+unitest自动化测试初探(中篇)
目录 6.生成测试报告 7.编写邮件发送工具 8.发送邮件 发布 0 86 编辑 删除 Python3+unitest自动化测试初探(中篇)(2019-04-18 01:41) 发布 3 245 编辑 ...
- .NET Core 技巧汇总篇
前言 本篇幅会专门记录在工作中实际碰到的问题场景,和一些比较好的实现方法作为汇总,可以供各位借鉴和参考,当然 本人入行不深,能力有限,仅供各位借鉴和参考.欢迎补充 技巧一:引入其他项目类库文件 做项目 ...
- 使用 ASP.NET Core MVC 创建 Web API(一)
从今天开始来学习如何在 ASP.NET Core 中构建 Web API 以及每项功能的最佳适用场景.关于此次示例的数据库创建请参考<学习ASP.NET Core Razor 编程系列一> ...
- 浅谈SQL Server内部运行机制
对于已经很熟悉T-SQL的读者,或者对于较专业的DBA来说,逻辑的增删改查,或者较复杂的SQL语句,都是非常简单的,不存在任何挑战,不值得一提,那么,SQL的哪些方面是他们的挑战 或者软肋呢? 那就是 ...
- asp.net core系列 30 EF管理数据库架构--必备知识 迁移
一.管理数据库架构概述 EF Core 提供两种主要方法来保持 EF Core 模型和数据库架构同步.一是以 EF Core 模型为基准,二是以数据库为基准. (1)如果希望以 EF Core 模型为 ...
- 在React中使用Typescript的实践问题总结
1.布尔值的大小写问题: 声明变量类型的时候,使用小写boolean 2. 对于从父组件传递过来的函数,子组件在模版中调用时,如果采用原来的写法,会报错: 改变写法后是如下这样,如果有参数和函数返回值 ...
- ado.net的简单数据库操作(二)之封装SqlHelperl类
今天我书接上回,接着昨天的ado.net的数据库操作的相关知识来讲哈! 从上篇文章给出的实例来看,你一定会发现,操作数据库其实还挺麻烦的,就连一个最简单的数据库操作语句都要包括 定义数据库连接字符串. ...
- c# List根据某个属性进行分类,变成以属性名称作为分类的多个List
在平时的开发中,我们从数据库中得到List列表,但是我们希望可以根据属性名称再次进行分类. 其实LINQ中已经内置相应的算法. 长话短说,直接上代码: var dataList = JsonHelpe ...
- MySQL 笔记整理(17) --如何正确地显示随机消息?
笔记记录自林晓斌(丁奇)老师的<MySQL实战45讲> (本篇内图片均来自丁奇老师的讲解,如有侵权,请联系我删除) 17) --如何正确地显示随机消息? 如果有这么一个英语单词表,需要每次 ...
- ASP.NET应用程序服务器集群方案
本文采用Nginx来实现ASP.NET程序集群化. 准备环境 首先准备Nginx环境,Windows版本下载链接:http://nginx.org/en/download.html 解压后文件格式如下 ...