
Spring注解AOP及单元测试junit(6)
2019-03-10/20:19:56
演示:将xml配置方式改为注解方式
静态以及动态代理推荐博客:https://blog.csdn.net/javazejian/article/details/56267036
junit单元测试jar包:https://share.weiyun.com/5pKuXVL
1.注解配置业务类
使用@Component("s") 注解ProductService 类表示业务类的Bean名字为 s
 package service;

 import org.springframework.stereotype.Component;

 @Component("s")
 public class ProductService {
     public void doSomeService(){
         System.out.println("doSomeService");
     }

 }
2.注解配置切面AOP
@Aspect 注解表示这是一个切面
@Component 表示这是一个bean,由Spring进行管理
在切面类的具体的方法前加上一句,表示这个切点被触发的时候,执行该函数,用Around方式,相当于把这个切点和这个切点的处理方法关联起来。
@Around(value = "execution(* service.ProductService.*(..))") 表示对service.ProductService 这个类中的所有方法进行切面操作.
含义就是,当expression中的函数被调用时,就会用around形式来触发切面函数,这条语句放在谁前面,谁就被定义为切面函数,也就是辅助功能。
 package aspect;
 import org.aspectj.lang.ProceedingJoinPoint;
 import org.aspectj.lang.annotation.Around;
 import org.aspectj.lang.annotation.Aspect;
 import org.springframework.stereotype.Component;

 @Aspect
 @Component
 public class LoggerAspect {

     @Around(value = "execution(* service.ProductService.*(..))")
     public Object log(ProceedingJoinPoint joinPoint) throws Throwable {
         System.out.println("start log:" + joinPoint.getSignature().getName());
         Object object = joinPoint.proceed();
         System.out.println("end log:" + joinPoint.getSignature().getName());
         return object;
     }
 }
3.配置文件applicationContext.xml
去掉原有的配置添加三行配置
 <?xml version="1.0" encoding="UTF-8"?>
 <beans xmlns="http://www.springframework.org/schema/beans"
     xmlns:xsi="http://www.w3.org/2001/XMLSchema-instance"
     xmlns:aop="http://www.springframework.org/schema/aop"
     xmlns:tx="http://www.springframework.org/schema/tx"
     xmlns:context="http://www.springframework.org/schema/context"
     xsi:schemaLocation="
    http://www.springframework.org/schema/beans
    http://www.springframework.org/schema/beans/spring-beans-3.0.xsd
    http://www.springframework.org/schema/aop
    http://www.springframework.org/schema/aop/spring-aop-3.0.xsd
    http://www.springframework.org/schema/tx
    http://www.springframework.org/schema/tx/spring-tx-3.0.xsd
    http://www.springframework.org/schema/context
    http://www.springframework.org/schema/context/spring-context-3.0.xsd">

     <context:component-scan base-package="aspect"/>
     <context:component-scan base-package="service"/>
     <aop:aspectj-autoproxy/>

 </beans>
4.单元测试junit
1.下载jar包地址在文章引用部分 junit-4.12.jar和hamcrest-all-1.3.jar 记得Add
2.修改TestSpring
@RunWith(SpringJUnit4ClassRunner.class) 表示这是一个Spring的测试类
@ContextConfiguration("classpath:applicationContext.xml")定位Spring的配置文件
@Autowired给这个测试类装配Category对象
@Test测试逻辑,打印c对象的名称
3.单元测试用的例子是博主SpringIOC/DI这篇文章中的例子参考链接https://www.cnblogs.com/bencoper/p/10494369.html
4.所有代码
TestSpring
 package test;

 import org.junit.Test;
 import org.junit.runner.RunWith;
 import org.springframework.beans.factory.annotation.Autowired;
 import org.springframework.test.context.ContextConfiguration;
 import org.springframework.test.context.junit4.SpringJUnit4ClassRunner;

 import pojo.Category;

 @RunWith(SpringJUnit4ClassRunner.class)
 @ContextConfiguration("classpath:applicationContext.xml")
 public class TestSpring {
     @Autowired
     Category c;

     @Test
     public void test(){
         System.out.println(c.getName());
     }
 }
 package com.how2java.test;

 import org.springframework.context.ApplicationContext;

 import org.springframework.context.support.ClassPathXmlApplicationContext;

 import pojo.Category;

 public class TestSpringOldWay {

     public static void main(String[] args) {
         ApplicationContext context = new ClassPathXmlApplicationContext(new String[] { "applicationContext.xml" });

         Category c = (Category) context.getBean("c");

         System.out.println(c.getName());
     }
 }
TestSpringOldWay
 <?xml version="1.0" encoding="UTF-8"?>
 <beans xmlns="http://www.springframework.org/schema/beans"
     xmlns:xsi="http://www.w3.org/2001/XMLSchema-instance"
     xmlns:aop="http://www.springframework.org/schema/aop"
     xmlns:tx="http://www.springframework.org/schema/tx"
     xmlns:context="http://www.springframework.org/schema/context"
     xsi:schemaLocation="
    http://www.springframework.org/schema/beans
    http://www.springframework.org/schema/beans/spring-beans-3.0.xsd
    http://www.springframework.org/schema/aop
    http://www.springframework.org/schema/aop/spring-aop-3.0.xsd
    http://www.springframework.org/schema/tx
    http://www.springframework.org/schema/tx/spring-tx-3.0.xsd
    http://www.springframework.org/schema/context
    http://www.springframework.org/schema/context/spring-context-3.0.xsd">

     <bean name="c" class="pojo.Category">
         <property name="name" value="category 1" />
     </bean>

 </beans>
applicationContext.xml
 package pojo;

 public class Category {
     private int id;
     private String name;

     public int getId() {
         return id;
     }
     public void setId(int id) {
         this.id = id;
     }
     public String getName() {
         return name;
     }
     public void setName(String name) {
         this.name = name;
     }

 }
Category.java
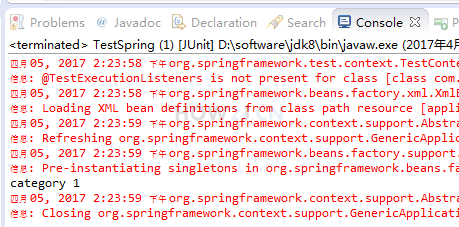
测试结果
Spring注解AOP及单元测试junit(6)的更多相关文章
- Spring注解 - AOP 面向切面编程
基本概念: AOP:Aspect Oriented Programming,即面向切面编程 指在程序运行期间动态的将某段代码切入到指定方法指定位置进行运行的编程方式 前置通知(@Before):在目标 ...
- 基于spring注解AOP的异常处理
一.前言 项目刚刚开发的时候,并没有做好充足的准备.开发到一定程度的时候才会想到还有一些问题没有解决.就比如今天我要说的一个问题:异常的处理.写程序的时候一般都会通过try...catch...fin ...
- spring 注解AOP
aspectAnnotation的切面信息,加到了AnnotationAwareAspectJAutoProxyCreator的advisorsCache属性里面去了. 解析annotationSe ...
- 重新学习Spring注解——AOP
面向切面编程——思想:在一个地方定义通用功能,但是可以通过声明的方式定义这个功能要以何种方式在何处运用,而无须修改受影响的类. 切面:横切关注点可以被模块化为特殊的类. 优点: 1.每个关注点都集中在 ...
- spring注解 aop
@Resource(name="as") 为空按类型装配 @autowired 按类型 @quafiler (name="xx") 按名称 spring继承关 ...
- spring 注解aop调用invoke()
public static void main(String[] args) { ClassPathXmlApplicationContext context = new ClassPathXmlAp ...
- JAVAEE——spring02:使用注解配置spring、sts插件、junit整合测试和aop演示
一.使用注解配置spring 1.步骤 1.1 导包4+2+spring-aop 1.2 为主配置文件引入新的命名空间(约束) 1.3 开启使用注解代替配置文件 1.4 在类中使用注解完成配置 2.将 ...
- Spring注解配置、Spring aop、整合Junit——Spring学习 day2
注解配置: 1.为主配置文件引入新的命名空间(约束) preference中引入文件 2.开启使用注解代理配置文件 <?xml version="1.0" encoding= ...
- 一步一步深入spring(5)--使用基于注解的spring实现 AOP
1.要利用spring aop,至少需要添加以下jar包 使用spring需要的jarspring.jar .commons-logging.jar 使用切面编程(AOP)需要的jar aspectj ...
随机推荐
- ASP.NET Core 实战:构建带有版本控制的 API 接口
一.前言 在上一篇的文章中,主要是搭建了我们的开发环境,同时创建了我们的项目模板框架.在整个前后端分离的项目中,后端的 API 接口至关重要,它是前端与后端之间进行沟通的媒介,如何构建一个 “好用” ...
- 在.NET Core中使用Exceptionless分布式日志收集框架
一.Exceptionless简介 Exceptionless 是一个开源的实时的日志收集框架,它可以应用在基于 ASP.NET,ASP.NET Core,Web Api,Web Forms,WPF, ...
- Docker最全教程之使用.NET Core推送钉钉消息(十九)
前言 上一篇我们通过实战分享了使用Go推送钉钉消息,由于技痒,笔者现在也编写了一个.NET Core的Demo,作为简单的对照和说明. 最后,由于精力有限,笔者希望有兴趣的朋友可以分享下使用CoreR ...
- 关于JAVA中Byte类型的取值范围的推论(*零为正数,-128在计算机中的表示方法...)
先看一段推理<*一切都是在8个比特位的前提下,讨论二进制的符号位,溢出等等,才有意义*> +124:0111 1100 -124:1000 0100 +125:0111 1101 -125 ...
- 安卓开发笔记(二十四):手把手教你一步步集成腾讯X5内核(Tencent TBS X5)
1.为什么要集成腾讯X5内核? X5内核相对于系统webview,具有下述明显优势: 1) 速度快:相比系统webview的网页打开速度有30+%的提升: 2) 省流量:使用云端优化技术使流量节省20 ...
- Git来操作GitHub~
设置用户名(设置一次 以后就不用再设置了) git config --global user.name 'taopanfeng' 设置邮箱(设置一次 以后就不用再设置了) git config --g ...
- windows远程桌面神器
近需要远程家庭版的WINDOWS系统的笔记本,发现它竟然没有远程桌面功能,系统属性下面根本没有远程桌面选项. 于是上网搜解决方案,找到下面这个神器,名字叫RDPwrap,不但能开通Vista以后任何版 ...
- kafka集群broker频繁挂掉问题解决方案
现象:kafka集群频繁挂掉 排查日志:查看日志文件[kafkaServer.out],发现错误日志:ERROR Shutdown broker because all log dirs in /tm ...
- Java 钩子函数编程技巧
Java提供注册钩子线程,在JVM进程关闭之前,会自动执行这个钩子线程. 运用这个技巧,可以再JVM关闭之前,释放一些系统资源. 这个功能利用的是Runtime类来实现. public class H ...
- 吴恩达机器学习笔记59-向量化:低秩矩阵分解与均值归一化(Vectorization: Low Rank Matrix Factorization & Mean Normalization)
一.向量化:低秩矩阵分解 之前我们介绍了协同过滤算法,本节介绍该算法的向量化实现,以及说说有关该算法可以做的其他事情. 举例:1.当给出一件产品时,你能否找到与之相关的其它产品.2.一位用户最近看上一 ...