Nginx做流媒体服务Windows版实现直播
声明:网上有很多关于Linux系统的配置,这里就不记录了。刚开始搭建直播室,用的是Java语言,
Java开源的流媒体服务有Red5,但是很久没更新了,而且文档较少不容易上手,对于直播功能相对要求较低的还是选择ngin来搭建流媒体服务,下面是记录搭建步骤。
一、下载搭建时需要用到的软件
1、下载 nginx 1.7.11.3 Gryphon
链接: http://nginx-win.ecsds.eu/download/nginx 1.7.11.3 Gryphon.zip
下载完成后解压,将文件重新命名因为含有空格,nginx
2、下载服务器状态检查程序
链接:https://github.com/arut/nginx-rtmp-module/
下载完成后解压,将解压过的文件放到nginx根目录,例如:E:\nginx\nginx-rtmp-module
3、下载OBS推流软件
链接:https://obsproject.com/ 进入官网选择下载
二、配置流媒体服务
1、修改nginx服务器中 conf 目录下的 nginx-win.conf 文件,配置如下
#user  nobody;

# multiple workers works !

worker_processes  ;

#error_log  logs/error.log;

#error_log  logs/error.log  notice;

#error_log  logs/error.log  info;

#pid        logs/nginx.pid;

events {

    worker_connections  ;

    # max value , nginx recycling connections+registry optimization =

    #   this.value *  = max concurrent connections currently tested with one worker

    #   C1000K should be possible depending there is enough ram/cpu power

    # multi_accept on;

}

rtmp {

    server {

        listen 1935;

        chunk_size 4000;

        notify_method get;

        application live { #rtmp推流地址:rtmp://ip地址:1935/live

             live on;

             on_publish http://192.168.8.210/on_publish.php; #rtmp推流鉴权,如果鉴权不通过则没有权限进行推流

        }

    }

}

http {

    #include      /nginx/conf/naxsi_core.rules;

    include       mime.types;

    default_type  application/octet-stream;

    #log_format  main  '$remote_addr:$remote_port - $remote_user [$time_local] "$request" '

    #                  '$status $body_bytes_sent "$http_referer" '

    #                  '"$http_user_agent" "$http_x_forwarded_for"';

    #access_log  logs/access.log  main;

#     # loadbalancing PHP

#     upstream myLoadBalancer {

#         server 127.0.0.1: weight= fail_timeout=;

#         server 127.0.0.1: weight= fail_timeout=;

#         server 127.0.0.1: weight= fail_timeout=;

#         server 127.0.0.1: weight= fail_timeout=;

#         server 127.0.0.1: weight= fail_timeout=;

#         server 127.0.0.1: weight= fail_timeout=;

#         server 127.0.0.1: weight= fail_timeout=;

#         server 127.0.0.1: weight= fail_timeout=;

#         server 127.0.0.1: weight= fail_timeout=;

#         server 127.0.0.1: weight= fail_timeout=;

#         least_conn;

#     }

    sendfile        off;

    #tcp_nopush     on;

    server_names_hash_bucket_size ;

## Start: Timeouts ##

    client_body_timeout   ;

    client_header_timeout ;

    keepalive_timeout     ;

    send_timeout          ;

    keepalive_requests    ;

## End: Timeouts ##

    #gzip  on;

    server {

        listen       ;

        server_name  localhost;

        location /stat {

            rtmp_stat all;

            rtmp_stat_stylesheet stat.xsl;

        }

        location /stat.xsl {

            root nginx-rtmp-module/;

        }

        location /control {

            rtmp_control all;

        }

        #charset koi8-r;

        #access_log  logs/host.access.log  main;

        ## Caching Static Files, put before first location

        #location ~* \.(jpg|jpeg|png|gif|ico|css|js)$ {

        #    expires 14d;

        #    add_header Vary Accept-Encoding;

        #}

# For Naxsi remove the single # line for learn mode, or the ## lines for full WAF mode

        location / {

            #include    /nginx/conf/mysite.rules; # see also http block naxsi include line

            ##SecRulesEnabled;

              ##DeniedUrl "/RequestDenied";

              ##CheckRule "$SQL >= 8" BLOCK;

              ##CheckRule "$RFI >= 8" BLOCK;

              ##CheckRule "$TRAVERSAL >= 4" BLOCK;

              ##CheckRule "$XSS >= 8" BLOCK;

            root   html;

            index  index.html index.htm;

        }

# For Naxsi remove the ## lines for full WAF mode, redirect location block used by naxsi

        ##location /RequestDenied {

        ##    return ;

        ##}

## Lua examples !

#         location /robots.txt {

#           rewrite_by_lua '

#             if ngx.var.http_host ~= "localhost" then

#               return ngx.exec("/robots_disallow.txt");

#             end

#           ';

#         }

        #error_page                /.html;

        # redirect server error pages to the static page /50x.html

        #

        error_page        /50x.html;

        location = /50x.html {

            root   html;

        }

        # proxy the PHP scripts to Apache listening on 127.0.0.1:

        #

        #location ~ \.php$ {

        #    proxy_pass   http://127.0.0.1;

        #}

        # pass the PHP scripts to FastCGI server listening on 127.0.0.1:

        #

        #location ~ \.php$ {

        #    root           html;

        #    fastcgi_pass   127.0.0.1:; # single backend process

        #    fastcgi_pass   myLoadBalancer; # or multiple, see example above

        #    fastcgi_index  index.php;

        #    fastcgi_param  SCRIPT_FILENAME  $document_root$fastcgi_script_name;

        #    include        fastcgi_params;

        #}

        # deny access to .htaccess files, if Apache's document root

        # concurs with nginx's one

        #

        #location ~ /\.ht {

        #    deny  all;

        #}

    }

    # another virtual host using mix of IP-, name-, and port-based configuration

    #

    #server {

    #    listen       ;

    #    listen       somename:;

    #    server_name  somename  alias  another.alias;

    #    location / {

    #        root   html;

    #        index  index.html index.htm;

    #    }

    #}

    # HTTPS server

    #

    #server {

    #    listen        ssl spdy;

    #    server_name  localhost;

    #    ssl                  on;

    #    ssl_certificate      cert.pem;

    #    ssl_certificate_key  cert.key;

    #    ssl_session_timeout  5m;

    #    ssl_prefer_server_ciphers On;

    #    ssl_protocols TLSv1 TLSv1. TLSv1.;

    #    ssl_ciphers ECDH+AESGCM:ECDH+AES256:ECDH+AES128:ECDH+3DES:RSA+AESGCM:RSA+AES:RSA+3DES:!aNULL:!eNULL:!MD5:!DSS:!EXP:!ADH:!LOW:!MEDIUM;

    #    location / {

    #        root   html;

    #        index  index.html index.htm;

    #    }

    #}

}
推流鉴权文件PHP:on_publish.php,可以为任意服务端文件, on_publish 指定服务器鉴权地址,此代码简单的作了用户验证,也可以改成带数据库验证以及加入更多参数进行验证。
<?php

// ?user=user&pass=pass

$user = isset($_POST['user']) ? $_POST['user'] : '';

$pass = isset($_POST['pass']) ? $_POST['pass'] : '';

if (empty($user) || empty($pass)) {

    echo "wrong query input";

    header('HTTP/1.0 500 error...');

    exit();

}

$saveuser = $user;

$savepass = $pass;

if (strcmp($user, $saveuser) == 0 && strcmp($pass, $savepass) == 0) {

    echo "Username and Password OK";

} else {

    echo "Username or Password wrong";

    header('HTTP/1.0 404 Not Found');

    exit();

}

?>
注意:在接受参数时一定用POST接收,否则鉴权失败。
更新配置文件,运行cmd命令:
> cd nginx

> nginx.exe -c conf\nginx-win.conf
2、打开OBS客户端进行推流测试,按照如下步骤进行配置

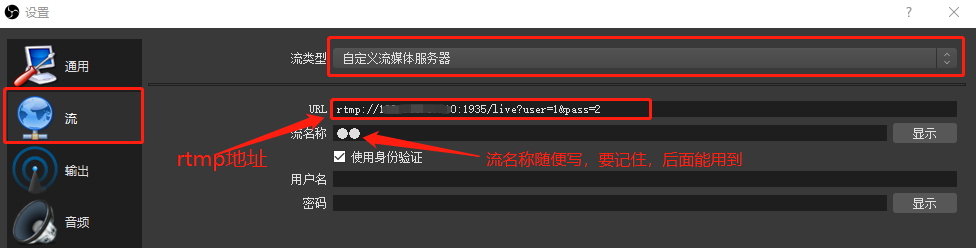
注意:rtmp地址:rtmp://ip地址:1935/live?user=1&pass=2,后面的参数为鉴权所用,否则连接失败。

Nginx做流媒体服务Windows版实现直播的更多相关文章
- Nginx Windows版的服务安装和管理工具
以前研究过负载均衡,最近正在项目上实施(从来没做过小项目以上级别的东西,哈),nginx挺好,不过Windows有点为难,小流量和本地不追求性能,简单易用是目标. Nginx Windows上并没有提 ...
- Nginx+Tomcat安装与配置(windows版)
相信很多人都听过nginx,这个小巧的东西慢慢地在吞食apache和IIS的份额.那究竟它有什么作用呢?可能很多人未必了解. 说到反向代理,可能很多人都听说,但具体什么是反向代理,很多人估计就不清楚了 ...
- Windows版Nginx启动失败之1113: No mapping for the Unicode character exists in the target multi-byte code page
Windows版Nginx启动一闪,进程中未发现nginx进程,查看nginx日志,提示错误为1113: No mapping for the Unicode character exists in ...
- Nginx+Tomcat在Windows下做负载均衡
一. 为什么需要对Tomcat服务器做负载均衡 Tomcat服务器作为一个Web服务器,其并发数在300-500之间,如果有超过500的并发数便会出现Tomcat不能响应新的请求的情况,严重影响网站的 ...
- Windows版:Nginx部署React项目并访问Spring Boot后台数据
一, 打包react项目 1,在工作空间目录下create-react-app test-arrange 创建项目test-arrange 2,在新建的项目中写好请求与页面 3,打包, 在项目目录下 ...
- nginx windows 版 创建windows 服务
使用的工具 Windows Service Wrapper 使用的指令 nginx -s top Windows Service Wrapper 工具的使用: 1. 定义xml 文件: 说明如下: ...
- ffmpeg,rtmpdump和nginx rtmp实现录屏,直播和录制
公司最近在做视频直播的项目,我这里分配到对直播的视频进行录制,录制的方式是通过rtmpdump对rtmp的视频流进行录制 前置的知识 ffmpeg: 用于实现把录屏工具发出的视频和音频流,转换成我们需 ...
- Zookeeper Windows版的服务安装和管理工具
以前研究过负载均衡,最近正在项目上实施(从来没做过小项目以上级别的东西,哈).然后遇到了多个一模一样但是同时运行的服务.不同服务但依赖同相同的配置数据(前端网页服务:Nginx+IIS+nodejs. ...
- Sass安装(windows版)
Sass安装(windows版) 在 Windows 平台下安装 Ruby 需要先有 Ruby 安装包,大家可以到 Ruby 的官网(http://rubyinstaller.org/download ...
随机推荐
- open-falcon部署v0.2.1版本
环境准备 安装redis yum install redis -y systemctl start redis 安装mysql rpm -ivh http://dev.mysql.com/get/my ...
- Overture里镲片的使用
在我们使用Overture进行作曲编曲时,往往会增添很多乐器设备来使我们的乐器更丰富,今天我们来一起看看Overture里镲片怎么使用以及它在Overture的什么位置呢? 镲片,是一种乐器,通常指爵 ...
- javaweb闲暇小程序之抽签程序
学自潭州学院视频 主程序页面截图 <%@ page language="java" contentType="text/html; charset=UTF-8&qu ...
- python学习之——习题一
习题一:使用while循环输入1 2 3 4 5 6 8 9 10 (不含7) 首先想到,先使用while循环打印出1-10数字,然后再将数字“7”剔除. # 先打印出1-10 n = 1 whi ...
- 树形插件zTree与组织插件jOrgChart交互
<html> <head> <title>组织架构</title> <meta http-equiv="content-type&quo ...
- Nuget安装包
Selenium.WebDriver Selenium.WebDriver.ChromeDriver Selenium.Firefox.WebDriver Selenium.WebDriver.IED ...
- [译]RabbitMQ教程C#版 - 主题
先决条件 本教程假定 RabbitMQ 已经安装,并运行在localhost标准端口(5672).如果你使用不同的主机.端口或证书,则需要调整连接设置. 从哪里获得帮助 如果您在阅读本教程时遇到困难, ...
- Qt信号槽第5个参数
1.Qt::AutoConnection: 默认值,使用这个值则连接类型会在信号发送时决定.如果接收者和发送者在同一个线程,则自动使用Qt::DirectConnection类型.如果接收者和发送者不 ...
- jieba库和好玩的词云
首先,通过pip3 install jieba安装jieba库,随后在网上下载<斗破>. 代码如下: import jieba.analyse path = '小说路径' fp = ope ...
- Uniprot数据库
Uniprot数据库是Universal Protein的英文缩写,是信息最丰富.资源最广的蛋白质数据库. UniprotKB由两部分组成: UniProtKB/Swiss-Prot 高质量的.手工注 ...