
git 安装配置
一、下载安装Git
1、下载Git 官方地址为:https://git-scm.com/download/win

2、下载完之后,双击安装

3、选择安装目录

4、选择组件

5、开始菜单目录名设置

6、以下步骤依次执行

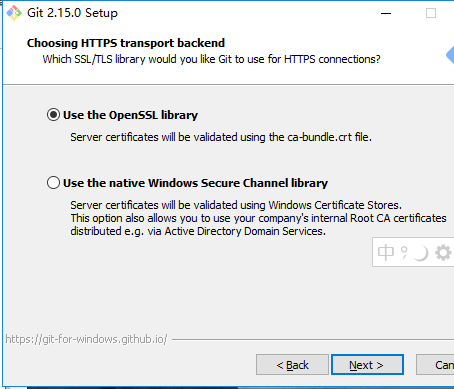

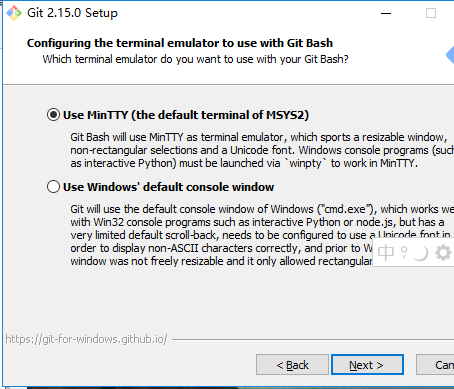
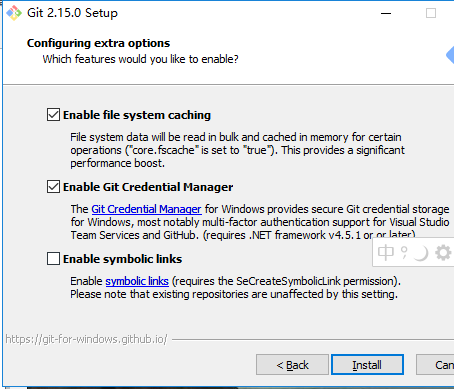

7、安装完成

9、检验是否安装成功
回到电脑桌面,鼠标右击如果看到有两个git单词则安装成功

二、Git初始化操作
1、Git安装之后需要进行一些基本信息设置
a、设置用户名:git config -- global user.name '你再github上注册的用户名';
b、设置用户邮箱:git config -- global user.email '注册时候的邮箱';
注意:该配置会在github主页上显示谁提交了该文件
c、配置ok之后,我们用如下命令来看看是否配置成功
git config --list
注意:git config --global 参数,有了这个参数表示你这台机器上所有的git仓库都会使用这个配置,当然你也可以对某个仓库指定不同的用户名和邮箱
以下是一些字符等参数配置:
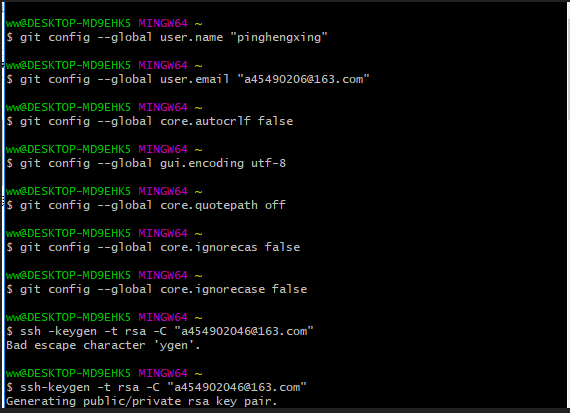
git config --global core.autocrlf false
#让git不要管win/unix换行符转换的事
git config --global gui.encoding utf-8
#避免git gui中的中文乱码
git config --global core.quotepath off
#避免git status 显示的中文文件名称乱码
window中配置:
git config --global core.ignorecase false
1.ssh key pair配置
ssh-keygen -t rsa -C "a454902046@163.com"
然后一路回车,不要输入任何密码,生成ssh key pair
2.公钥添加到github账号:


3.下载自己的代码:
git clone git@github.com:pinghengxing/shoping.git
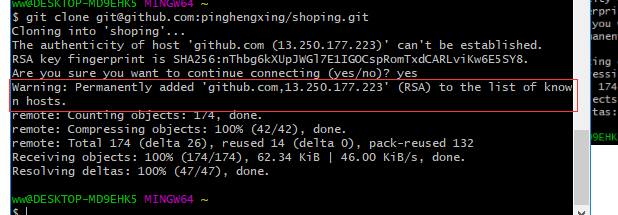
如果出现以上提示,按照提示,在hosts【C:\Windows\System32\drivers\etc\hosts】中添加以下内容并重试重试:
13.250.177.223 github.com
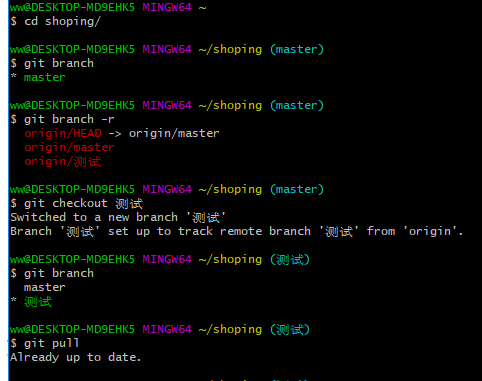
基本命令:
git branch
#显示本地分支
git branch -r
#显示远程分支
git checkout 分支名称
#切换到对应分支
git pull
#拉取
#git push
#提交
三、Git克隆操作
目的:将远程仓库(github上对应的项目)复制到本地
1、代码:git clone 仓库地址
仓库地址由来如下:

2、克隆项目

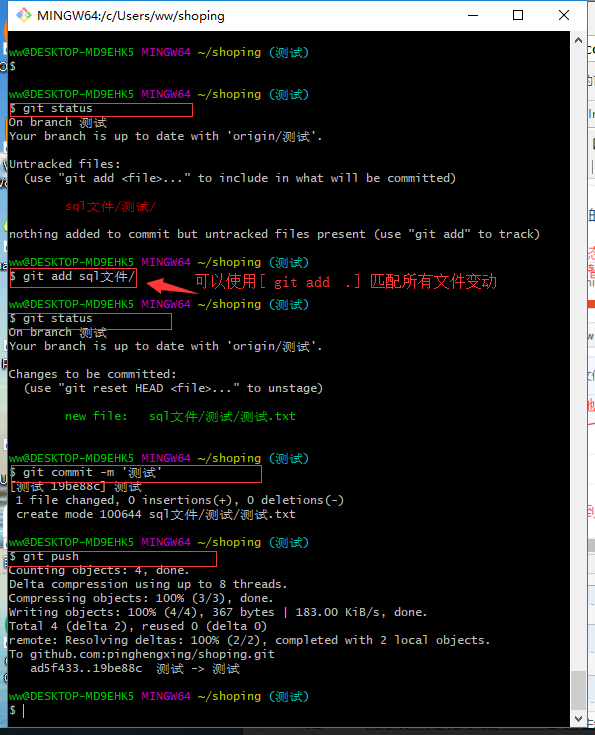
3、将本地仓库同步到git远程仓库中:git push

或者如下示例::
四、git本地创建仓库提交代码过程
D:\idea workspace\mmall>git init
Initialized empty Git repository in D:/idea workspace/mmall/.git/
D:\idea workspace\mmall>git status
On branch master
No commits yet
Untracked files:
(use "git add <file>..." to include in what will be committed)
.gitignore
README.md
mmall.iml
pom.xml
src/
nothing added to commit but untracked files present (use "git add" to track)
D:\idea workspace\mmall>git status
On branch master
No commits yet
Untracked files:
(use "git add <file>..." to include in what will be committed)
.gitignore
README.md
pom.xml
src/
nothing added to commit but untracked files present (use "git add" to track)
D:\idea workspace\mmall>git add .
D:\idea workspace\mmall>git status
On branch master
No commits yet
Changes to be committed:
(use "git rm --cached <file>..." to unstage)
new file: .gitignore
new file: README.md
new file: pom.xml
new file: src/main/webapp/WEB-INF/web.xml
new file: src/main/webapp/index.jsp
D:\idea workspace\mmall>git commit -am '项目初始化'
[master (root-commit) 5674ee3] '项目初始化'
5 files changed, 115 insertions(+)
create mode 100644 .gitignore
create mode 100644 README.md
create mode 100644 pom.xml
create mode 100644 src/main/webapp/WEB-INF/web.xml
create mode 100644 src/main/webapp/index.jsp
D:\idea workspace\mmall>git remote add origin
usage: git remote add [<options>] <name> <url>
-f, --fetch fetch the remote branches
--tags import all tags and associated objects when fetching
or do not fetch any tag at all (--no-tags)
-t, --track <branch> branch(es) to track
-m, --master <branch>
master branch
--mirror[=<push|fetch>]
set up remote as a mirror to push to or fetch from
D:\idea workspace\mmall>git remote add origin git@github.com:pinghengxing/shoping_mall.git
D:\idea workspace\mmall>git branch
* master
D:\idea workspace\mmall>git push -u origin master
To github.com:pinghengxing/shoping_mall.git
! [rejected] master -> master (fetch first)
error: failed to push some refs to 'git@github.com:pinghengxing/shoping_mall.git'
hint: Updates were rejected because the remote contains work that you do
hint: not have locally. This is usually caused by another repository pushing
hint: to the same ref. You may want to first integrate the remote changes
hint: (e.g., 'git pull ...') before pushing again.
hint: See the 'Note about fast-forwards' in 'git push --help' for details.
D:\idea workspace\mmall>git pull
warning: no common commits
remote: Counting objects: 3, done.
remote: Total 3 (delta 0), reused 0 (delta 0), pack-reused 0
Unpacking objects: 100% (3/3), done.
From github.com:pinghengxing/shoping_mall
* [new branch] master -> origin/master
There is no tracking information for the current branch.
Please specify which branch you want to merge with.
See git-pull(1) for details.
git pull <remote> <branch>
If you wish to set tracking information for this branch you can do so with:
git branch --set-upstream-to=origin/<branch> master
D:\idea workspace\mmall>git push -u origin master
To github.com:pinghengxing/shoping_mall.git
! [rejected] master -> master (non-fast-forward)
error: failed to push some refs to 'git@github.com:pinghengxing/shoping_mall.git'
hint: Updates were rejected because the tip of your current branch is behind
hint: its remote counterpart. Integrate the remote changes (e.g.
hint: 'git pull ...') before pushing again.
hint: See the 'Note about fast-forwards' in 'git push --help' for details.
D:\idea workspace\mmall>git push -u -f origin master
Counting objects: 11, done.
Delta compression using up to 8 threads.
Compressing objects: 100% (7/7), done.
Writing objects: 100% (11/11), 1.61 KiB | 330.00 KiB/s, done.
Total 11 (delta 0), reused 0 (delta 0)
To github.com:pinghengxing/shoping_mall.git
+ 42fd514...5674ee3 master -> master (forced update)
Branch 'master' set up to track remote branch 'master' from 'origin'.
D:\idea workspace\mmall>git branch
* master
D:\idea workspace\mmall>git branch -r
origin/master
D:\idea workspace\mmall>git checkout -b v1.0 origin/master
Switched to a new branch 'v1.0'
Branch 'v1.0' set up to track remote branch 'master' from 'origin'.
D:\idea workspace\mmall>git branch -r
origin/master
D:\idea workspace\mmall>git branch
master
* v1.0
D:\idea workspace\mmall>git push origin HEAD -u
Total 0 (delta 0), reused 0 (delta 0)
To github.com:pinghengxing/shoping_mall.git
* [new branch] HEAD -> v1.0
Branch 'v1.0' set up to track remote branch 'v1.0' from 'origin'.
D:\idea workspace\mmall>git branch -r
origin/master
origin/v1.0
D:\idea workspace\mmall>git branch
master
* v1.0
参考学习:https://www.cnblogs.com/ximiaomiao/p/7140456.html
git 安装配置的更多相关文章
- Git 安装配置手册
Git 安装配置手册 首先我们要了解 Git 是类似于 SVN 用来管理项目的 首先要先下载 Git ,这个东西相当于一个核,是该功能的核心 下载地址(<https://gitforwindow ...
- Git安装配置和提交本地代码至Github,修改GitHub上显示的项目语言
1. 下载安装git Windows版Git下载地址: https://gitforwindows.org/ 安装没有特别要求可以一路Next即可,安装完成后可以看到: 2. 创建本地代码仓库 打开G ...
- Git-Runoob:Git 安装配置
ylbtech-Git-Runoob:Git 安装配置 1.返回顶部 1. Git 安装配置 在使用Git前我们需要先安装 Git.Git 目前支持 Linux/Unix.Solaris.Mac和 W ...
- Linux下git安装配置
一.Linux下git安装配置 2013-07-28 20:32:10| 分类: 默认分类 | 标签:linux git server |举报|字号 订阅 http://abomby ...
- 【第二篇】- Git 安装配置之Spring Cloud直播商城 b2b2c电子商务技术总结
Git 安装配置 在使用Git前我们需要先安装 Git.Git 目前支持 Linux/Unix.Solaris.Mac和 Windows 平台上运行. Git 各平台安装包下载地址为:http://g ...
- 转 git安装配置
Win7上Git安装及配置过程 一.安装说明 1.Git在windows平台上安装说明. Git 是 Linux Torvalds 为了帮助管理 Linux 内核开发而开发的一个开放源码的版本控制软件 ...
- Git安装配置(完整版)
首先安装Windows客户端的git和TortoiseGit. 安装这两个软件还是蛮重要的,很多选项不能乱选. 为了写个完整的博客,我是装了又卸,卸了又装. 1.安装git 下载:https://gi ...
- Windows系统Git安装配置
Git的安装 Git是一个开源的分布式的版本控制软件,是Linus Torvalds 为了方便开源贡献者协同开发和管理 Linux 内核开发替代BitKe而开发的. 打开git官网的下载地址:http ...
- git安装配置
1.git 安装 sudo apt-get install git 2.配置本机git的两个重要信息,user.name和user.email git config --global user.nam ...
随机推荐
- 在ibatis中时间段查询完整代码
ibatis.xml文件中的代码如下: <typeAlias alias="ServInvokeTest" type="com.entity.ServInvokeT ...
- go生成不重复的纯数字6位的随机数
最近在学go, 按照入门指南学完go的基础语法, 开始学习go的标准库; 借用生成这个小任务复习一下go的基础语法. 推荐go编辑, jb公司的goland, 超级好用. 推荐go入门指南, htt ...
- sys 模块的应用
1.常见的sys模块的应用: 1.在解释器启动后, argv 列表包含了传递给脚本的所有参数, 列表的第一个元素为脚本自身的名称 argv(命令行参数个数) #!/usr/bin/env python ...
- JRebel springboot部署idea
JRebel springboot部署idea http://127.0.0.1:8888/88414687-3b91-4286-89ba-2dc813b107ce ctrl+shift+ ...
- javaEE完整体系结构
学习之前了解熟悉一下javaEE的完整体系结构会更有助于理解 https://segmentfault.com/a/1190000007090110
- laravel5.5 env
env 函数 读取的变量里面带有 # 号的情况下 数据会丢失
- Win10优化:这8个操作简单的小方法让你的Win10系统更加流畅
目前,市场上比较流行的主流电脑系统无非就是win7和win10这两个,这两个也是比较稳定的.但是自从微软发布将于2020年停止对win7支持后,很多小伙伴也表示无奈之下得升win10了啊. win10 ...
- vue-router路由讲解
此文章用来系统讲解vue-router路由 安装 只介绍npm安装 npm install vue-router --save 项目所需依赖 在main.js或者app.vue中导入 import V ...
- 【C语言】数组知识点总结
[C语言]数组知识点总结 标签: 数组 2018年04月12日 17:44:4481人阅读 评论(0) 收藏 举报 分类: C语言知识总结(4) 版权声明:本文为博主原创文章,未经博主允许不得转载 ...
- eclipse光标变粗解决方法
如上图,光标变成黑块好像没那么顺眼,原因是我们不小心按到了insert键造成的,再按一下insert键就OK了,如果delete和insert是一个键那么就用FN键+delete/insert键就可以 ...