Centos7环境下搭建Nginx+Lua+Redis进行数据存取
1.安装依赖环境
yum -y install gcc zlib zlib-devel pcre-devel openssl openssl-devel
2.安装LuaJIT
cd /usr/local/

mkdir LuaJIT

cd /usr/local/LuaJIT

wget http://luajit.org/download/LuaJIT-2.0..tar.gz

tar –xvf LuaJIT-2.0..tar.gz

cd LuaJIT-2.0.

make install
3.安装nginx
cd /usr/local/

mkdir nginx
下载ngx_devel_kit
wget https://github.com/simpl/ngx_devel_kit/archive/v0.3.0.tar.gz
下载lua-nginx-module
wget https://github.com/openresty/lua-nginx-module/archive/v0..9rc7.tar.gz
下载nginx
wget http://nginx.org/download/nginx-1.12..tar.gz
解压文件
tar -xvf ngx_devel_kit-0.3. .tar.gz

tar -xvf lua-nginx-module-0.10.9rc7.tar.gz

tar -xvf nginx-1.12..tar.gz
编译nginx
cd nginx-1.12.

./configure --prefix=/usr/local/nginx --add-module=../ngx_devel_kit-0.3.0 --add-module=../lua-nginx-module-0.10.9rc7
安装
make

make install
或者合并两个命令(4表示并行运行任务的数量)
make -j && make install
启动nginx
cd /usr/local/nginx/sbin

./nginx
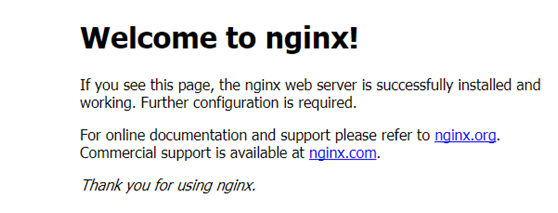
测试是否启动成功:
访问 http:127.0.0.1:80
显示welcome to n ginx!表示启动成功
关闭nginx
./nginx –s stop
4.安装redis
cd /usr/local

mkdir redis
下载
wget http://download.redis.io/releases/ redis-2.8..tar.gz
解压
tar -xvf redis-2.8..tar.gz
进入解压后的文件夹
cd redis-2.8.
安装
make
启动redis(&表示后台运行)
cd src

./redis-server &
启动成功后按ctrl+c退出启动界面
测试
./redis-cli

set foo liq  ---OK

get foo ---liq
关闭redis
SHUTDOWN
5.配置redis主从
5.1主reids 配置文件
复制一份redis的配置文件:
cd /usr/local/redis/redis-2.8.

mkdir –p /data /data

cp redis.conf  /usr/local/redis/redis-2.8.//data/redis-.conf
编辑文件
cd /usr/local/redis/ redis-2.8.//data/

vim redis-.conf
cd /usr/local/redis/ redis-2.8.//data/

vim redis-.conf
5.1.1
daemonize no
修改为:
daemonize yes (后台程序方式运行)
5.1.2
pidfile /var/run/redis_6379.pid
修改为:
pidfile /usr/local/redis/redis-2.8.17/6379/redis_6379.pid
5.1.3
//设置请求密码
requirepass system
5.1.4
//设置数据文件路径
dir /usr/local/redis/redis-2.8.17/6379/data
5.2从reids 配置文件
cp /usr/local/redis/redis-2.8.//data/redis-.conf /usr/local/redis/redis-2.8.//data/redis-.conf
5.2.1
port 改为6380
5.2.2
pidfile 改为/usr/local/redis/redis-2.8.17/6380/redis_6380.pid
5.2.2
删除 requirepass system
5.2.3
//设置数据文件路径
dir /usr/local/redis/redis-2.8.17/6380/data
5.2.4
添加从属关系
slaveof 127.0.0.1 6379
5.2.5
添加主redis访问密码
masterauth system
5.3启动redis
/usr/local/redis/redis-2.8./src/redis-server /usr/local/redis/redis-2.8.//redis-.conf
/usr/local/redis/redis-2.8./src/redis-server /usr/local/redis/redis-2.8.//redis-.conf
5.4测试主从
在主redis中存数据
cd /usr/local/redis/redis-2.8./src

./redis-cli -h 127.0.0.1 -p  auth system

set foo test
ctrl+c退出
在从redis中取数据
./redis-cli -h 127.0.0.1 -p

get foo
6.安装lua-resty-redis
从https://github.com/openresty/lua-resty-redis.git下载lua-resty-redis-master后解压
将lib包安装到lua库
cd lua-resty-redis-master

make && make install
安装完成之后在/usr/local/lib/lua/resty里面会有redis.lua
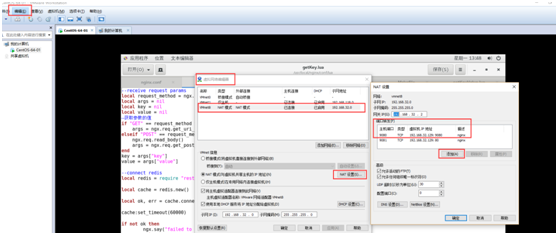
7.修改nginx配置文件
cd /usr/local/nginx/conf

vim nginx.conf
7.1
http内添加 lua_package_path "/usr/local/lib/lua/?.lua;;";
7.2
server listen改为 9080;
7.3
server 内添加
location /lua/set {
default_type 'text/plain';
content_by_lua_file conf/lua/setKeyValue.lua;
}
location /lua/get {
default_type 'text/plain';
content_by_lua_file conf/lua/getKey.lua;
}
完整配置文件nginx.cnof:
worker_processes  ;

events {

    worker_connections  ;

}

http {

    include       mime.types;

    default_type  application/octet-stream;

    lua_package_path "/usr/local/lib/lua/?.lua;;";

    sendfile        on;

    keepalive_timeout  ;

    server {

        listen       ;

        server_name  localhost;

        location / {

            root   html;

            index  index.html index.htm;

        }

        location /lua/set {

             default_type 'text/plain';

           content_by_lua_file conf/lua/setKeyValue.lua;

        }

        location /lua/get {

             default_type 'text/plain';

           content_by_lua_file conf/lua/getKey.lua;

        }

        error_page        /50x.html;

        location = /50x.html {

            root   html;

        }

    }

}
8.编写content_by_lua_file对应的lua脚本
8.1
#对应nginx中的配置: content_by_lua_file conf/lua/setKeyValue.lua;
cd /usr/local/nginx/conf

mkdir lua

cd lua

vim setKeyValue.lua
setKeyValue.lua代码:
--receive request params

local request_method = ngx.var.request_method

local args = nil

local key = nil

local value = nil

--获取参数的值

if "GET" == request_method then

    args = ngx.req.get_uri_args()

elseif "POST" == request_method then

    ngx.req.read_body()

    args = ngx.req.get_post_args()

end

key = args["key"]

value = args["value"]

--connect redis

local redis = require "resty.redis"

local cache = redis.new()

local ok, err = cache.connect(cache, '127.0.0.1', '')

cache:set_timeout()

if not ok then

        ngx.say("failed to connect:", err)

        return

end

-- 请注意这里 auth 的调用过程

-- check password

local count

count, err = cache:get_reused_times()

if  == count then

    ok, err = cache:auth("system")

if not ok then

       ngx.say("failed to auth: ", err)

       return

end

elseif err then

    ngx.say("failed to get reused times: ", err)

return

end

local res, err = cache:set(key, value)

if not res then

        ngx.say("failed to set "..key..": ", err)

        return

end

if res == ngx.null then

        ngx.say(key.." not found.")

        return

end

ngx.say("set redis value >>> "..key..": ", res)

local ok, err = cache:close()

if not ok then

        ngx.say("failed to close:", err)

        return

end
8.2
#对应nginx中的配置: content_by_lua_file conf/lua/getKey.lua;
vim getKey.lua
getKey.lua代码:
--receive request params

local request_method = ngx.var.request_method

local args = nil

local key = nil

local value = nil

--获取参数的值

if "GET" == request_method then

    args = ngx.req.get_uri_args()

elseif "POST" == request_method then

    ngx.req.read_body()

    args = ngx.req.get_post_args()

end

key = args["key"]

value = args["value"]

--connect redis

local redis = require "resty.redis"

local cache = redis.new()

local ok, err = cache.connect(cache, '127.0.0.1', '')

cache:set_timeout()

if not ok then

        ngx.say("failed to connect:", err)

        return

end

local res, err = cache:get(key)

if not res then

        ngx.say("failed to get "..key..": ", err)

        return

end

if res == ngx.null then

        ngx.say(key.." not found.")

        return

end

ngx.say("get from redis >>> "..key..": ", res)

local ok, err = cache:close()

if not ok then

        ngx.say("failed to close:", err)

        return

end
9.开启端口映射(如果不是安装在虚拟机上的不需要此步骤)
9.1开启虚拟机端口映射:
9.2开放9080端口的防火墙(--permanent永久生效,没有此参数重启后失效):
firewall-cmd --zone=public --add-port=9080/tcp --permanent
10.重新启动nginx
cd /usr/local/nginx/sbin

./nginx
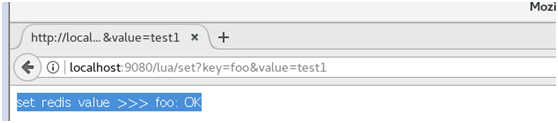
11.查看效果
存值 -- 访问网址并传参:
http://localhost:/lua/set?key=foo&value=test1
取值 -- 访问网址并传参:
http://localhost:/lua/get?key=foo

Centos7环境下搭建Nginx+Lua+Redis进行数据存取的更多相关文章
- Linux centos7环境下安装Nginx
Linux centos7环境下安装Nginx的步骤详解 1. 首先到Nginx官网下载Nginx安装包 http://nginx.org/download/nginx-1.5.9.tar.gz ...
- Centos7环境下使用Nginx托管.Net Core应用程序
一.安装.Net Core 参考官方文档:https://www.microsoft.com/net/core#linuxcentos 1.添加dotnet产品Feed 在安装.NET Core之前, ...
- centos7环境下安装nginx
安装所需环境 nginx是C语言开发,在Linux和windows环境上面都可以运行. 1.gcc安装 安装nginx需要将官网下载的代码进行编译,编译依赖gcc环境,如果没有gcc环境,需要先安装g ...
- 在Windows环境下搭建Nginx文件服务器(简单实用版)
为了解决项目组内容应用,打算把本地的e:tools目录共享出来,具体操作步骤如下1.下载安装包:http://nginx.org/download/nginx-1.9.15.zip2.解压缩3.修改配 ...
- Windows环境下搭建Nginx和多版本PHP共存
PHP版本众多,彼此之间兼容性不好,不同程序经常需要的不同版本的PHP版本.这里介绍如何使用NGINX让不同版本的PHP共存. 软件下载地址 与nginx整合的php需要选择Non Thread Sa ...
- Centos7环境下etcd集群的搭建
Centos7环境下etcd集群的搭建 一.简介 "A highly-available key value store for shared configuration and servi ...
- CentOS 环境下基于 Nginx uwsgi 搭建 Django 站点
因为我的个人网站 restran.net 已经启用,博客园的内容已经不再更新.请访问我的个人网站获取这篇文章的最新内容,CentOS 环境下基于 Nginx uwsgi 搭建 Django 站点 以下 ...
- windows下搭建nginx+php开发环境
windows下搭建nginx+php开发环境 1.前言 windows下大多我们都是下载使用集成环境,但是本地已经存在一个集成环境,但不适合项目的需求.因此准备再自己搭建一个环境. 2.准备 工具: ...
- windows环境下基于nginx搭建rtmp服务器
基于nginx搭建rtmp服务器需要引入rtmp模块,引入之后需重新编译nginx linux环境几个命令行就能实现编译,笔者未尝试,网上有很多教程. windows环境还需要安装一系列的编译环境,例 ...
随机推荐
- Data Lake Analytics,大数据的ETL神器!
0. Data Lake Analytics(简称DLA)介绍 数据湖(Data Lake)是时下大数据行业热门的概念:https://en.wikipedia.org/wiki/Data_lake. ...
- 配置android studio环境
配置java jdk 1.1运行exe 程序 1.2配置jdk 环境变量 添加环境变量 ;%JAVA_HOME%\bin;%JAVA_HOME%\jre\bin .;%JAVA_HOME%\lib;% ...
- localStorage对象简单应用 - - 访问次数
<!DOCTYPE html> <html lang="en"> <head> <meta charset="UTF-8&quo ...
- ACMer之歌
<<死了都要编>> 死了都要编 不动态规划不痛快 算法多深只有这样 才足够表白 死了都要编 不A星算法不痛快 宇宙毁灭星还在 把每天当成是比赛来编程 一分一秒都编到汗水掉下来 ...
- 索尼微单cmos坏点屏蔽
偶然发现相机有坏点了,果断去售后换了一台回来.然后试机,吐血 要不是我旧机器满是岁月的痕迹,我真以为原封给我退回来了 这样不行啊,难道再换一个回来?毕竟是脸皮薄的人.不好意思操作啊. 于是上网找找,果 ...
- os模块和sys模块
1.os模块与path有关:os.path.isfile():判断置顶对象是否为文件,是返回True,否返回Falseos.path.isdir():判断指定对象是否为目录,是返回True,否返回Fa ...
- 洛谷P1147 连续自然数和 [2017年6月计划 数论01]
P1147 连续自然数和 题目描述 对一个给定的自然数M,求出所有的连续的自然数段,这些连续的自然数段中的全部数之和为M. 例子:1998+1999+2000+2001+2002 = 10000,所以 ...
- 【logo】设计书籍的logo
一个女孩发光般的看着,眼前发现的书籍 含义:这本书就是女孩想要得到的书籍 平台的宗旨:就是让学生能够得到想要的书籍 书籍来源:其他学生的书籍 目的:实现书籍回收再利用,同时让接受者低于市场价得到
- Hdu 1156
题目链接 Brownie Points II Time Limit: 20000/10000 MS (Java/Others) Memory Limit: 65536/32768 K (Java ...
- zoj 1028 Flip and Shift(数学)
Flip and Shift Time Limit: 2 Seconds Memory Limit: 65536 KB This puzzle consists of a random se ...