Centos7环境下搭建Nginx+Lua+Redis进行数据存取
1.安装依赖环境
yum -y install gcc zlib zlib-devel pcre-devel openssl openssl-devel
2.安装LuaJIT
cd /usr/local/

mkdir LuaJIT

cd /usr/local/LuaJIT

wget http://luajit.org/download/LuaJIT-2.0..tar.gz

tar –xvf LuaJIT-2.0..tar.gz

cd LuaJIT-2.0.

make install
3.安装nginx
cd /usr/local/

mkdir nginx
下载ngx_devel_kit
wget https://github.com/simpl/ngx_devel_kit/archive/v0.3.0.tar.gz
下载lua-nginx-module
wget https://github.com/openresty/lua-nginx-module/archive/v0..9rc7.tar.gz
下载nginx
wget http://nginx.org/download/nginx-1.12..tar.gz
解压文件
tar -xvf ngx_devel_kit-0.3. .tar.gz

tar -xvf lua-nginx-module-0.10.9rc7.tar.gz

tar -xvf nginx-1.12..tar.gz
编译nginx
cd nginx-1.12.

./configure --prefix=/usr/local/nginx --add-module=../ngx_devel_kit-0.3.0 --add-module=../lua-nginx-module-0.10.9rc7
安装
make

make install
或者合并两个命令(4表示并行运行任务的数量)
make -j && make install
启动nginx
cd /usr/local/nginx/sbin

./nginx
测试是否启动成功:
访问 http:127.0.0.1:80
显示welcome to n ginx!表示启动成功
关闭nginx
./nginx –s stop
4.安装redis
cd /usr/local

mkdir redis
下载
wget http://download.redis.io/releases/ redis-2.8..tar.gz
解压
tar -xvf redis-2.8..tar.gz
进入解压后的文件夹
cd redis-2.8.
安装
make
启动redis(&表示后台运行)
cd src

./redis-server &
启动成功后按ctrl+c退出启动界面
测试
./redis-cli

set foo liq  ---OK

get foo ---liq
关闭redis
SHUTDOWN
5.配置redis主从
5.1主reids 配置文件
复制一份redis的配置文件:
cd /usr/local/redis/redis-2.8.

mkdir –p /data /data

cp redis.conf  /usr/local/redis/redis-2.8.//data/redis-.conf
编辑文件
cd /usr/local/redis/ redis-2.8.//data/

vim redis-.conf
cd /usr/local/redis/ redis-2.8.//data/

vim redis-.conf
5.1.1
daemonize no
修改为:
daemonize yes (后台程序方式运行)
5.1.2
pidfile /var/run/redis_6379.pid
修改为:
pidfile /usr/local/redis/redis-2.8.17/6379/redis_6379.pid
5.1.3
//设置请求密码
requirepass system
5.1.4
//设置数据文件路径
dir /usr/local/redis/redis-2.8.17/6379/data
5.2从reids 配置文件
cp /usr/local/redis/redis-2.8.//data/redis-.conf /usr/local/redis/redis-2.8.//data/redis-.conf
5.2.1
port 改为6380
5.2.2
pidfile 改为/usr/local/redis/redis-2.8.17/6380/redis_6380.pid
5.2.2
删除 requirepass system
5.2.3
//设置数据文件路径
dir /usr/local/redis/redis-2.8.17/6380/data
5.2.4
添加从属关系
slaveof 127.0.0.1 6379
5.2.5
添加主redis访问密码
masterauth system
5.3启动redis
/usr/local/redis/redis-2.8./src/redis-server /usr/local/redis/redis-2.8.//redis-.conf
/usr/local/redis/redis-2.8./src/redis-server /usr/local/redis/redis-2.8.//redis-.conf
5.4测试主从
在主redis中存数据
cd /usr/local/redis/redis-2.8./src

./redis-cli -h 127.0.0.1 -p  auth system

set foo test
ctrl+c退出
在从redis中取数据
./redis-cli -h 127.0.0.1 -p

get foo
6.安装lua-resty-redis
从https://github.com/openresty/lua-resty-redis.git下载lua-resty-redis-master后解压
将lib包安装到lua库
cd lua-resty-redis-master

make && make install
安装完成之后在/usr/local/lib/lua/resty里面会有redis.lua
7.修改nginx配置文件
cd /usr/local/nginx/conf

vim nginx.conf
7.1
http内添加 lua_package_path "/usr/local/lib/lua/?.lua;;";
7.2
server listen改为 9080;
7.3
server 内添加
location /lua/set {
default_type 'text/plain';
content_by_lua_file conf/lua/setKeyValue.lua;
}
location /lua/get {
default_type 'text/plain';
content_by_lua_file conf/lua/getKey.lua;
}
完整配置文件nginx.cnof:
worker_processes  ;

events {

    worker_connections  ;

}

http {

    include       mime.types;

    default_type  application/octet-stream;

    lua_package_path "/usr/local/lib/lua/?.lua;;";

    sendfile        on;

    keepalive_timeout  ;

    server {

        listen       ;

        server_name  localhost;

        location / {

            root   html;

            index  index.html index.htm;

        }

        location /lua/set {

             default_type 'text/plain';

           content_by_lua_file conf/lua/setKeyValue.lua;

        }

        location /lua/get {

             default_type 'text/plain';

           content_by_lua_file conf/lua/getKey.lua;

        }

        error_page        /50x.html;

        location = /50x.html {

            root   html;

        }

    }

}
8.编写content_by_lua_file对应的lua脚本
8.1
#对应nginx中的配置: content_by_lua_file conf/lua/setKeyValue.lua;
cd /usr/local/nginx/conf

mkdir lua

cd lua

vim setKeyValue.lua
setKeyValue.lua代码:
--receive request params

local request_method = ngx.var.request_method

local args = nil

local key = nil

local value = nil

--获取参数的值

if "GET" == request_method then

    args = ngx.req.get_uri_args()

elseif "POST" == request_method then

    ngx.req.read_body()

    args = ngx.req.get_post_args()

end

key = args["key"]

value = args["value"]

--connect redis

local redis = require "resty.redis"

local cache = redis.new()

local ok, err = cache.connect(cache, '127.0.0.1', '')

cache:set_timeout()

if not ok then

        ngx.say("failed to connect:", err)

        return

end

-- 请注意这里 auth 的调用过程

-- check password

local count

count, err = cache:get_reused_times()

if  == count then

    ok, err = cache:auth("system")

if not ok then

       ngx.say("failed to auth: ", err)

       return

end

elseif err then

    ngx.say("failed to get reused times: ", err)

return

end

local res, err = cache:set(key, value)

if not res then

        ngx.say("failed to set "..key..": ", err)

        return

end

if res == ngx.null then

        ngx.say(key.." not found.")

        return

end

ngx.say("set redis value >>> "..key..": ", res)

local ok, err = cache:close()

if not ok then

        ngx.say("failed to close:", err)

        return

end
8.2
#对应nginx中的配置: content_by_lua_file conf/lua/getKey.lua;
vim getKey.lua
getKey.lua代码:
--receive request params

local request_method = ngx.var.request_method

local args = nil

local key = nil

local value = nil

--获取参数的值

if "GET" == request_method then

    args = ngx.req.get_uri_args()

elseif "POST" == request_method then

    ngx.req.read_body()

    args = ngx.req.get_post_args()

end

key = args["key"]

value = args["value"]

--connect redis

local redis = require "resty.redis"

local cache = redis.new()

local ok, err = cache.connect(cache, '127.0.0.1', '')

cache:set_timeout()

if not ok then

        ngx.say("failed to connect:", err)

        return

end

local res, err = cache:get(key)

if not res then

        ngx.say("failed to get "..key..": ", err)

        return

end

if res == ngx.null then

        ngx.say(key.." not found.")

        return

end

ngx.say("get from redis >>> "..key..": ", res)

local ok, err = cache:close()

if not ok then

        ngx.say("failed to close:", err)

        return

end
9.开启端口映射(如果不是安装在虚拟机上的不需要此步骤)
9.1开启虚拟机端口映射:
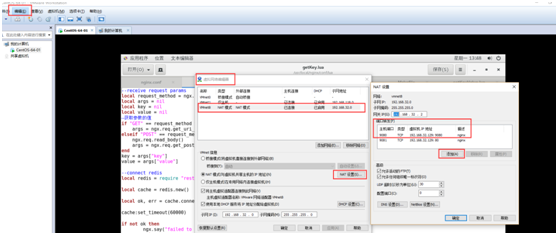
9.2开放9080端口的防火墙(--permanent永久生效,没有此参数重启后失效):
firewall-cmd --zone=public --add-port=9080/tcp --permanent
10.重新启动nginx
cd /usr/local/nginx/sbin

./nginx
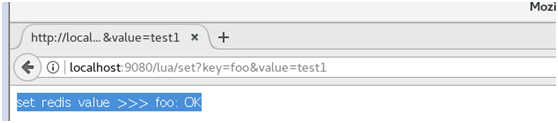
11.查看效果
存值 -- 访问网址并传参:
http://localhost:/lua/set?key=foo&value=test1
取值 -- 访问网址并传参:
http://localhost:/lua/get?key=foo

Centos7环境下搭建Nginx+Lua+Redis进行数据存取的更多相关文章
- Linux centos7环境下安装Nginx
Linux centos7环境下安装Nginx的步骤详解 1. 首先到Nginx官网下载Nginx安装包 http://nginx.org/download/nginx-1.5.9.tar.gz ...
- Centos7环境下使用Nginx托管.Net Core应用程序
一.安装.Net Core 参考官方文档:https://www.microsoft.com/net/core#linuxcentos 1.添加dotnet产品Feed 在安装.NET Core之前, ...
- centos7环境下安装nginx
安装所需环境 nginx是C语言开发,在Linux和windows环境上面都可以运行. 1.gcc安装 安装nginx需要将官网下载的代码进行编译,编译依赖gcc环境,如果没有gcc环境,需要先安装g ...
- 在Windows环境下搭建Nginx文件服务器(简单实用版)
为了解决项目组内容应用,打算把本地的e:tools目录共享出来,具体操作步骤如下1.下载安装包:http://nginx.org/download/nginx-1.9.15.zip2.解压缩3.修改配 ...
- Windows环境下搭建Nginx和多版本PHP共存
PHP版本众多,彼此之间兼容性不好,不同程序经常需要的不同版本的PHP版本.这里介绍如何使用NGINX让不同版本的PHP共存. 软件下载地址 与nginx整合的php需要选择Non Thread Sa ...
- Centos7环境下etcd集群的搭建
Centos7环境下etcd集群的搭建 一.简介 "A highly-available key value store for shared configuration and servi ...
- CentOS 环境下基于 Nginx uwsgi 搭建 Django 站点
因为我的个人网站 restran.net 已经启用,博客园的内容已经不再更新.请访问我的个人网站获取这篇文章的最新内容,CentOS 环境下基于 Nginx uwsgi 搭建 Django 站点 以下 ...
- windows下搭建nginx+php开发环境
windows下搭建nginx+php开发环境 1.前言 windows下大多我们都是下载使用集成环境,但是本地已经存在一个集成环境,但不适合项目的需求.因此准备再自己搭建一个环境. 2.准备 工具: ...
- windows环境下基于nginx搭建rtmp服务器
基于nginx搭建rtmp服务器需要引入rtmp模块,引入之后需重新编译nginx linux环境几个命令行就能实现编译,笔者未尝试,网上有很多教程. windows环境还需要安装一系列的编译环境,例 ...
随机推荐
- [Array]189. Rotate Array
Rotate an array of n elements to the right by k steps. For example, with n = 7 and k = 3, the array ...
- laravel--request类获取传值
request类获取传值 Request类的方法很多,常用的有如下几个: Request -> all() : 表示一次性获取所有的传值(包括get和post,但不能获取参数) Request ...
- CSS--去除除文本基线的几种方式
削除文本基线的几种方式:1.display:block2.vertical-align:middle3.font-size:0px
- H5C3--盒子模型
<!DOCTYPE html> <html lang="en"> <head> <meta charset="UTF-8&quo ...
- Java review-basic1
1. Dependency Injection Answer: Any application is composed of many objects that collaborate with ea ...
- Struts Tiles框架使用(转)
原文:Struts Tiles框架使用 Tiles框架 ++YONG原创,转载请声明 Tiles框架为创建Web页面提供了一种模板机制,它能将网页的布局和内容分离.它用模板定义网页布局,每个页面模板都 ...
- ROWID的使用——快速删除重复的记录
ROWID是数据的详细地址,通过rowid,oracle可以快速的定位某行具体的数据的位置.ROWID可以分为物理rowid和逻辑rowid两种.普通的表中的rowid是物理rowid,索引组织表(I ...
- day36 03-Hibernate检索方式:排序、参数绑定、投影查询
排序之后是分页查询. 检索单个对象 还可以进行参数的绑定. HQL的参数绑定,按参数名称绑定或者是按参数位置绑定. 还可以用投影的操作,投影的操作是只查询这里面的某几个属性.只查询某一个属性,查询多个 ...
- Python科学计算生态圈--Pandas
- linux 关于网络接口及配置工具说明
在Linux操作系统中配置网络接口,一般是通过网络配置工具实现的,但最终目的还是通过网络配置工具来达到修改与网络相关的配置文件而起作用的.由此说来,我们配置网络可以直接修改配置文件. 比如网络网络接口 ...