How to install the NVIDIA drivers on Ubuntu 18.04 Bionic Beaver Linux
Objective
The objective is to install the NVIDIA drivers on Ubuntu 18.04 Bionic Beaver Linux. This article will discuss three methods of Nvidia driver installation in the following order:
- Automatic Install using standard Ubuntu Repository
- Automatic Install using PPA repository to install Nvidia Beta drivers
- Manual Install using the Official nvidia.com driver
Operating System and Software Versions
- Operating System: - Ubuntu 18.04 Bionic Beaver Linux
Requirements
Privileged access to your Ubuntu 18.04 Bionic Beaver installation will be required.
Difficulty
EASY - MEDIUM
Conventions
- # - requires given linux commands to be executed with root privileges either directly as a root user or by use of
sudo command
- $ - requires given linux commands to be executed as a regular non-privileged user
Automatic Install using standard Ubuntu Repository
The first method is the easiest to perform and in most cases it is the recommended approach. First, detect the model of your nvidia graphic card and the recommended driver. To do so execute:
 $ ubuntu-drivers devices

== /sys/devices/pci0000:00/0000:00:01.0/0000:01:00.0 ==

modalias : pci:v000010DEd00001180sv00001458sd0000353Cbc03sc00i00

vendor   : NVIDIA Corporation

model    : GK104 [GeForce GTX 680]

driver   : nvidia-304 - distro non-free

driver   : nvidia-340 - distro non-free

driver   : nvidia-384 - distro non-free recommended

driver   : xserver-xorg-video-nouveau - distro free builtin

== cpu-microcode.py ==

driver   : intel-microcode - distro free
- Operating System: - Ubuntu 18.04 Bionic Beaver Linux
Requirements
Privileged access to your Ubuntu 18.04 Bionic Beaver installation will be required.
Difficulty
EASY - MEDIUM
Conventions
- # - requires given linux commands to be executed with root privileges either directly as a root user or by use of
sudo command
- $ - requires given linux commands to be executed as a regular non-privileged user
Automatic Install using standard Ubuntu Repository
The first method is the easiest to perform and in most cases it is the recommended approach. First, detect the model of your nvidia graphic card and the recommended driver. To do so execute:
$ ubuntu-drivers devices
== /sys/devices/pci0000:00/0000:00:01.0/0000:01:00.0 ==
modalias : pci:v000010DEd00001180sv00001458sd0000353Cbc03sc00i00
vendor : NVIDIA Corporation
model : GK104 [GeForce GTX 680]
driver : nvidia-304 - distro non-free
driver : nvidia-340 - distro non-free
driver : nvidia-384 - distro non-free recommended
driver : xserver-xorg-video-nouveau - distro free builtin
== cpu-microcode.py ==
driver : intel-microcode - distro free
sudo command$ ubuntu-drivers devices
== /sys/devices/pci0000:00/0000:00:01.0/0000:01:00.0 ==
modalias : pci:v000010DEd00001180sv00001458sd0000353Cbc03sc00i00
vendor : NVIDIA Corporation
model : GK104 [GeForce GTX 680]
driver : nvidia-304 - distro non-free
driver : nvidia-340 - distro non-free
driver : nvidia-384 - distro non-free recommended
driver : xserver-xorg-video-nouveau - distro free builtin == cpu-microcode.py ==
driver : intel-microcode - distro free
From the above output we can conclude that the current system has NVIDIA GeForce GTX 680graphic card installed and the recommend driver to install is nvidia-384. If you agree with the recommendation feel free to use ubuntu-drivers command again to install all recommended drivers:
$ sudo ubuntu-drivers autoinstall
Alternatively, install desired driver selectively using the apt command. For example:
$ sudo apt install nvidia-340
Once the installation is concluded, reboot your system and you are done.
Automatic Install using PPA repository to install Nvidia Beta drivers
Using graphics-drivers PPA repository allows us to install bleeding edge Nvidia beta drivers at the risk of unstable system. To proceed first add the ppa:graphics-drivers/ppa repository into your system:
$ sudo add-apt-repository ppa:graphics-drivers/ppa

$ sudo apt update
$ sudo apt update
Next, identify your graphic card model and recommended driver:
$ ubuntu-drivers devices

== /sys/devices/pci0000:00/0000:00:01.0/0000:01:00.0 ==

modalias : pci:v000010DEd00001180sv00001458sd0000353Cbc03sc00i00

vendor   : NVIDIA Corporation

model    : GK104 [GeForce GTX 680]

driver   : nvidia-340 - third-party free

driver   : nvidia-390 - third-party free recommended

driver   : nvidia-387 - third-party free

driver   : nvidia-304 - distro non-free

driver   : nvidia-384 - third-party free

driver   : xserver-xorg-video-nouveau - distro free builtin

== cpu-microcode.py ==

driver   : intel-microcode - distro free
Same as with the above standard Ubuntu repository example, either install all recommended drivers automatically:
$ sudo ubuntu-drivers autoinstall
or selectively using the apt command. Example:
$ sudo apt install nvidia-390
Once done, reboot your system.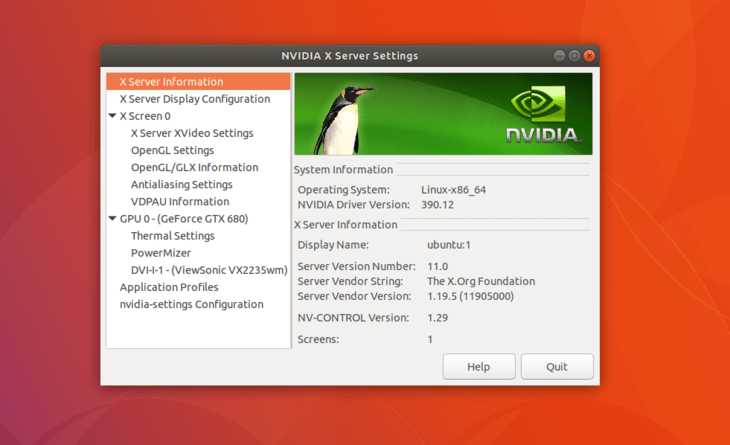
Manual Install using the Official Nvidia.com driver
Identify your NVIDIA VGA card
The below commands will allow you to identify your Nvidia card model:
$  lshw -numeric -C display

or

$ lspci -vnn | grep VGA
Download the Official Nvidia Driver
Using your web browser navigate to the official Nvidiawebsite and download an appropriate driver for your Nvidia graphic card. Save the file into your home directory. Example:
$ ls

NVIDIA-Linux-x86_64-384.111.bin
Install Prerequisites
The following prerequisites are required to compile and install Nvidia driver:
$ sudo dpkg --add-architecture i386

$ sudo apt update

$ sudo apt install build-essential libc6:i386
Disable Nouveau Nvidia driver
Next step is to disable the default nouveau Nvidia driver. Follow this guide on how to disable the default Nouveau Nvidia driver. Make sure you reboot your system before you proceed to the next step.
Stop Desktop Manager
In order to install new Nvidia driver we need to stop the current display server. The easiest way to do this is to change into runlevel 3 using the telinit command. After executing the following linux command the display server will stop, therefore make sure you save all your current work ( if any ) before you proceed:
$ sudo telinit 3
or
$ lspci -vnn | grep VGA
$ ls
NVIDIA-Linux-x86_64-384.111.bin
Install Prerequisites
The following prerequisites are required to compile and install Nvidia driver:
$ sudo dpkg --add-architecture i386
$ sudo apt update
$ sudo apt install build-essential libc6:i386
Disable Nouveau Nvidia driver
Next step is to disable the default nouveau Nvidia driver. Follow this guide on how to disable the default Nouveau Nvidia driver. Make sure you reboot your system before you proceed to the next step.
Stop Desktop Manager
In order to install new Nvidia driver we need to stop the current display server. The easiest way to do this is to change into runlevel 3 using the telinit command. After executing the following linux command the display server will stop, therefore make sure you save all your current work ( if any ) before you proceed:
$ sudo telinit 3
$ sudo apt update
$ sudo apt install build-essential libc6:i386
Stop Desktop Manager
In order to install new Nvidia driver we need to stop the current display server. The easiest way to do this is to change into runlevel 3 using the telinit command. After executing the following linux command the display server will stop, therefore make sure you save all your current work ( if any ) before you proceed:
$ sudo telinit 3
Hit CTRL+ALT+F1 and login with your username and password to open a new TTY1 session.
Install Nvidia Driver
To start installation of Nvidia driver execute the following linux command and follow the wizard:
$ bash NVIDIA-Linux-x86_64-384.111.bin
- Accept License
- The distribution-provided pre-install script failed! Are you sure you want to continue? -> CONTINUE INSTALLATION
- Would you like to run the nvidia-xconfig utility? -> YES
The Nvidia driver is now installed. Reboot your system:
$ sudo reboot
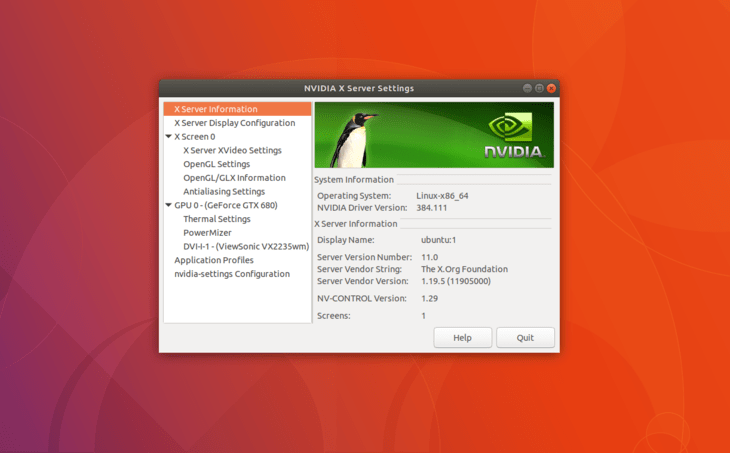
Configure NVIDIA X Server Settings
After reboot your should be able to start NVIDIA X Server Settings app from the Activities menu.
Appendix
Error message:
WARNING: Unable to find suitable destination to install 32-bit compatibility libraries
WARNING: Unable to find suitable destination to install 32-bit compatibility libraries
Depending on your needs, this can be safely ignored. However, if you wish to install steam game platform this issue cannot be ignored. To resolve execute:
$ sudo dpkg --add-architecture i386

$ sudo apt update

$ sudo apt install libc6:i386
and re-run the nvidia driver installation.
How to install the NVIDIA drivers on Ubuntu 18.04 Bionic Beaver Linux的更多相关文章
- How to Install Oracle Java 11 on Ubuntu 18.04 LTS (Bionic) Written by Rahul, Updated on April 3, 20
本文系转载备份 请阅读点击下面链接阅读原文以获取更佳地阅读体验.谢谢. How to Install Oracle Java 11 on Ubuntu 18.04 LTS (Bionic) Writt ...
- How to install tensorflow from source on ubuntu 18.04 64bit
1,install dependencies sudo apt-get install openjdk-8-jdk git python-dev python3-dev python-numpy py ...
- [转]How to Install Oracle Java 11 in Ubuntu 18.04/18.10
链接地址:http://ubuntuhandbook.org/index.php/2018/11/how-to-install-oracle-java-11-in-ubuntu-18-04-18-10 ...
- 如何在Ubuntu 18.04上安装和卸载TeamViewer
卸载命令:sudo apt --purge remove teamviewer 安装:https://www.linuxidc.com/Linux/2018-05/152282.htm 如何在Ubun ...
- How To Install Docker On Ubuntu 18.04
Docker is an increasingly popular software package that creates a container for application developm ...
- 升级Ubuntu 16.04 到 Ubuntu 18.04 的方法
特别注意,在进行升级前,请做好重要数据备份工作,防止升级失败或者其他奇怪原因,导致数据丢失或损坏 sudo vim /etc/apt/sources.list 将 http://archive.ubu ...
- Ubuntu 18.04编译AOSP源码
总结一下我从Ubuntu 18.04下编译成功AOSP的过程,以及遇到的坑 我的电脑配置: OS: Ubuntu 18.04 bionic Kernel: x86_64 Linux 4.18.0-17 ...
- Ubuntu 18.04及Snap体验——让Linux入门更简单(转))
https://www.linuxidc.com/Linux/2018-06/152993.htm 初次听说过Linux的时候,是大一计算机课时候老师介绍说除了Windows还有Linux.Unix操 ...
- Ubuntu 18.04 安装、配置和美化
本文章修改自inkss的博文 为什么要修改原文? 本来我是想自己写这么一篇的,但是没想到在百度一搜,居然一篇好文.我之前没看到,真是可惜. 这篇文章主要是帮助我记录一些东西,如题. 原文虽然不错,但是 ...
随机推荐
- train loss与test loss结果分析
train loss 不断下降,test loss不断下降,说明网络仍在学习; train loss 不断下降,test loss趋于不变,说明网络过拟合; train loss 趋于不变,test ...
- JAVA中 this关键字的用法
this 在类中就是代表当前对象,可以通过 this 关键字完成当前对象的成员属性.成员方法和构造方法的调用. 那么何时用 this? 当在定义类中的方法时,如果需要调用该类对象,就可以用 this来 ...
- 离线安装eclipse的maven插件包
离线安装eclipse的maven插件包 1.打开你本地的eclipse根目录,随便新建一个文件夹例如mavenPlugin,把maven离线插件包中两个文件夹复制到这个新建的这个文件夹里边 2.找到 ...
- turtle库笔记
turtle库是学习python的一个重要数据库,在当下是一个很有趣流行的绘制图像的数据库,她把画笔想象为一只小乌龟在爬行,让小乌龟在一个以横轴为x,纵轴为y的画布上行驶,并且会有多样的行驶角度,速度 ...
- 整理的最全 python常见面试题
整理的最全 python常见面试题(基本必考)① ②③④⑤⑥⑦⑧⑨⑩ 1.大数据的文件读取: ① 利用生成器generator: ②迭代器进行迭代遍历:for line in file; 2.迭代 ...
- HttpClient登陆后获取并携带cookies发起请求
最近项目中,用到了登陆后获取并携带cookies发起请求的业务场景,现总结写出来备忘一下. 1.定义存取cookies信息的全局变量 public class HttpUtil { /** * 用来存 ...
- Python"由于目标计算机积极拒绝,无法连接。"错误解决
出现这种情况的原因是电脑使用了代理服务器,在设置中,将代理服务关闭就行 这时候通过GET访问界面就能成功了.测试代码: import requests r=requests.get('https:// ...
- C语言实现链表
#include<stdio.h>#include<malloc.h>#include<stdlib.h> typedef struct Node { int ...
- 新时代运维重器 Tencent Hub 最佳实践——云+未来峰会开发者专场回顾
欢迎大家前往腾讯云+社区,获取更多腾讯海量技术实践干货哦~ 演讲者:邹辉 腾讯云 PaaS 产品总监 背景:5月23-24日,以"焕启"为主题的腾讯"云+未来" ...
- gihub简单学习 步步操作(简单易学)
一:Git是什么? Git是目前世界上最先进的分布式版本控制系统. 二:SVN与Git的最主要的区别? SVN是集中式版本控制系统,版本库是集中放在中央服务器的,而干活的时候,用的都是自己的电脑,所以 ...