SpringCloud系列三:SpringSecurity 安全访问(配置安全验证、服务消费端处理、无状态 Session 配置、定义公共安全配置程序类)
1、概念:SpringSecurity 安全访问
2、具体内容
所有的 Rest 服务最终都是暴露在公网上的,也就是说如果你的 Rest 服务属于一些你自己公司的私人业务,这样的结果会直接 导致你信息的泄漏,所以对于 Rest 访问,安全性是首要的因素。
2.1、配置安全验证
如果要想进行安全的验证处理,那么首先一定要先在服务的提供方上进行处理。
1、 【microcloud-provider-dept-8001】修改 pom.xml 配置文件,追加 SpringSecurity 相关依赖包引入:
        <dependency>

            <groupId>org.springframework.boot</groupId>

            <artifactId>spring-boot-starter-security</artifactId>

        </dependency>
如果你现在配置了安全框架,则在启动时会出现有如下的一个提示信息:
Using default security password: 75f5d975-0cfc-16e9-b9cc-68fbb0b56465
2、 【microcloud-provider-dept-8001】修改 application.yml 配置文件,进行安全的用户名配置:

security:

  basic:

    enabled: true # 启用SpringSecurity的安全配置项

  user:

    name: studyjava  # 认证用户名

    password: hello # 认证密码

    role:        # 授权角色

    - USER
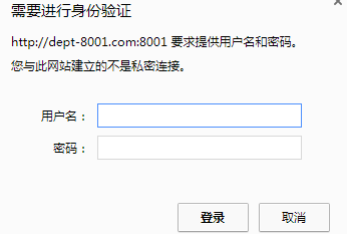
随后在项目之中访问 Rest 服务接口:http://dept-8001.com:8001/dept/list,此时在访问的时候会直接询问用户要求用户输入用户 名以及密码。
这个时候有一种更简化的方法进行内容的输入:http:/studyjava:hello@dept-8001.com:8001/dept/list;
2.2、服务消费端处理
在实际的开发之中,对于 Rest 服务提供者是不可能被用户直接进行访问的,于是肯定需要有一个 Rest 客户端(WEB 端、 SpringBoot)进行调用,可是现在 Rest 提供者的服务上有了认证信息,那么该如何访问呢?
public static final String DEPT_GET_URL = "http://studyjava:hello@dept-8001.com:8001/dept/get/";
如果这个时候在 Rest 客户端上直接使用用户名和密码做加密处理,那么根本就无法进行访问,此时会出现有 401 的错误代码, 因为认证出现了错误。之所以无法访问,是因为所有的认证的处理操作,应该以头信息的模式来进行处理。而后要使用Base64进行加密处理后才可以得到一个正确的访问路径。
1、 【microcloud-consumer-80】修改 RestConfig 配置类,在这个配置类上追加有新的 Bean 配置项HttpHeaders
package cn.study.microcloud.config;

import java.nio.charset.Charset;

import java.util.Base64;

import org.springframework.context.annotation.Bean;

import org.springframework.context.annotation.Configuration;

import org.springframework.http.HttpHeaders;

import org.springframework.web.client.RestTemplate;

@Configuration

public class RestConfig {

    @Bean

    public HttpHeaders getHeaders() { // 要进行一个Http头信息配置

        HttpHeaders headers = new HttpHeaders(); // 定义一个HTTP的头信息

        String auth = "studyjava:hello"; // 认证的原始信息

        byte[] encodedAuth = Base64.getEncoder()

                .encode(auth.getBytes(Charset.forName("US-ASCII"))); // 进行一个加密的处理

        // 在进行授权的头信息内容配置的时候加密的信息一定要与“Basic”之间有一个空格

        String authHeader = "Basic " + new String(encodedAuth);

        headers.set("Authorization", authHeader);

        return headers;

    }

    @Bean

    public RestTemplate getRestTemplate() {

        return new RestTemplate();

    }

}
2、 【microcloud-consumer-80】修改 ConsumerDeptController 配置类,在进行 Rest 访问的时候设置好这个头部的信息
package cn.study.microcloud.controller;

import java.util.List;

import javax.annotation.Resource;

import org.springframework.http.HttpEntity;

import org.springframework.http.HttpHeaders;

import org.springframework.http.HttpMethod;

import org.springframework.web.bind.annotation.RequestMapping;

import org.springframework.web.bind.annotation.RestController;

import org.springframework.web.client.RestTemplate;

import cn.study.vo.Dept;

@RestController

public class ConsumerDeptController {

    public static final String DEPT_GET_URL = "http://dept-8001.com:8001/dept/get/";

    public static final String DEPT_LIST_URL = "http://dept-8001.com:8001/dept/list/";

    public static final String DEPT_ADD_URL = "http://dept-8001.com:8001/dept/add?dname=";

    @Resource

    private RestTemplate restTemplate;

    @Resource

    private HttpHeaders headers;

    @RequestMapping(value = "/consumer/dept/get")

    public Object getDept(long id) {

        Dept dept = this.restTemplate

                .exchange(DEPT_GET_URL + id, HttpMethod.GET,

                        new HttpEntity<Object>(this.headers), Dept.class)

                .getBody();

        return dept;

    }

    @SuppressWarnings("unchecked")

    @RequestMapping(value = "/consumer/dept/list")

    public Object listDept() {

        List<Dept> allDepts = this.restTemplate

                .exchange(DEPT_LIST_URL, HttpMethod.GET,

                        new HttpEntity<Object>(this.headers), List.class)

                .getBody();

        return allDepts;

    }

    @RequestMapping(value = "/consumer/dept/add")

    public Object addDept(Dept dept) throws Exception {

        Boolean flag = this.restTemplate.exchange(DEPT_ADD_URL, HttpMethod.POST,

                new HttpEntity<Object>(dept, this.headers), Boolean.class)

                .getBody();

        return flag;

    }

}
3、无状态 Session 配置
通过之前一系列的演示可以发现整个 Rest 项目中的一个问题所在,所有的 Rest 都是基于 HTTP 协议的一种应用,而在这种应 用上,所有的 WEB 容器一般都会提供有一个 Session 的机制,也就是说每一个用户访问之后如果该用户一直连接,则认为该用户 应该一直被服务器保存状态,但是微服务有可能同时并发访问几十万人,那么如果所有的 Session 状态都被维护着就会出现内存泄漏
1、 【microcloud-provider-dept-8001】现在修改 Rest 程序类,追加一个取得 session id 的方法:
package cn.study.microcloud.rest;

import javax.annotation.Resource;

import javax.servlet.http.HttpServletRequest;

import org.springframework.web.bind.annotation.PathVariable;

import org.springframework.web.bind.annotation.RequestBody;

import org.springframework.web.bind.annotation.RequestMapping;

import org.springframework.web.bind.annotation.RequestMethod;

import org.springframework.web.bind.annotation.RestController;

import cn.study.microcloud.service.IDeptService;

import cn.study.vo.Dept;

@RestController

public class DeptRest {

    @Resource

    private IDeptService deptService ;

    @RequestMapping("/dept/sessionId")

    public Object id(HttpServletRequest request) {

        return request.getSession().getId() ;

    }

    @RequestMapping(value="/dept/get/{id}",method=RequestMethod.GET)

    public Object get(@PathVariable("id") long id) {

        return this.deptService.get(id) ;

    }

    @RequestMapping(value="/dept/add",method=RequestMethod.POST)

    public Object add(@RequestBody Dept dept) {

        return this.deptService.add(dept) ;

    }

    @RequestMapping(value="/dept/list",method=RequestMethod.GET)

    public Object list() {

        return this.deptService.list() ;

    }

}
随后进行提供者的 Rest 连接访问:http://studyjava:hello@dept-8001.com:8001/dept/sessionId;会发现每访问一次就会出现不同的session id
2、 在有一些的 SpringCloud 的配置之中,默认是会保存有 Session 状态的,而后如果用户有需要则可以根据“SessionCreationPolicy” 枚举类进行不同的 session 状态设置,但是从整体的操作来说,session 最好设置为无状态。
· 以下为保持 Session 状态(服务器内存有可能被占满):
security:

  sessions: always
· 以下为无状态的 Session 设置(服务器不保存 Session 状态,每一次连接都是一个新的用户):
security:

  sessions: stateless
不管你以后的项目或者支持类中是否有设置无状态的问题,你最好都进行一下设置,否则你的 Rest 服务将受到严重的内存困 扰,最严重的问题就是内存溢出。
4、定义公共安全配置程序类
在进行 Rest 服务开发的时候,为了保证安全所有的程序里面都需要进行 Spring-Security 安全认证处理,可是之前所进行的认 证处理都是在 application.yml 配置文件完成的,这样的配置明显是非常不合乎逻辑的,因为如果此时你要开发的微服务很多,并且 这些微服务都要求使用统一的用户名和密码的时候就非常不方便了。所以现在最简单的做法是进行统一的设置。
1、 创建一个 microcloud-security 的 Maven 模块;
2、 【microcloud-security】修改 pom.xml 配置文件添加spring-boot-starter-security:
    <dependencies>

        <dependency>

            <groupId>org.springframework.boot</groupId>

            <artifactId>spring-boot-starter-web</artifactId>

        </dependency>

        <dependency>

            <groupId>org.springframework.boot</groupId>

            <artifactId>spring-boot-starter-security</artifactId>

        </dependency>

        <dependency>

            <groupId>org.springframework</groupId>

            <artifactId>springloaded</artifactId>

        </dependency>

        <dependency>

            <groupId>org.springframework.boot</groupId>

            <artifactId>spring-boot-devtools</artifactId>

        </dependency>

    </dependencies>
3、 【microcloud-security】建立一个统一的安全配置类:
package cn.study.microcloud.config;

import javax.annotation.Resource;

import org.springframework.context.annotation.Configuration;

import org.springframework.security.config.annotation.authentication.builders.AuthenticationManagerBuilder;

import org.springframework.security.config.annotation.web.builders.HttpSecurity;

import org.springframework.security.config.annotation.web.configuration.EnableWebSecurity;

import org.springframework.security.config.annotation.web.configuration.WebSecurityConfigurerAdapter;

import org.springframework.security.config.http.SessionCreationPolicy;

@Configuration

@EnableWebSecurity

public class WebSecurityConfig extends WebSecurityConfigurerAdapter {

    @Resource

    public void configGlobal(AuthenticationManagerBuilder auth)

            throws Exception {

        auth.inMemoryAuthentication().withUser("studyjava").password("hello")

                .roles("USER").and().withUser("admin").password("hello")

                .roles("USER", "ADMIN");

    }

    @Override

    protected void configure(HttpSecurity http) throws Exception {

        // 表示所有的访问都必须进行认证处理后才可以正常进行

        http.httpBasic().and().authorizeRequests().anyRequest()

                .fullyAuthenticated();

        // 所有的Rest服务一定要设置为无状态,以提升操作性能

        http.sessionManagement()

                .sessionCreationPolicy(SessionCreationPolicy.STATELESS);

    }

}
4、 【microcloud-provider-dept-8001】修改 pom.xml 配置文件,引入安全配置模块:
        <dependency>

            <groupId>cn.study</groupId>

            <artifactId>microcloud-security</artifactId>

        </dependency>
5、 【microcloud-provider-dept-8001】删除掉 application.yml 中与安全有关的配置项(以下内容删除);
security:

 sessions: stateless

 basic:

  enabled: true # 启用SpringSecurity的安全配置项

 user:

  name: studyjava # 认证用户名

  password: hello # 认证密码

  role: # 授权角色

  - USER
SpringCloud系列三:SpringSecurity 安全访问(配置安全验证、服务消费端处理、无状态 Session 配置、定义公共安全配置程序类)的更多相关文章
- 微软BI 之SSIS 系列 - 使用 Script Task 访问非 Windows 验证下的 SMTP 服务器发送邮件
原文:微软BI 之SSIS 系列 - 使用 Script Task 访问非 Windows 验证下的 SMTP 服务器发送邮件 开篇介绍 大多数情况下我们的 SSIS 包都会配置在 SQL Agent ...
- Docker & k8s 系列三:在k8s中部署单个服务实例
本章将会讲解: pod的概念,以及如何向k8s中部署一个单体应用实例. 在上面的篇幅中,我们了解了docker,并制作.运行了docker镜像,然后将镜像发布至中央仓库了.然后又搭建了本机的k8s环境 ...
- 编写WCF服务时右击配置文件无“Edit WCF Configuration”(编辑 WCF 配置)远程的解决办法
原文:编写WCF服务时右击配置文件无“Edit WCF Configuration”远程的解决办法 今天在看<WCF揭秘>书中看到作者提出可以在一个WCF Host应用程序的App.Con ...
- SpringCloud系列三:将微服务注册到Eureka Server上
1. 回顾 通过上篇博客的讲解,我们知道硬编码提供者地址的方式有不少问题.要想解决这些问题,服务消费者需要一个强大的服务发现机制,服务消费者使用这种机制获取服务提供者的网络信息.不仅如此,即使服务提供 ...
- springcloud系列三 搭建服务模块
搭建服务模块为了模拟正式开发环境,只是少写了service层直接在controller里面直接引用,直接上图和代码:更为方便: 创建完成之后加入配置: pom.xml文件: <?xml vers ...
- spring cloud 入门系列三:使用Eureka 搭建高可用服务注册中心
在上一篇中分享了如何使用Eureka 进行服务治理,里面搭建的服务注册中心是单体的, 但是在实际的应用中,分布式系统为了防止单体服务宕机带来严重后果,一般都会采用服务器集群的形式,服务注册中心也是一样 ...
- IPv6系列-彻底弄明白有状态与无状态配置IPv6地址
深入研究自动分配IPv6地址的Stateless(无状态)与Stateful(有状态)方式 小慢哥的原创文章,欢迎转载 目录 ▪ 一. Link-Local Address的生成方式 ▪ 二. Glo ...
- Memcache+Tomcat9集群实现session共享(非jar式配置, 手动编写Memcache客户端)
Windows上两个tomcat, 虚拟机中ip为192.168.0.30的centos上一个(测试用三台就够了, 为了测试看见端口所以没有使用nginx转发请求) 开始 1.windows上开启两个 ...
- nginx配置为windows服务中的坑
网上搜索“nginx 配置为windows服务”,很容易搜索到使用windows server warpper来配置,于是按照网上的方法我从github上的链接下载了1.17版本,前面都很顺利,很容易 ...
随机推荐
- Sql Server索引重建
公司线上数据有几千万数据,有时候索引碎片会导致索引达不到我们的预期查询效率,这个时候将索引重建将会提升一定效率,不过重建的时候一定得晚上用户少的时候,索引重建需要一定时间. 直接贴自动重建索引脚本吧 ...
- python学习2:turtle的使用蟒蛇绘制的学习以及自己摸索的等边三角形绘制(跟随mooc学习)
首先先放上蟒蛇的绘制程序 import turtle#引入外部库#def保留字用于 定义函数 def drawSnake(rad,angle,len,neckrad): for i in range( ...
- 阿里的maven镜像仓库,eclipse中使用maven下载jar包的时候提升速度
<mirrors> <mirror> <id>alimaven</id> <name>aliyun maven</name> & ...
- Matlab_audiowrite_音频生成
输出音频文件所需函数为 audiowrite .通过例程进行解释: % 生成时间序列 fs = 5000; % [Hz] 信号采样频率 T = 1; % [s] 信号长度 x = 0:1/fs:T; ...
- How to create your iOS team provisioning profile ?
From Apple Developer: https://developer.apple.com/library/content/documentation/IDEs/Conceptual/AppS ...
- MAC如何生成SSH key与GitHub关联
一.检查 SSH key 是否存在 在终端输入如下代码: ls -al ~/.ssh 如果没有,终端显示如下: No such file or directory 如果有,终端显示如下: ➜ ~ ls ...
- html(二)常见符号
HTML当中的常见实体内容:
- vue day3 bootstrap 联动下拉
<!DOCTYPE html> <html> <head> <meta charset="utf-8" /> <meta ht ...
- redis性能提升之pipeline
1.以前正常使用过程 客户端向服务器发送查询,并从套接字读取,通常以阻塞的方式,用于服务器响应. 服务器处理命令并将响应发送回客户端. 也就是每个命令都会有一来以往的过程 2.管道的意义 如果能将连续 ...
- C#的发展历程 -- 系列介绍
C#的发展历程第五 - C# 7开始进入快速迭代道路 C#与C++的发展历程第四 - C#6的新时代 C#与C++的发展历程第三 - C#5.0异步编程巅峰 C#与C++的发展历程第二 - C#4.0 ...