IOS UITableView下拉刷新和上拉加载功能的实现
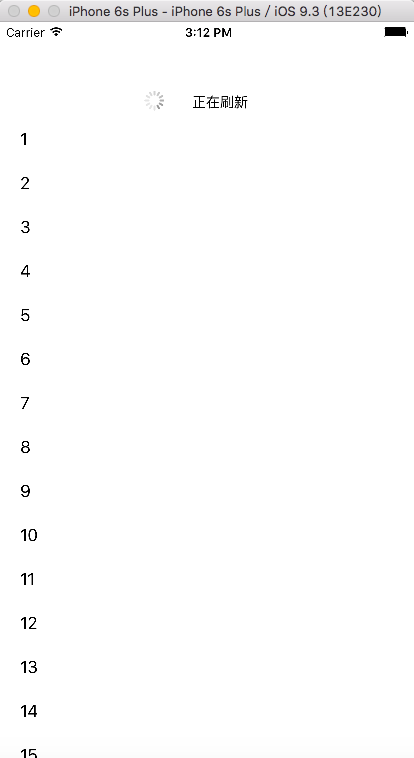
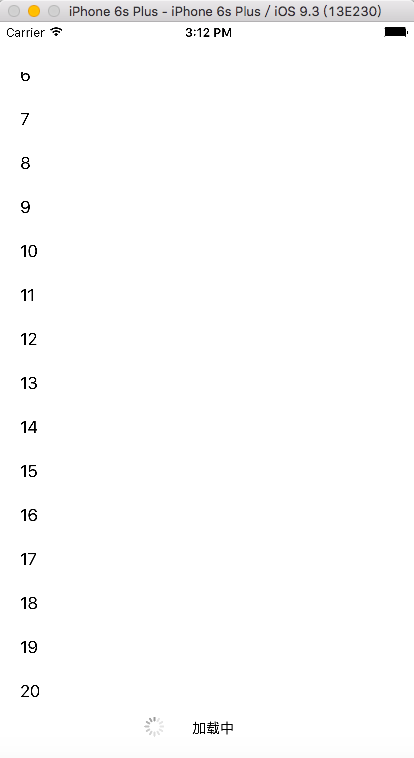
在IOS开发中UITableView是非常常用的一个功能,而在使用UITableView的时候我们经常要用到下拉刷新和上拉加载的功能,今天花时间实现了简单的UITableView的下拉刷新和上拉加载功能,效果图如下:
代码如下:
TableRefreshHeaderView.h
#import <UIKit/UIKit.h>

@interface TableRefreshHeaderView : UIView

@property(nonatomic, strong)UIImageView *arrowView;

@property(nonatomic, strong)UILabel *refreshText;

@property(nonatomic, strong)UIActivityIndicatorView *loadingIndicatorView;

-(instancetype)initWithFrame:(CGRect)frame;

- (void)setRefreshMode:(int)mode;

@end
TableRefreshHeaderView.m
#import "TableRefreshHeaderView.h"

#define UISCREEN_WIDTH [UIScreen mainScreen ].bounds.size.width

#define UISCREEN_HEIGHT [UIScreen mainScreen ].bounds.size.height

@implementation TableRefreshHeaderView

/*

// Only override drawRect: if you perform custom drawing.

// An empty implementation adversely affects performance during animation.

- (void)drawRect:(CGRect)rect {

    // Drawing code

}

*/

-(instancetype)initWithFrame:(CGRect)frame;

{

    self = [super initWithFrame:frame];

    if (self) {

        [self addSubview:self.arrowView];

        [self addSubview:self.refreshText];

        [self addSubview:self.loadingIndicatorView];

        self.loadingIndicatorView.hidden = YES;

    }

    return self;

}

//箭头图片UIImageView

-(UIImageView *)arrowView

{

    if (!_arrowView) {

        _arrowView = [[UIImageView alloc]initWithFrame:CGRectMake(UISCREEN_WIDTH / 2.0 - , , , )];

        _arrowView.image = [UIImage imageNamed:@"arrow"];

    }

    return _arrowView;

}

//下拉刷新文字

-(UILabel *)refreshText

{

    if (!_refreshText) {

        _refreshText = [[UILabel alloc]initWithFrame:CGRectMake(UISCREEN_WIDTH / 2.0 - , , , )];

        _refreshText.font = [UIFont fontWithName:@"Arial" size:];

        _refreshText.textColor = [UIColor blackColor];

        _refreshText.text = @"下拉刷新";

    }

    return _refreshText;

}

//刷新旋转视图

- (UIActivityIndicatorView *)loadingIndicatorView

{

    if (!_loadingIndicatorView) {

        _loadingIndicatorView = [[UIActivityIndicatorView alloc]initWithFrame:CGRectMake(UISCREEN_WIDTH / 2.0 - , , , )];

        [_loadingIndicatorView setActivityIndicatorViewStyle:UIActivityIndicatorViewStyleGray];

        _loadingIndicatorView.backgroundColor = [UIColor clearColor];

        _loadingIndicatorView.center = CGPointMake(UISCREEN_WIDTH / 2.0 - , );

    }

    return _loadingIndicatorView;

}

//设置三种刷新模式

- (void)setRefreshMode:(int)mode

{

    switch (mode) {

        case ://下拉过程中

        {

            self.arrowView.hidden = NO;

            self.loadingIndicatorView.hidden = YES;

            [self.loadingIndicatorView stopAnimating];

            [UIView animateWithDuration:0.3 animations:^(void){

                _arrowView.transform = CGAffineTransformMakeRotation(M_PI * );

            }];

            self.refreshText.text = @"下拉刷新";

        }

            break;

        case ://提示松开刷新

        {

            self.arrowView.hidden = NO;

            self.loadingIndicatorView.hidden = YES;

            [self.loadingIndicatorView stopAnimating];

            [UIView animateWithDuration:0.3 animations:^(void){

                _arrowView.transform = CGAffineTransformMakeRotation(M_PI);

            }];

            self.refreshText.text = @"松开刷新";

        }

            break;

        case ://松开后刷新

        {

            self.arrowView.hidden = YES;

            self.loadingIndicatorView.hidden = NO;

            [self.loadingIndicatorView startAnimating];

            self.refreshText.text = @"正在刷新";

        }

            break;

        default:

            break;

    }

}

@end
TableRefreshFooterView.h
#import <UIKit/UIKit.h>

@interface TableRefreshFooterView : UIView

@property(nonatomic, strong) UIActivityIndicatorView *loadingIndcatorView;

@property(nonatomic, strong) UILabel *loadingText;

- (void)setLoadingMode:(int)mode;

@end
TableRefreshFooterView.m
#import "TableRefreshFooterView.h"

#define UISCREEN_WIDTH [UIScreen mainScreen ].bounds.size.width

#define UISCREEN_HEIGHT [UIScreen mainScreen ].bounds.size.height

@implementation TableRefreshFooterView

- (instancetype)initWithFrame:(CGRect)frame

{

    self = [super initWithFrame:frame];

    if (self) {

        [self addSubview:self.loadingIndcatorView];

        [self addSubview:self.loadingText];

    }

    return self;

}

- (UIActivityIndicatorView *)loadingIndcatorView

{

    if (!_loadingIndcatorView) {

        _loadingIndcatorView = [[UIActivityIndicatorView alloc]initWithFrame:CGRectMake(UISCREEN_WIDTH / 2.0 - , , , )];

        [_loadingIndcatorView setActivityIndicatorViewStyle:UIActivityIndicatorViewStyleGray];

        _loadingIndcatorView.backgroundColor = [UIColor clearColor];

        _loadingIndcatorView.center = CGPointMake(UISCREEN_WIDTH / 2.0 - , );

    }

    return _loadingIndcatorView;

}

- (UILabel *)loadingText

{

    if (!_loadingText) {

        _loadingText = [[UILabel alloc]initWithFrame:CGRectMake(UISCREEN_WIDTH / 2.0 - , , , )];

        _loadingText.font = [UIFont fontWithName:@"Arial" size:];

        _loadingText.textColor = [UIColor blackColor];

        _loadingText.text = @"加载中";

    }

    return _loadingText;

}

- (void)setLoadingMode:(int)mode

{

    switch (mode) {

        case :

            _loadingText.text = @"加载中";

            [self.loadingIndcatorView startAnimating];

            self.loadingIndcatorView.hidden = NO;

            break;

            case :

            _loadingText.text = @"加载完毕";

            [self.loadingIndcatorView stopAnimating];

            self.loadingIndcatorView.hidden = YES;

            break;

        default:

            break;

    }

}

/*

// Only override drawRect: if you perform custom drawing.

// An empty implementation adversely affects performance during animation.

- (void)drawRect:(CGRect)rect {

    // Drawing code

}

*/

@end
ViewController.h
#import <UIKit/UIKit.h>

#import "TableRefreshHeaderView.h"

#import "TableRefreshFooterView.h"

@interface ViewController : UIViewController<UITableViewDelegate, UITableViewDataSource>

{

    int rowCount;//行数

    BOOL isLoading;//是否正在加载

    BOOL isRefreshing;//是否正在刷新

    int drageMode;//1为下拉刷新,2为上拉加载

}

@property(nonatomic, strong)UITableView *myTableView;

@property(nonatomic, strong)TableRefreshHeaderView *refreshHeaderView;

@property(nonatomic, strong)TableRefreshFooterView *loadingFooterView;

@end
ViewController.m
#import "ViewController.h"

#define UISCREEN_WIDTH [UIScreen mainScreen ].bounds.size.width

#define UISCREEN_HEIGHT [UIScreen mainScreen ].bounds.size.height

@interface ViewController ()

@end

@implementation ViewController

- (void)viewDidLoad {

    [super viewDidLoad];

    rowCount = ;

    isLoading = NO;

    isRefreshing = NO;

    drageMode = -;

    [self.view addSubview:self.myTableView];

    [self.myTableView addSubview:self.refreshHeaderView];

    [self.myTableView addSubview:self.loadingFooterView];

    [self.myTableView addObserver:self forKeyPath:@"contentOffset" options:NSKeyValueObservingOptionNew | NSKeyValueObservingOptionOld context:nil];

    // Do any additional setup after loading the view, typically from a nib.

}

- (void)didReceiveMemoryWarning {

    [super didReceiveMemoryWarning];

    // Dispose of any resources that can be recreated.

}

- (void)dealloc

{

    [self.myTableView removeObserver:self forKeyPath:@"contentOffset"];

}

- (UITableView *)myTableView

{

    if (!_myTableView) {

        _myTableView = [[UITableView alloc]initWithFrame:CGRectMake(, , UISCREEN_WIDTH, UISCREEN_HEIGHT - )];

        _myTableView.delegate = self;

        _myTableView.dataSource = self;

    }

    return _myTableView;

}

- (TableRefreshHeaderView *)refreshHeaderView

{

    if (!_refreshHeaderView) {

        _refreshHeaderView = [[TableRefreshHeaderView alloc]initWithFrame:CGRectMake(, -, UISCREEN_WIDTH, )];

    }

    return _refreshHeaderView;

}

- (TableRefreshFooterView *)loadingFooterView

{

    if (!_loadingFooterView) {

        _loadingFooterView = [[TableRefreshFooterView alloc]initWithFrame:CGRectMake(, self.myTableView.contentSize.height, UISCREEN_WIDTH, )];

    }

    return _loadingFooterView;

}

- (NSInteger)tableView:(UITableView *)tableView numberOfRowsInSection:(NSInteger)section

{

    return rowCount;

}

- (NSInteger)numberOfSectionsInTableView:(UITableView *)tableView

{

    return ;

}

- (UITableViewCell*)tableView:(UITableView *)tableView cellForRowAtIndexPath:(NSIndexPath *)indexPath

{

    UITableViewCell *cell = [tableView dequeueReusableCellWithIdentifier:@"Cell"];

    if (cell == nil) {

        cell = [[UITableViewCell alloc] initWithStyle:UITableViewCellStyleDefault reuseIdentifier:@"Cell"];

    }

    cell.textLabel.text=[NSString stringWithFormat:@"%ld",indexPath.row+];

    return cell;

}

-(void) tableView:(UITableView *)tableView willDisplayCell:(UITableViewCell *)cell forRowAtIndexPath:(NSIndexPath *)indexPath

{

    //如果列表控件加载完毕且当前为下拉加载,则将下拉加载视图移到列表可视范围之外

    if([indexPath row] == ((NSIndexPath*)[[tableView indexPathsForVisibleRows] lastObject]).row && drageMode == ){

        self.myTableView.contentInset = UIEdgeInsetsMake(, , , );

    }

}

//监听UITableview的顶部和头部下拉事件

- (void)observeValueForKeyPath:(NSString *)keyPath ofObject:(id)object change:(NSDictionary<NSString *,id> *)change context:(void *)context

{

    if ([keyPath isEqualToString:@"contentOffset"] && !isLoading && !isRefreshing) {

        self.loadingFooterView.frame = CGRectMake(, self.myTableView.contentSize.height, UISCREEN_WIDTH, );

        if (self.myTableView.isDragging) {

            if (self.myTableView.contentOffset.y > -) {

                [self.refreshHeaderView setRefreshMode:];

            }

            else if (self.myTableView.contentOffset.y < -)

            {

                [self.refreshHeaderView setRefreshMode:];

            }

        }

        else

        {

            if (self.myTableView.contentOffset.y < -)

            {

                drageMode = ;

                self.myTableView.contentInset = UIEdgeInsetsMake(, , , );

                [self.refreshHeaderView setRefreshMode:];

                [self beginRefresh];

            }

            else if (self.myTableView.contentOffset.y  > self.myTableView.contentSize.height - self.myTableView.frame.size.height + )

            {

                drageMode = ;

                    if (rowCount < ) {

                    [self.loadingFooterView setLoadingMode:];

                    [self beginLoading];

                }

                else

                {

                    [self.loadingFooterView setLoadingMode:];

                    self.myTableView.contentInset = UIEdgeInsetsMake(, , , );

                }

            }

        }

    }

}

//开始刷新

- (void)beginRefresh

{

    dispatch_async(dispatch_get_global_queue(, ), ^{

        isRefreshing = YES;

        sleep();//处理耗时操作

        dispatch_async(dispatch_get_main_queue(), ^{

            [self endRefresh];//处理完之后更新界面

        });

    }) ;

}

//停止刷新

- (void)endRefresh

{

    [UIView animateWithDuration:0.3 animations:^{

        self.myTableView.contentInset = UIEdgeInsetsMake(, , , );

    }];

    [self.refreshHeaderView setRefreshMode:];

    isRefreshing = NO;

}

//开始加载

- (void)beginLoading

{

    dispatch_async(dispatch_get_global_queue(, ), ^{

            isLoading = YES;

            rowCount += ;

            self.myTableView.contentInset = UIEdgeInsetsMake(, , , );

            sleep();//处理耗时操作

        dispatch_async(dispatch_get_main_queue(), ^{

            [self.myTableView reloadData];

            [self endLoading];//处理完之后更新界面

        });

    }) ;

}

//停止加载

- (void)endLoading

{

    if (rowCount >= ) {

        [self.loadingFooterView setLoadingMode:];

        self.myTableView.contentInset = UIEdgeInsetsMake(, , , );

    }

    else

    {

        self.myTableView.contentInset = UIEdgeInsetsMake(, , , );

        [self.loadingFooterView setLoadingMode:];

    }

    isLoading = NO;

}

@end
源码下载地址:http://download.csdn.net/detail/lzm2625347497/9601843
IOS UITableView下拉刷新和上拉加载功能的实现的更多相关文章
- android--------自定义控件ListView实现下拉刷新和上拉加载
开发项目过程中基本都会用到listView的下拉刷新和上滑加载更多,为了方便重写的ListView来实现下拉刷新,同时添加了上拉自动加载更多的功能. Android下拉刷新可以分为两种情况: 1.获取 ...
- IOS 开发下拉刷新和上拉加载更多
IOS 开发下拉刷新和上拉加载更多 简介 1.常用的下拉刷新的实现方式 (1)UIRefreshControl (2)EGOTTableViewrefresh (3)AH3DPullRefresh ( ...
- 下拉刷新和上拉加载 Swift
转载自:http://iyiming.me/blog/2015/07/05/custom-refresh-and-loading/ 关于下拉刷新和上拉加载,项目中一直使用MJRefresh(原先还用过 ...
- iOS下拉刷新和上拉刷新
在iOS开发中,我们经常要用到下拉刷新和上拉刷新来加载新的数据,当前这也适合分页.iOS原生就带有该方法,下面就iOS自带的下拉刷新方法来简单操作. 上拉刷新 1.在TableView里,一打开软件, ...
- Android 5.X新特性之为RecyclerView添加下拉刷新和上拉加载及SwipeRefreshLayout实现原理
RecyclerView已经写过两篇文章了,分别是Android 5.X新特性之RecyclerView基本解析及无限复用 和 Android 5.X新特性之为RecyclerView添加Header ...
- iscroll.js 下拉刷新和上拉加载
html代码如下 <!DOCTYPE html> <html> <head> <meta charset="utf-8"> < ...
- Android 使用PullToRefresh实现下拉刷新和上拉加载(ExpandableListView)
PullToRefresh是一套实现非常好的下拉刷新库,它支持: 1.ListView 2.ExpandableListView 3.GridView 4.WebView 等多种常用的需要刷新的Vie ...
- 使用PullToRefresh实现下拉刷新和上拉加载
使用PullToRefresh实现下拉刷新和上拉加载 分类: Android2013-12-20 15:51 78158人阅读 评论(91) 收藏 举报 Android下拉刷新上拉加载PullToRe ...
- H5下拉刷新和上拉加载实现原理浅析
前言 在移动端H5网页中,下拉刷新和上拉加载更多数据的交互方式出现频率很高,开源社区也有很多类似的解决方案,如iscroll,pulltorefresh.js库等.下面是对这两种常见交互基本实现原理的 ...
随机推荐
- [MFC] 向文本编辑框写入数据与从其中读取数据
GetDlgItemText(IDC_USER_NAME_EDIT,m_csUserName); SetDlgItemText(IDC_USER_NAME_EDIT,s);
- jenkins2 pipeline 语法快速参考
jenkins2 pipeline中常用的语法快速参考. 文章来自:http://www.ciandcd.com文中的代码来自可以从github下载: https://github.com/ciand ...
- 使用paramikoHelper类实现MySQL安装和数据恢复
本脚本实现远程Linux主机登陆和安装MySQL的rpm包,同时导入mysql数据,实现自动化安装 paramikoHelper类在本博客中 http://www.cnblogs.com/djoker ...
- paip.语义相关是否可在 哈米 的语义分析中应用
paip.语义相关是否可在 哈米 的语义分析中应用 作者Attilax 艾龙, EMAIL:1466519819@qq.com 来源:attilax的专栏 地址:http://blog.csdn. ...
- atitit.文件上传带进度条的实现原理and组件选型and最佳实践总结O7
atitit.文件上传带进度条的实现原理and组件选型and最佳实践总结O7 1. 实现原理 1 2. 大的文件上传原理::使用applet 1 3. 新的bp 2 1. 性能提升---分割小文件上传 ...
- Cocoa编程开发者手册
Cocoa编程开发者手册(Objective-C权威著作超一流翻译阵容) [美] 奇斯纳尔(Chisnall,D.) 著 霍炬等 译 ISBN 978-7-121-12239-2 2013年7月出版 ...
- iOS-SVN、Git
版本控制SVN和Git使用详解 公司的实际开发中,在天朝使用较多的还是SVN,因为SVN是集中式的,在天朝上班你们都懂的! -----------------svn--------- ...
- MyEclipse使用总结——MyEclipse文件查找技巧 ctrl+shift+R ctrl+H
一.查找文件 使用快捷键[ctrl+shift+R]弹出弹出文件查找框,如下图所示: 二.查找包含某个字符串的文件 使用快捷键[ctrl+H]在弹出对话框中选File Search选项,然后在第一个文 ...
- hdu 1284完全背包
http://acm.hdu.edu.cn/showproblem.php?pid=1284 New~ 欢迎“热爱编程”的高考少年——报考杭州电子科技大学计算机学院关于2015年杭电ACM暑期集训队的 ...
- windows下codelite的使用
codelite官方打不开,从这里下载安装程序,地址:http://sourceforge.net/projects/codelite/ 在使用codelite的时候遇到的几个问题: 1).中文问 ...