spring源码深度解析— IOC 之 属性填充
doCreateBean() 主要用于完成 bean 的创建和初始化工作,我们可以将其分为四个过程:
createBeanInstance()实例化 beanpopulateBean()属性填充- 循环依赖的处理
initializeBean()初始化 bean
第一个过程实例化 bean在前面一篇博客中已经分析完了,这篇博客开始分析 属性填充,也就是 populateBean()
protected void populateBean(String beanName, RootBeanDefinition mbd, BeanWrapper bw) {

    PropertyValues pvs = mbd.getPropertyValues();

    if (bw == null) {

        if (!pvs.isEmpty()) {

            throw new BeanCreationException(

                    mbd.getResourceDescription(), beanName, "Cannot apply property values to null instance");

        }

        else {

            // Skip property population phase for null instance.

            return;

        }

    }

    // Give any InstantiationAwareBeanPostProcessors the opportunity to modify the

    // state of the bean before properties are set. This can be used, for example,

    // to support styles of field injection.

    boolean continueWithPropertyPopulation = true;

    if (!mbd.isSynthetic() && hasInstantiationAwareBeanPostProcessors()) {

        for (BeanPostProcessor bp : getBeanPostProcessors()) {

            if (bp instanceof InstantiationAwareBeanPostProcessor) {

                InstantiationAwareBeanPostProcessor ibp = (InstantiationAwareBeanPostProcessor) bp;

                //返回值为是否继续填充bean

                if (!ibp.postProcessAfterInstantiation(bw.getWrappedInstance(), beanName)) {

                    continueWithPropertyPopulation = false;

                    break;

                }

            }

        }

    }

    //如果后处理器发出停止填充命令则终止后续的执行

    if (!continueWithPropertyPopulation) {

        return;

    }

    if (mbd.getResolvedAutowireMode() == RootBeanDefinition.AUTOWIRE_BY_NAME ||

            mbd.getResolvedAutowireMode() == RootBeanDefinition.AUTOWIRE_BY_TYPE) {

        MutablePropertyValues newPvs = new MutablePropertyValues(pvs);

        // Add property values based on autowire by name if applicable.

        //根据名称自动注入

        if (mbd.getResolvedAutowireMode() == RootBeanDefinition.AUTOWIRE_BY_NAME) {

            autowireByName(beanName, mbd, bw, newPvs);

        }

        // Add property values based on autowire by type if applicable.

        //根据类型自动注入

        if (mbd.getResolvedAutowireMode() == RootBeanDefinition.AUTOWIRE_BY_TYPE) {

            autowireByType(beanName, mbd, bw, newPvs);

        }

        pvs = newPvs;

    }

    //后处理器已经初始化

    boolean hasInstAwareBpps = hasInstantiationAwareBeanPostProcessors();

    //需要依赖检查

    boolean needsDepCheck = (mbd.getDependencyCheck() != RootBeanDefinition.DEPENDENCY_CHECK_NONE);

    if (hasInstAwareBpps || needsDepCheck) {

        PropertyDescriptor[] filteredPds = filterPropertyDescriptorsForDependencyCheck(bw, mbd.allowCaching);

        if (hasInstAwareBpps) {

            for (BeanPostProcessor bp : getBeanPostProcessors()) {

                if (bp instanceof InstantiationAwareBeanPostProcessor) {

                    InstantiationAwareBeanPostProcessor ibp = (InstantiationAwareBeanPostProcessor) bp;

                    //对所有需要依赖检查的属性进行后处理

                    pvs = ibp.postProcessPropertyValues(pvs, filteredPds, bw.getWrappedInstance(), beanName);

                    if (pvs == null) {

                        return;

                    }

                }

            }

        }

        if (needsDepCheck) {

            //依赖检查,对应depends-on属性,3.0已经弃用此属性

            checkDependencies(beanName, mbd, filteredPds, pvs);

        }

    }

    //将属性应用到bean中

    //将所有ProtertyValues中的属性填充至BeanWrapper中。

    applyPropertyValues(beanName, mbd, bw, pvs);

}
我们详细分析下populateBean的流程:
(1)首先进行属性是否为空的判断
(2)通过调用InstantiationAwareBeanPostProcessor的postProcessAfterInstantiation(bw.getWrappedInstance(), beanName)方法来控制程序是否继续进行属性填充
(3)根据注入类型(byName/byType)提取依赖的bean,并统一存入PropertyValues中
(4)应用InstantiationAwareBeanPostProcessor的postProcessPropertyValues(pvs, filteredPds, bw.getWrappedInstance(), beanName)方法,对属性获取完毕填充前的再次处理,典型的应用是RequiredAnnotationBeanPostProcesser类中对属性的验证
(5)将所有的PropertyValues中的属性填充至BeanWrapper中
上面步骤中有几个地方是我们比较感兴趣的,它们分别是依赖注入(autowireByName/autowireByType)以及属性填充,接下来进一步分析这几个功能的实现细节
自动注入
Spring 会根据注入类型( byName / byType )的不同,调用不同的方法(autowireByName() / autowireByType())来注入属性值。
autowireByName()
protected void autowireByName(

        String beanName, AbstractBeanDefinition mbd, BeanWrapper bw, MutablePropertyValues pvs) {

    // 获取 Bean 对象中非简单属性

    String[] propertyNames = unsatisfiedNonSimpleProperties(mbd, bw);

    for (String propertyName : propertyNames) {

        // 如果容器中包含指定名称的 bean,则将该 bean 注入到 bean中

        if (containsBean(propertyName)) {

            // 递归初始化相关 bean

            Object bean = getBean(propertyName);

            // 为指定名称的属性赋予属性值

            pvs.add(propertyName, bean);

            // 属性依赖注入

            registerDependentBean(propertyName, beanName);

            if (logger.isDebugEnabled()) {

                logger.debug("Added autowiring by name from bean name '" + beanName +

                        "' via property '" + propertyName + "' to bean named '" + propertyName + "'");

            }

        }

        else {

            if (logger.isTraceEnabled()) {

                logger.trace("Not autowiring property '" + propertyName + "' of bean '" + beanName +

                        "' by name: no matching bean found");

            }

        }

    }

}
该方法逻辑很简单,获取该 bean 的非简单属性,什么叫做非简单属性呢?就是类型为对象类型的属性,但是这里并不是将所有的对象类型都都会找到,比如 8 个原始类型,String 类型 ,Number类型、Date类型、URL类型、URI类型等都会被忽略,如下:
protected String[] unsatisfiedNonSimpleProperties(AbstractBeanDefinition mbd, BeanWrapper bw) {

    Set<String> result = new TreeSet<>();

    PropertyValues pvs = mbd.getPropertyValues();

    PropertyDescriptor[] pds = bw.getPropertyDescriptors();

    for (PropertyDescriptor pd : pds) {

        if (pd.getWriteMethod() != null && !isExcludedFromDependencyCheck(pd) && !pvs.contains(pd.getName()) &&

                !BeanUtils.isSimpleProperty(pd.getPropertyType())) {

            result.add(pd.getName());

        }

    }

    return StringUtils.toStringArray(result);

}
这里获取的就是需要依赖注入的属性。
autowireByName()函数的功能就是根据传入的参数中的pvs中找出已经加载的bean,并递归实例化,然后加入到pvs中
autowireByType
autowireByType与autowireByName对于我们理解与使用来说复杂程度相似,但是实现功能的复杂度却不一样,我们看下方法代码:
protected void autowireByType(

        String beanName, AbstractBeanDefinition mbd, BeanWrapper bw, MutablePropertyValues pvs) {

    TypeConverter converter = getCustomTypeConverter();

    if (converter == null) {

        converter = bw;

    }

    Set<String> autowiredBeanNames = new LinkedHashSet<String>(4);

    //寻找bw中需要依赖注入的属性

    String[] propertyNames = unsatisfiedNonSimpleProperties(mbd, bw);

    for (String propertyName : propertyNames) {

        try {

            PropertyDescriptor pd = bw.getPropertyDescriptor(propertyName);

            // Don't try autowiring by type for type Object: never makes sense,

            // even if it technically is a unsatisfied, non-simple property.

            if (!Object.class.equals(pd.getPropertyType())) {

                //探测指定属性的set方法

                MethodParameter methodParam = BeanUtils.getWriteMethodParameter(pd);

                // Do not allow eager init for type matching in case of a prioritized post-processor.

                boolean eager = !PriorityOrdered.class.isAssignableFrom(bw.getWrappedClass());

                DependencyDescriptor desc = new AutowireByTypeDependencyDescriptor(methodParam, eager);

                //解析指定beanName的属性所匹配的值,并把解析到的属性名称存储在autowiredBeanNames中,

                Object autowiredArgument = resolveDependency(desc, beanName, autowiredBeanNames, converter);

                if (autowiredArgument != null) {

                    pvs.add(propertyName, autowiredArgument);

                }

                for (String autowiredBeanName : autowiredBeanNames) {

                    //注册依赖

                    registerDependentBean(autowiredBeanName, beanName);

                    if (logger.isDebugEnabled()) {

                        logger.debug("Autowiring by type from bean name '" + beanName + "' via property '" +

                                propertyName + "' to bean named '" + autowiredBeanName + "'");

                    }

                }

                autowiredBeanNames.clear();

            }

        }

        catch (BeansException ex) {

            throw new UnsatisfiedDependencyException(mbd.getResourceDescription(), beanName, propertyName, ex);

        }

    }

}
根据名称第一步与根据属性第一步都是寻找bw中需要依赖注入的属性,然后遍历这些属性并寻找类型匹配的bean,其中最复杂就是寻找类型匹配的bean。spring中提供了对集合的类型注入支持,如使用如下注解方式:
@Autowired

private List<Test> tests;
这种方式spring会把所有与Test匹配的类型找出来并注入到tests属性中,正是由于这一因素,所以在autowireByType函数,新建了局部遍历autowireBeanNames,用于存储所有依赖的bean,如果只是对非集合类的属性注入来说,此属性并无用处。
对于寻找类型匹配的逻辑实现是封装在了resolveDependency函数中,其实现如下:
public Object resolveDependency(DependencyDescriptor descriptor, String beanName, Set<String> autowiredBeanNames, TypeConverter typeConverter) throws BeansException {

    descriptor.initParameterNameDiscovery(getParameterNameDiscoverer());

    if (descriptor.getDependencyType().equals(ObjectFactory.class)) {

        //ObjectFactory类注入的特殊处理

        return new DependencyObjectFactory(descriptor, beanName);

    }

    else if (descriptor.getDependencyType().equals(javaxInjectProviderClass)) {

        //javaxInjectProviderClass类注入的特殊处理

        return new DependencyProviderFactory().createDependencyProvider(descriptor, beanName);

    }

    else {

        //通用处理逻辑

        return doResolveDependency(descriptor, descriptor.getDependencyType(), beanName, autowiredBeanNames, typeConverter);

    }

}

protected Object doResolveDependency(DependencyDescriptor descriptor, Class<?> type, String beanName,

        Set<String> autowiredBeanNames, TypeConverter typeConverter) throws BeansException {

    /*

     * 用于支持Spring中新增的注解@Value

     */

    Object value = getAutowireCandidateResolver().getSuggestedValue(descriptor);

    if (value != null) {

        if (value instanceof String) {

            String strVal = resolveEmbeddedValue((String) value);

            BeanDefinition bd = (beanName != null && containsBean(beanName) ? getMergedBeanDefinition(beanName) : null);

            value = evaluateBeanDefinitionString(strVal, bd);

        }

        TypeConverter converter = (typeConverter != null ? typeConverter : getTypeConverter());

        return (descriptor.getField() != null ?

                converter.convertIfNecessary(value, type, descriptor.getField()) :

                converter.convertIfNecessary(value, type, descriptor.getMethodParameter()));

    }

    //如果解析器没有成功解析,则需要考虑各种情况

    //属性是数组类型

    if (type.isArray()) {

        Class<?> componentType = type.getComponentType();

        //根据属性类型找到beanFactory中所有类型的匹配bean,

        //返回值的构成为:key=匹配的beanName,value=beanName对应的实例化后的bean(通过getBean(beanName)返回)

        Map<String, Object> matchingBeans = findAutowireCandidates(beanName, componentType, descriptor);

        if (matchingBeans.isEmpty()) {

            //如果autowire的require属性为true而找到的匹配项却为空则只能抛出异常

            if (descriptor.isRequired()) {

                raiseNoSuchBeanDefinitionException(componentType, "array of " + componentType.getName(), descriptor);

            }

            return null;

        }

        if (autowiredBeanNames != null) {

            autowiredBeanNames.addAll(matchingBeans.keySet());

        }

        TypeConverter converter = (typeConverter != null ? typeConverter : getTypeConverter());

        //通过转换器将bean的值转换为对应的type类型

        return converter.convertIfNecessary(matchingBeans.values(), type);

    }

    //属性是Collection类型

    else if (Collection.class.isAssignableFrom(type) && type.isInterface()) {

        Class<?> elementType = descriptor.getCollectionType();

        if (elementType == null) {

            if (descriptor.isRequired()) {

                throw new FatalBeanException("No element type declared for collection [" + type.getName() + "]");

            }

            return null;

        }

        Map<String, Object> matchingBeans = findAutowireCandidates(beanName, elementType, descriptor);

        if (matchingBeans.isEmpty()) {

            if (descriptor.isRequired()) {

                raiseNoSuchBeanDefinitionException(elementType, "collection of " + elementType.getName(), descriptor);

            }

            return null;

        }

        if (autowiredBeanNames != null) {

            autowiredBeanNames.addAll(matchingBeans.keySet());

        }

        TypeConverter converter = (typeConverter != null ? typeConverter : getTypeConverter());

        return converter.convertIfNecessary(matchingBeans.values(), type);

    }

    //属性是Map类型

    else if (Map.class.isAssignableFrom(type) && type.isInterface()) {

        Class<?> keyType = descriptor.getMapKeyType();

        if (keyType == null || !String.class.isAssignableFrom(keyType)) {

            if (descriptor.isRequired()) {

                throw new FatalBeanException("Key type [" + keyType + "] of map [" + type.getName() +

                        "] must be assignable to [java.lang.String]");

            }

            return null;

        }

        Class<?> valueType = descriptor.getMapValueType();

        if (valueType == null) {

            if (descriptor.isRequired()) {

                throw new FatalBeanException("No value type declared for map [" + type.getName() + "]");

            }

            return null;

        }

        Map<String, Object> matchingBeans = findAutowireCandidates(beanName, valueType, descriptor);

        if (matchingBeans.isEmpty()) {

            if (descriptor.isRequired()) {

                raiseNoSuchBeanDefinitionException(valueType, "map with value type " + valueType.getName(), descriptor);

            }

            return null;

        }

        if (autowiredBeanNames != null) {

            autowiredBeanNames.addAll(matchingBeans.keySet());

        }

        return matchingBeans;

    }

    else {

        Map<String, Object> matchingBeans = findAutowireCandidates(beanName, type, descriptor);

        if (matchingBeans.isEmpty()) {

            if (descriptor.isRequired()) {

                raiseNoSuchBeanDefinitionException(type, "", descriptor);

            }

            return null;

        }

        if (matchingBeans.size() > 1) {

            String primaryBeanName = determinePrimaryCandidate(matchingBeans, descriptor);

            if (primaryBeanName == null) {

                throw new NoUniqueBeanDefinitionException(type, matchingBeans.keySet());

            }

            if (autowiredBeanNames != null) {

                autowiredBeanNames.add(primaryBeanName);

            }

            return matchingBeans.get(primaryBeanName);

        }

        // We have exactly one match.

        Map.Entry<String, Object> entry = matchingBeans.entrySet().iterator().next();

        if (autowiredBeanNames != null) {

            autowiredBeanNames.add(entry.getKey());

        }

        //已经确定只有一个匹配项

        return entry.getValue();

    }

}
主要就是通过Type从BeanFactory中找到对应的benaName,然后通过getBean获取实例
protected Map<String, Object> findAutowireCandidates(

        @Nullable String beanName, Class<?> requiredType, DependencyDescriptor descriptor) {

    //在BeanFactory找到所有Type类型的beanName

    String[] candidateNames = BeanFactoryUtils.beanNamesForTypeIncludingAncestors(

            this, requiredType, true, descriptor.isEager());

    Map<String, Object> result = new LinkedHashMap<>(candidateNames.length);

    //遍历所有的beanName,通过getBean获取

    for (String candidate : candidateNames) {

        if (!isSelfReference(beanName, candidate) && isAutowireCandidate(candidate, descriptor)) {

            //

            addCandidateEntry(result, candidate, descriptor, requiredType);

        }

    }

    return result;

}

private void addCandidateEntry(Map<String, Object> candidates, String candidateName,

        DependencyDescriptor descriptor, Class<?> requiredType) {

    Object beanInstance = descriptor.resolveCandidate(candidateName, requiredType, this);

    if (!(beanInstance instanceof NullBean)) {

        candidates.put(candidateName, beanInstance);

    }

}

public Object resolveCandidate(String beanName, Class<?> requiredType, BeanFactory beanFactory)

        throws BeansException {

    //通过类型找到beanName,然后再找到其实例

    return beanFactory.getBean(beanName);

}
applyPropertyValues
程序运行到这里,已经完成了对所有注入属性的获取,但是获取的属性是以PropertyValues形式存在的,还并没有应用到已经实例化的bean中,这一工作是在applyPropertyValues中。继续跟踪到方法体中:
protected void applyPropertyValues(String beanName, BeanDefinition mbd, BeanWrapper bw, PropertyValues pvs) {

    if (pvs == null || pvs.isEmpty()) {

        return;

    }

    MutablePropertyValues mpvs = null;

    List<PropertyValue> original;

    if (System.getSecurityManager() != null) {

        if (bw instanceof BeanWrapperImpl) {

            ((BeanWrapperImpl) bw).setSecurityContext(getAccessControlContext());

        }

    }

    if (pvs instanceof MutablePropertyValues) {

        mpvs = (MutablePropertyValues) pvs;

        //如果mpvs中的值已经被转换为对应的类型那么可以直接设置到beanwapper中

        if (mpvs.isConverted()) {

            // Shortcut: use the pre-converted values as-is.

            try {

                bw.setPropertyValues(mpvs);

                return;

            }

            catch (BeansException ex) {

                throw new BeanCreationException(

                        mbd.getResourceDescription(), beanName, "Error setting property values", ex);

            }

        }

        original = mpvs.getPropertyValueList();

    }

    else {

        //如果pvs并不是使用MutablePropertyValues封装的类型,那么直接使用原始的属性获取方法

        original = Arrays.asList(pvs.getPropertyValues());

    }

    TypeConverter converter = getCustomTypeConverter();

    if (converter == null) {

        converter = bw;

    }

    //获取对应的解析器

    BeanDefinitionValueResolver valueResolver = new BeanDefinitionValueResolver(this, beanName, mbd, converter);

    // Create a deep copy, resolving any references for values.

    List<PropertyValue> deepCopy = new ArrayList<PropertyValue>(original.size());

    boolean resolveNecessary = false;

    //遍历属性,将属性转换为对应类的对应属性的类型

    for (PropertyValue pv : original) {

        if (pv.isConverted()) {

            deepCopy.add(pv);

        }

        else {

            String propertyName = pv.getName();

            Object originalValue = pv.getValue();

            Object resolvedValue = valueResolver.resolveValueIfNecessary(pv, originalValue);

            Object convertedValue = resolvedValue;

            boolean convertible = bw.isWritableProperty(propertyName) &&

                    !PropertyAccessorUtils.isNestedOrIndexedProperty(propertyName);

            if (convertible) {

                convertedValue = convertForProperty(resolvedValue, propertyName, bw, converter);

            }

            // Possibly store converted value in merged bean definition,

            // in order to avoid re-conversion for every created bean instance.

            if (resolvedValue == originalValue) {

                if (convertible) {

                    pv.setConvertedValue(convertedValue);

                }

                deepCopy.add(pv);

            }

            else if (convertible && originalValue instanceof TypedStringValue &&

                    !((TypedStringValue) originalValue).isDynamic() &&

                    !(convertedValue instanceof Collection || ObjectUtils.isArray(convertedValue))) {

                pv.setConvertedValue(convertedValue);

                deepCopy.add(pv);

            }

            else {

                resolveNecessary = true;

                deepCopy.add(new PropertyValue(pv, convertedValue));

            }

        }

    }

    if (mpvs != null && !resolveNecessary) {

        mpvs.setConverted();

    }

    // Set our (possibly massaged) deep copy.

    try {

        bw.setPropertyValues(new MutablePropertyValues(deepCopy));

    }

    catch (BeansException ex) {

        throw new BeanCreationException(

                mbd.getResourceDescription(), beanName, "Error setting property values", ex);

    }

}
我们来看看具体的属性赋值过程
public class MyTestBean {

    private String name ;

    public MyTestBean(String name) {

        this.name = name;

    }

    public MyTestBean() {

    }

    public String getName() {

        return name;

    }

    public void setName(String name) {

        this.name = name;

    }

}

<bean id="myTestBean"  class="chenhao.spring01.MyTestBean">

        <property name="name" value="chenhao"></property>

</bean>
如上 bw.setPropertyValues 最终都会走到如下方法
@Override

public void setValue(final @Nullable Object value) throws Exception {

    //获取writeMethod,也就是我们MyTestBean的setName方法

    final Method writeMethod = (this.pd instanceof GenericTypeAwarePropertyDescriptor ?

            ((GenericTypeAwarePropertyDescriptor) this.pd).getWriteMethodForActualAccess() :

            this.pd.getWriteMethod());

    if (System.getSecurityManager() != null) {

        AccessController.doPrivileged((PrivilegedAction<Object>) () -> {

            ReflectionUtils.makeAccessible(writeMethod);

            return null;

        });

        try {

            AccessController.doPrivileged((PrivilegedExceptionAction<Object>) () ->

                    writeMethod.invoke(getWrappedInstance(), value), acc);

        }

        catch (PrivilegedActionException ex) {

            throw ex.getException();

        }

    }

    else {

        ReflectionUtils.makeAccessible(writeMethod);

        //通过反射调用方法进行赋值

        writeMethod.invoke(getWrappedInstance(), value);

    }

}
Debug如下
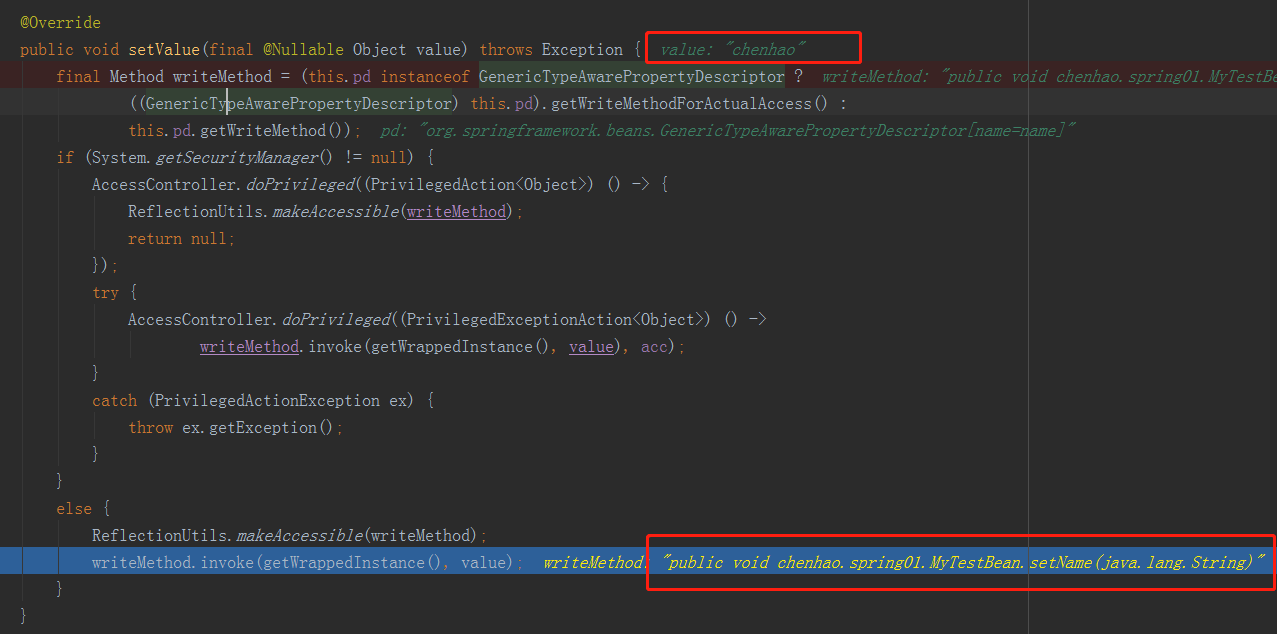
就是利用反射进行调用对象的set方法赋值
至此,doCreateBean() 第二个过程:属性填充 已经分析完成了,下篇分析第三个过程:循环依赖的处理,其实循环依赖并不仅仅只是在 doCreateBean() 中处理,其实在整个加载 bean 的过程中都有涉及,所以下篇内容并不仅仅只局限于 doCreateBean()。
spring源码深度解析— IOC 之 属性填充的更多相关文章
- spring源码深度解析— IOC 之 默认标签解析(上)
概述 接前两篇文章 spring源码深度解析—Spring的整体架构和环境搭建 和 spring源码深度解析— IOC 之 容器的基本实现 本文主要研究Spring标签的解析,Spring的标签 ...
- spring源码深度解析— IOC 之 默认标签解析(下)
在spring源码深度解析— IOC 之 默认标签解析(上)中我们已经完成了从xml配置文件到BeanDefinition的转换,转换后的实例是GenericBeanDefinition的实例.本文主 ...
- spring源码深度解析— IOC 之 开启 bean 的加载
概述 前面我们已经分析了spring对于xml配置文件的解析,将分析的信息组装成 BeanDefinition,并将其保存注册到相应的 BeanDefinitionRegistry 中.至此,Spri ...
- spring源码深度解析— IOC 之 容器的基本实现
概述 上一篇我们搭建完Spring源码阅读环境,spring源码深度解析—Spring的整体架构和环境搭建 这篇我们开始真正的阅读Spring的源码,分析spring的源码之前我们先来简单回顾下spr ...
- spring源码深度解析— IOC 之 bean 创建
在 Spring 中存在着不同的 scope,默认是 singleton ,还有 prototype.request 等等其他的 scope,他们的初始化步骤是怎样的呢?这个答案在这篇博客中给出. s ...
- spring源码深度解析— IOC 之 循环依赖处理
什么是循环依赖 循环依赖其实就是循环引用,也就是两个或则两个以上的bean互相持有对方,最终形成闭环.比如A依赖于B,B依赖于C,C又依赖于A.如下图所示: 注意,这里不是函数的循环调用,是对象的相互 ...
- spring源码深度解析— IOC 之 自定义标签解析
概述 之前我们已经介绍了spring中默认标签的解析,解析来我们将分析自定义标签的解析,我们先回顾下自定义标签解析所使用的方法,如下图所示: 我们看到自定义标签的解析是通过BeanDefinition ...
- spring源码深度解析— IOC 之 bean 的初始化
一个 bean 经历了 createBeanInstance() 被创建出来,然后又经过一番属性注入,依赖处理,历经千辛万苦,千锤百炼,终于有点儿 bean 实例的样子,能堪大任了,只需要经历最后一步 ...
- Spring源码深度解析之Spring MVC
Spring源码深度解析之Spring MVC Spring框架提供了构建Web应用程序的全功能MVC模块.通过策略接口,Spring框架是高度可配置的,而且支持多种视图技术,例如JavaServer ...
随机推荐
- bigdata_ Kafka集群模式部署
环境:kafka 0.8.1.1 基本概念 Kafka维护按类区分的消息,称为主题(topic) 生产者(producer)向kafka的主题发布消息 消费者(consumer)向主题注册,并且接收发 ...
- WPF元素绑定
原文:WPF元素绑定 数据绑定简介:数据绑定是一种关系,该关系告诉WPF从源对象提取一些信息,并用这些信息设置目标对象的属性.目标属性是依赖项属性.源对象可以是任何内容,从另一个WPF元素乃至ADO. ...
- httpclient POST请求(urlencoded)
搬砖搬砖~ Content-Type:application/x-www-form-urlencoded的请求如下 var nvc = new List<KeyValuePair<stri ...
- laravel在wamp中输入地址后总是无法访问
在wamp中的apache中conf的httpd.conf #LoadModule rewrite_module modules/mod_rewrite.so 改为 LoadModule rewrit ...
- 微服务架构之「 下一代微服务 Service Mesh 」
Service Mesh 被大家称为下一代的微服务,是微服务领域的一颗新星,被大家讨论的非常多. 我在大家的讨论中,还看到有人说 “目前的微服务架构我都没学会呢,现在又来一个下一代微服务,真学不动了” ...
- Delphi Android ActivityManager(提供了接口, 利用它可以方便的对Memory, Processes, Task, Service 等进行管)
ActivityManager: 对Activity交互提供了接口, 利用它可以方便的对Memory, Processes, Task, Service 等进行管理,. 这里对Delphi接口进行 ...
- DevExpress的xtraMessageBox汉化
原文:DevExpress的xtraMessageBox汉化 项目使用的界面库是DevExpress 相当好用,不过里面弹出对话框XtraMessageBox的按钮都是英文的, 可能会对用户造成困扰, ...
- 将多个文本文件内的数据导入到Datagridview
private BindingList listXSxxInfoList = new BindingList(); openFileDialog1.Multiselect = true;//允许选择多 ...
- create table as 复制not null
创建一张表包含非空约束,唯一约束和check约束 SQL> create table dept( 2 ename varchar2(20) constraint mep_ename_nn not ...
- UWP入门(二) -- 基础笔记
原文:UWP入门(二) -- 基础笔记 不错的UWP入门视频,1092417123,欢迎交流 UWP-04 - What i XMAL? XAML - XML Syntax(语法) ,create i ...