Android集成极光推送
要说学习极光推送,个人感觉官方文档就非常好啦,但是没法,人太懒啦,为了下次能够快速的将极光推送集成到项目中,故结合之前开发的项目和官方文档记录下简单的Android集成极光推送,在这之前,先上一张简单的思维导图吧,最近一直在研究思维导图,感觉帮助还挺大的。
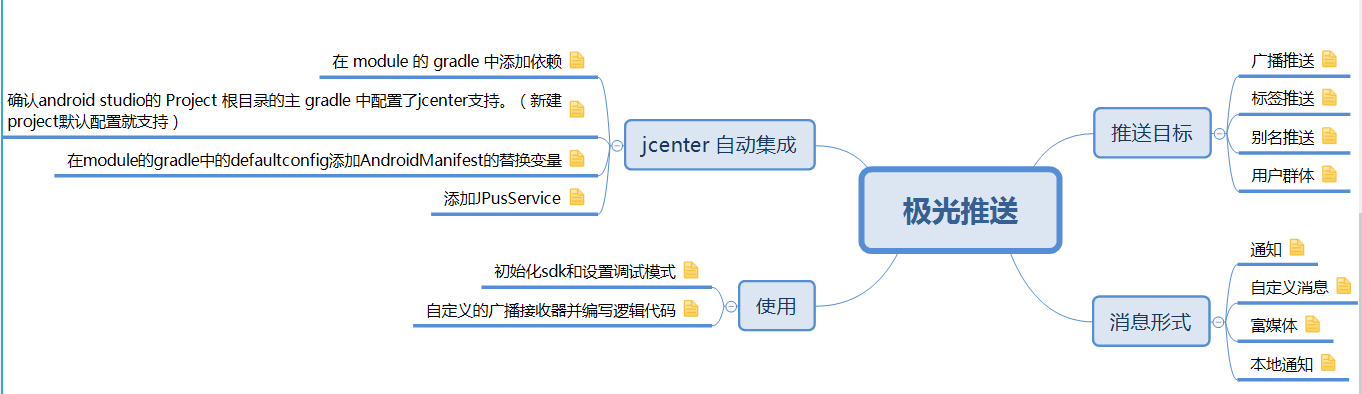
先从官方文档中摘取出一些熟悉的名词,推送目标主要分为四种:
广播推送:向所有的注册用户发送一条广播消息
标签推送:根据属性对用户设置标签分组,向群组用户发送
别名推送:客户端绑定用户别名,向具体的单个用户推送
用户群体:根据JPush提供的多条件组合进行用户群组划分,实时筛选实时推送
推送的消息形式也分为四种:
通知:指在手机的通知栏(状态栏)上会显示的一条通知信息。通知主要用于提示用户的目的,应用于新闻内容、促销活动、产品信息、版本更新提醒、订单状态提醒等多种场景
自定义形式:自定义消息不是通知,所以不会被SDK展示到通知栏上。其内容完全由开发者自己定义。自定义消息主要用于应用的内部业务逻辑。一条自定义消息推送过来,有可能没有任何界面显示。
富媒体:JPush支持开发者发送图文并茂的通知,从而更好的传达信息,带来更丰富的用户互动。JPush提供了5种模板,开发者可以通过填充模板的内容,发送landing page、弹窗、信息流形式的富媒体通知。开发者还可以直接通过URL发送预先编辑好的页面。
本地通知:本地通知API不依赖于网络,无网条件下依旧可以触发;本地通知的定时时间是自发送时算起的,不受中间关机等操作的影响。本地通知与网络推送的通知是相互独立的,不受保留最近通知条数上限的限制。本地通知适用于在特定时间发出的通知,如一些Todo和闹钟类的应用,在每周、每月固定时间提醒用户回到应用查看任务
集成极光推送主要有两种方式,一种是jcenter 自动集成,另外一种是手动集成,这里主要介绍下jcenter 自动集成,手动集成的可参考官方文档
1:我们先在module的gradle中添加依赖
  compile 'cn.jiguang.sdk:jpush:3.0.3'  // 此处以JPush 3.0.3 版本为例。

  compile 'cn.jiguang.sdk:jcore:1.1.1'  // 此处以JCore 1.1.1 版本为例。
2:确认android studio的 Project 根目录的主 gradle 中配置了jcenter支持。(新建project默认配置就支持)
 buildscript {

     repositories {

         jcenter()

     }

     ......

 }

 allprojets {

     repositories {

         jcenter()

     }

 }
3:在module的gradle中的defaultconfig添加AndroidManifest的替换变量
    ndk {

             //选择要添加的对应cpu类型的.so库。

             abiFilters 'armeabi', 'armeabi-v7a', 'arm64-v8a'

             // 还可以添加 'x86', 'x86_64', 'mips', 'mips64'

         }

         manifestPlaceholders = [

                 JPUSH_PKGNAME: applicationId,

                 JPUSH_APPKEY : "4f44ddfa7aa983a7df72b5b3", //JPush上注册的包名对应的appkey.

                 JPUSH_CHANNEL: "developer-default", //用户渠道统计的渠道名称

         ]
4:在AndroidManifest中添加JPusService并配置android:process参数将PushService放在其他进程中:
  <!-- Required SDK 核心功能-->

         <!-- 可配置android:process参数将PushService放在其他进程中 -->

         <service

             android:name="cn.jpush.android.service.PushService"

             android:process=":pushcore"

             android:exported="false">

             <intent-filter>

                 <action android:name="cn.jpush.android.intent.REGISTER" />

                 <action android:name="cn.jpush.android.intent.REPORT" />

                 <action android:name="cn.jpush.android.intent.PushService" />

                 <action android:name="cn.jpush.android.intent.PUSH_TIME" />

             </intent-filter>

         </service>
至此,集成极光推送完毕,那我们怎么使用呢?其实你可以下一个官方的Demo JPushExample研究研究
1:首先我们要在Application中设置JPush调试模式和初始化SDK
 /**

  * Created by kebinran on 2017/7/20.

  */

 public class APP extends Application {

     @Override

     public void onCreate() {

         super.onCreate();

         //设置调试模式

         JPushInterface.setDebugMode(true);

         //init 初始化SDK

         JPushInterface.init(this);

     }

 }
2:自定义的广播接收器并编写逻辑代码,你可以更快捷的从JPushExample中复制响应的代码在上面修改即可
 package com.example.kebinran.jpushdemo;

 import android.content.BroadcastReceiver;

 import android.content.Context;

 import android.content.Intent;

 import android.os.Bundle;

 import android.support.v4.content.LocalBroadcastManager;

 import android.text.TextUtils;

 import org.json.JSONException;

 import org.json.JSONObject;

 import java.util.Iterator;

 import cn.jpush.android.api.JPushInterface;

 /**

  * 自定义接收器

  *

  * 如果不定义这个 Receiver,则:

  * 1) 默认用户会打开主界面

  * 2) 接收不到自定义消息

  */

 public class MyReceiver extends BroadcastReceiver {

     private static final String TAG = "JIGUANG-Example";

     @Override

     public void onReceive(Context context, Intent intent) {

         try {

             Bundle bundle = intent.getExtras();

             Logger.d(TAG, "[MyReceiver] onReceive - " + intent.getAction() + ", extras: " + printBundle(bundle));

             if (JPushInterface.ACTION_REGISTRATION_ID.equals(intent.getAction())) {

                 String regId = bundle.getString(JPushInterface.EXTRA_REGISTRATION_ID);

                 Logger.d(TAG, "[MyReceiver] 接收Registration Id : " + regId);

                 //send the Registration Id to your server...

             } else if (JPushInterface.ACTION_MESSAGE_RECEIVED.equals(intent.getAction())) {

                 Logger.d(TAG, "[MyReceiver] 接收到推送下来的自定义消息: " + bundle.getString(JPushInterface.EXTRA_MESSAGE));

                 processCustomMessage(context, bundle);

             } else if (JPushInterface.ACTION_NOTIFICATION_RECEIVED.equals(intent.getAction())) {

                 Logger.d(TAG, "[MyReceiver] 接收到推送下来的通知");

                 int notifactionId = bundle.getInt(JPushInterface.EXTRA_NOTIFICATION_ID);

                 Logger.d(TAG, "[MyReceiver] 接收到推送下来的通知的ID: " + notifactionId);

             } else if (JPushInterface.ACTION_NOTIFICATION_OPENED.equals(intent.getAction())) {

                 Logger.d(TAG, "[MyReceiver] 用户点击打开了通知");

                 //打开自定义的Activity

                 Intent i = new Intent(context, MainActivity.class);

                 i.putExtras(bundle);

                 //i.setFlags(Intent.FLAG_ACTIVITY_NEW_TASK);

                 i.setFlags(Intent.FLAG_ACTIVITY_NEW_TASK | Intent.FLAG_ACTIVITY_CLEAR_TOP );

                 context.startActivity(i);

             } else if (JPushInterface.ACTION_RICHPUSH_CALLBACK.equals(intent.getAction())) {

                 Logger.d(TAG, "[MyReceiver] 用户收到到RICH PUSH CALLBACK: " + bundle.getString(JPushInterface.EXTRA_EXTRA));

                 //在这里根据 JPushInterface.EXTRA_EXTRA 的内容处理代码,比如打开新的Activity, 打开一个网页等..

             } else if(JPushInterface.ACTION_CONNECTION_CHANGE.equals(intent.getAction())) {

                 boolean connected = intent.getBooleanExtra(JPushInterface.EXTRA_CONNECTION_CHANGE, false);

                 Logger.w(TAG, "[MyReceiver]" + intent.getAction() +" connected state change to "+connected);

             } else {

                 Logger.d(TAG, "[MyReceiver] Unhandled intent - " + intent.getAction());

             }

         } catch (Exception e){

         }

     }

     // 打印所有的 intent extra 数据

     private static String printBundle(Bundle bundle) {

         StringBuilder sb = new StringBuilder();

         for (String key : bundle.keySet()) {

             if (key.equals(JPushInterface.EXTRA_NOTIFICATION_ID)) {

                 sb.append("\nkey:" + key + ", value:" + bundle.getInt(key));

             }else if(key.equals(JPushInterface.EXTRA_CONNECTION_CHANGE)){

                 sb.append("\nkey:" + key + ", value:" + bundle.getBoolean(key));

             } else if (key.equals(JPushInterface.EXTRA_EXTRA)) {

                 if (TextUtils.isEmpty(bundle.getString(JPushInterface.EXTRA_EXTRA))) {

                     Logger.i(TAG, "This message has no Extra data");

                     continue;

                 }

                 try {

                     JSONObject json = new JSONObject(bundle.getString(JPushInterface.EXTRA_EXTRA));

                     Iterator<String> it =  json.keys();

                     while (it.hasNext()) {

                         String myKey = it.next().toString();

                         sb.append("\nkey:" + key + ", value: [" +

                                 myKey + " - " +json.optString(myKey) + "]");

                     }

                 } catch (JSONException e) {

                     Logger.e(TAG, "Get message extra JSON error!");

                 }

             } else {

                 sb.append("\nkey:" + key + ", value:" + bundle.getString(key));

             }

         }

         return sb.toString();

     }

     //send msg to MainActivity

     private void processCustomMessage(Context context, Bundle bundle) {

         if (MainActivity.isForeground) {

             String message = bundle.getString(JPushInterface.EXTRA_MESSAGE);

             String extras = bundle.getString(JPushInterface.EXTRA_EXTRA);

             Intent msgIntent = new Intent(MainActivity.MESSAGE_RECEIVED_ACTION);

             msgIntent.putExtra(MainActivity.KEY_MESSAGE, message);

             if (!ExampleUtil.isEmpty(extras)) {

                 try {

                     JSONObject extraJson = new JSONObject(extras);

                     if (extraJson.length() > 0) {

                         msgIntent.putExtra(MainActivity.KEY_EXTRAS, extras);

                     }

                 } catch (JSONException e) {

                 }

             }

             LocalBroadcastManager.getInstance(context).sendBroadcast(msgIntent);

         }

     }

 }
别忘了在AndroidManifest中声明
   <!-- User defined.  For test only  用户自定义的广播接收器-->

         <receiver

             android:name=".MyReceiver"

             android:enabled="true"

             android:exported="false">

             <intent-filter>

                 <action android:name="cn.jpush.android.intent.REGISTRATION" /> <!--Required  用户注册SDK的intent-->

                 <action android:name="cn.jpush.android.intent.MESSAGE_RECEIVED" /> <!--Required  用户接收SDK消息的intent-->

                 <action android:name="cn.jpush.android.intent.NOTIFICATION_RECEIVED" /> <!--Required  用户接收SDK通知栏信息的intent-->

                 <action android:name="cn.jpush.android.intent.NOTIFICATION_OPENED" /> <!--Required  用户打开自定义通知栏的intent-->

                 <action android:name="cn.jpush.android.intent.CONNECTION" /><!-- 接收网络变化 连接/断开 since 1.6.3 -->

                 <category android:name="com.example.kebinran.jpushdemo" />

             </intent-filter>

         </receiver>
Android集成极光推送的更多相关文章
- Xamarin.Forms学习系列之Android集成极光推送
一般App都会有消息推送的功能,如果是原生安卓或者IOS集成消息推送很容易,各大推送平台都有相关的Sample,但是关于Xamarin.Forms的消息推送集成的资料非常少,下面就说下Xamarin. ...
- 1、Android Studio集成极光推送(Jpush) 报错 java.lang.UnsatisfiedLinkError: cn.jpush.android.service.PushProtoco
Android studio 集成极光推送(Jpush) (华为手机)报错, E/JPush: [JPushGlobal] Get sdk version fail![获取sdk版本失败!] W/Sy ...
- C#—ASP.NET:集成极光推送(Push API v3)
C#—ASP.NET:集成极光推送(Push API v3) 原文地址: https://blog.csdn.net/CXLLLK/article/details/86489994 1.极光推送官 ...
- 李洪强iOS之集成极光推送一iOS SDK概述
李洪强iOS之集成极光推送一iOS SDK概述 JPush iOS 从上图可以看出,JPush iOS Push 包括 2 个部分,APNs 推送(代理),与 JPush 应用内消息. 红色部分是 A ...
- ionic2集成极光推送
ionic2集成极光推送: ionic2api:https://ionicframework.com/docs/ 极光推送官网:https://www.jiguang.cn android-怎么注册极 ...
- Swift3集成极光推送
现在很多程序都开始使用Swift开发了,但是第三方库大多数都是用OC写的,所以我们要使用Swift和OC混编.今天的内容主要讲Swift3.0集成极光推送. 1.准备工作 集成指南,极光上说的 ...
- 李洪强iOS之集成极光推送三iOS集成指南
李洪强iOS之集成极光推送三iOS集成指南 SDK说明 适用版本 本文匹配的 SDK版本:r2.1.5 以后.查看最近更新了解最新的SDK更新情况.使用Xcode 6及以上版本可以使用新版Push S ...
- 李洪强iOS之集成极光推送二iOS 证书 设置指南
李洪强iOS之集成极光推送二iOS 证书 设置指南 创建应用程序ID 登陆 iOS Dev Center 选择进入iOS Provisioning Portal. 在 iOS Provisioning ...
- ThinkPHP 3.2.x 集成极光推送指北
3.2版本已经过了维护生命周期,官方已经不再维护,请及时更新至5.0版本 -- ThinkPHP 官方仓库 以上,如果有条件,请关闭这个页面,然后升级至 ThinkPHP 5,如果由于各种各样的原因无 ...
随机推荐
- git worktree 使用笔记
一 worktree 的基本概念和操作 再也不用克隆多个仓库啦!git worktree 一个 git 仓库可以连接多个工作目录 - walterlv的专栏 - CSDN博客 再也不用克隆多个仓库啦! ...
- 最小割最大流定理&残量网络的性质
最小割最大流定理的内容: 对于一个网络流图 $G=(V,E)$,其中有源点和汇点,那么下面三个条件是等价的: 流$f$是图$G$的最大流 残量网络$G_f$不存在增广路 对于$G$的某一个割$(S,T ...
- 剑指offer笔记面试题9----用两个栈实现队列
题目:用两个栈实现一个队列.队列的声明如下,请实现它的两个函数appendTail和deleteHead,分别完成在尾部插入节点和在队列头部删除节点的功能. 测试用例: 往空的队列里添加.删除元素. ...
- textarea中文本高亮选中
最近在实现原文/译文句段高亮对比显示,和有道翻译类似,如下图所示: 最初的解决方案是采用富文本编辑器,把所有句段信息都用HTML标签包裹,操作空间比较大,页面上需要的功能几乎都可以实现,但是由此带来了 ...
- [转]How to mouse hover using Blue prism on a web page
本文转自:https://stackoverflow.com/questions/53126436/how-to-mouse-hover-using-blue-prism-on-a-web-page/ ...
- DOM CSS
DOM CSS HTML DOM 允许 JavaScript 改变 HTML 元素的样式. 改变 HTML 样式 如需改变 HTML 元素的样式,请使用这个语法: document.getElemen ...
- iOS---------审核被拒(隔壁群发的)
Hello, We are writing to let you know the results of your appeal for your app The App Review Board e ...
- 获取格式字符串第idx个值及实例
--根据索引idx值获取格式串中第idx个值 如数据'11,12,13,14,15,16' 方法:格式串+分隔符:@str='11,12,13,14,15,16'+',' select dbo.Get ...
- 数据结构笔记2(c++)_跨函数使用内存的问题
预备知识 1.所有的指针变量只占4个子节 用第一个字节的地址表示整个变量的地址 //1.cpp 所有的指针变量只占4个子节 用第一个字节的地址表示整个变量的地址 # include <stdi ...
- sshd 启动后 出现:Could not load host key: /etc/ssh/ssh_host_rsa_key
今天在启动sshd时,出现了如下问题,导致客户端不能成功连接服务端,不能建立ssh连接: 有两个提示 Could not load host key: /etc/ssh/ssh_host_rsa_ke ...