
RecyclerView 添加自定义分割线
默认的浅灰色的分割线在某些时候并不能满足我们的要求,这时就需要自定义分割线了。
我们可以通过两种方式来实现:调用 DividerItemDecoration.setDrawable 方法或者继承实现 RecyclerView.ItemDecoration 类来实现。
一、调用 DividerItemDecoration.setDrawable 方法
实现分割线只需要调用 setDrawable(@NonNull Drawable drawable)方法,然后传入一个Drawable函数对象就可以了。
现在可以用shape来编写一个分割线样式:
<?xml version="1.0" encoding="utf-8"?>

<shape xmlns:android="http://schemas.android.com/apk/res/android"

    android:shape="rectangle">

    <gradient

        android:centerColor="#ff00ff00" //绿色

        android:endColor="#ff0000ff"    //蓝色

        android:startColor="#ffff0000"  //红色

        android:type="linear" />

    <size android:height="3dp" />

</shape>
添加分割线的代码改为如下:
//添加自定义分割线

DividerItemDecoration divider = new DividerItemDecoration(this,DividerItemDecoration.VERTICAL);

divider.setDrawable(ContextCompat.getDrawable(this,R.drawable.custom_divider));

recyclerView.addItemDecoration(divider);
运行起来之后,就可以看到一条多彩的分割线了:
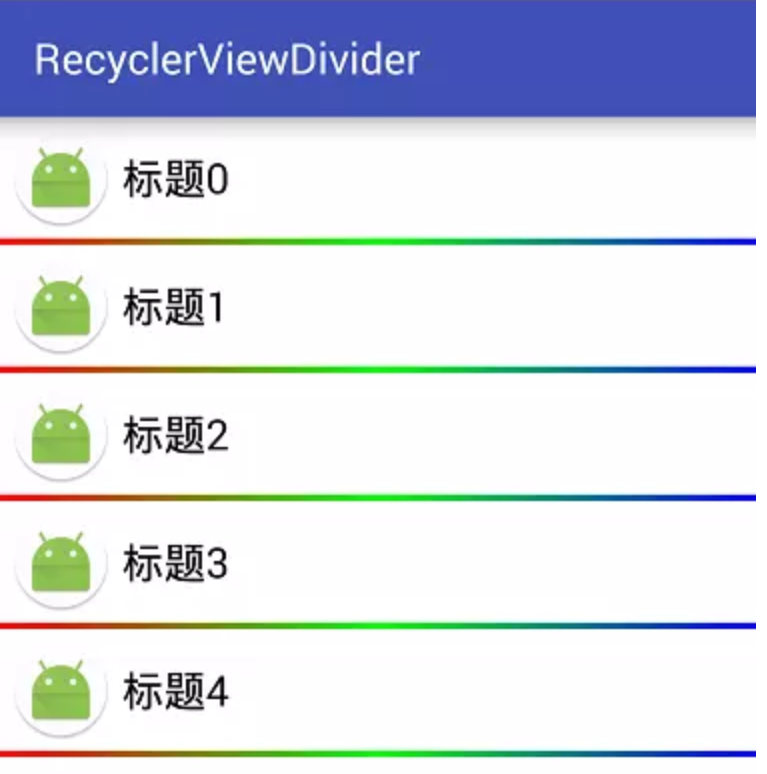
二、继承实现 RecyclerView.ItemDecoration 类
这块就不多赘述了,直接贴代码:
public class RecyclerViewDivider extends RecyclerView.ItemDecoration{

    private Paint mPaint;

    //分割线

    private Drawable mDivider;

    //分割线高度,默认是2px

    private int mDividerHeight = 2;

    //列表的方向:LinearLayoutManager.VERTICAL或LinearLayoutManager.HORIZONTAL

    private int mOrientation;

    private static final int[] ATTRS = new int[]{android.R.attr.listDivider};

    /**

     *

     * 默认分割线:高度为2px,颜色为灰色

     * 获取属性值,

     *

     * @param context

     * @param orientation  列表方向

     */

    public RecyclerViewDivider(Context context, int orientation){

        if (orientation != LinearLayoutManager.VERTICAL && orientation != LinearLayoutManager.HORIZONTAL) {

            throw new IllegalArgumentException("请输入正确的参数!");

        }

        mOrientation = orientation;

        final TypedArray array = context.obtainStyledAttributes(ATTRS);

        mDivider = array.getDrawable(0);

        array.recycle();

        mDividerHeight = mDivider.getIntrinsicHeight();

    }

    /**

     * 自定义分割线

     *

     * @param context

     * @param orientation 列表方向

     * @param drawableId  分割线图片

     */

    public RecyclerViewDivider(Context context, int orientation, int drawableId) {

        if (orientation != LinearLayoutManager.VERTICAL && orientation != LinearLayoutManager.HORIZONTAL) {

            throw new IllegalArgumentException("请输入正确的参数!");

        }

        mOrientation = orientation;

        mDivider = ContextCompat.getDrawable(context, drawableId);

        mDividerHeight = mDivider.getIntrinsicHeight();

    }

    /**

     * 自定义分割线

     *

     * @param context

     * @param orientation   列表方向

     * @param dividerHeight 分割线高度

     * @param dividerColor  分割线颜色

     */

    public RecyclerViewDivider(Context context, int orientation, int dividerHeight, int dividerColor) {

        if (orientation != LinearLayoutManager.VERTICAL && orientation != LinearLayoutManager.HORIZONTAL) {

            throw new IllegalArgumentException("请输入正确的参数!");

        }

        mOrientation = orientation;

        mDividerHeight = dividerHeight;

        mPaint = new Paint(Paint.ANTI_ALIAS_FLAG);

        mPaint.setColor(dividerColor);

        mPaint.setStyle(Paint.Style.FILL);

    }

    //获取分割线尺寸

    @Override

    public void getItemOffsets(Rect outRect, View view, RecyclerView parent, RecyclerView.State state) {

        if (mOrientation == LinearLayoutManager.VERTICAL) {

            outRect.set(0, 0, 0, mDivider.getIntrinsicHeight());

        } else {

            outRect.set(0, 0, mDivider.getIntrinsicWidth(), 0);

        }

        outRect.set(0, 0, 0, mDividerHeight);

    }

    @Override

    public void onDraw(Canvas c, RecyclerView parent, RecyclerView.State state) {

        super.onDraw(c, parent, state);

        if(mOrientation==LinearLayoutManager.VERTICAL){

            drawVerticalLine(c,parent);

        }else{

            drawHorizontalLine(c,parent);

        }

    }

    //为横方向item, 画分割线

    private void drawHorizontalLine(Canvas canvas, RecyclerView parent) {

        final int top = parent.getPaddingTop();

        final int bottom = parent.getMeasuredHeight() - parent.getPaddingBottom();

        final int childSize = parent.getChildCount();

        for (int i = 0; i < childSize; i++) {

            final View child = parent.getChildAt(i);

            RecyclerView.LayoutParams layoutParams = (RecyclerView.LayoutParams) child.getLayoutParams();

            final int left = child.getRight() + layoutParams.rightMargin;

            final int right = left + mDividerHeight;

            if (mDivider != null) {

                mDivider.setBounds(left, top, right, bottom);

                mDivider.draw(canvas);

            }

            if (mPaint != null) {

                canvas.drawRect(left, top, right, bottom, mPaint);

            }

        }

    }

    //为竖方向item, 画分割线

    private void drawVerticalLine(Canvas canvas, RecyclerView parent) {

        final int left = parent.getPaddingLeft();

        final int right = parent.getMeasuredWidth() - parent.getPaddingRight();

        final int childSize = parent.getChildCount();

        for (int i = 0; i < childSize; i++) {

            final View child = parent.getChildAt(i);

            RecyclerView.LayoutParams layoutParams = (RecyclerView.LayoutParams) child.getLayoutParams();

            final int top = child.getBottom() + layoutParams.bottomMargin;

            final int bottom = top + mDividerHeight;

            if (mDivider != null) {

                mDivider.setBounds(left, top, right, bottom);

                mDivider.draw(canvas);

            }

            if (mPaint != null) {

                canvas.drawRect(left, top, right, bottom, mPaint);

            }

        }

    }

}
RecyclerView 添加自定义分割线的更多相关文章
- 自定义RecyclerView.ItemDecoration,实现RecyclerView的分割线效果
[转] 原文 自定义RecyclerView.ItemDecoration,实现RecyclerView的分割线效果 字数1598 阅读302 评论2 喜欢23 1.背景 RecyclerView ...
- RecyclerView线性分割线
由于recyclerview默认是没有分割线的,需要显示分割线的话,可以在布局里添加一条有背景色的View标签,或者通过ItemDecoration来实现,本文以后者为例. ItemDecoratio ...
- RecyclerView添加分割线
mRecyclerView = findView(R.id.id_recyclerview); //设置布局管理器 mRecyclerView.setLayoutManager(layout); // ...
- Android TabLayout添加自定义分割线并且可以修改分割线高度
为TabLayout添加分割线,显示的效果如下(红框内部分): 分割线 首先添加个竖线xml名为layout_divider_vertical: LinearLayout linearLayout = ...
- RecyclerView的万能分割线
效果图: 使用方法: 添加默认分割线:高度为2px,颜色为灰色 mRecyclerView.addItemDecoration(new RecyclerViewDivider(mContext, Li ...
- Android RecyclerView(瀑布流)水平/垂直方向分割线
Android RecyclerView(瀑布流)水平/垂直方向分割线 Android RecyclerView不像过去的ListView那样随意的设置水平方向的分割线,如果要实现Recycle ...
- Android零基础入门第65节:RecyclerView分割线开发技巧
在上一期通过简单学习,已经领略到了RecyclerView的灵活性,当然都是一些最基础的用法,那么本期一起来学习RecyclerView的分割线使用. 相信有的比较细心的同学已经发现了,使用Recyc ...
- Android 高级UI设计笔记07:RecyclerView 的详解
1. 使用RecyclerView 在 Android 应用程序中列表是一个非常重要的控件,适用场合非常多,如新闻列表.应用列表.消息列表等等,但是从Android 一出生到现在并没有非常 ...
- 安卓高级3 RecyclerView 和cardView使用案例
cardView: 添加依赖:在Studio搜索cardview即可 在V7包中 或者直接在gradle中添加 compile 'com.android.support:cardview-v7:24. ...
随机推荐
- Android最大方法数和解决方案
转载请标明出处:http://blog.csdn.net/shensky711/article/details/52329035 本文出自: [HansChen的博客] 什么是64K限制和Linear ...
- Apache Thrift 的魅力
WhyApacheThrift 因为最近在项目中需要集成进来一个Python编写的机器学习算法,但是我的后端主要使用的是SpringCloud技术栈. 于是面临着异构语言之间的通信实现方式的抉择. 因 ...
- Winows下安装RabbitMQ
RabbitMQ的简介 RabbitMQ是一套开源(MPL)的消息队列服务软件,是由 LShift 提供的一个 Advanced Message Queuing Protocol (AMQP) 的开源 ...
- 【前端】之JavaScript基础知识
JS 基础知识 JS中,简单类型的数据存储在栈中,复杂类型的数据存储在堆中,其引用存储在栈中 JS中的深拷贝和浅拷贝: 浅拷贝:将对象中的所有简单类型的属性拷贝出来,引用类型属性直接赋值null 深拷 ...
- flanneld 安装
目录 flanneld 安装 下载分发flanneld二进制文件 分发二进制文件到所有集群的节点 创建Flannel证书和私钥 创建证书签名请求 生成证书和私钥 向etcd写入Pod网段信息 创建fl ...
- CCNA 之 四 管理和配置CISCO设备
管理和配置CISCO设备 路由器组件 cpu 执行操作系统的指令 随机访问存储器RAM - RAM中内容断电丢失 - 运行操作系统: - 运行配置文件: - IP 路由表: - ARP 缓存; - 数 ...
- C# partial 关键字分析
简单的来说 partial是局部类型的意思 就是说有这个关键字的类.结构或接口可以写成几个部分 比如 public partial class Program { static void Main(s ...
- C语言博客作业08
C语言I博客作业08](https://www.cnblogs.com/490-85-00-58-/p/11863312.html) 问题 回答 这个作业属于那个课程 C语言程序设计II 这个作业要求 ...
- 全新一代云服务器S6,重新定义性价比
S6通用计算型云服务器,搭载全新一代处理器,配套华为自研高性能智能网卡,计算与网络性能全面升级.S6进一步强化高性价比定位,满足企业性能要求的同时,降低中小企业上云成本. 更多详情请访问ECS产品介绍 ...
- ajax异步请求的三种常见方式
首先先介绍下ajax,ajax(ASynchronous JavaScript And XML)为异步的javascript和xml.所谓的异步和同步是指: 同步:客户端必须等待服务器的响应,在等待期 ...