spring整合mybatisplus2.x详解
一丶Mp的配置文件
<?xml version="1.0" encoding="UTF-8"?>
<beans xmlns="http://www.springframework.org/schema/beans"
xmlns:xsi="http://www.w3.org/2001/XMLSchema-instance"
xmlns:context="http://www.springframework.org/schema/context"
xmlns:tx="http://www.springframework.org/schema/tx"
xmlns:mybatis-spring="http://mybatis.org/schema/mybatis-spring"
xsi:schemaLocation="http://mybatis.org/schema/mybatis-spring http://mybatis.org/schema/mybatis-spring-1.2.xsd
http://www.springframework.org/schema/beans http://www.springframework.org/schema/beans/spring-beans.xsd
http://www.springframework.org/schema/context http://www.springframework.org/schema/context/spring-context-4.0.xsd
http://www.springframework.org/schema/tx http://www.springframework.org/schema/tx/spring-tx-4.0.xsd"> <!-- 数据源 -->
<context:property-placeholder location="classpath:db.properties"/>
<bean id="dataSource" class="com.mchange.v2.c3p0.ComboPooledDataSource">
<property name="driverClass" value="${jdbc.driver}"></property>
<property name="jdbcUrl" value="${jdbc.url}"></property>
<property name="user" value="${jdbc.username}"></property>
<property name="password" value="${jdbc.password}"></property>
</bean> <!-- 事务管理器 -->
<bean id="dataSourceTransactionManager"
class="org.springframework.jdbc.datasource.DataSourceTransactionManager">
<property name="dataSource" ref="dataSource"></property>
</bean>
<!-- 基于注解的事务管理 -->
<tx:annotation-driven transaction-manager="dataSourceTransactionManager"/> <!-- 配置SqlSessionFactoryBean
Mybatis提供的: org.mybatis.spring.SqlSessionFactoryBean
MP提供的:com.baomidou.mybatisplus.spring.MybatisSqlSessionFactoryBean
-->
<bean id="sqlSessionFactoryBean" class="com.baomidou.mybatisplus.spring.MybatisSqlSessionFactoryBean">
<!-- 数据源 -->
<property name="dataSource" ref="dataSource"></property>
<property name="configLocation" value="classpath:mybatis-config.xml"></property>
<!-- 别名处理 -->
<property name="typeAliasesPackage" value="com.atguigu.mp.beans"></property> <!-- 注入全局MP策略配置 -->
<property name="globalConfig" ref="globalConfiguration"></property>
</bean> <!-- 定义MybatisPlus的全局策略配置-->
<bean id ="globalConfiguration" class="com.baomidou.mybatisplus.entity.GlobalConfiguration">
<!-- 在2.3版本以后,dbColumnUnderline 默认值就是true -->
<property name="dbColumnUnderline" value="true"></property> <!-- 全局的主键策略 -->
<property name="idType" value="0"></property> <!-- 全局的表前缀策略配置 -->
<property name="tablePrefix" value="tbl_"></property>
</bean>
<!--
配置mybatis 扫描mapper接口的路径
-->
<bean class="org.mybatis.spring.mapper.MapperScannerConfigurer">
<property name="basePackage" value="com.atguigu.mp.mapper"></property>
</bean> </beans>
二丶CRUD的常用方法
2.1 Insert 方法
/*
* MybatisPlus会默认使用实体类的类名到数据中找对应的表.
*
*/
//<property name="tablePrefix" value="tbl_"></property>
@TableName(value = "tbl_employee")
public class Employee {
/*
* @TableId: value: 指定表中的主键列的列名, 如果实体属性名与列名一致,可以省略不指定. type: 指定主键策略.
*/
//<property name="idType" value="0"></property>
@TableId(value = "id", type = IdType.AUTO)
private Integer id; // int //<property name="dbColumnUnderline" value="true"></property>
@TableField(value = "last_name")
private String lastName;
private String email;
private Integer gender;
private Integer age; @TableField(exist = false)
//当数据库里面的表没有这个字段的时候,就不要写
private Double salary;
}
2.1.1 Insert (对象)
@Test
public void testCommonInsert1() {
// 初始化Employee对象
Employee employee = new Employee();
employee.setLastName("MP");
employee.setEmail("mp@atguigu.com");
employee.setGender(1);
employee.setAge(22);
employee.setSalary(20000.0);
// 插入到数据库
// insert方法在插入时, 会根据实体类的每个属性进行非空判断,只有非空的属性对应的字段才会出现到SQL语句中
Integer result = employeeMapper.insert(employee);
System.out.println("result: " + result);
}
2.1.2 insertAllColumn(对象)
@Test
public void testCommonInsert() {
// 初始化Employee对象
Employee employee = new Employee();
employee.setLastName("MP");
employee.setEmail("mp@atguigu.com");
// employee.setGender(1);
// employee.setAge(22);
employee.setSalary(20000.0);
// insertAllColumn方法在插入时, 不管属性是否非空, 属性所对应的字段都会出现到SQL语句中.
Integer result = employeeMapper.insertAllColumn(employee);
System.out.println("result: " + result);
}
2.1.3 获得主键
       // 获取当前数据在数据库中的主键值

         Integer key = employee.getId();

         System.out.println("key:" + key);
2.2 Update 方法
2.2.1 updateById(对象)
  /**

      * 通用 更新操作

      */

     @Test

     public void testCommonUpdate() {

         // 初始化修改对象

         Employee employee = new Employee();

         employee.setId(7);

         employee.setLastName("小泽老师");

         employee.setEmail("xz@sina.com");

         employee.setGender(0);

         Integer result = employeeMapper.updateById(employee);

         System.out.println("result: " + result);

     }
2.2.2 updateAllColumnById(对象)
/**
* 通用 更新操作
*/
@Test
public void testCommonUpdate() {
// 初始化修改对象
Employee employee = new Employee();
employee.setId(7);
employee.setLastName("小泽老师");
employee.setEmail("xz@sina.com");
employee.setGender(0);
Integer result = employeeMapper.updateAllColumnById(employee);
System.out.println("result: " + result);
}
2.3 Select 方法
2.3.1 selectById
    // 1. 通过id查询

         // Employee employee = employeeMapper.selectById(7);

         // System.out.println(employee);
2.3.2 selectOne
    // 2. 通过多个列进行查询 id + lastName

         // Employee employee = new Employee();

         // //employee.setId(7);

         // employee.setLastName("小泽老师");

         // employee.setGender(0);

         //

         // Employee result = employeeMapper.selectOne(employee);

         // System.out.println("result: " +result );

         // 这个只能查一条数据,多的时候回报错
2.3.3 selectBatchIds
    // 3. 通过多个id进行查询 <foreach>

         // List<Integer> idList = new ArrayList<>();

         // idList.add(4);

         // idList.add(5);

         // idList.add(6);

         // idList.add(7);

         // List<Employee> emps = employeeMapper.selectBatchIds(idList);

         // System.out.println(emps);
2.3.4 selectByMap
   // 4. 通过Map封装条件查询

         // Map<String,Object> columnMap = new HashMap<>();

         // columnMap.put("last_name", "Tom");

         // columnMap.put("gender", 1);

         //

         // List<Employee> emps = employeeMapper.selectByMap(columnMap);

         // System.out.println(emps);
2.4 Delete 方法
2.4.1 deleteById
   // 1 .根据id进行删除

         Integer result = employeeMapper.deleteById(13);

         System.out.println("result: " + result);
2.4.2 deleteByMap
  // 2. 根据 条件进行删除

         // Map<String,Object> columnMap = new HashMap<>();

         // columnMap.put("last_name", "MP");

         // columnMap.put("email", "mp@atguigu.com");

         // Integer result = employeeMapper.deleteByMap(columnMap);

         // System.out.println("result: " + result );
2.4.3 deleteBatchIds
  // 3. 批量删除

         // List<Integer> idList = new ArrayList<>();

         // idList.add(3);

         // idList.add(4);

         // idList.add(5);

         // Integer result = employeeMapper.deleteBatchIds(idList);

         // System.out.println("result: " + result );
三丶CRUD原理
employeeMapper 的本质 org.apache.ibatis.binding.MapperProxy
MapperProxy 中 sqlSession –>SqlSessionFactory
SqlSessionFacotry 中 → Configuration→ MappedStatements
每一个 mappedStatement 都表示 Mapper 接口中的一个方法与 Mapper 映射文件
中的一个 SQL。
MP 在启动就会挨个分析 xxxMapper 中的方法,并且将对应的 SQL 语句处理好,保
存到 configuration 对象中的 mappedStatements 中.
SqlSessionFacotry 中 → Configuration→ MappedStatements
每一个 mappedStatement 都表示 Mapper 接口中的一个方法与 Mapper 映射文件
中的一个 SQL。
MP 在启动就会挨个分析 xxxMapper 中的方法,并且将对应的 SQL 语句处理好,保
存到 configuration 对象中的 mappedStatements 中.
D. 本质:
Configuration: MyBatis 或者 MP 全局配置对象
MappedStatement:一个 MappedStatement 对象对应 Mapper 配置文件中的一个
select/update/insert/delete 节点,主要描述的是一条 SQL 语句
SqlMethod : 枚举对象 , MP 支持的 SQL 方法
TableInfo: 数据库表反射信息 ,可以获取到数据库表相关的信息
SqlSource: SQL 语句处理对象
MapperBuilderAssistant: 用于缓存、 SQL 参数、查询方剂结果集处理等.
通过 MapperBuilderAssistant 将每一个 mappedStatement
添加到 configuration 中的 mappedstatements中
四丶条件构造器
| 查询方式 | 说明 |
|---|---|
| setSqlSelect | 设置 SELECT 查询字段 |
| where | WHERE 语句,拼接 + WHERE 条件 |
| and | AND 语句,拼接 + AND 字段=值 |
| andNew | AND 语句,拼接 + AND (字段=值) |
| or | OR 语句,拼接 + OR 字段=值 |
| orNew | OR 语句,拼接 + OR (字段=值) |
| eq | 等于= |
| allEq | 基于 map 内容等于= |
| ne | 不等于<> |
| gt | 大于> |
| ge | 大于等于>= |
| lt | 小于< |
| le | 小于等于<= |
| like | 模糊查询 LIKE |
| notLike | 模糊查询 NOT LIKE |
| in | IN 查询 |
| notIn | NOT IN 查询 |
| isNull | NULL 值查询 |
| isNotNull | IS NOT NULL |
| groupBy | 分组 GROUP BY |
| having | HAVING 关键词 |
| orderBy | 排序 ORDER BY |
| orderAsc | ASC 排序 ORDER BY |
| orderDesc | DESC 排序 ORDER BY |
| exists | EXISTS 条件语句 |
| notExists | NOT EXISTS 条件语句 |
| between | BETWEEN 条件语句 |
| notBetween | NOT BETWEEN 条件语句 |
| addFilter | 自由拼接 SQL |
| last | 拼接在最后,例如:last("LIMIT 1") |
官方示例
 @Test

 public void testTSQL11() {

     /*

      * 实体带查询使用方法  输出看结果

      */

     EntityWrapper<User> ew = new EntityWrapper<User>();

     ew.setEntity(new User(1));

     ew.where("user_name={0}", "'zhangsan'").and("id=1")

             .orNew("user_status={0}", "0").or("status=1")

             .notLike("user_nickname", "notvalue")

             .andNew("new=xx").like("hhh", "ddd")

             .andNew("pwd=11").isNotNull("n1,n2").isNull("n3")

             .groupBy("x1").groupBy("x2,x3")

             .having("x1=11").having("x3=433")

             .orderBy("dd").orderBy("d1,d2");

     System.out.println(ew.getSqlSegment());

 }

 int buyCount = selectCount(Condition.create()

                 .setSqlSelect("sum(quantity)")

                 .isNull("order_id")

                 .eq("user_id", 1)

                 .eq("type", 1)

                 .in("status", new Integer[]{0, 1})

                 .eq("product_id", 1)

                 .between("created_time", startDate, currentDate)

                 .eq("weal", 1));
自定义的SQL怎么使用
List<User> selectMyPage(RowBounds rowBounds, @Param("ew") Wrapper<T> wrapper);
<select id="selectMyPage" resultType="User">
SELECT * FROM user
<where>
${ew.sqlSegment}
</where>
</select>
/**
- 用户登录次数
*/
@Select("<script>SELECT * FROM z080_user_login <where> ${ew.sqlSegment} </where></script>")
List<UserLogin> findUserLogin(@Param("ew") Wrapper<?> wrapper);
/**
- 用户在线时长
*/
@Select("<script>SELECT * FROM z080_user_online <where> ${ew.sqlSegment} </where></script>")
List<UserOnline> findUserOnline(@Param("ew") Wrapper<?> wrapper);

常用的用法:
delete、selectCount、selectList、selectMaps、selectObjs、update。。。。
五丶ActiveRecord(活动记录)
5.1 java类继承
 public class Employee extends Model<Employee> {

     private Integer id; // int

     private String lastName;

     private String email;

     private Integer gender;

     private Integer age;

 }
5.2继承BaseMapper
 public interface EmployeeMapper extends BaseMapper<Employee> {

     //   Integer  insertEmployee(Employee employee );

     //   <insert useGeneratedKeys="true" keyProperty="id" > SQL...</insert>

 }
5.3 测试类
/**
* AR 修改操作
*/
@Test
public void testARUpdate() {
Employee employee = new Employee();
employee.setId(20);
employee.setLastName("宋老湿");
employee.setEmail("sls@atguigu.com");
employee.setGender(1);
employee.setAge(36);
boolean result = employee.updateById();
System.out.println("result:" + result);
}
/**
* AR 插入操作
*/
@Test
public void testARInsert() {
Employee employee = new Employee();
employee.setLastName("宋老师");
employee.setEmail("sls@atguigu.com");
employee.setGender(1);
employee.setAge(35);
boolean result = employee.insert();
System.out.println("result:" + result);
}
/**
* AR 分页复杂操作
*/
@Test
public void testARPage() {
Employee employee = new Employee();
Page<Employee> page = employee.selectPage(new Page<>(1, 1),
new EntityWrapper<Employee>().like("last_name", "老"));
List<Employee> emps = page.getRecords();
System.out.println(emps);
}
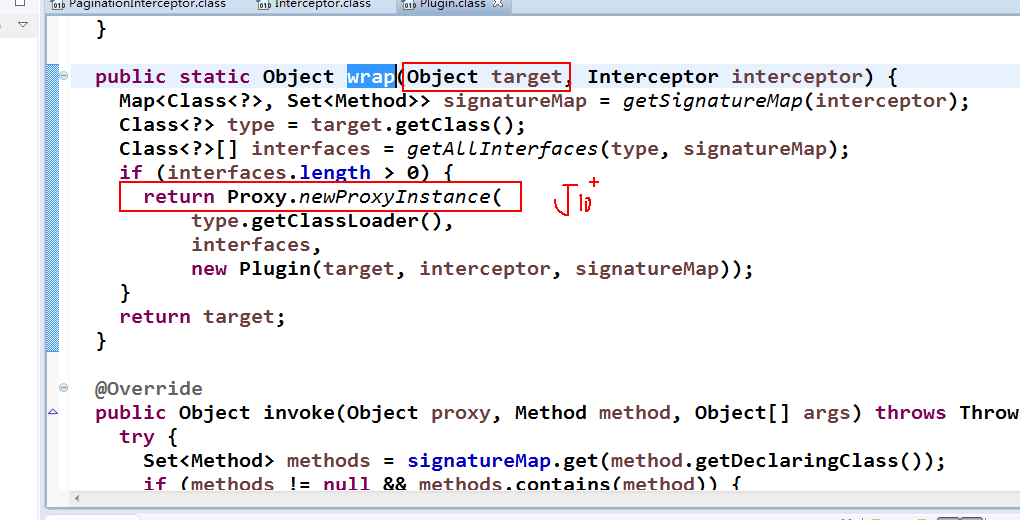
七丶插件原理
 <!-- 插件注册 -->

         <property name="plugins">

             <list>

                 <!-- 注册分页插件 -->

             <bean class="com.baomidou.mybatisplus.plugins.PaginationInterceptor"></bean>

                 <!-- 注册执行分析插件 -->

                 <bean class="com.baomidou.mybatisplus.plugins.SqlExplainInterceptor">

                     <property name="stopProceed" value="true"></property>

                 </bean>

                 <!-- 注册性能分析插件 -->

                 <bean class="com.baomidou.mybatisplus.plugins.PerformanceInterceptor">

                     <property name="format" value="true"></property>

                     <!-- <property name="maxTime" value="5"></property> -->

                 </bean>

                 <!-- 注册乐观锁插件 -->

         <bean class="com.baomidou.mybatisplus.plugins.OptimisticLockerInterceptor">

                 </bean>

             </list>

         </property>
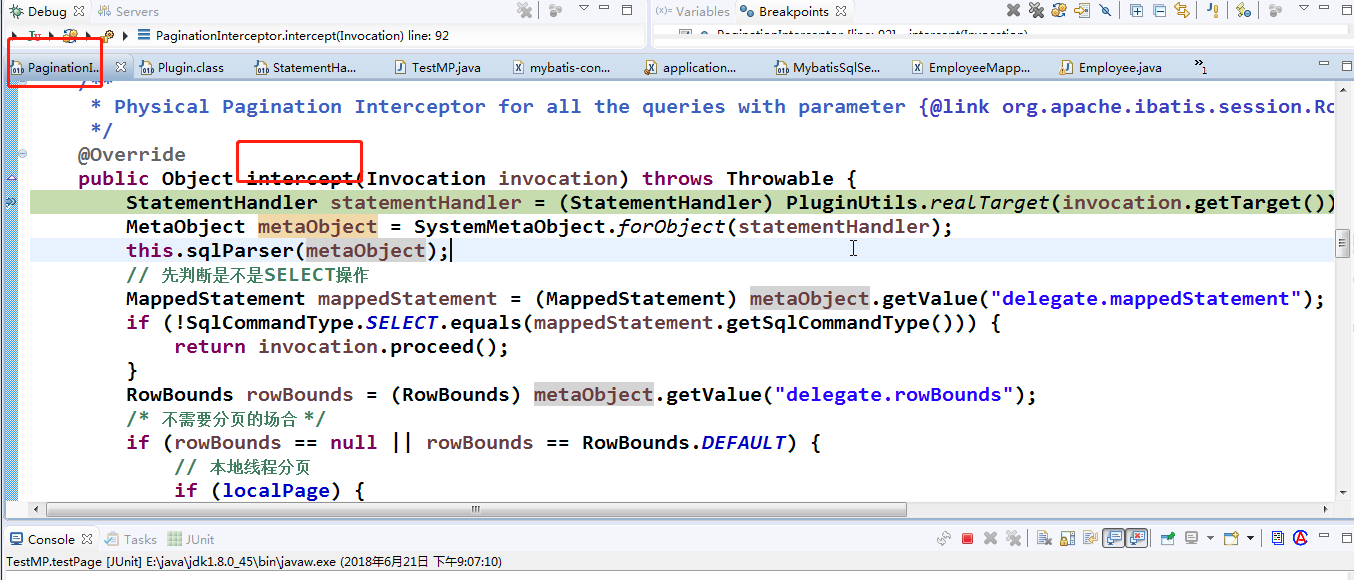
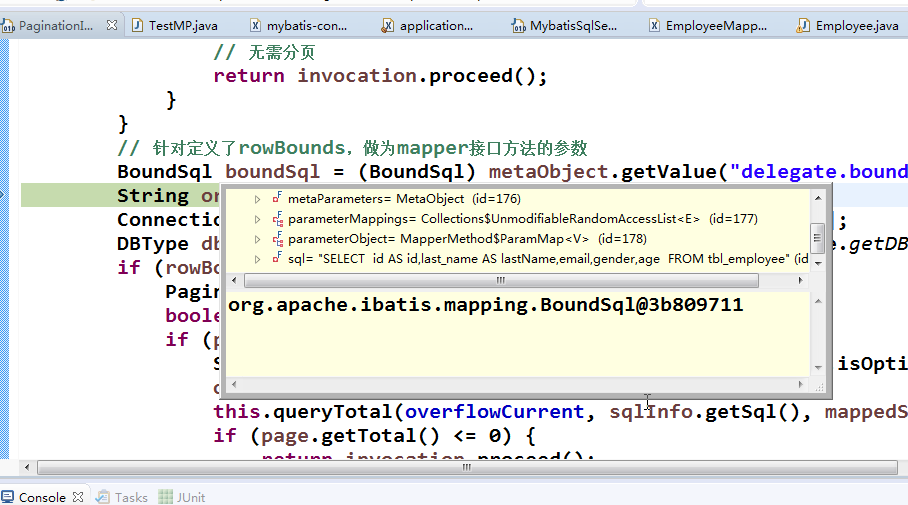
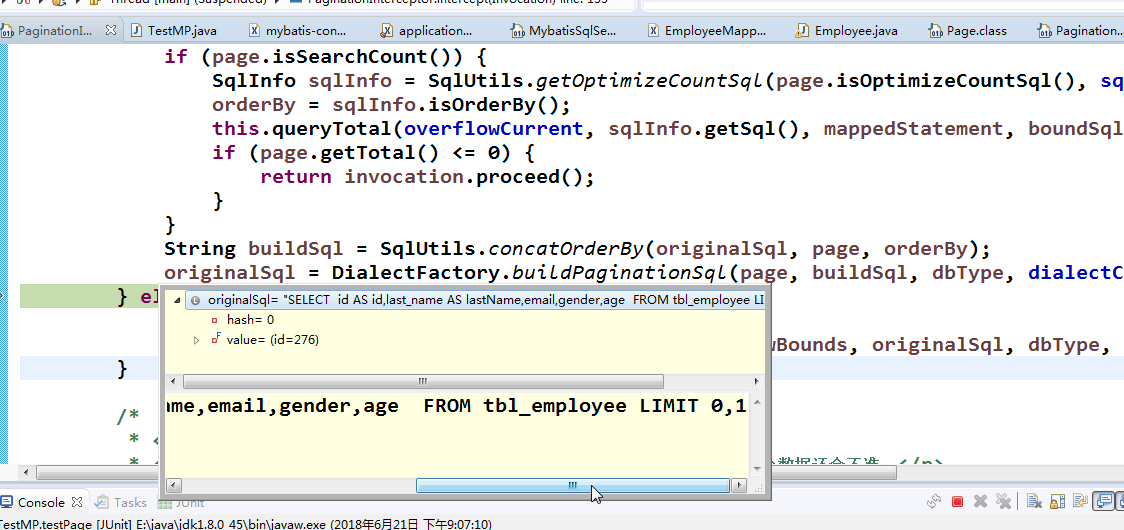
7.1分页插件
/**
* 测试分页插件
*/
@Test
public void testPage() {
Page<Employee> page = new Page<>(1, 1);
List<Employee> emps = employeeMapper.selectPage(page, null);
System.out.println(emps);
System.out.println("===============获取分页相关的一些信息======================");
System.out.println("总条数:" + page.getTotal());
System.out.println("当前页码: " + page.getCurrent());
System.out.println("总页码:" + page.getPages());
System.out.println("每页显示的条数:" + page.getSize());
System.out.println("是否有上一页: " + page.hasPrevious());
System.out.println("是否有下一页: " + page.hasNext());
// 将查询的结果封装到page对象中
page.setRecords(emps);
List<Employee> records = page.getRecords();
System.out.println(records);
}
7.2分析插件
/**
* 测试SQL执行分析插件,执行全表删除的会报错
*/
@Test
public void testSQLExplain() {
employeeMapper.delete(null); // 全表删除
}
7.3性能分析插件
/**
* 测试 性能分析插件
*/
@Test
public void testPerformance() {
Employee employee = new Employee();
employee.setLastName("玛利亚老师");
employee.setEmail("mly@sina.com");
employee.setGender("0");
employee.setAge(22);
employeeMapper.insert(employee);
}


7.4 乐观锁插件
@Test
public void testOptimisticLocker() {
// 更新操作
Employee employee = new Employee();
employee.setId(15);
employee.setLastName("TomAA");
employee.setEmail("tomAA@sina.com");
employee.setGender("1");
employee.setAge(22);
employee.setVersion(3);
employeeMapper.updateById(employee);
}
@Version
private Integer version ;
7.5概述
1) 插件机制:
Mybatis 通过插件(Interceptor) 可以做到拦截四大对象相关方法的执行,根据需求, 完
成相关数据的动态改变。
Executor
StatementHandler
ParameterHandler
ResultSetHandler
2) 插件原理
四大对象的每个对象在创建时,都会执行 interceptorChain.pluginAll(),会经过每个插
件对象的 plugin()方法,目的是为当前的四大对象创建代理。代理对象就可以拦截到四
大对象相关方法的执行,因为要执行四大对象的方法需要经过代理.
7.2 分页插件
1) com.baomidou.mybatisplus.plugins.PaginationInterceptor
7.3 执行分析插件
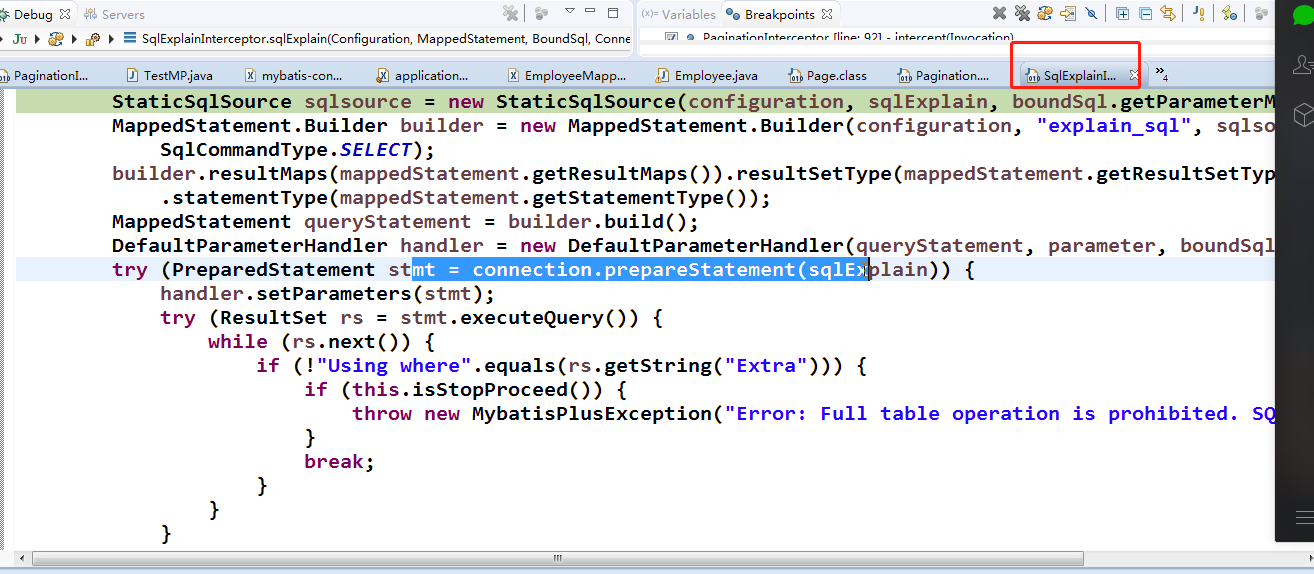
1) com.baomidou.mybatisplus.plugins.SqlExplainInterceptor
2) SQL 执行分析拦截器,只支持 MySQL5.6.3 以上版本
3) 该插件的作用是分析 DELETE UPDATE 语句,防止小白
或者恶意进行 DELETE UPDATE 全表操作
4) 只建议在开发环境中使用,不建议在生产环境使用
5) 在插件的底层 通过 SQL 语句分析命令:Explain 分析当前的 SQL 语句,
根据结果集中的 Extra 列来断定当前是否全表操作。
7.4 性能分析插件
1) com.baomidou.mybatisplus.plugins.PerformanceInterceptor
2) 性能分析拦截器,用于输出每条 SQL 语句及其执行时间java 课程系列
3) SQL 性能执行分析,开发环境使用, 超过指定时间,停止运行。有助于发现问题
7.5 乐观锁插件
1) com.baomidou.mybatisplus.plugins.OptimisticLockerInterceptor
2) 如果想实现如下需求: 当要更新一条记录的时候,希望这条记录没有被别人更新
3) 乐观锁的实现原理:
取出记录时,获取当前 version 2
更新时,带上这个 version 2
执行更新时, set version = yourVersion+1 where version = yourVersion
如果 version 不对,就更新失败
4) @Version 用于注解实体字段,必须要有。


八丶其他配置
<!-- 定义自定义注入器 -->
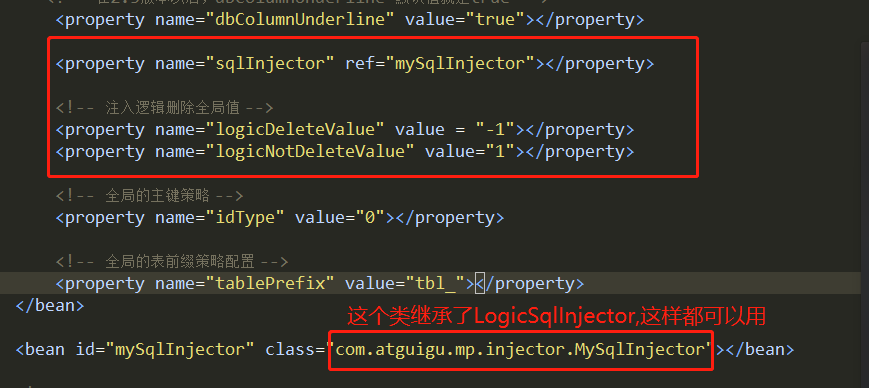
<bean id="mySqlInjector" class="com.atguigu.mp.injector.MySqlInjector"></bean> <!-- 逻辑删除 -->
<bean id="logicSqlInjector" class="com.baomidou.mybatisplus.mapper.LogicSqlInjector"></bean> <!-- 公共字段填充 处理器 -->
<bean id="myMetaObjectHandler" class="com.atguigu.mp.metaObjectHandler.MyMetaObjectHandler"> </bean> <!-- 配置Oracle主键Sequence -->
<bean id="oracleKeyGenerator" class="com.baomidou.mybatisplus.incrementer.OracleKeyGenerator"></bean>
<!------------------------------------------------------------------------>
<!--注入自定义全局操作
<property name="sqlInjector" ref="mySqlInjector"></property>
-->
<!-- 注入逻辑删除 -->
<property name="sqlInjector" ref="logicSqlInjector"></property> <!-- 注入逻辑删除全局值 -->
<property name="logicDeleteValue" value = "-1"></property>
<property name="logicNotDeleteValue" value="1"></property> <!-- 注入公共字段填充处理器 -->
<property name="metaObjectHandler" ref="myMetaObjectHandler"></property> <!-- 注入Oracle主键Sequence -->
<property name="keyGenerator" ref="oracleKeyGenerator"></property>
8.1 自定义全局操作
8.1.1 在 Mapper 接口中定义相关的 CRUD 方法
 /**

  * <p>

  *  Mapper 接口

  * </p>

  *

  * @author weiyunhui

  * @since 2018-06-21

  */

 public interface EmployeeMapper extends BaseMapper<Employee> {

     int  deleteAll();

 }
8.1.2扩展 AutoSqlInjector inject 方法,实现 Mapper 接口中方法要注入的 SQL
public class MySqlInjector extends AutoSqlInjector{
/**
* 扩展inject 方法,完成自定义全局操作
*/
@Override
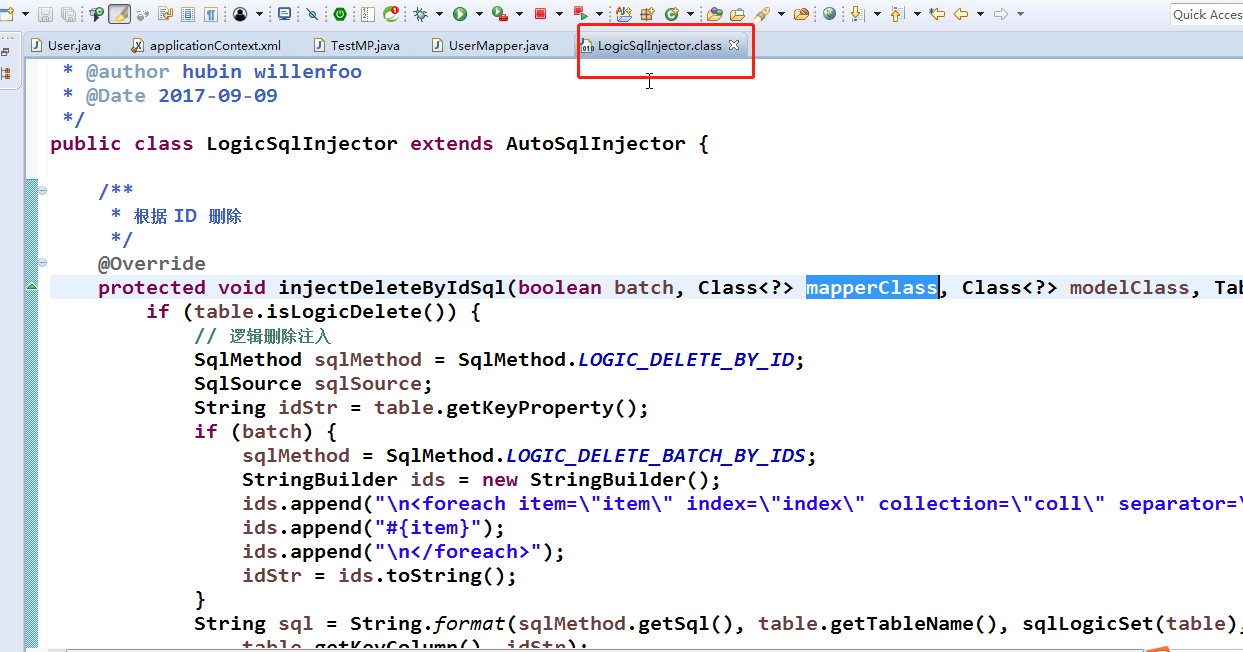
public void inject(Configuration configuration, MapperBuilderAssistant builderAssistant, Class<?> ,
Class<?> modelClass, TableInfo table) {
//将EmployeeMapper中定义的deleteAll, 处理成对应的MappedStatement对象,加入到configuration对象中。
//注入的SQL语句
String sql = "delete from " +table.getTableName();
//注入的方法名 一定要与EmployeeMapper接口中的方法名一致
String method = "deleteAll" ;
//构造SqlSource对象
SqlSource sqlSource = languageDriver.createSqlSource(configuration, sql, modelClass);
//构造一个删除的MappedStatement
this.addDeleteMappedStatement(mapperClass, method, sqlSource);
}
}
8.1.3 在 MP 全局策略中,配置 自定义注入器
<property name="sqlInjector" ref="mySqlInjector"></property>
启动的时候会把deleteAll添加进去了
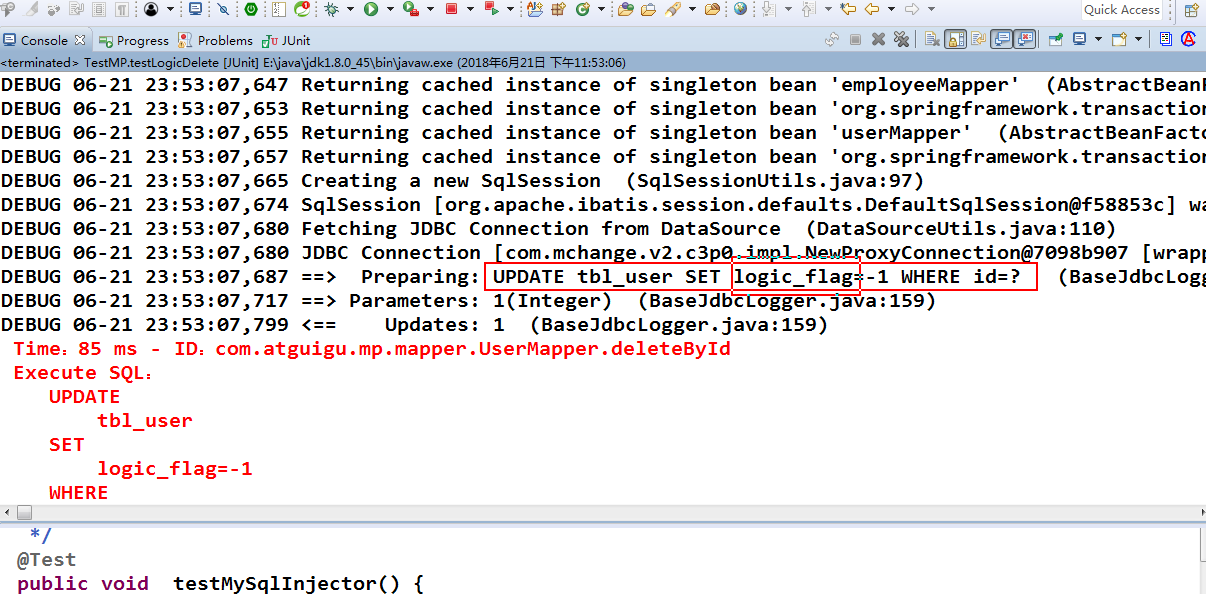
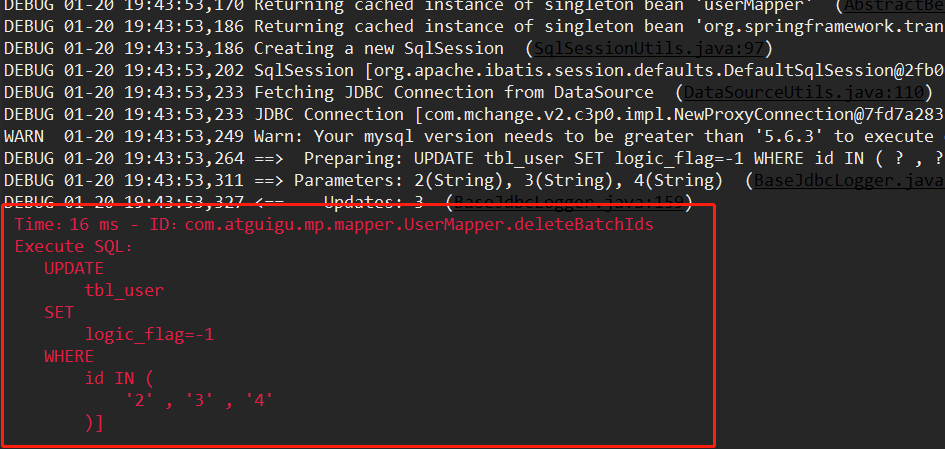
8.2 逻辑删除
1) com.baomidou.mybatisplus.mapper.LogicSqlInjector

2) logicDeleteValue 逻辑删除全局值

3) logicNotDeleteValue 逻辑未删除全局值

4) 在 POJO 的逻辑删除字段 添加 @TableLogic 注解

5) 会在 mp 自带查询和更新方法的 sql 后面,追加『逻辑删除字段』=『LogicNotDeleteValue

默认值』 删除方法: deleteById()和其他 delete 方法, 底层 SQL 调用的是 update tbl_xxx

set 『逻辑删除字段』 =『logicDeleteValue 默认值』
8.2.1 xml配置
 <!-- 逻辑删除 -->

     <bean id="logicSqlInjector" class="com.baomidou.mybatisplus.mapper.LogicSqlInjector"></bean>

 <!-- 注入逻辑删除 -->

         <property name="sqlInjector" ref="logicSqlInjector"></property>

 <!-- 注入逻辑删除全局值 -->

         <property name="logicDeleteValue" value = "-1"></property>

         <property name="logicNotDeleteValue" value="1"></property>
8.2.2添加注解
 @TableLogic   // 逻辑删除属性

     private Integer logicFlag ;
8.2.3 方法
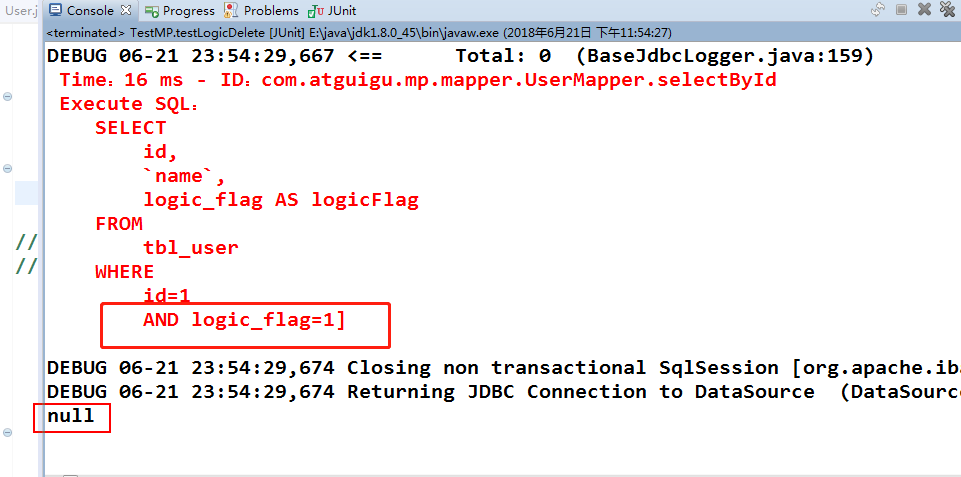
    /**

      * 测试逻辑删除

      */

     @Test

     public void testLogicDelete() {

 //      Integer result = userMapper.deleteById(1);

 //      System.out.println("result:" +result );

         User user = userMapper.selectById(1);

         System.out.println(user);

     }


.png?lastModify=1571799230)
.png?lastModify=1571799230)


.png?lastModify=1571799230)
8.3公共字段填充
8.3.1继承类重写方法
/**
* 自定义公共字段填充处理器
*/
public class MyMetaObjectHandler extends MetaObjectHandler {
/**
* 插入操作 自动填充
*/
@Override
public void insertFill(MetaObject metaObject) {
// 获取到需要被填充的字段的值
Object fieldValue = getFieldValByName("name", metaObject);
if (fieldValue == null) {
System.out.println("*******插入操作 满足填充条件*********");
setFieldValByName("name", "weiyunhui", metaObject);
}
}
/**
* 修改操作 自动填充
*/
@Override
public void updateFill(MetaObject metaObject) {
Object fieldValue = getFieldValByName("name", metaObject);
if (fieldValue == null) {
System.out.println("*******修改操作 满足填充条件*********");
setFieldValByName("name", "weiyh", metaObject);
}
}
}
8.3.2注解填充字段 @TableFile(fill = FieldFill.INSERT) 查看 FieldFill
@TableField(fill=FieldFill.INSERT_UPDATE)

    private String name ;
8.3.3 MP 全局注入 自定义公共字段填充处理器
 <!-- 注入公共字段填充处理器 -->

         <property name="metaObjectHandler" ref="myMetaObjectHandler"></property>

 测试方法

     /**

      * 测试公共字段填充

      */

     @Test

     public void testMetaObjectHandler() {

         User user = new User();

         //user.setName("Tom");

         user.setId(5);

         user.setLogicFlag(1);

         userMapper.updateById(user);

     }
8.4Oracle序列
8.4.1实体类配置主键 Sequence @KeySequence
 //@KeySequence(value="seq_user",clazz=Integer.class)

 public class User extends Parent {

     //@TableId(type=IdType.INPUT)

     private Integer id  ;
8.4.2 全局 MP 主键生成策略为 IdType.INPUT
   <!-- Oracle全局主键策略 -->

    <property name="idType" value="1"></property>
8.4.3全局 MP 中配置 Oracle 主键 Sequence
<!-- 注入Oracle主键Sequence -->

<property name="keyGenerator" ref="oracleKeyGenerator"></property>
8.4.4 写一个父类
@KeySequence(value="seq_user",clazz=Integer.class)
public abstract class Parent {
}
spring整合mybatisplus2.x详解的更多相关文章
- elasticSearch+spring 整合 maven依赖详解
摘自:http://www.mayou18.com/detail/nTxPQSyu.html [Elasticsearch基础]elasticSearch+spring 整合 maven依赖详解 Ma ...
- Spring整合redis配置文件详解
<?xml version="1.0" encoding="UTF-8"?> <beans xmlns="http://www.sp ...
- 转载 Spring、Spring MVC、MyBatis整合文件配置详解
Spring.Spring MVC.MyBatis整合文件配置详解 使用SSM框架做了几个小项目了,感觉还不错是时候总结一下了.先总结一下SSM整合的文件配置.其实具体的用法最好还是看官方文档. ...
- Spring MVC、MyBatis整合文件配置详解
Spring:http://spring.io/docs MyBatis:http://mybatis.github.io/mybatis-3/ Building a RESTful Web Serv ...
- Springboot 整合 Dubbo/ZooKeeper 详解 SOA 案例
摘要: 原创出处:www.bysocket.com 泥瓦匠BYSocket 希望转载,保留摘要,谢谢! “看看星空,会觉得自己很渺小,可能我们在宇宙中从来就是一个偶然.所以,无论什么事情,仔细想一 ...
- Spring Boot 集成 FreeMarker 详解案例(十五)
一.Springboot 那些事 SpringBoot 很方便的集成 FreeMarker ,DAO 数据库操作层依旧用的是 Mybatis,本文将会一步一步到来如何集成 FreeMarker 以及配 ...
- Spring各个jar包详解
Spring各jar包详解 spring.jar 是包含有完整发布模块的单个jar 包.但是不包括mock.jar,aspects.jar, spring-portlet.jar, and sprin ...
- Spring Data操作Redis详解
Spring Data操作Redis详解 Redis是一种NOSQL数据库,Key-Value形式对数据进行存储,其中数据可以以内存形式存在,也可以持久化到文件系统.Spring data对Redis ...
- Spring Aop底层原理详解
Spring Aop底层原理详解(来源于csdn:https://blog.csdn.net/baomw)
随机推荐
- Flask学习之旅--用 Python + Flask 制作一个简单的验证码系统
一.写在前面 现在无论大大小小的网站,基本上都会使用验证码,登录的时候要验证,下载的时候要验证,而使用的验证码也从那些简简单单的字符图形验证码“进化”成了需要进行图文识别的验证码.需要拖动滑块的滑动验 ...
- Hadoop点滴-HDFS文件系统
1.HDFS中,目录作为元数据,保存在namenode中,而非datanode中 2.HDFS的文件权限模型与POSIX的权限模式非常相似,使用 r w x 3.HDFS的文件执行权限(X)可以 ...
- bootstrap具体知识点(2)
3.以移动设备为优先 <meta name=”viewport” content=”width=device-width,initial-scale=1,user-scalable=no”> ...
- charles抓包小程序
charles抓包小程序: 原理呢,简单理解,通过charles开代理,然后手工wifi设置代理上网. 但是要做一些准备:手机要安装charles 证书. 注意的是安卓和ios有区别:目前安卓7.0版 ...
- asp.net 开源工作流-ccflow关于 “ 是否自动计算未来的处理人”的功能变更
关键字:流程未来节点处理人 工作流快速开发平台 工作流流设计 业务流程管理 asp.net 开源工作流 业务背景:一个流程在启动起来后,是可以对一些节点计算出来处理人是谁,流程的走向.对于另 ...
- 教你制作挂件头像 | 小程序七十二变之 canvas 绘制国旗头像
昨天朋友圈被「请给我一面国旗@微信官方」刷屏,虽然知道是假的,但是从另一个角度来看,弄清楚如何实现更有趣. 1.canvas 这就不得不提到小程序中的 API canvas,H5 中也是有 canva ...
- B-概率论-熵和信息增益
目录 熵和信息增益 一.熵(Entropy) 二.条件熵(Conditional Entropy) 三.联合熵(Joint Entropy) 四.相对熵(Relative Entropy) 4.1 相 ...
- Kotlin 中的伴生对象和静态成员
用了一段时间kotlin,越用越觉得好用,爱不释手啊,留点笔记. Kotlin 中,在类中定义的对象(object)声明,可使用 companion 修饰,这样此对象(object)就是伴生对象了.类 ...
- 8 个 Python 实用脚本,【速】收藏备用!
脚本写的好,下班下得早!程序员的日常工作除了编写程序代码,还不可避免地需要处理相关的测试和验证工作. 例如,访问某个网站一直不通,需要确定此地址是否可访问,服务器返回什么,进而确定问题在于什么.完成这 ...
- Python高级核心技术97讲 ☝☝☝
Python高级核心技术97讲 ☝☝☝ Python高级核心技术97讲 系列教程 学习 教程 Python的标准整数类型是最通用的数字类型.在大多数32位机器上,标准整数类型的取值范围是-2**31 ...