SpringCloud教程二:Ribbon(Finchley版)
在上一篇文章,讲了服务的注册和发现。在微服务架构中,业务都会被拆分成一个独立的服务,服务与服务的通讯是基于http restful的。Spring cloud有两种服务调用方式,一种是ribbon+restTemplate,另一种是feign。在这一篇文章首先讲解下基于ribbon+rest。
一、ribbon简介
Ribbon is a client side load balancer which gives you a lot of control over the behaviour of HTTP and TCP clients. Feign already uses Ribbon, so if you are using @FeignClient then this section also applies.
—–摘自官网
ribbon是一个负载均衡客户端,可以很好的控制htt和tcp的一些行为。Feign默认集成了ribbon。
ribbon 已经默认实现了这些配置bean:
IClientConfig ribbonClientConfig: DefaultClientConfigImpl
IRule ribbonRule: ZoneAvoidanceRule
IPing ribbonPing: NoOpPing
ServerList ribbonServerList: ConfigurationBasedServerList
ServerListFilter ribbonServerListFilter: ZonePreferenceServerListFilter
ILoadBalancer ribbonLoadBalancer: ZoneAwareLoadBalancer
二、准备工作
这一篇文章基于上一篇文章的工程,启动eureka-server 工程;启动eureka-client工程,它的端口为8882;将service-hi的配置文件的端口改为8883,并启动,这时你会发现:eureka-client在eureka-server注册了2个实例,我将端口又换成8886,这样就往eureka-server中注册了三个实例,这就相当于一个小的集群。如下图可以看到图标显示为3,说明同时启动了三个实例。

如何在idea下启动多个实例,请参照这篇文章: https://blog.csdn.net/forezp/article/details/76408139
访问localhost:8881如图所示: 如何一个工程启动多个实例,请看这篇文章:https://blog.csdn.net/forezp/article/details/76408139

三、建一个服务消费者
重新建一个Maven工程,其中pom如下:
 <?xml version="1.0" encoding="UTF-8"?>

 <project xmlns="http://maven.apache.org/POM/4.0.0"

          xmlns:xsi="http://www.w3.org/2001/XMLSchema-instance"

          xsi:schemaLocation="http://maven.apache.org/POM/4.0.0 http://maven.apache.org/xsd/maven-4.0.0.xsd">

     <modelVersion>4.0.0</modelVersion>

     <groupId>com.liumy</groupId>

     <artifactId>ribbon-f-2</artifactId>

     <version>1.0-SNAPSHOT</version>

     <packaging>pom</packaging>

     <parent>

         <groupId>org.springframework.boot</groupId>

         <artifactId>spring-boot-starter-parent</artifactId>

         <version>2.0.3.RELEASE</version>

         <relativePath/>

     </parent>

     <modules>

         <module>service-ribbon</module>

     </modules>

     <properties>

         <project.build.sourceEncoding>UTF-8</project.build.sourceEncoding>

         <project.reporting.outputEncoding>UTF-8</project.reporting.outputEncoding>

         <java.version>1.8</java.version>

         <spring-cloud.version>Finchley.RELEASE</spring-cloud.version>

     </properties>

     <dependencies>

         <dependency>

             <groupId>org.springframework.boot</groupId>

             <artifactId>spring-boot-starter-test</artifactId>

             <scope>test</scope>

         </dependency>

     </dependencies>

     <dependencyManagement>

         <dependencies>

             <dependency>

                 <groupId>org.springframework.cloud</groupId>

                 <artifactId>spring-cloud-dependencies</artifactId>

                 <version>${spring-cloud.version}</version>

                 <type>pom</type>

                 <scope>import</scope>

             </dependency>

         </dependencies>

     </dependencyManagement>

     <build>

         <plugins>

             <plugin>

                 <groupId>org.springframework.boot</groupId>

                 <artifactId>spring-boot-maven-plugin</artifactId>

             </plugin>

         </plugins>

     </build>

 </project>
再重新建一个spring-boot工程,取名为:service-ribbon; 在它的pom.xml继承了父pom文件,并引入了以下依赖:
<?xml version="1.0" encoding="UTF-8"?>

<project xmlns="http://maven.apache.org/POM/4.0.0" xmlns:xsi="http://www.w3.org/2001/XMLSchema-instance"

         xsi:schemaLocation="http://maven.apache.org/POM/4.0.0 https://maven.apache.org/xsd/maven-4.0.0.xsd">

    <modelVersion>4.0.0</modelVersion>

    <parent>

        <groupId>com.liumy</groupId>

        <artifactId>ribbon-f-2</artifactId>

        <version>1.0-SNAPSHOT</version>

    </parent>

    <groupId>com.liumy</groupId>

    <artifactId>service-ribbon</artifactId>

    <version>0.0.1-SNAPSHOT</version>

    <packaging>jar</packaging>

    <name>service-ribbon</name>

    <description>Demo project for Spring Boot</description>

    <dependencies>

        <dependency>

            <groupId>org.springframework.boot</groupId>

            <artifactId>spring-boot-starter-web</artifactId>

        </dependency>

        <dependency>

            <groupId>org.springframework.cloud</groupId>

            <artifactId>spring-cloud-starter-netflix-eureka-client</artifactId>

        </dependency>

        <dependency>

            <groupId>org.springframework.cloud</groupId>

            <artifactId>spring-cloud-starter-netflix-ribbon</artifactId>

        </dependency>

    </dependencies>

</project>
在工程的配置文件指定服务的注册中心地址为http://localhost:8881/eureka/,程序名称为 service-ribbon,程序端口为8884。配置文件application.yml如下:
 eureka:

   client:

     serviceUrl:

       defaultZone: http://localhost:8881/eureka/

 server:

   port: 8884

 spring:

   application:

     name: service-ribbon
在工程的启动类中,通过@EnableDiscoveryClient向服务中心注册;并且向程序的ioc注入一个bean: restTemplate;并通过@LoadBalanced注解表明这个restRemplate开启负载均衡的功能。
 package com.liumy.serviceribbon;

 import org.springframework.boot.SpringApplication;

 import org.springframework.boot.autoconfigure.SpringBootApplication;

 import org.springframework.cloud.client.discovery.EnableDiscoveryClient;

 import org.springframework.cloud.client.loadbalancer.LoadBalanced;

 import org.springframework.cloud.netflix.eureka.EnableEurekaClient;

 import org.springframework.context.annotation.Bean;

 import org.springframework.web.client.RestTemplate;

 @EnableEurekaClient

 @SpringBootApplication

 @EnableDiscoveryClient//通过@EnableDiscoveryClient向服务中心注册

 public class ServiceRibbonApplication {

     public static void main(String[] args) {

         SpringApplication.run(ServiceRibbonApplication.class, args);

     }

     @Bean//向程序的ioc注入一个bean

     @LoadBalanced//通过@LoadBalanced注解表明这个restRemplate开启负载均衡的功能。

     RestTemplate restTemplate(){

         return new RestTemplate();

     }

 }
写一个测试类HelloService,通过之前注入ioc容器的restTemplate来消费eureka-client服务的“/hello”接口,在这里我们直接用的程序名替代了具体的url地址,在ribbon中它会根据服务名来选择具体的服务实例,根据服务实例在请求的时候会用具体的url替换掉服务名,代码如下:
 package com.liumy.serviceribbon;

 import org.springframework.beans.factory.annotation.Autowired;

 import org.springframework.stereotype.Service;

 import org.springframework.web.client.RestTemplate;

 /**

  * @ClassName HelloService

  * @Descroption TODO ribbon测试service

  * @Author Yubaba

  * @Date 2019/10/20 15:11

  **/

 @Service

 public class HelloService {

     @Autowired

     RestTemplate restTemplate;

     public String HelloService(String name){

         return restTemplate.getForObject("http://EUREKA-CLIENT/hello?name="+name,String.class);

     }

 }
写一个controller,在controller中用调用HelloService 的方法,代码如下:
 package com.liumy.serviceribbon;

 import org.springframework.beans.factory.annotation.Autowired;

 import org.springframework.web.bind.annotation.GetMapping;

 import org.springframework.web.bind.annotation.RequestParam;

 import org.springframework.web.bind.annotation.RestController;

 /**

  * @ClassName HelloController

  * @Descroption TODO ribbon测试controller

  * @Author Yubaba

  * @Date 2019/10/20 15:15

  **/

 @RestController

 public class HelloController {

     @Autowired

     HelloService helloService;

     @GetMapping("helloController")

     public String helloController(@RequestParam("name")String name){

         return helloService.HelloService(name);

     }

 }
在浏览器上多次访问http://localhost:8884/helloController?name=测试,浏览器交替显示:
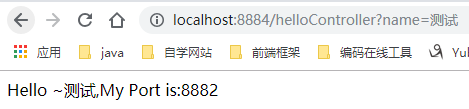
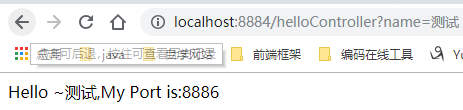
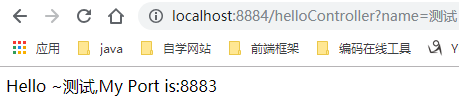
这说明当我们通过调用restTemplate.getForObject(“http://EUREKA-CLIENT/hello?name=”+name,String.class)方法时,已经做了负载均衡,访问了不同的端口的服务实例。
四、此时的架构
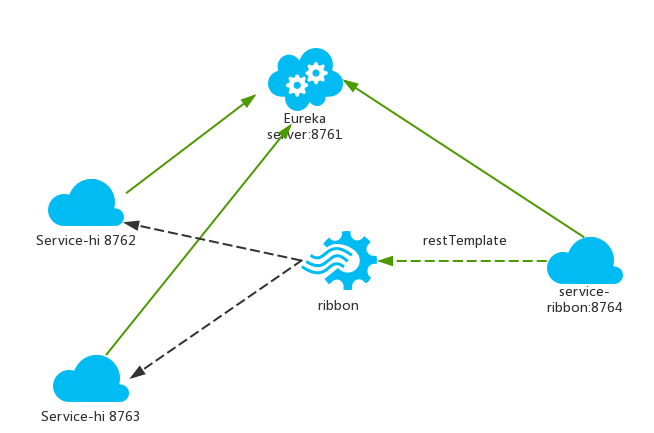
(图例来源于网络,为了方便理解)
- 一个服务注册中心,eureka server,端口为8881
- service-hi工程跑了三个实例,端口分别为8882,8883,8886,分别向服务注册中心注册
- sercvice-ribbon端口为8884,向服务注册中心注册
- 当sercvice-ribbon通过restTemplate调用service-hi的hi接口时,因为用ribbon进行了负载均衡,会轮流的调用eureka-client:8882、8883和8886 三个端口的hello接口
五、参考资料
本文参考了以下:
http://blog.csdn.net/forezp/article/details/69788938
http://cloud.spring.io/spring-cloud-static/Finchley.RELEASE/single/spring-cloud.html
注:本篇为原创文章,其中的过程与实现是参考某BAT顶级架构师的教学完成。
SpringCloud教程二:Ribbon(Finchley版)的更多相关文章
- 最适合新手入门的SpringCloud教程 6—Ribbon负载均衡「F版本」
SpringCloud版本:Finchley.SR2 SpringBoot版本:2.0.3.RELEASE 源码地址:https://gitee.com/bingqilinpeishenme/Java ...
- GitHub 新手教程 二,Windows 版 GitHub 安装
1,下载地址: https://git-scm.com/download/ 2,信息: 3,选择安装位置: 例如:d:\soft\git 4,选择组件: 5,创建开始菜单: 6,选择Git使用的默认编 ...
- Spring Cloud(十二):分布式链路跟踪 Sleuth 与 Zipkin【Finchley 版】
Spring Cloud(十二):分布式链路跟踪 Sleuth 与 Zipkin[Finchley 版] 发表于 2018-04-24 | 随着业务发展,系统拆分导致系统调用链路愈发复杂一个前端请 ...
- Spring Cloud(二):服务注册与发现 Eureka【Finchley 版】
Spring Cloud(二):服务注册与发现 Eureka[Finchley 版] 发表于 2018-04-15 | 更新于 2018-05-07 | 上一篇主要介绍了相关理论,这一篇开始我们 ...
- 学习笔记(三)--->《Java 8编程官方参考教程(第9版).pdf》:第十章到十二章学习笔记
回到顶部 注:本文声明事项. 本博文整理者:刘军 本博文出自于: <Java8 编程官方参考教程>一书 声明:1:转载请标注出处.本文不得作为商业活动.若有违本之,则本人不负法律责任.违法 ...
- 学习笔记(二)--->《Java 8编程官方参考教程(第9版).pdf》:第七章到九章学习笔记
注:本文声明事项. 本博文整理者:刘军 本博文出自于: <Java8 编程官方参考教程>一书 声明:1:转载请标注出处.本文不得作为商业活动.若有违本之,则本人不负法律责任.违法者自负一切 ...
- 史上最简单的SpringCloud教程 | 第十篇: 高可用的服务注册中心(Finchley版本)
转载请标明出处: 原文首发于 https://www.fangzhipeng.com/springcloud/2018/08/30/sc-f10-eureka/ 本文出自方志朋的博客 文章 史上最简单 ...
- springcloud(十二):Ribbon客户端负载均衡介绍
springcloud(十二):Ribbon客户端负载均衡介绍 Ribbon简介 使用分布式微服务脚骨的应用系统,在部署的时候通常会为部分或者全部微服务搭建集群环境,通过提供多个实例来提高系统的稳定型 ...
- 史上最简单的 SpringCloud 教程 | 终章
https://blog.csdn.net/forezp/article/details/70148833转载请标明出处:http://blog.csdn.net/forezp/article/det ...
随机推荐
- webview与webApp页面交互传参
参考网址:https://blog.csdn.net/books1958/article/details/44747045 上一篇说了Android集成极光推送获取了RegistrationId推送标 ...
- FreeSql 新手上路系列教程已发布在 cnblogs
FreeSql 是一个功能强大的对象关系映射程序(O/RM),支持 .NETCore 2.1+ 或 .NETFramework 4.5+(QQ群:4336577) FreeSql采用MIT开源协议托管 ...
- change,Ringo题目
<!DOCTYPE html><html lang="en"><head> <meta charset="UTF-8" ...
- android端 版本升级
由于项目中要求实现版本升级,特写此代码,有因为这段代码基本都是通用,所以记录下来,以便下次直接拷贝... public class ApkVersionUpdate { /** apk文件下载状态:正 ...
- java PDF转word的初步实现
package com.springboot.springboot.util; import java.io.File; import java.io.FileOutputStream; import ...
- 【学习笔记】第二章 python安全编程基础---正则表达式
一.python正则表达式 定义:正则表达式是一个特殊的字符序列,它能帮助你方便的检查一个字符串是否与某种模式相匹配: 1.1RE模块:是python语言拥有全部的正则表达式功能的一个正则模块: 常见 ...
- 喜大普奔,两个开源的 Spring Boot + Vue 前后端分离项目可以在线体验了
折腾了一周的域名备案昨天终于搞定了. 松哥第一时间想到赶紧把微人事和 V 部落部署上去,我知道很多小伙伴已经等不及了. 1. 也曾经上过线 其实这两个项目当时刚做好的时候,我就把它们部署到服务器上了, ...
- redis的几个知识点
Redis的全称是Remote Dictionary Server,即远程字典服务,通常用作服务器缓存服务. 这里通过Redis的几个知识点来了解Redis. Redis的通讯协议 Redis的通讯协 ...
- 企业及监控zabbix
Php要求必须是5.4及以上(centos 7默认是 5.4.16可以) #安装依赖库 yum -y install gcc curl curl-devel net-snmp net-snmp-dev ...
- Day4 总结