
spring boot:使用redis cluster集群作为分布式session(redis 6.0.5/spring boot 2.3.1)
一,为什么要使用分布式session?
HpptSession默认使用内存来管理Session,如果将应用横向扩展将会出现Session共享问题,
所以我们在创建web集群时,把session保存到redis中,
这样用户访问到web集群中的任一台服务器,都可以读取到自己的session信息
说明:刘宏缔的架构森林是一个专注架构的博客,地址:https://www.cnblogs.com/architectforest
对应的源码可以访问这里获取: https://github.com/liuhongdi/
说明:作者:刘宏缔 邮箱: 371125307@qq.com
二,演示项目相关信息
1,项目地址:
https://github.com/liuhongdi/redissession
2,项目原理
把session保存到redis中,从而实现分布式的session
为了防止单点问题,我们首先要创建一个redis cluster
3,redis cluster结构
redis1: 172.17.0.2

redis2: 172.17.0.3

redis3: 172.17.0.4

redis4: 172.17.0.5

redis5: 172.17.0.6

redis6: 172.17.0.7
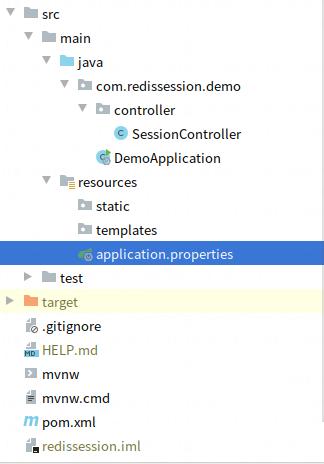
4,项目结构:
如图:
三,创建redis cluster
1,每台机器:生成安装用目录:
[root@redis /]# mkdir /usr/local/soft

[root@redis /]# mkdir /usr/local/source

[root@redis /]# mkdir /usr/local/source/redis
2,每台机器:安装必需的rpm包
[root@redis redis]# dnf install wget

[root@redis redis]# dnf install gcc

[root@redis redis]# dnf install tcl

[root@redis redis]# dnf install make

[root@redis redis]# dnf install which
3,每台机器:下载/编译/安装:
[root@redis /]# cd /usr/local/source/redis/

[root@redis redis]# wget http://download.redis.io/releases/redis-6.0.5.tar.gz
[root@redis redis]# tar -zxvf redis-6.0.5.tar.gz
编译、安装
[root@redis redis]# cd redis-6.0.5

[root@redis redis-6.0.5]# make PREFIX=/usr/local/soft/redis-6.0.5 install
[root@redis redis-6.0.5]# make test
\o/ All tests passed without errors!
4,每台机器:配置
[root@redis redis-6.0.5]# mkdir /usr/local/soft/redis-6.0.5/conf

[root@redis redis-6.0.5]# cp redis.conf /usr/local/soft/redis-6.0.5/conf/
生成日志/数据目录
[root@redis redis-6.0.5]# mkdir -p /data/redis-6.0.5/logs

[root@redis redis-6.0.5]# mkdir -p /data/redis-6.0.5/data

[root@redis redis-6.0.5]# mkdir -p /data/redis-6.0.5/cluster
[root@redis redis-6.0.5]# cd /usr/local/soft/redis-6.0.5/conf/

[root@redis conf]# vi redis.conf
配置项内容:
daemonize yes

logfile "/data/redis-6.0.5/logs/redis.log"

maxmemory 128MB

dir /data/redis-6.0.5/data/

protected-mode no

requirepass lhddemo

#bind 127.0.0.1(此行注释掉)

io-threads 2

cluster-enabled yes(此行取消注释)

cluster-config-file /data/redis-6.0.5/cluster/nodes-6379.conf

cluster-node-timeout 15000(此行取消注释)

masterauth lhddemo
5,每台机器:用systemd管理redis服务
生成服务文件
[root@redis conf]# vi /lib/systemd/system/redis6.service
[Unit]

Description=Redis

After=network.target

[Service]

Type=forking

PIDFile=/var/run/redis_6379.pid

ExecStart=/usr/local/soft/redis-6.0.5/bin/redis-server /usr/local/soft/redis-6.0.5/conf/redis.conf

ExecReload=/bin/kill -s HUP $MAINPID

ExecStop=/bin/kill -s QUIT $MAINPID

PrivateTmp=true

[Install]

WantedBy=multi-user.target
启动
[root@redis conf]# systemctl daemon-reload

[root@redis conf]# systemctl start redis6
6,每台机器:测试访问redis服务
[root@redis logs]# /usr/local/soft/redis-6.0.5/bin/redis-cli

127.0.0.1:6379> auth lhddemo

OK

127.0.0.1:6379> set name lhd

(error) CLUSTERDOWN Hash slot not served
提示cluster未启动
7,集群中任一台机器上:创建集群:
#-a: 输入登录验证密码
#--cluster create :用来创建集群,指定集群中机器的ip和端口
#--cluster-replicas :指定集群中的每个主节点的从节点的数量,1表示每个主节点各有一个从节点
[root@redis1 /]# /usr/local/soft/redis-6.0.5/bin/redis-cli -a lhddemo \
--cluster create 172.17.0.2:6379 172.17.0.3:6379 172.17.0.4:6379 172.17.0.5:6379 172.17.0.6:6379 172.17.0.7:6379 \
--cluster-replicas 1
Can I set the above configuration? (type 'yes' to accept): yes
在这里输入yes 并回车
8, 集群中任一台机器上:查看创建集群的效果:查看集群信息:
#列出群集中的机器节点信息
[root@redis5 /]# /usr/local/soft/redis-6.0.5/bin/redis-cli -c -h 172.17.0.6

172.17.0.6:6379> auth lhddemo

OK

172.17.0.6:6379> cluster nodes

aa20aa58234477746468843269bc25b06bf1edd5 172.17.0.7:6379@16379 slave 8a66552f8869dc4c9ef81b473558cec6f55104dd 0 1593222901512 6 connected

6a8d2ccfed713a7d7023852686d24ef95520135d 172.17.0.4:6379@16379 master - 0 1593222898000 3 connected 10923-16383

a205c4ba5ba680381bfb8d349755a33c8c60f340 172.17.0.2:6379@16379 master - 0 1593222899496 1 connected 0-5460

52ca45c11d5d09207882ac9eb17bfccb81a6b713 172.17.0.6:6379@16379 myself,slave a205c4ba5ba680381bfb8d349755a33c8c60f340 0 1593222898000 5 connected

8a66552f8869dc4c9ef81b473558cec6f55104dd 172.17.0.3:6379@16379 master - 0 1593222900000 2 connected 5461-10922

dc271cb9bb59f163854ab16113e3d41234831ebe 172.17.0.5:6379@16379 slave 6a8d2ccfed713a7d7023852686d24ef95520135d 0 1593222900503 4 connected
四,配置文件说明:
1,application.properties:
spring.redis.cluster.nodes=172.17.0.2:6379,172.17.0.3:6379,172.17.0.4:6379,172.17.0.5:6379,172.17.0.6:6379,172.17.0.7:6379

spring.redis.password=lhddemo

spring.session.store-type=redis

#redis-lettuce

spring.redis.lettuce.pool.max-active=8

spring.redis.lettuce.pool.max-wait=1

spring.redis.lettuce.pool.max-idle=8

spring.redis.lettuce.pool.min-idle=0
说明:
spring.redis.cluster.nodes:指定cluster中各redis节点
spring.redis.password: 登录密码
spring.session.store-type: 指定session的存储方式,这里使用redis
2,pom.xml
        <dependency>

            <groupId>org.springframework.session</groupId>

            <artifactId>spring-session-data-redis</artifactId>

        </dependency>

        <dependency>

            <groupId>org.springframework.boot</groupId>

            <artifactId>spring-boot-starter-data-redis</artifactId>

        </dependency>

        <dependency>

            <groupId>org.apache.commons</groupId>

            <artifactId>commons-pool2</artifactId>

        </dependency>
五,java代码说明
1, DemoApplication.java
@SpringBootApplication

@EnableRedisHttpSession(maxInactiveIntervalInSeconds = 60)

public class DemoApplication {

    public static void main(String[] args) {

        SpringApplication.run(DemoApplication.class, args);

    }

}
说明:
EnableRedisHttpSession:启用redis作为session
maxInactiveIntervalInSeconds = 60指定session的时长,秒数,
建议时长3600秒
2,SessionController.java
@RestController

@RequestMapping("/session")

public class SessionController {

    /*

    * read session

    * */

    @RequestMapping("/get")

    public Object getSession(HttpServletRequest request){

        Map<String, Object> map = new HashMap<>();

        map.put("sessionId", request.getSession().getId());

        map.put("user", request.getSession().getAttribute("user"));

        map.put("maxInactiveInterval", request.getSession().getMaxInactiveInterval());

        SimpleDateFormat sdf = new SimpleDateFormat("yyyy-MM-dd HH:mm:ss");

        String time = sdf.format(new Date(request.getSession().getCreationTime()));

        map.put("creationTime", time);

        return map;

    }

    /*

    * write session

    * */

    @RequestMapping("/set/{name}")

    public String setSession(@PathVariable String name, HttpServletRequest request) {

        request.getSession().setAttribute("user", name);

        return "ok";

    }

}
六, 效果演示
1,设置session

2,读取session

3,从redis中查看session
172.17.0.4:6379> hgetall spring:session:sessions:e9f0e981-d3be-4f44-8783-7cbb3792bc23

1) "sessionAttr:user"

2) "\xac\xed\x00\x05t\x00\x0bgoodabcdefg"

3) "creationTime"

4) "\xac\xed\x00\x05sr\x00\x0ejava.lang.Long;\x8b\xe4\x90\xcc\x8f#\xdf\x02\x00\x01J\x00\x05valuexr\x00\x10java.lang.Number\x86\xac\x95\x1d\x0b\x94\xe0\x8b\x02\x00\x00xp\x00\x00\x01r\xf3\x8d?+"

5) "maxInactiveInterval"

6) "\xac\xed\x00\x05sr\x00\x11java.lang.Integer\x12\xe2\xa0\xa4\xf7\x81\x878\x02\x00\x01I\x00\x05valuexr\x00\x10java.lang.Number\x86\xac\x95\x1d\x0b\x94\xe0\x8b\x02\x00\x00xp\x00\x00\x00<"

7) "lastAccessedTime"

8) "\xac\xed\x00\x05sr\x00\x0ejava.lang.Long;\x8b\xe4\x90\xcc\x8f#\xdf\x02\x00\x01J\x00\x05valuexr\x00\x10java.lang.Number\x86\xac\x95\x1d\x0b\x94\xe0\x8b\x02\x00\x00xp\x00\x00\x01r\xf3\x8d\\\x8a"
如果我们del这个session中,
session中记录的信息就会丢失
七,查看redis版本
[root@redis4 /]# /usr/local/soft/redis-6.0.5/bin/redis-server --version

Redis server v=6.0.5 sha=00000000:0 malloc=jemalloc-5.1.0 bits=64 build=3432450123f459c8
八,查看spring boot版本
  .   ____          _            __ _ _

 /\\ / ___'_ __ _ _(_)_ __  __ _ \ \ \ \

( ( )\___ | '_ | '_| | '_ \/ _` | \ \ \ \

 \\/  ___)| |_)| | | | | || (_| |  ) ) ) )

  '  |____| .__|_| |_|_| |_\__, | / / / /

 =========|_|==============|___/=/_/_/_/

 :: Spring Boot ::        (v2.3.1.RELEASE)
spring boot:使用redis cluster集群作为分布式session(redis 6.0.5/spring boot 2.3.1)的更多相关文章
- centos8平台redis cluster集群添加/删除node节点(redis5.0.7)
一,当前redis cluster的node情况: 我们的添加删除等操作都是以这个cluster作为demo cluster采用六台redis,3主3从 redis1 : ip: 172.17.0.2 ...
- centos6下redis cluster集群部署过程
一般来说,redis主从和mysql主从目的差不多,但redis主从配置很简单,主要在从节点配置文件指定主节点ip和端口,比如:slaveof 192.168.10.10 6379,然后启动主从,主从 ...
- redis cluster 集群畅谈(二)
上一篇http://www.cnblogs.com/qinyujie/p/9029482.html, 主要讲解 redis cluster 集群 搭建,本篇主要讲解实验多master写入.读写分离.实 ...
- python 连接 redis cluster 集群
一. redis集群模式有多种, cluster模式只是其中的一种实现方式, 其原理请自行谷歌或者百度, 这里只举例如何使用Python操作 redis cluster 集群 二. python 连接 ...
- K8S部署Redis Cluster集群
kubernetes部署单节点redis: https://www.cnblogs.com/zisefeizhu/p/14282299.html Redis 介绍 • Redis代表REmote DI ...
- K8S部署Redis Cluster集群(三主三从模式) - 部署笔记
一.Redis 介绍 Redis代表REmote DIctionary Server是一种开源的内存中数据存储,通常用作数据库,缓存或消息代理.它可以存储和操作高级数据类型,例如列表,地图,集合和排序 ...
- Redis Cluster 集群搭建与扩容、缩容
说明:仍然是伪集群,所有的Redis节点,都在一个服务器上,采用不同配置文件,不同端口的形式实现 前提:已经安装好了Redis,本文的redis的版本是redis-6.2.3 Redis的下载.安装参 ...
- Redis Cluster集群搭建与应用
1.redis-cluster设计 Redis集群搭建的方式有多种,例如使用zookeeper,但从redis 3.0之后版本支持redis-cluster集群,redis-cluster采用无中心结 ...
- Redis Cluster集群主从方案
本文介绍一种通过Jedis和Cluster实现Redis集群(主从)的高可用方案,该方案需要使用Jedis2.8.0(推荐),Redis3.0及以上版本(强制). 附:Redis Cluster集群主 ...
随机推荐
- 3896. 【NOIP2014模拟10.26】战争游戏
鉴于如此一道恶心的题,作者还花了一个晚上草草学了tarjan. 于是乎,这道题就是道tarjan 具体怎么实现呢?正解上有个什么树形DP,看的我一脸懵逼. 这道题可以运用到tarjan一个高科技的算法 ...
- sql注入 --显错注入
前提知识 数据库:就是将大量数据把保存起来,通过计算机加工而成的可以高效访问数据库的数据集合数据库结构:库:就是一堆表组成的数据集合表:类似 Excel,由行和列组成的二维表字段:表中的列称为字段记录 ...
- python蟒蛇绘制
使用IDLE的文件方式编写代码并保存为PythonDraw.py文件 python蟒蛇绘制 import turtle引入了海龟绘图体系 使用setup函数,设定了一个宽650像素和高350像素的窗体 ...
- maven问题汇总
Failed to read artifact descriptor for xxx:jar 在MyEclipse中执行Maven的install命令时,报“Failed to read artifa ...
- Docker之简单操作
安装完Docker后,我们就可以与Docker进行交互来创建和管理容器等操作. 容器生命周期管理: 创建一个新的容器并运行一个命令 docker run [OPTIONS] IMAGE [COMMAN ...
- Python接口自动化测试01
1)环境准备: 接口测试的方式有很多,比如可以用工具(jmeter,postman)之类,也可以自己写代码进行接口测试,工具的使用相对来说都比较简单,重点是要搞清楚项目接口的协议是什么,然后有针对性的 ...
- 浅谈c++(一)
本人为菜鸟一枚,如有错误,欢迎指正. 由于上半年学了C语言,为了更好的过渡到C++,我将在未来展示一下两者的不同以及优缺点.在c++中,不得不谈到类.这是C++中最重要的语法特征.我们可以通过它,定义 ...
- linux学习(三)Linux 系统目录结构
一.查看目录 登录系统后,在当前命令窗口下输入命令: ls / 树状目录结构: 二.目录解析 /bin: 存放二进制可执行文件(ls,cat,mkdir等). /boot: 存放启动Linux时使用的 ...
- 使用jpa的注意事项
@Transactional 事务注解 nativeQuery = true表示使用写的sql,不是HQL@Modifying 注解完成修改操作使用jap时,在实体类的类名上面加上 @Entity@T ...
- git将本地仓库中的文件上传到远程仓库
现在我们开始创建本地git仓库(版本库又叫仓库) (本地仓库:$ git init之后的目录): 1.任意地方新建文件夹aaa,右击git bash here, 2.弹出一个对话框, 3. 首先配置你 ...