Spring 基于注解的 IOC 配置
创建 spring 的 的 xml 配置 文件
<context:component-scan base-package="com.itheim"/> 指定创建容器时要扫描的包
<?xml version="1.0" encoding="UTF-8"?>

<beans xmlns="http://www.springframework.org/schema/beans"

       xmlns:xsi="http://www.w3.org/2001/XMLSchema-instance"

       xmlns:context="http://www.springframework.org/schema/context"

       xsi:schemaLocation="http://www.springframework.org/schema/beans

        http://www.springframework.org/schema/beans/spring-beans.xsd

        http://www.springframework.org/schema/context

        http://www.springframework.org/schema/context/spring-context.xsd">

    <context:component-scan base-package="com.itheim"/>

</beans>
常用注解
用于创建对象的
@Component
相当于: <bean id="" class="">
作用:

把资源让 spring 来管理。相当于在 xml 中配置一个 bean。

属性:

value:指定 bean 的 id。如果不指定 value 属性,默认 bean 的 id 是当前类的类名。首字母小写
@Controller @Service @Repository
他们三个注解都是针对一个的衍生注解,他们的作用及属性都是一模一样的。

他们只不过是提供了更加明确的语义化。

@Controller :一般用于表现层的注解。

@Service :一般用于业务层的注解。

@Repository :一般用于持久层的注解。

细节:如果注解中有且只有一个属性 要赋值时是 ,且名称是 value ,value 在赋值是可以不写。
用于注入数据的
相当于: <property name="" ref=""><property name="" value="">
@Autowired
作用:

自动按照类型注入。当使用注解注入属性时,set方法可以省略。它只能注入其他 bean 类型。当有多个

类型匹配时,使用要注入的对象变量名称作为 bean 的 id,在 spring 容器查找,找到了也可以注入成功。找不到

就报错。
@Qualifier
作用:

在自动按照类型注入的基础之上,再按照 Bean 的 id 注入。它在给字段注入时不能独立使用,必须和

@Autowire 一起使用;但是给方法参数注入时,可以独立使用。

属性:

value:指定 bean 的 id。
@Resource
作用:

直接按照 Bean 的 id 注入。它也只能注入其他 bean 类型。

属性:

name:指定 bean 的 id。
@Value
作用:

注入基本数据类型和 String 类型数据的

属性:

value:用于指定值  value值的方式  ${jdbc.url}
用于改变作用范围的:
相当于: <bean id="" class="" scope="">
@Scope
作用:
指定 bean 的作用范围。
属性:
value:指定范围的值。
取值:singleton prototype request session globalsession
和生命周期相关的:( 了解)
相当于: <bean id="" class="" init-method="" destroy-method="" />
@PostConstruct
用于指定初始化方法
@PreDestroy
用于指定销毁方法
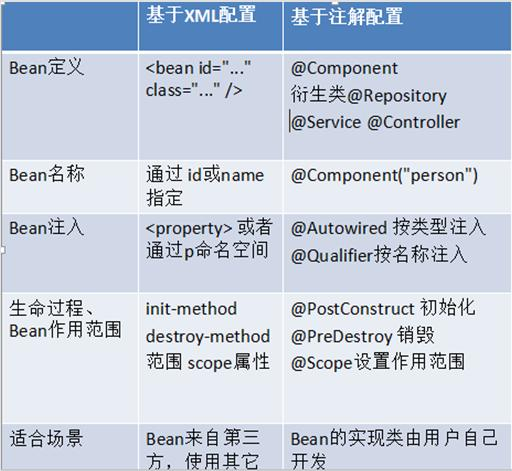
关于 Spring 注解和 XML 的选择问题
注解的优势:

配置简单,维护方便(我们找到类,就相当于找到了对应的配置)。

XML 的优势:

修改时,不用改源码。不涉及重新编译和部署。

Spring 管理 Bean 方式的比较:
案例
通过注解实现从数据库查询信息
bean.xml配置
<?xml version="1.0" encoding="UTF-8"?>

<beans xmlns="http://www.springframework.org/schema/beans"

       xmlns:xsi="http://www.w3.org/2001/XMLSchema-instance"

       xsi:schemaLocation="http://www.springframework.org/schema/beans

        http://www.springframework.org/schema/beans/spring-beans.xsd">

    <bean id="accountService" class="com.itheim.service.Imp.accountServiceImp">

        <property name="dao" ref="dao"/>

    </bean>

    <bean id="dao" class="com.itheim.dao.Imp.accountDaoImp">

        <property name="runner" ref="runner"/>

    </bean>

    <bean id="runner" class="org.apache.commons.dbutils.QueryRunner" scope="prototype">

        <constructor-arg name="ds" ref="ds"/>

    </bean>

    <!-- 配置数据源-->

    <bean id="ds" class="com.mchange.v2.c3p0.ComboPooledDataSource">

        <property name="driverClass" value="com.mysql.jdbc.Driver"/>

        <property name="jdbcUrl" value="jdbc:mysql://localhost:3306/eesy_mybatis"/>

        <property name="user" value="root"/>

        <property name="password" value="root"/>

    </bean>

</beans>
使用Service注解配置管理资源
/**

* 账户的业务层实现类

* @author

* @Company

* @Version 1.0

*/

@Service("accountService")

public class accountServiceImp implements accountService {

    private accountDao dao;

    static {

        System.out.println("service创建完成");

    }

    public void setDao(accountDao dao) {

        this.dao = dao;

    }

    public List<Account> findAll() {

        return dao.findAll();

    }

    public void Update(int id) {

        dao.Update(id);

    }

    public void saveUser(Account account) {

        dao.saveUser(account);

    }

}

/**

* 账户的持久层实现类

* @author

* @Company

* @Version 1.0

*/

public class accountDaoImp implements accountDao {

    private QueryRunner runner;

    public void setRunner(QueryRunner runner) {

        this.runner = runner;

    }

    public List<Account> findAll() {

        try {

            String sql="select * from account";

            return runner.query(sql,new BeanListHandler<Account>(Account.class));

        } catch (SQLException e) {

            throw new RuntimeException(e);

        }

    }

    public void Update(int id) {

        try {

            String sql="update account set money=? where id=? ";

            runner.update(sql,7000,id);

        } catch (SQLException e) {

            throw new RuntimeException(e);

        }

    }

    public void saveUser(Account account) {

        try {

            String sql="insert into account(money) values(?)";

            runner.update(sql,account.getMoney());

        } catch (SQLException e) {

            throw new RuntimeException(e);

        }

    }

}
注意:
1、当我们使用注解注入时,set 方法不用写
编写测试类
@Test

    public void springTest(){

        ApplicationContext context=new ClassPathXmlApplicationContext("bean.xml");

        accountService service = (accountService) context.getBean("accountService");

        Account account = (Account) context.getBean("account");

        List<Account> list = service.findAll();

        System.out.println(list);

        account.setMoney(6000);

        service.saveUser(account);

    }
pom.xml下的配置为
<dependencies>

        <dependency>

            <groupId>mysql</groupId>

            <artifactId>mysql-connector-java</artifactId>

            <version>5.1.6</version>

        </dependency>

        <!--导入spring依赖jar包-->

        <dependency>

            <groupId>org.springframework</groupId>

            <artifactId>spring-context</artifactId>

            <version>5.0.2.RELEASE</version>

        </dependency>

        <dependency>

            <groupId>junit</groupId>

            <artifactId>junit</artifactId>

            <version>4.12</version>

        </dependency>

        <dependency>

            <groupId>c3p0</groupId>

            <artifactId>c3p0</artifactId>

            <version>0.9.1.2</version>

        </dependency>

        <dependency>

            <groupId>commons-dbutils</groupId>

            <artifactId>commons-dbutils</artifactId>

            <version>1.7</version>

        </dependency>

    </dependencies>
Spring 基于注解的 IOC 配置的更多相关文章
- 10 Spring框架--基于注解的IOC配置
1.工程环境搭建 2.基于注解的IOC配置 IOC注解的分类 (1)用于创建对象的 他们的作用就和在XML配置文件中编写一个<bean>标签实现的功能是一样的@Component: 作用: ...
- spring基于注解的IoC以及IoC的案例
1.Spring中IoC的常用注解 1.1明确: (1)基于注解的配置和xml的配置要实现的功能都是一样的,都是要降低程序之间的耦合,只是配置的形式不一样 2.案例:使用xml方式和注解方式实现单表的 ...
- 阶段3 2.Spring_08.面向切面编程 AOP_9 spring基于注解的AOP配置
复制依赖和改jar包方式 src下的都复制过来. 复制到新项目里了 bean.xml里面复制上面一行代码到下面.把aop改成context. 配置spring容器创建时要扫描的包 Service的配置 ...
- 基于注解的IOC配置
1 明确 注解配置和XML配置要实现的功能都是一样的,都是要降低程序间的耦合.只是配置的形式不一样. 关于实际的开发中到底是使用XML还是注解,每家公司有着不同的习惯.具体问题具体分析. 2 环境搭建 ...
- spring的基于注解的IOC配置
1.配置文件配置 <?xml version="1.0" encoding="UTF-8"?><beans xmlns="http: ...
- spring基于注解的IOC
曾经的XML配置: <bean id="accountService" class="com.itheima.service.impl.AccountService ...
- 缓存初解(五)---SpringMVC基于注解的缓存配置--web应用实例
之前为大家介绍了如何使用spring注解来进行缓存配置 (EHCache 和 OSCache)的简单的例子,详见 Spring基于注解的缓存配置--EHCache AND OSCache 现在介绍一下 ...
- 缓存初解(三)---Spring3.0基于注解的缓存配置+Ehcache和OScache
本文将构建一个普通工程来说明spring注解缓存的使用方式,关于如何在web应用中使用注解缓存,请参见: Spring基于注解的缓存配置--web应用实例 一.简介 在spring的modules包中 ...
- 8 -- 深入使用Spring -- 4...5 AOP代理:基于注解的“零配置”方式
8.4.5 基于注解的“零配置”方式 AspectJ允许使用注解定义切面.切入点和增强处理,而Spring框架则可识别并根据这些注解来生成AOP代理.Spring只是使用了和AspectJ 5 一样的 ...
随机推荐
- MYSQL 之 JDBC(七):增删改查(五) DAO设计模式
Data Access Object,数据访问对象 what:访问数据信息的类.包含了对数据的CRUD(create.read.update.delete,增删改查)操作,而不包含任何业务相关的信息. ...
- Django- 开发通用且万能的的权限框架组件
本节内容 需求讨论 权限设计 代码设计 自定义权限钩子 业务场景分析 假设我们在开发一个培训机构的 客户关系管理系统,系统分客户管理.学员管理.教学管理3个大模块,每个模块大体功能如下 客户管理销售人 ...
- 分布式任务调度平台 → XXL-JOB 初探
开心一刻 旁边的女乘客太吵,我实在忍无可忍,便对她说:“你能不能让我睡会儿?” 她挥手就给了我一个耳光:“你个臭流氓!” 我顿时就清醒了,理论到:“你让我睡一会怎么了吗” 她害羞的低下了头,说道:“人 ...
- Ethical Hacking - NETWORK PENETRATION TESTING(12)
Post Connection Attacks Sophisticated attacks that can be used after connecting to the target AP. Ga ...
- iview实战 : 树形组件自定义
Tree树形组件是 iview 中相对复杂的一个组件. 自定义节点内容 使用强大的 Render 函数可以自定义节点显示内容和交互,比如添加图标,按钮等. ——官方文档 但官方的 example 只有 ...
- 最全JavaScript基础总结
JavaScript介绍 什么是JavaScript? Javascript是一门面向对象的,跨平台的脚本语言. JavaScript有什么特点? 解释性脚本语言 运行在浏览器(浏览器内核带有js解释 ...
- 什么是viewstate,能否禁用?是否所用控件都可以禁用
viewstate用于在两次postback之间保持状态的一种机制禁用viewstate将不能在回发之间保存状态 当控件状态无关使用viewstate将造成性能问题时需要禁用viewstate Vie ...
- 题解 CF786B 【Legacy】
本题要求我们支持三种操作: ① 点向点连边. ② 点向区间连边. ③ 区间向点连边. 然后跑最短路得出答案. 考虑使用线段树优化建图. 建两颗线段树,入树和出树,每个节点为一段区间的原节点集合.入树内 ...
- socket解决半包、粘包问题
最近项目遇到socket服务端接收报文不全的问题,与其客户端约定的是报文长度+报文体.然而当客户端数据量大的时候,用分包发送,导致服务端报文日志接收不完整,于是想着先读出包体长度,再读出包体,不够就一 ...
- 用x种方式求第n项斐波那契数,99%的人只会第一种
大家好啊,我们又见面了.听说有人想学数据结构与算法却不知道从何下手?那你就认真看完本篇文章,或许能从中找到方法与技巧. 本期我们就从斐波那契数列的几种解法入手,感受算法的强大与奥妙吧. 原文链 ...