
ios 气泡聊天
最近做的项目里面,有几个模块用到了聊天功能和评论回复的功能,使用的频率还是很高的,所以抽时间做了这个博客,希望能给自己和别人带来方便,
具体代码如下:
1,创建model,
#import <Foundation/Foundation.h>

@interface MessageObj : NSObject

@property(nonatomic,copy)NSString *message;

@property(nonatomic,assign)BOOL isMe;

@end
2,自定义cell
1)声明一个label和imageview
@property(nonatomic,strong)UIImageView *messageImg;

@property(nonatomic,strong)UILabel *messageLab;
2)初始化构造方法
-(id)initWithStyle:(UITableViewCellStyle)style reuseIdentifier:(NSString *)reuseIdentifier

{

    self = [super initWithStyle:style reuseIdentifier:reuseIdentifier];

    if (self) {

        //这里只需要初始化,不需要设置具体的坐标

        self.backgroundColor = [UIColor clearColor];

        self.selectionStyle = UITableViewCellSelectionStyleNone;

        _messageImg = [[UIImageView alloc]init];

        [self addSubview:_messageImg];

        _messageLab = [[UILabel alloc]init];

        _messageLab.numberOfLines = ;

        [self addSubview:_messageLab];

    }

    return self;

}
3,准备工作已做好,现在进行聊天功能的完善
1)声明所需的成员变量
@interface ViewController ()<UITextFieldDelegate,UITableViewDelegate,UITableViewDataSource>

{

    UITextField *tf;

    UIView *inputView;

    UIButton *rightBtn;

    UITableView *tableViews;

    int _count;

    NSMutableArray *_datasArray;

}
2)界面的布局,做好适配
- (void)viewDidLoad {

    [super viewDidLoad];

    // Do any additional setup after loading the view.

    _datasArray = [NSMutableArray array];//这里一定要记得初始化

    self.title = @"气泡聊天";

    self.view.backgroundColor = [UIColor whiteColor];

    tableViews = [[UITableView alloc]initWithFrame:CGRectMake(, , MainScreen_width, self.view.bounds.size.height-) style:UITableViewStylePlain];

    tableViews.delegate = self;

    tableViews.dataSource = self;

    tableViews.tableFooterView = [[UIView alloc]init];

    tableViews.separatorStyle = UITableViewCellSeparatorStyleNone;

    [self.view addSubview:tableViews];

    inputView = [[UIView alloc]initWithFrame:CGRectMake(, MainScreen_height - , MainScreen_width, )];

    inputView.backgroundColor = RGBAColor(, , , );

    [self.view addSubview:inputView];

    tf = [[UITextField alloc]initWithFrame:CGRectMake(, , MainScreen_width - , )];

    tf.delegate = self;

    tf.returnKeyType = UIReturnKeyDefault;

    [inputView addSubview:tf];

    rightBtn = [UIButton buttonWithType:UIButtonTypeCustom];

    rightBtn.frame = CGRectMake(MainScreen_width - -, , MainScreen_width - tf.frame.size.width, );

    [rightBtn setTitle:@"发送" forState:UIControlStateNormal];

    [rightBtn setTitleColor:[UIColor whiteColor] forState:UIControlStateNormal];

    [rightBtn addTarget:self action:@selector(btnClick:) forControlEvents:UIControlEventTouchUpInside];

    [inputView addSubview:rightBtn];

    //增加监听,当键盘改变是发出消息

    [[NSNotificationCenter defaultCenter]addObserver:self selector:@selector(keyboardWillShow:) name:UIKeyboardWillShowNotification object:nil];

    //增加监听,当键盘退出时发出消息

    [[NSNotificationCenter defaultCenter]addObserver:self selector:@selector(keyboardWillHide:) name:UIKeyboardWillHideNotification object:nil];

}
注:这里最后,声明了两个通知,这样是为了,监听键盘弹出和弹下的高度,
具体实现如下:
-(void)keyboardWillShow:(NSNotification *)hNotification

{

    //获取键盘的高度

    NSDictionary *userInfo = [hNotification userInfo];

    NSValue *aValue = [userInfo objectForKey:UIKeyboardFrameEndUserInfoKey];

    CGRect keyboardRect = [aValue CGRectValue];

    int height = keyboardRect.size.height;//获取到的键盘的高度

    [UIView animateWithDuration:0.1 animations:^{

        CGRect tableFrame = tableViews.frame;

        tableFrame.size.height = MainScreen_height - height - ;

        tableViews.frame = tableFrame;

        CGRect rect = inputView.frame;

        rect.origin.y = MainScreen_height - height - ;

        inputView.frame = rect;

    }];

}

-(void)keyboardWillHide:(NSNotification *)hNotification

{

    [UIView animateWithDuration:0.1 animations:^{

        CGRect tableViewRect = tableViews.frame;

        tableViewRect.size.height = MainScreen_height- ;

        tableViews.frame = tableViewRect;

        CGRect rect = inputView.frame;

        rect.origin.y = MainScreen_height - ;

        inputView.frame = rect;

    }];

    if (_datasArray.count > )

    {

        //让表的最后一行滚动到表的底部

        NSIndexPath * indexPath = [NSIndexPath indexPathForRow:_datasArray.count- inSection:];

        [tableViews scrollToRowAtIndexPath:indexPath atScrollPosition:UITableViewScrollPositionBottom animated:YES];

    }

}
3)发送按钮的点击方法
-(void)btnClick:(id)sender

{

    _count ++;//这里声明一个int类型的变量是为了下面区分是否是自己

    //这里使用model,会很方便,单独作为对象来使用,方便进行设置

    MessageObj *objets = [[MessageObj alloc]init];

    objets.message = tf.text;

    if (objets.message != nil && [objets.message isEqualToString:@""]) {

        UIAlertView *alertView = [[UIAlertView alloc]initWithTitle:@"温馨体香" message:@"不能为空" delegate:nil cancelButtonTitle:@"取消" otherButtonTitles:nil, nil];

        [alertView show];

        return;

    }else

    {

        //这里通过第一个发送的顺序,设为自己,其他为别人,然后绑定一个bool值的状态,yes为自己,no为别人

        if (_count% == ) {

            objets.isMe = YES;

        }else

        {

            objets.isMe = NO;

        }

        [_datasArray addObject:objets];

        NSLog(@"--%lu",(unsigned long)_datasArray.count);

        [tableViews reloadData];

        //让表的最后一行滚动到表的底部

        NSIndexPath * indexPath = [NSIndexPath indexPathForRow:_datasArray.count- inSection:];

        [tableViews scrollToRowAtIndexPath:indexPath atScrollPosition:UITableViewScrollPositionBottom animated:YES];

        tf.text = nil;

    }

}
注:这里面有比较重要的地方,代码很详细,我就不一一解释了,大家可以自己看
4)表的具体展现和自适应
-(NSInteger)tableView:(UITableView *)tableView numberOfRowsInSection:(NSInteger)section

{

    return _datasArray.count;

}

-(CGFloat)tableView:(UITableView *)tableView heightForRowAtIndexPath:(NSIndexPath *)indexPath

{

    MessageObj *object = _datasArray[indexPath.row];

    CGFloat contentW = MainScreen_width - ;

    UIFont *fnt = [UIFont fontWithName:@"HelveticaNeue" size:18.0f];

    //ios 7 以后的方法,这里得到自适应的高度,从而动态的设置cell的高度

    CGRect tempRect = [object.message boundingRectWithSize:CGSizeMake(contentW, ) options:NSStringDrawingUsesLineFragmentOrigin attributes:[NSDictionary dictionaryWithObjectsAndKeys:fnt,NSFontAttributeName, nil] context:nil];

    CGFloat contenH = tempRect.size.height;

    return contenH + ;

}

-(UITableViewCell *)tableView:(UITableView *)tableView cellForRowAtIndexPath:(NSIndexPath *)indexPath
{
    static NSString *cellIdentifiers = @"CELLES";
    EightyTableViewCell *cell = [tableView cellForRowAtIndexPath:indexPath];
    if (!cell) {

        cell = [[EightyTableViewCell alloc]initWithStyle:UITableViewCellStyleDefault reuseIdentifier:cellIdentifiers];
        cell.selectionStyle = UITableViewCellSelectionStyleDefault;
    }

    MessageObj *object = _datasArray[indexPath.row];
    /*
     CGFloat contentW = MainScreen_width - 34;

     UIFont *fnt = [UIFont fontWithName:@"HelveticaNeue" size:18.0f];

     CGRect tempRect = [object.message boundingRectWithSize:CGSizeMake(320, 1000) options:NSStringDrawingUsesLineFragmentOrigin attributes:[NSDictionary dictionaryWithObjectsAndKeys:fnt,NSFontAttributeName, nil] context:nil];
     CGFloat contenH = tempRect.size.height;
     */

    //在这里进行宽度和高度的自适应
    UIFont *fnt = [UIFont fontWithName:@"HelveticaNeue" size:18.0f];
    CGSize size = CGSizeMake(MainScreen_width,1000);
    CGSize labSize = [object.message sizeWithFont:fnt constrainedToSize:size lineBreakMode:UILineBreakModeWordWrap];


    if (object.isMe == YES) {

        cell.messageLab.frame = CGRectMake(20, 0, labSize.width, labSize.height);
        cell.messageLab.textAlignment = NSTextAlignmentLeft;
        cell.messageLab.numberOfLines = 0;
        cell.messageImg.frame = CGRectMake(10, 0, labSize.width+20, labSize.height+10);
    }else
    {
        cell.messageLab.frame = CGRectMake(MainScreen_width - 20 - labSize.width, 5, labSize.width, labSize.height);
        cell.messageLab.numberOfLines = 0;
        cell.messageLab.textAlignment = NSTextAlignmentRight;
        cell.messageImg.frame = CGRectMake(MainScreen_width - 30 - labSize.width, 2, labSize.width + 20, labSize.height + 10);
    }

    NSString *imageName = object.isMe?@"bubbleSelf.png":@"bubble.png";
    UIImage *oldImage = [UIImage imageNamed:imageName];
    UIImage *newImage = [oldImage stretchableImageWithLeftCapWidth:18 topCapHeight:8];
    cell.messageImg.image = newImage;
    cell.messageLab.font = fnt;
    cell.messageLab.text = object.message;

    return  cell;

}
注:主要就是cellforrow方法里面的lab自适应坐标的设置,还有气泡背景图片的坐标设置,还有heightforrow里面根据lab的高度,动态判定cell的高度
效果图如下:
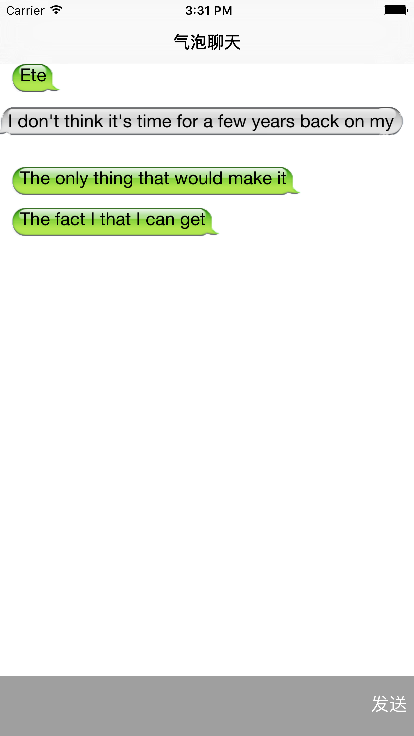
如需源码,可从这里下载:http://code.cocoachina.com/view/131767
ios 气泡聊天的更多相关文章
- DUILIB 实现微信气泡聊天效果
最近由于项目原因,需要做一个产品内嵌的IM聊天系统.而且要象微信类似的效果:界面也要比较炫: 开始考虑用MFC,但MFC的控件自绘很麻烦,后来又考虑QT,倒是使用控件使用方便,但QT库太大,所以也放弃 ...
- 转-Android仿微信气泡聊天界面设计
微信的气泡聊天是仿iPhone自带短信而设计出来的,不过感觉还不错可以尝试一下仿着微信的气泡聊天做一个Demo,给大家分享一下!效果图如下: 气泡聊天最终要的是素材,要用到9.png文件的素材,这样气 ...
- 基于Qt的类QQ气泡聊天的界面开发
近期在写IM 聊天界面,想设计出一个类似QQ气泡聊天的样式 使用了几种办法 1:使用Qt以下的QListview来实现QQ类似效果.差强人意 2:使用QWebview载入html css样式来完毕.发 ...
- Android仿微信气泡聊天界面设计
微信的气泡聊天是仿iPhone自带短信而设计出来的,不过感觉还不错可以尝试一下仿着微信的气泡聊天做一个Demo,给大家分享一下!效果图如下: 气泡聊天最终要的是素材,要用到9.png文件的素材,这样气 ...
- 模仿QQ气泡聊天
尝试了几种方案,想模仿QQ的气泡聊天,总是不尽如意.网上倒是大把的Android和Html的例子,Delphi的没找着,只能自己试着折腾. 1. 用WebBrowser加载本地html,屡次折腾,失败 ...
- android 仿QQ气泡聊天界面
1.现在的QQ,微信等一些APP的聊天界面都是气泡聊天界面,左边是接收到的消息,右边是发送的消息, 这个效果其实就是一个ListView在加载它的Item的时候,分别用了不同的布局xml文件. 2.效 ...
- 第五十八篇、iOS 微信聊天发送小视频的秘密
对于播放视频,大家应该一开始就想到比较方便快捷使用简单的MPMoviePlayerController类,确实用这个苹果官方为我们包装好了的 API 确实有很多事情都不用我们烦心,我们可以很快的做出一 ...
- iOS UI-QQ聊天布局
一.Model BWMessage.h #import <Foundation/Foundation.h> typedef enum{ BWMessageMe = ,//表示自己 BWMe ...
- 聊天界面之气泡文本cell(一)
在实现qq聊天界面的过程中,使用UITableViewCell碰到了不少问题,这里还是记录一下以免遗忘. 气泡聊天cell的实现,网上最多的方法还是: 1.手动计算设置frame的值,文本的size使 ...
随机推荐
- Windows10 64位 Python2.7 Matplotlib安装
为了安装Matplotlib 百度了一大堆,也下载了一大堆安装包,结果还是报错ImportError: DLL load failed: %1 不是有效的 Win32 应用程序. 后来直接从官网看怎么 ...
- JSP页面最终是编译为Servlet执行的
JSP页面最终是编译为Servlet执行的,你可以在Tomcat的%CATALINA_HOME%/work/Catalina/localhost中找到一个文件夹,该文件夹跟你的web-project的 ...
- Python的sys.argv使用说明 通过终端写入环境变量
刚开始使用这个参数的时候,很不明白其含义.网上搜索很多都是贴的官网上面的一则实例,说看懂,就明白.可是,我看不懂.现在在回头看这个参数使用,并不是很麻烦. 举几个小例子就明白了. 创建一个脚本,内容如 ...
- 文件io之——open/close
一个进程默认打开三个文件描述符: STDIN_FILENO 0STDOUT_FILENO 1STDERR_FILENO 2 man 2 open可查看详情: open函数可以打开或者创建一个文件: # ...
- js中Math.round、parseInt、Math.floor和Math.ceil小数取整小结【转】
[摘要:之前常常正在代码中看到Math.round.parseInt.Math.floor战Math.ceil那四个函数,固然晓得效果皆能够返回一个整数,然则对他们四者的差别照样没有太清晰,本日便做一 ...
- spring session实现集群中session共享
本文转自:http://dorole.com/1422/ 使用框架的会话管理工具,也就是本文要说的spring-session,可以理解是替换了Servlet那一套会话管理,既不依赖容器,又不需要改动 ...
- Fastjson 的简单使用<转>
简介 Fastjson是一个Java语言编写的高性能功能完善的JSON库. 高性能 fastjson采用独创的算法,将parse的速度提升到极致,超过所有json库,包括曾经号称最快的jackson. ...
- Android Animation动画效果简介
AlphaAnimation 淡入淡出动画 <alpha>A fade-in or fade-out animation. Represents an AlphaAnimation. a ...
- ubuntu配置apache和cgi
ubuntu配置apache和cgi . 更新源并进行安装,否则后面的下载可能会不成功. sudo apt-get update sudo apt-get upgrade . 安装apache2服务 ...
- 不可在 for 循环体内修改循环变量,防止 for 循环失去控制
不可在 for 循环体内修改循环变量,防止 for 循环失去控制. #include <iostream> /* run this program using the console pa ...