CentOS 6.6 安装 PHP Memcached 扩展
PHP 的 Memcached扩展使用了 libmemcached 库提供的 api 与 memcached 服务端进行交互。它同样提供了一个 session 处理器(memcached)。
PHP 的 Memcached 扩展支持 getMulti,setMulti 等方法,而 Memcache 扩展则不支持;
在安装 Memcached 扩展的时候需要先安装 libmemcached,libmemcached 是 Memcached 的 C 客户端,它具有的优点是低内存,线程安全等特点,在高并发下,稳定性果断提高。
首先安装 libmemcached 1.0.18
进入 /usr/local/src ,下载源码包:
[root@localhost src]# wget https://launchpad.net/libmemcached/1.0/1.0.18/+download/libmemcached-1.0.18.tar.gz
解压:
[root@localhost src]# tar -zxvf libmemcached-1.0.18.tar.gz
进入解压后文件夹:
[root@localhost libmemcached-1.0.18]# cd libmemcached-1.0.18
配置:
[root@localhost libmemcached-1.0.18]# ./configure --prefix=/usr/local/libmemcached --with-memcached
编译和安装:
[root@localhost libmemcached-1.0.18]# make && make install
PHP 的 Memcached 2.2.0 扩展的安装
进入 /usr/lcoal/src ,下载扩展的源码包:
[root@localhost src]# wget https://launchpad.net/libmemcached/+download/memcached-2.2.0.tgz
解压:
[root@localhost src]# tar -zxvf memcached-2.2.0.tgz
进入解压后目录:
[root@localhost src]# cd memcached-2.2.0
用 phpize 给 PHP 动态添加扩展:
[root@localhost memcached-2.2.0]# /usr/local/php/bin/phpize
配置:
[root@localhost memcached-2.2.0]#./configure --with-memcached -with-php-config=/usr/local/php/bin/php-config --with-libmemcached-dir=/usr/local/libmemcached --enable-memcached
如果报错:
configure: error: no, sasl.h is not available. Run configure with --disable-memcached-sasl to disable this check
那么配置改为:
[root@localhost memcached-2.2.0]# ./configure --with-memcached -with-php-config=/usr/local/php/bin/php-config --with-libmemcached-dir=/usr/local/libmemcached --enable-memcached --disable-memcached-sasl
编译和安装:
[root@localhost memcached-2.2.0]# make && make install
安装完成:

这时会生成一个 memcached.so 文件:
/usr/local/php/lib/php/extensions/no-debug-non-zts-20131226/
打开 php.ini 文件,添加一条"extension=/usr/local/php/lib/php/extensions/no-debug-non-zts-20131226/memcached.so"
重启 LNMP。
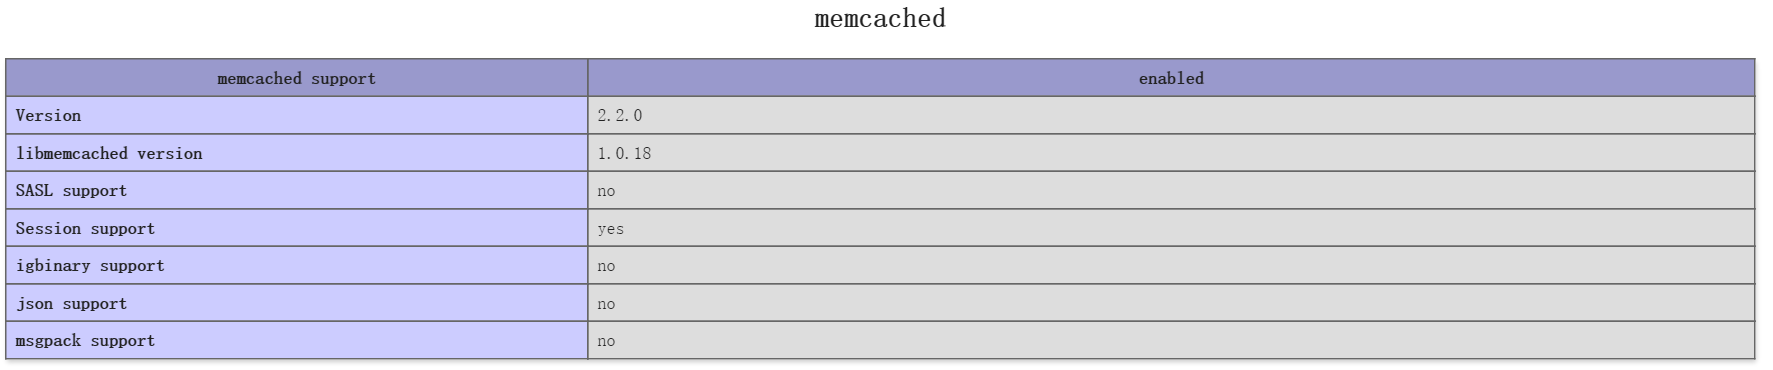
访问 phpinfo:
参考:
Linux基于libmemcached,php扩展memcached的安装
CentOS 6.6 安装 PHP Memcached 扩展的更多相关文章
- centos 安装php7 memcached扩展
在使用下面这种方式安装php7 memcached扩展时,先要安装好memcached服务器yum -y install php70w-pecl-memcached
- 安装PHP memcached扩展
引用 pecl.php.net有两个memcache扩展: memcache memcached extension memcached PHP extension for interfacing ...
- CentOS-6.4 安装 PHP Memcached 扩展
1.获取安装文件包 [root@phpdragon home]# wget https://launchpad.net/libmemcached/1.0/1.0.18/+download/libmem ...
- linux centos系统 php安装GD库扩展
yum --enablerepo=remi-php56 install php-gd php-mysql php-mbstring php-xml php-mcrypt //安装GD库扩展 servi ...
- Cent OS 6.5安装 php memcached扩展
首先查看memcache的依赖库是否有安装,如果对这个有疑问可以参考php手册的memcache的安装需求说明 命令如下: 查询: rpm -qa | grep libevent 安装:yum -y ...
- centos 6.5 安装php redis 扩展
一.安装: 其中,添加PHP扩展需要用到 phpize,所以我们需要安装 php-devel 这个包. #yum install php-devel 然后编译安装phpredis: #git clon ...
- Centos 下php安装配置xdebug扩展
2018年05月02日 19:54:42 杨汉松 阅读数:44 1.下载安装xdebug 获取xdebug wget http://www.xdebug.org/files/xdebug-2.3. ...
- (转发)centos,redhat 系统为php安装memcached扩展
转自:http://www.itnose.net/detail/6111623.html 1. 通过yum安装 yum -y install memcached #安装完成后执行: memcached ...
- centos系统为php安装memcached扩展
1. 通过yum安装 yum -y install memcached #安装完成后执行: memcached -h #出现memcached帮助信息说明安装成功 2. 加入启动服务 chkconfi ...
随机推荐
- PAT (BL) 1001
链接:http://pat.zju.edu.cn/contests/pat-b-practise/1001 /* 1001. 害死人不偿命的(3n+1)猜想 (15) 卡拉兹(Callatz)猜想: ...
- 百度地图API使用记录
用户数据图层的总教程: 就是把用户数据存到LBS云里面,应用从云里面读数据 http://developer.baidu.com/map/jsdevelop-9.htm 上传数据的地方: http:/ ...
- 【BZOJ1426】收集邮票 期望
[BZOJ1426]收集邮票 Description 有n种不同的邮票,皮皮想收集所有种类的邮票.唯一的收集方法是到同学凡凡那里购买,每次只能买一张,并且买到的邮票究竟是n种邮票中的哪一种是等概率的, ...
- POJ 3061 (二分+前缀和or尺取法)
题目链接: http://poj.org/problem?id=3061 题目大意:找到最短的序列长度,使得序列元素和大于S. 解题思路: 两种思路. 一种是二分+前缀和.复杂度O(nlogn).有点 ...
- codeforces round #234B(DIV2) A Inna and Choose Options
#include <iostream> #include <string> #include <vector> using namespace std; ; ,,, ...
- 【Oracle】ORA-28000: the account is locked-的解决办法
ORA-28000: the account is locked第一步:使用PL/SQL,登录名为system,数据库名称不变,选择类型的时候把Normal修改为Sysdba;第二步:选择myjob, ...
- 【bzoj2049】[Sdoi2008]Cave 洞穴勘测 link-cut-tree
2016-05-30 11:04:51 学习了link-cut-tree 二中神犇封禹的讲义感觉讲的超级清晰易懂啊(没有的可以q窝 算是模板吧 #include<bits/stdc++.h&g ...
- Linux_查看linux并发连接数
1.查看Web服务器(Nginx Apache)的并发请求数及其TCP连接状态:netstat -n | awk '/^tcp/ {++S[$NF]} END {for(a in S) print a ...
- 简述unix时间戳
unix时间戳是从1970年1月1日(UTC/GMT的午夜)开始所经过的秒数,不考虑闰秒. Unix时间戳(英文为Unix epoch, Unix time, POSIX time 或 Unix ti ...
- nodejs入门(一)
1.nodejs简介 Nodejs不是一个js应用.而是一个js运行平台. Node.js 使用事件驱动, 非阻塞I/O 模型而得以轻量和高效 2. 1).Nodejs内置了一个HTTP模块 var ...