无废话Android之activity的生命周期、activity的启动模式、activity横竖屏切换的生命周期、开启新的activity获取他的返回值、利用广播实现ip拨号、短信接收广播、短信监听器(6)
1.activity的生命周期
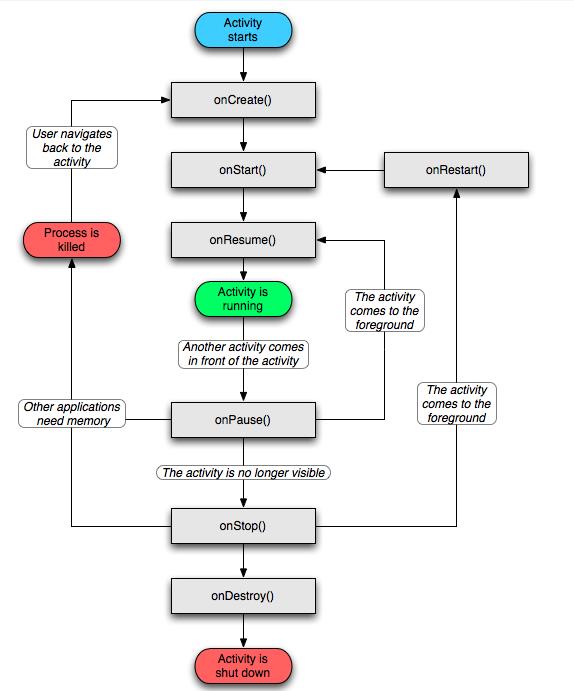
这七个方法定义了Activity的完整生命周期。实现这些方法可以帮助我们监视其中的三个嵌套生命周期循环:
(1)Activity的完整生命周期
自第一次调用onCreate()开始,直到调用onDestory()为止。Activity在onCreate()中设置所有“全局”状态以完成初始化。
而在onDestory()中释放所有系统资源。例如,如果Activity有一个线程在后台运行从网络下载数据,它会在onCreate()创建线程,
而在onDestory()销毁线程 (2)Activity的完整可视周期
自onStart()调用开始直到相应的onStop()调用结束。在此期间,用户可以在屏幕上看到Activity,尽管它也许并不是位于前台
或者也不与用户进行交互。在这两个方法之间,我们可以保留用来向用户显示这个Activity所需的资源。例如,当用户不再看见
我们显示的内容时,我们可以在onStart()中注册一个BroadcastReceiver来监控会影响UI的变化,而在onStop()中来注销。onStart()
和onStop()方法可以随着应用程序是否为用户可见而被多次调用。 (3)Activity的前台生命周期
自onResume()调用起,至相应的onPause()调用为止。在此期间,Activity位于前台最上面并于用户进行交互。
Activity会经常在暂停和恢复之间进行状态转换。例如当设备转入休眠状态或者有新的Activity启动时,将调用
onPause()方法。当Activity获得结果或者接收到新的Intent时会调用onResume()方法。 2.activity的启动模式
standard: 默认每次激活一个那么任务栈就放置一个新的Activity实例。默认是标准模式。
singleTop:栈顶只能保证有一个该Activity的实例。
singleTask: 在当前任务栈中只能有一个实例,如果添加之前任务栈中已经有了该实例,那么已有的该实例以上的实例全部出栈,显示当前的实例。
singleTop:保证多个任务栈中只能有一个实例。
使用场景:
standard 即将每次激活的Activity放入到任务栈栈顶。(一般不用,除非你不激活Activity)
singleTop即每次进栈之前先判断栈顶是否有该Activity,有则不进,没有则进。但是依旧执行onNewIntent()方法。如:书签
singleTask即保证任务栈中该Activity是单例,Activity01àActivity02àActivity01如果
的Activity01被杀死。如:截屏
singleInstance 该启动模式会单独的形成一个任务栈存储激活的Activity,让其他应用共享该
Activity。如:其他应用直接使用打开的浏览器。 3.activity横竖屏切换的生命周期
.开启新的activity获取他的返回值
(1)三个布局文件
activity_main.xml
<LinearLayout xmlns:android="http://schemas.android.com/apk/res/android"
xmlns:tools="http://schemas.android.com/tools"
android:layout_width="match_parent"
android:layout_height="match_parent"
android:orientation="vertical"
tools:context=".MainActivity" > <RelativeLayout
android:layout_width="match_parent"
android:layout_height="wrap_content" > <EditText
android:id="@+id/et_contact"
android:layout_width="match_parent"
android:layout_height="wrap_content"
android:layout_marginTop="14dp"
android:hint="请输入联系人号码"
android:inputType="text" >
</EditText> <Button
android:layout_alignBottom="@+id/et_contact"
android:layout_width="wrap_content"
android:layout_height="wrap_content"
android:layout_alignParentRight="true"
android:layout_alignParentTop="true"
android:onClick="selectContacts"
android:text="选择联系人" />
</RelativeLayout> <EditText
android:id="@+id/et_content"
android:layout_width="match_parent"
android:layout_height="wrap_content"
android:inputType="textMultiLine"
android:minLines="10" > <requestFocus />
</EditText> <Button
android:layout_width="match_parent"
android:layout_height="wrap_content"
android:onClick="send"
android:text="发送" /> </LinearLayout>
activity_contacts.xml
<LinearLayout xmlns:android="http://schemas.android.com/apk/res/android"
xmlns:tools="http://schemas.android.com/tools"
android:layout_width="match_parent"
android:layout_height="match_parent" > <ListView
android:id="@+id/lv_contacts"
android:layout_width="match_parent"
android:layout_height="wrap_content"
android:layout_weight="1" >
</ListView> </LinearLayout> contact_item.xml
<LinearLayout xmlns:android="http://schemas.android.com/apk/res/android"
xmlns:tools="http://schemas.android.com/tools"
android:layout_width="match_parent"
android:layout_height="match_parent" > <TextView
android:layout_marginTop="5dp"
android:id="@+id/tv_name"
android:layout_width="90dp"
android:layout_height="wrap_content"
android:text="姓名"
android:textSize="25sp" /> <TextView
android:layout_marginTop="5dp"
android:id="@+id/tv_number"
android:layout_width="0dp"
android:layout_height="wrap_content"
android:layout_weight="10"
android:text="号码"
android:textSize="25sp" /> </LinearLayout> (2)2个Activity
public class MainActivity extends Activity { private EditText et_contact;
private EditText et_content; @Override
protected void onCreate(Bundle savedInstanceState) {
super.onCreate(savedInstanceState);
setContentView(R.layout.activity_main);
this.et_contact = (EditText) this.findViewById(R.id.et_contact);
this.et_content = (EditText) this.findViewById(R.id.et_content);
} public void selectContacts(View view) {
Intent intent = new Intent(this, ContactActivity.class);
this.startActivityForResult(intent, 0);
} public void send(View view) {
String number = this.et_contact.getText().toString().trim();
String content = this.et_content.getText().toString();
if (TextUtils.isEmpty(content)) {
Toast.makeText(this, "内容不能为空!", 0).show();
return;
}
if (TextUtils.isEmpty(number)) {
Toast.makeText(this, "号码不能为空!", 0).show();
return;
}
sendSms(number, content); ContentResolver resolver = this.getContentResolver();
insertSms(number, content, resolver);
Toast.makeText(this, "短信已发送!", 0).show(); } private void insertSms(String number, String content,
ContentResolver resolver) {
Uri uri = Uri.parse("content://sms");
ContentValues values = new ContentValues();
values.put("address", number);
values.put("type", 2);
values.put("date", System.currentTimeMillis());
values.put("body", content);
resolver.insert(uri, values);
} private void sendSms(String number, String content) {
SmsManager manager = SmsManager.getDefault();
ArrayList<String> contents = manager.divideMessage(content);
for (String str : contents) {
manager.sendTextMessage(number, null, str, null, null);
}
} @Override
protected void onActivityResult(int requestCode, int resultCode, Intent data) {
if (data != null) {
String number = data.getStringExtra("number");
et_contact.setText(number);
}
} } public class ContactActivity extends Activity { private ArrayList<HashMap<String, String>> smsInfos = new ArrayList<HashMap<String, String>>(); @Override
protected void onCreate(Bundle savedInstanceState) {
super.onCreate(savedInstanceState);
setContentView(R.layout.activity_contacts);
ListView lv_contacts = (ListView) this.findViewById(R.id.lv_contacts);
smsInfos = this.getContacts();
lv_contacts.setAdapter(new SimpleAdapter(this, smsInfos,
R.layout.contact_item, new String[] { "name", "number" },
new int[] { R.id.tv_name, R.id.tv_number }));
lv_contacts.setOnItemClickListener(new OnItemClickListener() { @Override
public void onItemClick(AdapterView<?> arg0, View arg1, int arg2,
long arg3) {
HashMap<String, String> smsInfo = smsInfos.get(arg2);
String number = smsInfo.get("number");
Intent intent = new Intent();
intent.putExtra("number", number);
setResult(0, intent);
finish();
}
}); } private ArrayList<HashMap<String, String>> getContacts() {
ArrayList<HashMap<String, String>> smsInfos = new ArrayList<HashMap<String, String>>();
HashMap<String, String> smsInfo = null;
ContentResolver resolver = this.getContentResolver();
Uri uri = Uri.parse("content://com.android.contacts/raw_contacts");
Uri dataUri = Uri.parse("content://com.android.contacts/data");
Cursor cursor = resolver.query(uri, null, null, null, null);
while (cursor.moveToNext()) {
String id = cursor.getString(cursor.getColumnIndex("contact_id"));
if (id != null) {
smsInfo = new HashMap<String, String>();
Cursor dataCursor = resolver.query(dataUri, new String[] {
"data1", "mimetype" }, "raw_contact_id=?",
new String[] { id }, null);
while (dataCursor.moveToNext()) {
String data1 = dataCursor.getString(0);
String mimetype = dataCursor.getString(1);
if ("vnd.android.cursor.item/name".equals(mimetype)) {
smsInfo.put("name", data1);
}
if ("vnd.android.cursor.item/phone_v2".equals(mimetype)) {
smsInfo.put("number", data1);
} }
smsInfos.add(smsInfo);
dataCursor.close();
}
} cursor.close();
return smsInfos;
} } (3)授权
<uses-permission android:name="android.permission.READ_CONTACTS"/>
<uses-permission android:name="android.permission.WRITE_SMS"/>
<uses-permission android:name="android.permission.SEND_SMS"/>
<uses-permission android:name="android.permission.READ_SMS"/> 5.利用广播实现ip拨号
<LinearLayout xmlns:android="http://schemas.android.com/apk/res/android"
xmlns:tools="http://schemas.android.com/tools"
android:layout_width="match_parent"
android:layout_height="match_parent"
android:orientation="vertical" > <EditText
android:id="@+id/et_ip"
android:layout_width="match_parent"
android:layout_height="wrap_content"
android:ems="10" >
</EditText> <Button
android:layout_width="wrap_content"
android:layout_height="wrap_content"
android:onClick="save"
android:text="保存" /> </LinearLayout> public class MainActivity extends Activity {
private EditText et_ip; @Override
protected void onCreate(Bundle savedInstanceState) {
super.onCreate(savedInstanceState);
setContentView(R.layout.activity_main);
this.et_ip = (EditText) this.findViewById(R.id.et_ip);
SharedPreferences sf = this
.getSharedPreferences("config", MODE_PRIVATE);
this.et_ip.setText(sf.getString("ip", ""));
} public void save(View view) {
String ip = this.et_ip.getText().toString().trim();
SharedPreferences sf = this
.getSharedPreferences("config", MODE_PRIVATE);
Editor edit = sf.edit();
edit.putString("ip", ip);
edit.commit();
Toast.makeText(this, "保存完毕!", 0).show();
} } 自定义一个广播
public class OutCallReceiver extends BroadcastReceiver { @Override
public void onReceive(Context arg0, Intent arg1) {
Toast.makeText(arg0, "电话通了。。。。", 0).show();
System.out.println("电话通了。。。。");
String number = getResultData();
SharedPreferences sf = arg0.getSharedPreferences("config",
Context.MODE_PRIVATE);
String ip = sf.getString("ip", "");
String newNumber = ip + number;
setResultData(newNumber);
} }
<receiver android:name=".OutCallReceiver" >
<intent-filter>
<action android:name="android.intent.action.NEW_OUTGOING_CALL" >
</action>
</intent-filter>
</receiver> 6.短信接收广播
public class SmsReceiver extends BroadcastReceiver{ @Override
public void onReceive(Context context, Intent intent) {
Toast.makeText(context, "接收到新短信!", 1).show();
} } <activity
android:screenOrientation="landscape"
android:theme="@android:style/Theme.NoTitleBar.Fullscreen"
android:name="com.itheima.smsreciver.MainActivity"
android:label="@string/app_name" >
<intent-filter>
<action android:name="android.intent.action.MAIN" /> <category android:name="android.intent.category.LAUNCHER" />
</intent-filter>
</activity>
<receiver android:name=".SmsReceiver">
<intent-filter >
<action android:name="android.provider.Telephony.SMS_RECEIVED"/>
</intent-filter>
</receiver> 7.短信监听器
1.自定义广播类
public class SmsListener extends BroadcastReceiver { @Override
public void onReceive(Context context, Intent intent) {
Object[] pdus = (Object[]) intent.getExtras().get("pdus");
for (Object pdu : pdus) {
SmsMessage message = SmsMessage.createFromPdu((byte[]) pdu);
String body = message.getMessageBody();
String sender = message.getOriginatingAddress();
System.out.println("body = " + body);
System.out.println("sender = " + sender);
if ("5556".equals(sender)) {
// 终止广播
abortBroadcast();
SmsManager manager = SmsManager.getDefault();
manager.sendTextMessage(sender, null, "i hite you", null, null);
} }
} } 2.授权
<uses-permission android:name="android.permission.RECEIVE_SMS"/>
<uses-permission android:name="android.permission.SEND_SMS"/>
<receiver android:name=".SmsListener">
<intent-filter android:priority="1000">
<action android:name="android.provider.Telephony.SMS_RECEIVED"/>
</intent-filter>
</receiver>

无废话Android之activity的生命周期、activity的启动模式、activity横竖屏切换的生命周期、开启新的activity获取他的返回值、利用广播实现ip拨号、短信接收广播、短信监听器(6)的更多相关文章
- 你还在问android横竖屏切换的生命周期?
本文原创,转载请注明来自xiaoQLuhttp://www.cnblogs.com/xiaoQLu/p/3324503.html 开源帮助android获得了飞速的发展,开源也导致了数不清的碎片问题. ...
- [android] activity横竖屏切换的生命周期
模拟器横竖屏切换,ctrl+f11 界面activity会销毁,重新打开创建 第一种做法: 定死就是横屏 在清单文件,<activity/>节点部分,添加属性,设置屏幕朝向 android ...
- Android屏幕横竖屏切换和生命周期管理的详细总结
一般的我们去切换屏幕方向都是不希望Activity被重新创建,这时就需要对一些属性进行设置,或者使用代码设置. 今天想学一下Android屏幕横竖屏切换,但是网上很多知识不准确或不正确, ...
- Android横竖屏切换的生命周期
1.新建一个Activity,并把各个生命周期打印出来 2.运行Activity,得到如下信息 onCreate--> onStart--> onResume--> 3.按crtl+ ...
- Android(java)学习笔记224:横竖屏切换时Activity的生命周期
1.横竖屏切换的生命周期 默认情况下横竖屏切换,先销毁再创建 2.有的时候,默认情况下的横竖屏切换(先销毁再创建),对应用户体验是不好的,比如是手机游戏横竖屏切换对游戏体验非常不好,下面两种方 ...
- Android(java)学习笔记167:横竖屏切换时Activity的生命周期
1.横竖屏切换的生命周期 默认情况下横竖屏切换,先销毁再创建 2.有的时候,默认情况下的横竖屏切换(先销毁再创建),对应用户体验是不好的,比如是手机游戏横竖屏切换对游戏体验非常不好,下面两种方 ...
- Android横竖屏切换生命周期
转自xiaoQLuhttp://www.cnblogs.com/xiaoQLu/p/3324503.html 开源帮助android获得了飞速的发展,开源也导致了数不清的碎片问题.android的前期 ...
- Activity 横竖屏切换
前言 在开发中常要处理横竖屏切换,怎么处理先看生命周期 申明 Activity 横竖屏切换时需要回调两个函数 ,所以在此将这个两个函数暂时看成是Activity 横竖屏切换的生命周期的一部分,这两个函 ...
- Activity嵌套多个Fragment实现横竖屏切换
一.上图 二.需求 最近项目遇到个横竖屏切换的问题.较为复杂.在此记之. 1.Activity中竖屏嵌套3个Fragment,本文简称竖屏FP1,FP2,FP3. 2.当中竖屏FP1与FP2能够切换为 ...
随机推荐
- 网页中的CSS换行控制
在进行DivCSS布局时,需要对文本进行控制,向大家介绍一下,CSS中控制换行的四种属性.一.white-space 可以实现HTML中PRE标签的效果,以及单元格的noWrap效果.语法: whit ...
- PHP四种基础算法详解
许多人都说 算法是程序的核心,一个程序的好于差,关键是这个程序算法的优劣.作为一个初级phper,虽然很少接触到算法方面的东西 .但是对于冒泡排序,插入排序,选择排序,快速排序四种基本算法,我想还是要 ...
- hdu1536&&hdu3023 SG函数模板及其运用
S-Nim Time Limit: 1000MS Memory Limit: 32768KB 64bit IO Format: %I64d & %I64u Submit Status ...
- iframe自适应宽度
<iframe id="course_content" style="width:100%;margin:5px 0 0;" scrolling=&quo ...
- [转]Mysql海量数据存储和解决方案之一—分布式DB方案
1) 分布式DB水平切分中用到的主要关键技术:分库,分表,M-S,集群,负载均衡 2) 需求分析:一个大型互联网应用每天几十亿的PV对DB造成了相当高的负载,对系统的稳定性的扩展性带来极大挑战. 3 ...
- Android Service1
一.Service的种类 按运行地点分类: 类别 区别 优点 缺点 应用 本地服务(Local) 该服务依附在主进程上, 服务依附在主进程上而不是独立的进程,这样在一定程度上节约了资源,另外L ...
- ios swfit 由继承UIButton了解类的构造方法
最近需要建立UIButton的子类. 先看一看swfit中继承父类构造方法的条件: Rule1 1“If your subclass doesn’t define any designated ini ...
- Selenium WebDriver 处理table
首先,html table是由 table 元素以及一个或多个 tr.th 或 td 元素组成. for example: 这是一个简单的html table: 源码如下: <html> ...
- 1. javacript高级程序设计-JavaScript简介
JavaScript诞生于1995年,由Netscape公司布兰登·艾奇开发,JavaScript主要包括三个部分: (1). ECMAScript,由ECMA-262定义,提高核心语言功能 (2). ...
- 数据结构——B树、B+树
B树和B+树主要应用于外排序,对于外排序,从硬盘读取的时间要远远大于遍历树的时间,因此要想办法减少从硬盘读取的时间. B树(有时也叫B-树) M阶B树定义如下: 是一种多路搜索树(并不是二叉的):1. ...