Flask使用记录
关于FLASK框架的使用
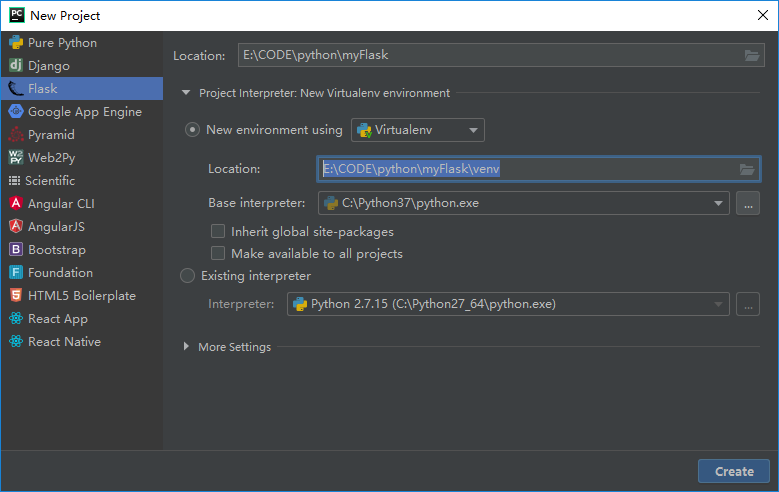
使用pycharm创建工程
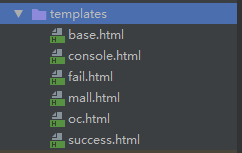
在默认的templates中新增模板页面
在默认的app.py中定义路由并引用模板
@app.route("/add", methods=["GET", "POST"])

def add():

    if request.method != 'POST':

        return render_template("login.html",info="请先登录系统")

    else:
     username = request.form.get('username')

        return render_template("add.html")
关于日志,可以使用FLASK自带的LOG模块
from flask import current_app

current_app.logger.info("登录用户名:" + account)
关于模板的使用
我创建了一个base.html基础模板用于继承
<!DOCTYPE html>
<html lang="en">
<head>
{% block head %}
<meta charset="UTF-8">
<link rel="stylesheet" href="../static/css/page.css"/>
<script type="text/javascript" src="../static/js/jquery.min.js"></script>
<script type="text/javascript" src="../static/js/index.js"></script>
<title>{% block title %}{% endblock %} - 操作平台</title>
{% endblock %}
</head>
<body>
<div class="left">
<div class="bigTitle">CA操作平台</div>
<div class="lines">
{% for menu in menu_list %}
{% if choice==loop.index0 %}
<div onclick="pageClick(this,{{ loop.index0 }})" class="active"><img
src="static/img/icon-{{ loop.index }}.png"/>
{{ menu }}
</div>
{% else %}
<div onclick="pageClick(this,{{ loop.index0 }})"><img src="static/img/icon-{{ loop.index }}.png"/>
{{ menu }}
</div>
{% endif %}
{% endfor %}
</div>
</div>
<div class="top">
<div class="leftTitle" id="flTitle">{{ menu_list[choice] }}</div>
<div class="thisUser">{{ user_info }}</div>
</div>
<div class="main">
<div class="mainForm">
{% block content %}
{% with messages = get_flashed_messages(with_categories=true) %} {# 对应:flash("请选择商品类型!", 'error') #}
{% if messages %}
{% for category,message in messages %}
<span class={{ category }}>{{ message }}</span>
{% endfor %}
{% else %}
{% endif %}
{% endwith %}
{% endblock %}
</div>
</div>
<!--<div id="footer">-->
<!--{% block footer %}-->
<!--© Copyright 2008 by <a href="http://domain.invalid/">Keyba</a>.-->
<!--{% endblock %}-->
<!--</div>-->
</body>
</html>
其它模板
 {% extends "base.html" %}

 {% block title %}

 {{ title }}

 {% endblock %}

 {% block content %}

 <div class="contentTitle">

     <span style="color: green; ">{{title}}</span>

     <table align="center">

         {% for row in rows %}

         <tr>

             {% for col in row %}

             <td>{{col}}</td>

             {% endfor %}

         </tr>

         {% endfor %}

     </table>

     <p align="center">

         <input type="button" name="Submit" class="button button1" onclick="history.back();" value="返回">

     </p>

 </div>

 {% endblock %}
关于FORM
建立MyForm类,这里使用了DataRequired, Email, Length三种校验方式,这里的role(下拉列表SelectField)没有设置choices属性值是为了后面可以动态from flask_wtf import FlaskFormfrom wtforms import StringField, TextAreaField, SubmitField, SelectFieldfrom wtforms.validators import DataRequired, Email, Length
class MyForm(FlaskForm):

    new_user = StringField(label='新账号:', validators=[DataRequired("请输入新的后台账号"), Length(6, 20, '账号长度为6到20位')],

                           description="请输入新的后台账号", render_kw={"required": "required"})

    email = StringField(label='邮箱:', validators=[DataRequired("请输入邮箱"), Email('邮箱格式错误')], description="请输入邮箱",

                        render_kw={"required": "required"})

    role = SelectField(label='角色:')

    label = '用户类型:'

    user_type = RadioField(label=label)

    submit = SubmitField('注册后台账号', render_kw={"class": "button button1"})
配置路由,并更新role下拉列表的值
from forms import MyForm
app.config['SECRET_KEY'] = 'string'  # 通过csrf

@app.route('/add/', methods=("GET", "POST"))

def add():

    form = MyForm()  # 这里的form只会进行一次赋值,POST请求过来时,不会更新,即可以重用。

    roles_list = [(str(d.get('roleId')), str(d.get("roleName"))) for d in all_roles]

    oc_form.role.choices = roles_list  # 这里我们对之前的role进行重新赋值

    form.user_type.choices = (['', ''], ['', ''])

    form.user_type.default = ''

    form.process()  # 这里我们刷新form,以使用户类型这个radioButton更新

    if request.method == 'POST' and form.validate_on_submit():

        return render_template("success.html", title="新增用户成功")

        # return redirect(url_for('pageTo', page=1)

return render_template('add.html', form=form)
对于多个提交的判断,我们可以这样写
add_user = SubmitField('注册', render_kw={"class": "button button1"})

auth_user = SubmitField('认证', render_kw={"class": "button button1"})

add_something = SubmitField('发布', render_kw={"class": "button button1"})
form = MallUserForm()

    if request.method == 'POST':

        if form.add_user.data:

            return add_mall_user(form)

        elif form.auth_user.data:

            return auth_user(form)

        elif form.add_something.data:

            if form.mall_type.data != 'None':

                return add_goods(form)

            else:

                flash("请选择商品类型!", 'error')

                return redirect(url_for('mall_index'))
HTML模板
<form name="baseForm" action="" role="form" method="post">

    <div class="contentTitle">后台账号操作</div>

    {% for item in form %}

        {% if item!=form.submit %}

            {% if item!=form.role %}

                <div>

                    {{ item.label }}{{ item(size=20) }} <!-- 定义size -->

                </div>

            {% else %}

                    {{ item.label }}{{ item }} <!-- 下拉列表框 -->

            {% endif %}

        {% else %}

            <div class="center">

                {{ item }} <!-- 提交按钮 -->

            </div>

        {% endif %}

    {% endfor %}

</form>
Flask使用记录的更多相关文章
- [ZHUAN]Flask学习记录之Flask-SQLAlchemy
From: http://www.cnblogs.com/agmcs/p/4445583.html 各种查询方式:http://www.360doc.com/content/12/0608/11/93 ...
- Flask学习记录之Flask-SQLAlchemy
Flask-SQLAlchemy库让flask更方便的使用SQLALchemy,是一个强大的关系形数据库框架,既可以使用orm方式操作数据库,也可以使用原始的SQL命令. Flask-Migrate ...
- 部署一个flask服务记录
最近使用flask写了一些简单的服务. 服务部署到服务器上进行使用,这个过程会有一些问题,需要进行记录一下. 说明运行的环境情况.使用的是python3.6的虚拟环境,系统是centos7,其他的有u ...
- flask 开发记录
from flask import request 判断method方式 request.method 'POST', ‘GET’ 获取form内容 request.form['form_name' ...
- Flask学习记录之Flask-Login
Flask-Loging 可以方便的管理用户会话,保护路由只让认证用户访问 http://flask-login.readthedocs.org/en/latest/ 一.初始化Flask-Login ...
- Flask学习记录之Flask-Admin
相信用过Django框架的都不会忘记它强大的Admin功能,Flask-admin是一款能够与Django Admin所媲美的扩展,能够快速创建Web管理界面,实现了用户.文件增删改查等常用功能:也可 ...
- Flask学习记录之MarkDown编辑文本
为了让网页支持markdown编辑文本,使用如下了4个库 PageDown : 在前端提供一个可以实时将markdown内容转换成html文本进行效果预览的编辑器 Flask-PageDown: 这个 ...
- Flask学习记录之Flask-Migrate
一.配置Flask-Migrate from flask.ext.migrate import Migrate, MigrateCommand migrate = Migrate(app,db) #第 ...
- Flask学习记录之Flask-WTF
Flask-wtf时Wtforms库的flask框架扩展,能够方便的处理Web表单 一.定义一个web表单 使用flask-wtf时,每个web表单都由一个继承自flask.ext.wtf.Form的 ...
- Flask学习记录之Flask-Moment
Moment.js 是一个简单易用的轻量级JavaScript日期处理类库,提供了日期格式化.日期解析等功能.它支持在浏览器和NodeJS两种环境中运行.此类库能够 将给定的任意日期转换成多种不同的格 ...
随机推荐
- 简单的PHP单例模式
class MySQL { private static $instance; // 阻止外部实例化 private function __construct() { # code... } // 阻 ...
- 生产者消费者synchronized wait notify
package ProduceQueueProduce; import java.util.Queue; public class ProducerThread extends Thread { pu ...
- C语言数据结构基础学习笔记——静态查找表
查找:在数据集合中寻找满足某种条件的数据元素的过程称为查找. 查找表:用于查找的数据集合称为查找表,一般有以下操作:①查找是否在表中:②查找属性:③进行操作. 查找表又分为: ①静态查找表:只可以进行 ...
- Oracle数据库中OVER()函数的了解
1.over函数介绍: 开窗函数,Oracle从8.1.6开始提供分析函数,分析函数用于计算基于组的某种聚合值,它和聚合函数的不同之处是:对于每个组返回多行,而聚合函数对于每个组只返回一行. ...
- 基于bootstrap table配置的二次封装
准备 jQuery js css 引用完毕 开始 如果对bootstrap table 的方法与事件不熟悉: Bootstrap table方法,Bootstrap table事件 <table ...
- input file禁用手机本地文件选择,只允许拍照上传图片
<input type="file" accept="image/*" capture="camera"> 会有个问题,上传的图 ...
- zabbix自动发现华为,H3C交换机
一.添加自动发现规则 1.ip范围尽量别太大 zabbix是通过ARP来搜索符合条件的主机的 2.团体名和交换机要一样.这个OID值是提取系统信息的 在OID这块遇到个坑 我用Getif查询到的是1. ...
- azkaban使用--邮件发送配置
前置条件:你的服务器是可以连外网. 当任务是异步定时的,我们对于结果的感知往往没有手动跑脚本那么及时,但是如果任何一个任务运行失败可能都会引起一些列问题,在这个情况下消息通知就很重要了,azkaban ...
- azkaban使用--传入动态参数
转: azkaban的工作流中的参数可以分为如下几个类型:azkaban UI 页面输入参数, 环境变量参数, job作业文件中定义的参数,工作流的用户定义的属性文件,上游作业传递给下游的参数,工作流 ...
- sublime_text3代码自动补全
因为项目需要用sublime_text3编辑器,安装之后代码自动补全功能没有,这比较苦恼. 其实蛮简单的 英文界面:menu->Preferences->Setting-User-> ...