Map的深浅拷贝的探究
1. 复制map示例
首先看一个例子,当我使用不同方法将一个源map拷贝到另一个map后,改变源map,复制后的map理应不受影响
import java.math.BigDecimal;

import java.util.HashMap;

import java.util.Iterator;

import java.util.Map;

import java.util.Map.Entry;

public class MapTest {

    public static void main(String[] args) {

        Map<String, BigDecimal> detailsmap = new HashMap<String, BigDecimal>();

        Map<String, BigDecimal> detailsmapByEquals = new HashMap<String, BigDecimal>();

        Map<String, BigDecimal> detailsmapByPutAll = new HashMap<String, BigDecimal>();

        Map<String, BigDecimal> detailsmapByIterator = new HashMap<String, BigDecimal>();

        detailsmap.put("key1", new BigDecimal("123.22"));

        detailsmap.put("key2", new BigDecimal("156.2"));

        // 通过“=”的方式复制map对象

        detailsmapByEquals = detailsmap;

        // 通过putAll的方式复制map对象

        detailsmapByPutAll.putAll(detailsmap);

        // 通过iterator的方式复制map对象

        mapCopy(detailsmapByIterator, detailsmap);

        System.out.println("detailsmap 的内容为:" + detailsmap);

        detailsmap.remove("key2");

        System.out.println("移除key2的 detailsmap 的内容为:" + detailsmap);

        System.out.println("通过  “=” 复制的map当前值为:" + detailsmapByEquals);

        System.out.println("通过  “putAll方法” 复制的map当前值为:" + detailsmapByPutAll);

        System.out.println("通过  “iterator方法” 复制的map当前值为:" + detailsmapByIterator);

    }

    public static void mapCopy(Map detailsmapByIterator, Map detailsmap) {

        // 将detailsmap内容拷贝到detailsmapByIterator

        if (detailsmapByIterator == null) {

            detailsmapByIterator = new HashMap();

        }

        if(detailsmap == null){

            return;

        }

        Iterator it = detailsmap.entrySet().iterator();

        while(it.hasNext()){

            Map.Entry entry = (Entry) it.next();

            Object key = entry.getKey();

            detailsmapByIterator.put(key, detailsmap.get(key) != null?detailsmap.get(key):"");

        }

    }

}
查看输出:

可以看到通过“=”复制的map内容随源map的改变而改变,而通过putAll方法和Iterator复制的map则不受源map改变的影响。
2. Map的两种拷贝类型
Map的拷贝分为两种情况:
- 浅拷贝:只拷贝对象的引用,两个引用仍然指向同一个对象,在内存中占用同一块内存。被拷贝对象的所有变量都含有与原来的对象相同的值,而所有的对其他对象的引用仍然指向原来的对象。即浅拷贝仅仅拷贝对象的引用,而不拷贝它所引用的对象。
- 深拷贝:被拷贝对象的所有变量都含有与原来的对象相同的值,除去那些引用其他对象的变量。那些引用其他对象的变量将指向被拷贝过的新对象,而不再是原有的那些被引用的对象。即深拷贝把要拷贝的对象所引用的对象都拷贝了一遍。
如示例中的三种拷贝方法:针对map中的数据为统一的、简单的基本数据类型,当拷贝的数据通过“=”复制map的方法为浅拷贝,putAll方法为深拷贝,iterator遍历添加的方式为深拷贝。
3. putAll方法并非深拷贝
两种深拷贝方法,iterator遍历添加的方式,由于是重新创建了一个对象,且遍历添加源Map的元素,因此在内存中另开辟了一块内存,毋庸置疑是深拷贝;而对于putAll方法参考其源码:
    /**

     * Copies all of the mappings from the specified map to this map.

     * These mappings will replace any mappings that this map had for

     * any of the keys currently in the specified map.

     *

     * @param m mappings to be stored in this map

     * @throws NullPointerException if the specified map is null

     */

    public void putAll(Map<? extends K, ? extends V> m) {

        int numKeysToBeAdded = m.size();

        if (numKeysToBeAdded == 0)

            return;

        /*

         * Expand the map if the map if the number of mappings to be added

         * is greater than or equal to threshold.  This is conservative; the

         * obvious condition is (m.size() + size) >= threshold, but this

         * condition could result in a map with twice the appropriate capacity,

         * if the keys to be added overlap with the keys already in this map.

         * By using the conservative calculation, we subject ourself

         * to at most one extra resize.

         */

        if (numKeysToBeAdded > threshold) {

            int targetCapacity = (int)(numKeysToBeAdded / loadFactor + 1);

            if (targetCapacity > MAXIMUM_CAPACITY)

                targetCapacity = MAXIMUM_CAPACITY;

            int newCapacity = table.length;

            while (newCapacity < targetCapacity)

                newCapacity <<= 1;

            if (newCapacity > table.length)

                resize(newCapacity);

        }

        for (Map.Entry<? extends K, ? extends V> e : m.entrySet())

            put(e.getKey(), e.getValue());

    }
通过源码可以看到putAll() 方法的实现仅仅是将源Map的第一层put进Map中,这种方式对于value为基本类型的map复制是实现深拷贝的效果的,但是当value为对象时,是不会奏效的。这里简单使用源Map内嵌Map的方式测试putAll方法,看其是否实现了深层次的复制:
import java.util.HashMap;

import java.util.Map;

public class MapDeepCopy {

    @SuppressWarnings("unchecked")

    public static void main(String[] args) {

        Map<String, Object> map = new HashMap<String, Object>();

        Map<String, Object> mapCopy = new HashMap<String, Object>();

        // Map中要嵌套Map

        Map mapInner = new HashMap();

        mapInner.put("num", "100");

        map.put("key1", mapInner);

        map.put("key2", "600");

        // 复制

        mapCopy.putAll(map);

        System.out.println("使用“putAll”方法复制map到mapCopy中,此时mapCopy值为:————"+mapCopy);

        // 更改复制之后的map中内嵌map的内容

        ((Map) mapCopy.get("key1")).put("num", "200");

        System.out.println("更改复制之后的mapCopy内容,更改之后mapCopy值为:————"+mapCopy);

        System.out.println("此时源map map的值为:————"+map);// 源Map也被改变

    }

}
输出如下,说明map和mapCopy中的mapInner元素使用的还是同一块内存:

4. Map深拷贝的实现
有一种方法,是使用序列化的方式来实现对象的深拷贝,但是前提是,对象必须是实现了Serializable接口才可以,Map本身没有实现 Serializable 这个接口,所以这种方式不能序列化Map,也就是不能深拷贝Map。但是HashMap是可以的,因为它实现了 Serializable。下面的方式,基于HashMap来讲,非Map的拷贝。
  /**

     * @Title: 对象深度克隆---使用序列化进行深拷贝

     * @Description:  使用序列化的方式来实现对象的深拷贝,但是前提是,对象必须是实现了 Serializable接口才可以,Map本身没有实现

                      Serializable 这个接口,所以这种方式不能序列化Map,也就是不能深拷贝Map。但是HashMap是可以的,因为它

                      实现了Serializable。

     * @param obj

     * @return T

     */

    @SuppressWarnings("unchecked")

    public static <T extends Serializable> T clone(T obj) {

        T clonedObj = null;

        try {

            ByteArrayOutputStream baos = new ByteArrayOutputStream();

            ObjectOutputStream oos = new ObjectOutputStream(baos);

            oos.writeObject(obj);

            oos.close();

            ByteArrayInputStream bais = new ByteArrayInputStream(

                    baos.toByteArray());

            ObjectInputStream ois = new ObjectInputStream(bais);

            clonedObj = (T) ois.readObject();

            ois.close();

        } catch (Exception e) {

            e.printStackTrace();

        }

        return clonedObj;

    }
调用
import java.io.ByteArrayInputStream;
import java.io.ByteArrayOutputStream;
import java.io.ObjectInputStream;
import java.io.ObjectOutputStream;
import java.io.Serializable;
import java.util.ArrayList;
import java.util.HashMap;
import java.util.List; public class MapTest { public static void main(String[] args) { List<Integer> list = new ArrayList<Integer>();
list.add(100);
list.add(200); HashMap<String, Object> map = new HashMap<String, Object>();
// 放基本类型数据
map.put("basic", 100);
// 放对象
map.put("list", list); HashMap<String, Object> mapNew = new HashMap<String, Object>();
mapNew.putAll(map); System.out.println("----数据展示-----");
System.out.println(map);
System.out.println(mapNew); System.out.println("----更改基本类型数据-----");
map.put("basic", 200);
System.out.println(map);
System.out.println(mapNew); System.out.println("----更改引用类型数据-----");
list.add(300);
System.out.println(map);
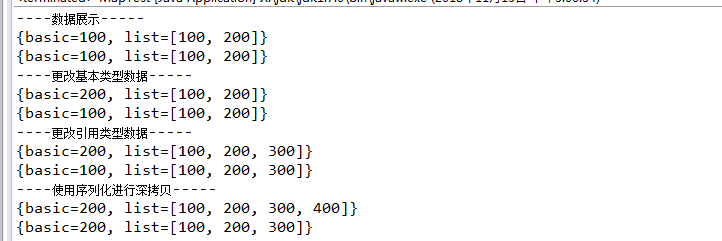
System.out.println(mapNew); System.out.println("----使用序列化进行深拷贝-----");
mapNew = clone(map);
list.add(400);
System.out.println(map);
System.out.println(mapNew);
}
}
输出如下:
附:
【4. Map深拷贝的实现】转自:https://www.cnblogs.com/cxxjohnson/p/6258742.html
Map的深浅拷贝的探究的更多相关文章
- Python-Day3知识点——深浅拷贝、函数基本定义、内置函数
一.深浅拷贝 import copy #浅拷贝 n1={'k1':'wu','k2':123,'k3':['carl',852]} n2=n1 n3=copy.copy(n1) print(id(n1 ...
- python基础知识5——赋值与深浅拷贝——整数和字符串,列表元组字典
深浅copy 一.数字和字符串 对于 数字 和 字符串 而言,赋值.浅拷贝和深拷贝无意义,因为其永远指向同一个内存地址. 1 import copy 2 # ######### 数字.字符串 #### ...
- iOS 深浅拷贝
-(void)copyDemo { // 在非集合类对象中:对immutable对象进行copy操作,是指针复制,mutableCopy操作时内容复制:对mutable对象进行copy和mutable ...
- [Python笔记]第三篇:深浅拷贝、函数
本篇主要内容:深浅拷贝,自定义函数,三目运算,lambda表达式, 深浅拷贝 一.数字和字符串 对于 数字 和 字符串 而言,赋值.浅拷贝和深拷贝无意义,因为其永远指向同一个内存地址. import ...
- python-Day3-set 集合-counter计数器-默认字典(defaultdict) -可命名元组(namedtuple)-有序字典(orderedDict)-双向队列(deque)--Queue单项队列--深浅拷贝---函数参数
上节内容回顾:C语言为什么比起他语言块,因为C 会把代码变异成机器码Pyhton 的 .pyc文件是什么python 把.py文件编译成的.pyc文件是Python的字节码, 字符串本质是 字符数组, ...
- Python学习笔记——基础篇2【第三周】——计数器、有序字典、元组、单(双)向队列、深浅拷贝、函数、装饰器
目录 1.Python计数器Counter 2.Python有序字典OrderredDict 3.Python默认字典default 4.python可命名元组namedtuple 5.Python双 ...
- python--关于赋值与深浅拷贝的认识
作为一个自学python的小白,平时用到深浅拷贝的机会很少,因此对其也是一知半解.但是,作为一个立志成为后端工程狮的男人,眼里揉不了沙子,于是专门花时间补了补课,在此记录一下学习心得. 在讲深浅 ...
- 深浅拷贝,原生和JQuery方法实现
7-17: 1:e.target.parentNode.remove();成功,查询一下JS原生的remove方法 2:复习JS DOM的原生操作方法,比如innerHTML(),insertBefo ...
- Python--day06(深浅拷贝、元组、字典、集合)
1. 深浅拷贝 1.1 值拷贝 s1直接将ls中存放的地址拿过来s1内部的值发生任何变化,s2都会随之变化 s1 = ['1','2','3','a']s2 = s1print(id(s1),id ...
随机推荐
- Create an Android library
官方文档 创建 Android 库 [Create an Android library] Android 库在结构上与 Android app module 相同.它可以提供构建应用所需的一切内容, ...
- 项目总结——MVC+MongoDB实现文件上传
在做项目的时候我们遇到了视频上传的问题.正式开始项目之前做了一个简单的Demo实现在MVC中视频文件的上 传,考虑到将视频放到MongoDB中上传和读取速度慢的问题,这次我们实现的文件上传是存储的路径 ...
- TensorFlow (RNN)深度学习 双向LSTM(BiLSTM)+CRF 实现 sequence labeling 序列标注问题 源码下载
http://blog.csdn.net/scotfield_msn/article/details/60339415 在TensorFlow (RNN)深度学习下 双向LSTM(BiLSTM)+CR ...
- Mysql 使用Group 和Case When统计数据
项目是基于:thinkcmf的,新的需求是对各栏目的文章数量进行统计 SQl很简单,先根据分类ID进行分组,然后再通过CASE WHEN 再统计不同文章状态数量 ) as count , =已审核 , ...
- 腾讯下载的视频转换为MP4
第一步:首先找到腾讯视频下载设置中的缓存目录,如下图 打开这个目录,找到最近的,就是刚才你下载的文件夹 打开最近的文件夹,如下图,copy里面的内容到D盘的qlv目录中 第二部:进入D盘的qlv目录, ...
- Docker: 如何将node.js的项目部署到docker的swarm上面去
前提条件: Docker创建虚机和swarm 如何用Docker建立一个Node.js的开发环境 正文: 将如何用Docker建立一个Node.js的开发环境文中创建的nodehello image发 ...
- IDEA实现序列号接口
idea自动生成serialVersionUID (2013-12-15 08:12:09)转载▼ Setting->Plugins 找到一个叫 GenerateSerialVersionUID ...
- RefreshListView中onItemClick点击错位
在使用RefreshListView的时候.发现有使用 /**** * parent.getAdapter().getItem(position)√ * adpter.getItem(id);√ * ...
- Redis 实现队列http://igeekbar.com/igeekbar/post/436.htm
场景说明: ·用于处理比较耗时的请求,例如批量发送邮件,如果直接在网页触发执行发送,程序会出现超时 ·高并发场景,当某个时刻请求瞬间增加时,可以把请求写入到队列,后台在去处理这些请求 ·抢购场景,先入 ...
- springboot结合jwt实现基于restful接口的身份认证
基于restful接口的身份认证,可以采用jwt的方式实现,想了解jwt,可以查询相关资料,这里不做介绍~ 下面直接看如何实现 1.首先添加jwt的jar包,pom.xml中添加依赖包: <de ...