UIWindow 实现遮盖导航条的蒙版
使用代码构建应用的主界面
我们先来介绍一下,如何使用代码来构建项目的主界面,以及主界面的一般架构方式
- 概述
- 刚创建的 iOS 项目默认是使用 Main.storeboard 作为项目的主界面的
- 若你不理解什么是主界面,那么请把它当成是应用启动后显示在用户的眼前的这个界面,通常是一个基于 UITabBarController 的界面。
请原谅我的无知
- 若你不理解什么是主界面,那么请把它当成是应用启动后显示在用户的眼前的这个界面,通常是一个基于 UITabBarController 的界面。
- 在通常的项目中,我们是不使用 StoreBoard,一般使用 代码 和 xib 结合的方式开发,也有人使用纯代码的方式开发。个人比较喜欢纯代码的方式开发项目。各有利弊在次不再赘述。
- 刚创建的 iOS 项目默认是使用 Main.storeboard 作为项目的主界面的
- 如何构建无 StoreBoard 的项目
删除 StoreBoard
StoreBoard 所处的文件夹,如图:
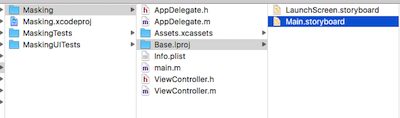
删除 main.toreBoard ,选中 main.toreBoard 点击 delete 键,选择 “Move to Trash”,如图:

更改项目设置,使其不以 Main.storeboard 作为主界面。如图:

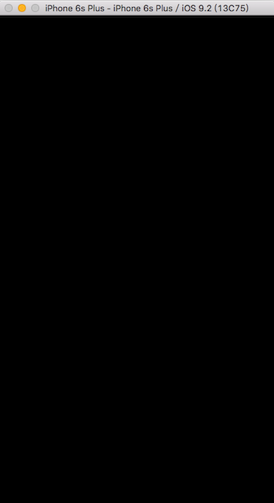
效果,此时启动项目将会看到应用的主界面一片漆黑,应为应用找不到主界面来显示。如图:
使用代码构建项目入口
关于 AppDelegate
- AppDelegate 是整个应用的代理,应用从启动到关闭的整个过程中的多数时间都会通知代理,如:加载应用的主界面,应用即将进入后台,内存警告等。在此不再介绍关于 AppDelegate 更多的知识,若有机会,我会用一篇博客的特意介绍 AppDelegate 那些事。
AppDelegate 中的 window
应用在启动的时候,会先检测是否以 Main.storeboard 作为主界面,若没有 Main.storeboard ,将会使用 AppDelegate 的 window 作为主界面
设置 AppDelegate 中 window 的背景色,验证 AppDelegate 中的 window 在应用中的作用
- (BOOL)application:(UIApplication *)application didFinishLaunchingWithOptions:(NSDictionary *)launchOptions {

	// 初始化 window

    self.window = [[UIWindow alloc] initWithFrame:[UIScreen mainScreen].bounds];

    self.window.backgroundColor = [UIColor whiteColor];

    // 显示 window

    [self.window makeKeyAndVisible];

    return YES;

}

如图所示,项目启动后的主界面是白色的,但是此时应用已经 crash,原因如图:

- 意思是:应用程序的窗口(windows)在应用程序加载结束时期望得到一个根控制器(若达不到,就会崩溃哦)
设置 AppDelegate 中的 window 的根控制器
// 设置 window 的根控制器

IDTabBarController *tabBarController = [[IDTabBarController alloc] init];

self.window.rootViewController = tabBarController;
- 常用的主界面架构
- 通常情况下,应用的主界面是 UITabBarController 管理下的多个(通常不超过四个) UINavigationController。
- 架构应用的主界面
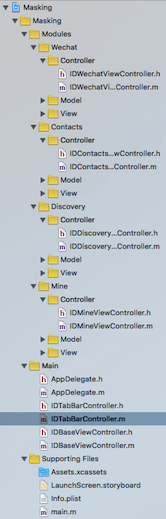
搭建项目的文件结构,如图所示:
创建应用中每个模块的控制器(共4个模块)
微信(Wechat)
@implementation IDWechatViewController

- (void)viewDidLoad {

    [super viewDidLoad];

    // 设置 tabBar 和 navigationBar 的 title

    self.title = @"微信";

}

@end
通讯录(Contacts)
@implementation IDContactsViewController

- (void)viewDidLoad {

    [super viewDidLoad];

    self.title = @"通讯录";

}

@end
发现(Discovery)
@implementation IDDiscoveryViewController

- (void)viewDidLoad {

    [super viewDidLoad];

    self.title = @"发现";

}

@end
我(Mine)
@implementation IDMineViewController

- (void)viewDidLoad {

    [super viewDidLoad];

    self.title = @"我";

}

@end
将各个模块的中跟控制器添加为 tabBarController 的 childViewController
不在 tabBarController 中设置 childViewController 的 item(学习一下方法的封装哦)
- (void)viewDidLoad {

    [super viewDidLoad];

    // 设置 tabBar 的子控制器

    [self setChildViewControllers];

}

/** 设置 tabBar 的子控制器 */

- (void)setChildViewControllers {

    // 添加 tabBar 中所有的自控制器

    for (int i = 0; i < self.childViewControllers.count; i++) {

        [self addChildViewController:self.childViewControllers[i] withTitle:@"" imageName:@"" selectedImageName:@""];

    }

}

/** 添加每一个控制器为 tabBar 的 childViewController */

- (void)addChildViewController:(UIViewController *)viewController withTitle:(NSString *)title imageName:(NSString *)imageName selectedImageName:(NSString *)selectedImageName  {

    // 设置每个控制器对应的 tabBarItem

    viewController.tabBarItem = [[UITabBarItem alloc] initWithTitle:title image:[UIImage imageNamed:imageName] selectedImage:[UIImage imageNamed:selectedImageName]];

    // 将每个模块的主控制器包装成导航控制器

    UINavigationController *navigationController = [[UINavigationController alloc] initWithRootViewController:viewController];

    // 将每个模块的主控制器添加为 tabBarController 的 childViewController

    [self addChildViewController:navigationController];

}
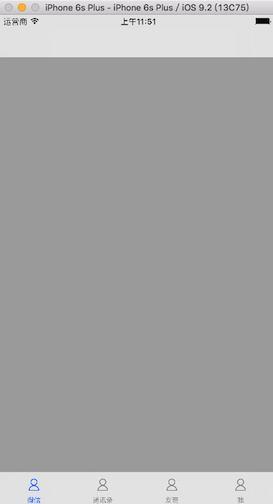
运行项目,并不是所有的子控制器标签全部显示到主屏幕窗口,如图:
在 tabBarController 中设置 childViewController 的 item,修改方法 setChildViewControllers
关于更多设置 item 的细节,再次不再赘述,大家可以自己琢磨一下。若有任何疑问,都可以联系我/** 设置 tabBar 的子控制器 */
- (void)setChildViewControllers {
// 添加 tabBar 中所有的自控制器
for (int i = 0; i < self.childViewControllers.count; i++) {
[self addChildViewController:self.childViewControllers[i] withTitle:self.titlesArray[i] imageName:@"mine_cust" selectedImageName:@""]; // 修改
}
}
/** 添加每一个控制器为 tabBar 的 childViewController */
- (void)addChildViewController:(UIViewController *)viewController withTitle:(NSString *)title imageName:(NSString *)imageName selectedImageName:(NSString *)selectedImageName {
// 设置每个控制器对应的 tabBarItem
UITabBarItem *item = [[UITabBarItem alloc] initWithTitle:title image:[UIImage imageNamed:imageName] selectedImage:[UIImage imageNamed:selectedImageName]];
viewController.tabBarItem = item;
// 若你未设置 tabBarItem , title 会同时作用于 tabBarItem 和 navigationItemd 的 item
viewController.title = title; // 在 item 中已经设置过了
// 将每个模块的主控制器包装成导航控制器
UINavigationController *navigationController = [[UINavigationController alloc] initWithRootViewController:viewController];
// 将每个模块的主控制器添加为 tabBarController 的 childViewController
[self addChildViewController:navigationController];
}
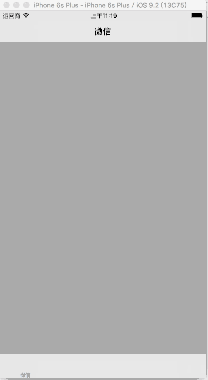
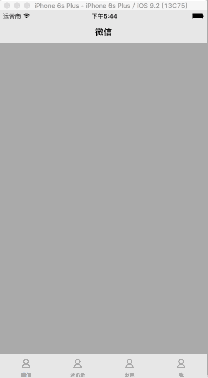
运行项目,所有的子控制器标签全部显示到主屏幕窗口,如图:
蒙版
很抱歉,扯了一些题外话,但希望可以对童鞋们,有所帮助。接下来进入主体。
- 概述
- 蒙版就是一种遮罩,盖在当前控制器上,阻止用户对当前控制器界面进行交互。通常的弹框空间后面会有一层蒙版
- 实现思路
- 在此,使用一个 window 来作为蒙版,主要原因如下:
- window 存在 windowLevel 属性,通过控制级别可以控制显示的层次
- window 是一个容器,可以容纳其他的控件
- window 的显示和隐藏极其方便
- 关于蒙版 window
- 在这里我们使用继承自 UIWindow 的单例,来实现蒙版 window,若你对单例设计模式不太了解,请参看一下文章:
- 关于 window 的 windowLevel
UIWindowLevelNormal
普通级别,可以遮盖导航条,但是无法遮盖状态栏,如图

UIWindowLevelAlert
可以遮盖状态栏,如图
UIWindowLevelStatusBar
- 最高级别
- 蒙版的使用方法
- 提供方法 show 和 hide 来显示和隐藏蒙版
- 在此,使用一个 window 来作为蒙版,主要原因如下:
- 具体实现
单例实现蒙版 window
在这里使用单例,或许不是一种好的选择,但是我们在此不讨论#pragma mark - 单例所需要实现的方法
- (instancetype)initWithFrame:(CGRect)frame {
if (self = [super initWithFrame:[UIScreen mainScreen].bounds]) {
}
return self;
}
+ (instancetype)shareIDMasking {
static dispatch_once_t onceToken;
dispatch_once(&onceToken, ^{
_idMasking = [[self alloc] init];
});
return _idMasking;
}
+ (instancetype)allocWithZone:(struct _NSZone *)zone {
static dispatch_once_t onceToken;
dispatch_once(&onceToken, ^{
_idMasking = [super allocWithZone:zone];
});
return _idMasking;
}
- (id)copyWithZone:(NSZone *)zone
{
return _idMasking;
}
暴露接口
#pragma mark - 蒙版的显示与隐藏

- (void)show {

    // 显示 蒙版 window

    [self makeKeyAndVisible];

}

- (void)hide {

    // 移除所有的子控件

    for (UIView *view in [self subviews]) {

        [view removeFromSuperview];

    }    // 将 蒙版 window 的 windowLevel 置为 nomal,否则其他的 window 无法显示出来

    self.windowLevel = UIWindowLevelNormal;

    // 先是应用主界面的 window

    [[[UIApplication sharedApplication].delegate window] makeKeyAndVisible];

}
蒙版的使用
@implementation IDWechatViewController
- (void)viewDidLoad {
[super viewDidLoad];
// 设置 “Hide” 按钮
[self setupHidenButton];
}
/** 设置 “Hide” 按钮 */
- (void)setupHidenButton {
self.hidedButton = [[UIButton alloc] initWithFrame:CGRectMake(180, 264, 70, 44)];
self.hidedButton.backgroundColor = [UIColor blueColor];
[self.hidedButton setTitle:@"Hide" forState:UIControlStateNormal];
[self.hidedButton addTarget:self action:@selector(buttonClick:) forControlEvents:UIControlEventTouchUpInside];
}
/** 点击控制器的 view 弹出蒙版 */
- (void)touchesBegan:(NSSet<UITouch *> *)touches withEvent:(UIEvent *)event {
[self setupMaskingAndShow];
}
/** 隐藏蒙版 */
- (void)buttonClick:(UIButton *)button {
[self.maskingWindow hide];
}
/** 设置蒙版并显示出来 */
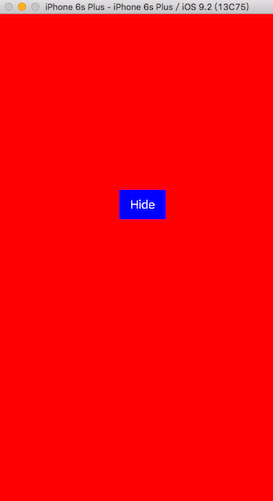
- (void)setupMaskingAndShow {
self.maskingWindow = [IDMasking shareIDMasking];
// 设置 maskingWindow 的等级
self.maskingWindow.windowLevel = UIWindowLevelAlert;
self.maskingWindow.backgroundColor = [UIColor redColor];
[self addSubviewsToMasking];
// 显示 蒙版
[self.maskingWindow show];
}
/** 向蒙版中添加子控件 */
- (void)addSubviewsToMasking {
[self.maskingWindow addSubview:self.hidedButton];
}
@end
效果,如图:
由于篇幅限制,Blog 中只提供了核心代码。若有需要完整工程文件的,请联系我,谢谢您的理解和支持。若您觉得有帮助,别忘了点击下方的推荐哦!
UIWindow 实现遮盖导航条的蒙版的更多相关文章
- Bootstrap之导航条
基本导航条 <!-- navbar-inverse相反颜色风格 --> <!-- navbar-static-top去除圆角 --> <!-- navbar-fixed- ...
- bootstrap学习笔记<十一>(导航条)
基础导航条.样式:class="navbar navbar-default",属性:role="navigation" <div class=" ...
- iOS:导航栏的工具条和导航条
功能:用NAV视图控制器打开新的视图,默认工具条和导航条隐藏,双击显示之 // // main.m // Hello // // Created by lishujun on 14-8-28. // ...
- iOS viewController添加导航条以及返回跳转选择
给单独的viewcontroller或者在Appdelegate的主页面添加导航条,只要在viewcontroller上添加navigationcontroller,在添加此navigationcon ...
- Swift - 使用导航条和导航条控制器来进行页面切换
通过使用导航条(UINavigationBar)与导航条控制器(UINavigationController)可以方便的在主页面和多层子页面之间切换.下面通过一个简单“组件效果演示”的小例子来说明如何 ...
- Bootstrap每天必学之导航条
http://www.jb51.net/article/75534.htm Bootstrap每天必学之导航条,本文向大家讲解了多种多样的导航条,以及导航条中元素的实现方法,感兴趣的小伙伴们可以参考一 ...
- 使用CSS3制作导航条和毛玻璃效果
导航条对于每一个Web前端攻城狮来说并不陌生,但是毛玻璃可能会相对陌生一些.简单的说,毛玻璃其实就是让图片或者背景使用相应的方法进行模糊处理.这种效果对用户来说是十分具有视觉冲击力的. 本次分享的主题 ...
- JQM (功能栏、导航条)
在Mobile中导航条的基本结构: <div data-role="navbar"> ul>li>a </div> 其中含有“行(grid)”和 ...
- css制作漂亮彩带导航条菜单
点击这里查看效果:http://keleyi.com/keleyi/phtml/divcss/17.htm 效果图: 以下是源代码: <!DOCTYPE html PUBLIC "-/ ...
随机推荐
- 开发ASP.NET MVC设置统一的命名空间
当你创建一个全新的ASP.NET MVC专案之后,你想设置统一的命名空间,从可以下面几次入手. 首先设置专案的属性: 第二步,打开Views/Web.config文件,修改: 第三步,修改路由文件的命 ...
- 使用html和css的一些经验
1.注释须知:html中注释不能这样写: <div></div><!--------这是错误写法-------> <div></div>&l ...
- 在吉日嘎拉DotNet.WebForm中使用FluentScheduler调度任务
有些用户一直说系统发送的邮件一直收不到,投诉系统不正常,这时候怎么洗刷冤屈呢?将发送的每一封Email都保存到数据库中,并记录发送的日志,让用户无话可说. 自己创建3个表: MessageFailed ...
- Android版的菜谱客户端应用源码完整版
Android版的菜谱客户端应用源码完整版,这个文章是从安卓教程网转载过来的,不是本人的原创,希望能够帮到大家的学习吧. <ignore_js_op> 152936qc7jdnv6vo0c ...
- Mybatis添加返回主键ID
1.对应xml文件<insert id="insert" parameterType="DetectStandard"useGeneratedKeys=& ...
- No.013:Roman to Integer
问题: Given a roman numeral, convert it to an integer.Input is guaranteed to be within the range from ...
- maven url
aliyun阿里云Maven仓库地址--加速你的maven构建 maven仓库用过的人都知道,国内有多么的悲催.还好有比较好用的镜像可以使用,尽快记录下来.速度提升100倍. http://mav ...
- jackson中JSON字符串节点遍历和修改
有些场景下,在实现一些基础服务和拦截器的时候,我们可能需要在不知道JSON字符串所属对象类型的情况下,对JSON字符串中的某些属性进行遍历和修改,比如,设置或查询一些报文头字段. 在jackson中, ...
- C语言之字符串处理函数
C语言中字符串处理函数介绍 下面介绍8种基本的常用的字符串处理函数,在数值数组中也常常用到(部分函数).所有的C语言编译系统中一般都提供这些函数. 1.puts函数——输出字符串的函数 一般的形式为p ...
- Bootstrap源码分析之transition、affix
一.Transition(过滤) 作为一个基础支持的组件,被其他组件多次引用.实现根据浏览器支持transition的能力,然后绑定动画的结束事件:首先:创建一个Element:然后:迭代查看此元素支 ...