用OpenResty搭建高性能服务端
相关链接:https://github.com/openresty/lua-nginx-module
OpenResty 简介
OpenResty是一个基于 Nginx 与 Lua 的高性能 Web 平台,其内部集成了大量精良的 Lua 库、第三方模块以及大多数的依赖项。用于方便地搭建能够处理超高并发、扩展性极高的动态 Web 应用、Web 服务和动态网关。
OpenResty 基于 Nginx开发,可以简单认为是 Nginx + lua-nginx-module的组合版。
官网:https://openresty.org/cn/ 官方文档:https://github.com/openresty/lua-nginx-module#version
高性能服务端两个重要要素:需要支持缓存,语言层面要支持异步非堵塞。
缓存速度上,内存 > SSD > 机械磁盘;本机 > 网络 ; 进程内 > 进程间 。异步非阻塞指的是事件驱动方式(事件完成后再通知)。
OpenResty 包含的技术:
Nginx:不仅仅是负载均衡+反向代理等功能,Nginx c module开发成本高。
LuaJIT:OpenResty用的是 LuaJIT,LuaJIT 是主打性能的Lua。
OpenResty 本质上是将 LuaJIT 的虚拟机嵌入到 Nginx的worker中,所以效率特别高,在性能上, OpenResty 接近或超过 Nginx c module:
OpenResty已经颠覆了高性能服务端的开发模式。
OpenResty与市面上其他语言对比:
node.js:第一门将异步非阻塞特性放入自己语言中的,前端同学可以快速切入。但是 node.js 用回调(callback)实现异步非阻塞,代码写起来比较麻烦。
Python:3.4之后加入了异步的支持,比如异步io和aiohttp;3.5引入了协程。缺点是版本跨度大,因为很多人还是使用2.7。
Golang:最近几年非常火。缺点:代码写法上需要使用go关键字;线上热调试不方便(
SystemTap提供了有限的支持)。
Hello World
OpenResty安装
以 CentOS 为例:
mkdir /opt && cd /opt

# download openresty

wget https://openresty.org/download/openresty-1.13.6.2.tar.gz

tar zxvf openresty-1.13.6.2.tar.gz

cd openresty-1.13.6.2

# configure

./configure --prefix=/usr/local/openresty -j4

make -j4 && make install
其中 源码包可以到 https://openresty.org/cn/download.html 该页面获取。 -j4表示使用4核。 configure那一步还可以指定各种参数:
./configure --prefix=/usr/local/openresty \

    --with-luajit \

    --without-http_redis2_module \

    --with-http_iconv_module \

    --with-http_postgres_module
使用 ./configure--help 查看更多的选项。
其它系统环境上安装可以参考 https://openresty.org/cn/installation.html 。
其实安装 OpenResty 和安装 Nginx 是类似的,因为 OpenResty 是基于 Nginx 开发的。
如果已经安装了 Nginx,又想使用 OpenResty 的功能,可以参考 《Nginx编译安装Lua》:https://www.cnblogs.com/52fhy/p/10164553.html 一文安装 lua-nginx-module模块即可。
第一个程序
修改 /usr/local/openresty/nginx/conf/nginx.conf:
worker_processes  1;

error_log logs/error.log;

events {

    worker_connections 1024;

}

http {

    server {

        listen 8080;

        location /hello {

            default_type text/html;

            content_by_lua '

                ngx.say("<p>hello, world</p>")

            ';

        }

    }

}
把默认的 80端口改为 8080,新增 /hello部分。
其中 content_by_lua便是 OpenResty 提供的指令,在官方文档可以搜索到https://github.com/openresty/lua-nginx-module
现在我们启动OpenResty:
/usr/local/openresty/nginx/sbin/nginx
启动成功后,查看效果:
知识点: 1、 content_by_lua:返回的内容使用 lua 代码。 2、 content_by_lua_file:读取lua文件里的 lua 代码。 3、默认情况下,修改Lua代码,需要 reload OpenResty服务才会生效。可以修改 lua_code_cache为 off,作用域: http, server, location, location if。请勿在生产环境里开启。
测试1:使用 content_by_lua_file
cd /usr/local/openresty

mkdir nginx/conf/lua

vim nginx/conf/lua/hello.lua
内容为:
ngx.say("<p>hello, lua world</p>")
然后修改 nginx.conf:
location /hello {

    default_type text/html;

    content_by_lua_file conf/lua/hello.lua;

}
重启 OpenResty:
./nginx/sbin/nginx -s reload
查看效果:
curl http://127.0.0.1:8080/hello
测试2:关闭 lua_code_cache: 根据 lua_code_cache作用域,我们可以在server块加上:
lua_code_cache off;

location /hello {

    default_type text/html;

    content_by_lua_file conf/lua/hello.lua;

}
重启:
./nginx/sbin/nginx -s reload
提示说 lua_code_cache关闭后影响性能。我们再次修改 nginx/conf/lua/hello.lua的代码,保存后就会生效,无需 reload server。
OpenResty 入门
这节使用 ngx_lua api完成一个小功能。
lua代码:
nginx/conf/lua/getrandomstring.lua
-- 实现随机字符串

local args = ngx.req.get_uri_args()

local salt = args.salt

if not salt then

    ngx.exit(ngx.HTTP_BAD_REQUEST)

end

local str = ngx.md5(ngx.time() .. salt)

ngx.say(str)
修改 nginx.conf ,新增:
location /get_random_string {

            content_by_lua_file conf/lua/getrandomstring.lua;

        }
由于修改了 nginx.conf ,需要reload OpenResty 服务。然后,我们访问服务:
curl http://127.0.0.1:8080/get_random_string?salt=2
说明:
1、 ngx.req.get_uri_args()用于获取URI请求参数。
2、 ngx.HTTP_BAD_REQUEST为ngx常量,指的是400。代码里尽量使用常量。
3、 ngx.time()用于获取时间戳,是带有缓存的。与Lua的日期库不同,不涉及系统调用。尽量使用Ngx给出的方法,以免发生性能问题。
4、 ngx.md5()用于生成md5值。
5、如果代码里有语法错误,我们可以通过nginx 的 error.log里看到,默认文件是 nginx/logs/error.log。
再次提醒大家,做 OpenResty 开发,lua-nginx-module 的文档是你的首选,Lua 语言的库都是同步阻塞的,用的时候要三思。也就是说,尽量使用 ngx_lua提供的api,而不是使用 Lua 本身的。例如 ngx.sleep()与 lua提供的sleep,前者不会造成阻塞,后者是会阻塞的,详见:sleep · OpenResty最佳实践 。
ngx_lua API介绍
本节主要是带着大家简单的过一下常用的ngx_lua API。
ngx_lua 有60多个指令(Directive),140多个 API(截止到2019-3-26)。
指令 是 ngx_lua 提供给Nginx调用的方法,与 Nginx自带的 location、 rewrite等是一个级别的。指令有自己的作用域,例如: content_by_lua_file只能作用于 location和 locationif里面:
API 是指ngx_lua基于lua代码实现的一系列方法或常量,遵循 lua的语法规则。只能在lua代码块或者lua文件里使用。
例如:
ngx.say("<p>hello, lua world</p>")
其中 content_by_lua是指令,作用于 location块; ngx.say()是 ngx_lua 提供的API。
下面,我们使用 ngx_lua完成另外一个小功能:实现base64的解码并重新json编码输出。代码里会用到一些指令和API。
lua代码:
nginx/conf/lua/decode_info.lua
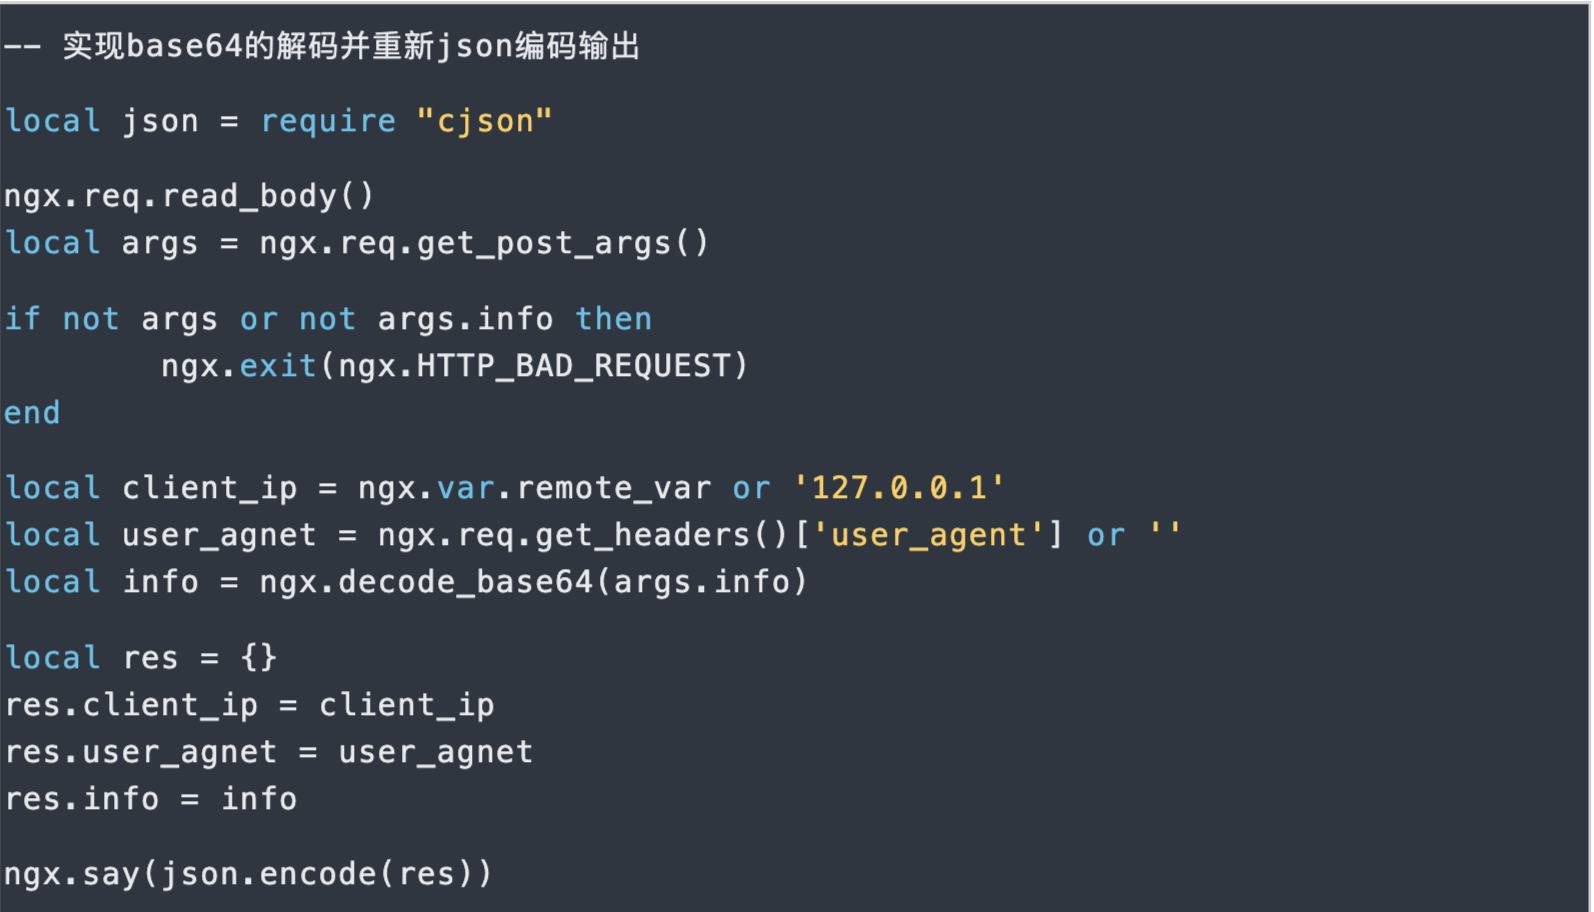
修改 nginx.conf ,新增:
location /decode_info {

    content_by_lua_file conf/lua/decode_info.lua;

}
由于修改了 nginx.conf ,需要 reload OpenResty 服务。然后,我们访问服务
$ php -r "echo base64_encode('test');"

dGVzdA==

$ curl -XPOST -d "info=dGVzdA==" http://127.0.0.1:8080/decode_info

{

	"user_agnet":"curl\/7.19.7",

	"client_ip":"127.0.0.1",

	"info":"test"

}
说明:
1、 require是 lua 里面引入其他库的关键字。这里引入的 cjson。
2、当我们要读取 http里的post数据的时候,就需要使用 ngx.req.read_body()。该API同步读取客户端请求主体而不阻塞Nginx事件循环。
3、 ngx.req.get_post_args() 用于获取post请求数据。
4、 ngx.var.remote_var实际是获取的nginx里的变量 remote_var。
也就是说, ngx.var.xxx实际是获取的nginx里的变量 xxx。例如:
nginx变量详见:[Alphabetical index of variables}(http://nginx.org/en/docs/varindex.html)。 ngx_lua ngx.var API详见:ngx.var.VARIABLE。
5、 ngx.req.get_headers() 用于读取nginx的header参数。返回的是lua table。
6、 ngx.decode_base64()用于 base64字符串解码。对应的编码API是 ngx.encode_base64()。
连接数据库
连接数据库我们需要使用到ngx_lua的第三方库:
lua-resty-redis library based on ngx_lua cosocket.
lua-resty-mysql library based on ngx_lua cosocket.
这两个库都是基于cosocket实现的,特点是异步非阻塞。代码风格是同步的写法。更多第三方库详见:See Also 。
连接 MySQL
lua代码:
nginx/conf/lua/test_mysql.lua
local mysql = require "resty.mysql"

local db, err = mysql:new()

if not db then

  ngx.say("failed to instantiate mysq:", err)

  return

end

db:set_timeout(1000) -- 1s

local ok, err, errcode, sqlstate = db:connect{

  host = "127.0.0.1",

  port = 3306,

  database = "ngx_test",

  user = "ngx_test",

  password = "ngx_test",

  charset = "utf8",

  max_packet_size = 1024 * 1024

}

if not ok then

  ngx.say("failed to connect:", err, ": ", errcode, " ", sqlstate)

  return

end

-- insert

res, err, errcode, sqlstate = db:query("insert into cats(name)".." values ('lanlang'),('')")

if not res then

  ngx.say("failed to insert data: ", err, ": ", errcode, " ", sqlstate)

  return

end

ngx.say(res.affected_rows, " rows inserted into table cat", "last insert id: ", res.insert_id)

res, err, errcode, sqlstate = db:query("select * from cats ", 10)

if not res then

  ngx.say("failed to select data: ", err, ": ", errcode, " ", sqlstate)

  return

end

local cjson = require "cjson"

ngx.say("result: ", cjson.encode(res))

-- close connection

local ok, err = db:close()

if not ok then

  ngx.say("failed to close: ", err)

  return

end
配置访问路径:
        location /test_mysql {

            content_by_lua_file conf/lua/test_mysql.lua;

        }
访问测试:
curl http://127.0.0.1:80/test_mysql
连接Redis
添加lua文件test_redis.lua
local redis = require "resty.redis"

local rds = redis.new()

rds:set_timeout(1000) -- 1s

local ok, err = rds:connect("127.0.0.1", 6379)if not ok then

    ngx.say("failed to connect:", err)    return

end

local res, err = rds:auth('Zxing.112233')

if not res then    ngx.say("failed to auth: ", err)

    returnend

ok, err = rds:set("name", "lanlang")

if not ok then

    ngx.say("failed to set name:", err)

    returnend

ngx.say("set result: ", ok)

res, err = rds:get("name")

if not res then

    ngx.say("failed to get name: ", err)

    return

end

if res == ngx.null then

    ngx.say("name not found.")

    return

end

ngx.say("name: ", res)

-- close the connection right away

local ok, err = rds:close()

if not ok then

    ngx.say("failed to close: ", err)

    return

end
添加配置:
        location /test_redis {

            content_by_lua_file conf/lua/test_redis.lua;

        }
测试:
curl http://127.0.0.1/test_redis
参考文档:
常见错误
1. lua entry thread aborted: runtime error: /opt/apps/openresty/lualib/resty/redis.lua:238: bad argument #1 to 'rawget' (table expected, got string)
解决方案:
ok,error = redis:set("fruit","apple") 此处应该为 : 号,若写成 . 则会报上述错误。若为逗号,set的参数应该为 set(self,"fruit","apple")
用OpenResty搭建高性能服务端的更多相关文章
- 《用OpenResty搭建高性能服务端》笔记
概要 <用OpenResty搭建高性能服务端>是OpenResty系列课程中的入门课程,主讲人:温铭老师.课程分为10个章节,侧重于OpenResty的基本概念和主要特点的介绍,包括它的指 ...
- OpenResty搭建高性能服务端
OpenResty搭建高性能服务端 Socket编程 Linux Socket编程领域为了处理大量连接请求场景,需要使用非阻塞I/O和复用,select.poll.epoll是Linux API提 ...
- 尹吉峰:使用 OpenResty 搭建高性能 Web 应用
2019 年 8 月 31 日,OpenResty 社区联合又拍云,举办 OpenResty × Open Talk 全国巡回沙龙·成都站,原贝壳找房基础架构部工程师尹吉峰在活动上做了<使用 O ...
- contos7搭建syslog服务端与客户端
搭建中心服务端1,编辑文件/etc/rsyslog.conf,找到以下内容,将前面的#注释符合去除#$ModLoad imtcp#$InputTCPServerRun 514 2,在/etc/rsys ...
- vue.js+koa2项目实战(四)搭建koa2服务端
搭建koa2服务端 安装两个版本的koa 一.版本安装 1.安装 koa1 npm install koa -g 注:必须安装到全局 2.安装 koa2 npm install koa@2 -g 二. ...
- Centos6.9 搭建rsync服务端与客户端 案例:全网备份项目
rsync的企业工作场景说明 1)定时备份 1.1生产场景集群架构服务器备份方案项目 借助cron+rsync把所有客户服务器数据同步到备份服务器 2)实时复制 本地数据传输模式(local-only ...
- 快速搭建Kerberos服务端及入门使用
快速搭建Kerberos服务端及入门使用 作者:尹正杰 版权声明:原创作品,谢绝转载!否则将追究法律责任. Kerberos是一种网络身份验证协议.它旨在通过使用秘密密钥加密为客户端/服务器应用程序提 ...
- 最全Linux搭建SVN服务端教程
文章首推 支付宝接口对接 高德地图调用 验证码登录 QQ邮箱登录 今日主题:Linux搭建SVN服务端 简介 相信程序员对SVN还是不陌生的,虽然现在用Git比较多,但是SVN也是用的,SVN可以做代 ...
- 使用poco 的NetSSL_OpenSSL 搭建https 服务端,使用C++客户端,java 客户端访问,python访问(python还没找到带证书访问的代码.)
V20161028 由于项目原因,需要用到https去做一些事情. 这儿做了一些相应的研究. 这个https 用起来也是折腾人,还是研究了一周多+之前的一些积累. 目录 1,java client 通 ...
- centos 搭建 git 服务端和客户端
centos 搭建git需要设置远程服务端和客户端.远程代码存放在服务端,多个客户端可以共享和维护服务端代码. 一.服务端主机 1.创建ssh,大部分默认已经安装,有ssh就跳过 yum instal ...
随机推荐
- Google Ads – 大杂烩
广告相互竞争, 自己打自己? About similar keywords in a Google Ads account 如果用户的搜索能匹配到广告 Campaign 中多个广告的话, 会怎么样? ...
- 【QT界面美化】QT界面美化效果截图QSS+QML
贴几个QT做的界面美化效果截图. 先来一张动图,有一些画面是QT Widgets + QSS实现的:另外一些画面是QT QML实现的. QT界面美化效果图QT QSS QML 补天云QT技术培训专家 ...
- 如何使用Java在Word中插入表格
序言 各位好啊,我是会编程的蜗牛,作为java开发者,有时候需要操作word或者excel.这里面比较常用的框架是POI,我之前用过POI来读写excel,也有用过alibaba easy excel ...
- 暑假集训CSP提高模拟7
这个 T1 的 \(n^{3}\) 的 SPJ 效率还是太慢了,膜拜 SPJ 大神学长,还会画画 A.Permutations & Primes 这题感觉挺水的但是感觉有不是那么水,主要还是因 ...
- 第42天:WEB攻防-PHP应用&MYSQL架构&SQL注入&跨库查询&文件读写&权限操作 - 快捷方式
接受的参数值未进行过滤直接带入SQL查询 MYSQL注入:(目的获取当前web权限) 1.判断常见四个信息(系统,用户,数据库名,版本) 2.根据四个信息去选择方案 root用户:先测试读写,后测试获 ...
- .net6 使用gRPC示例
创建一个gRPC服务项目(grpc服务端)和一个 webapi项目(客户端),测试项目结构如下: 公共模型 测试接口相关类,放在公共类库中,方便服务端和客户端引用相同模型 public class R ...
- Adobe Acrobat XI Pro 合并多个PDF文件时弹出Flash提示
事件起因: 某知名同事在使用 Acrobat XI Pro 软件合并多个PDF文件时弹出Flash提示报错,需要安装 FlashPlayer 解决办法: 合并文件的时候右上角选项-文件类型,选择& ...
- 在 macOS上安装 MongoDB 社区版
官网教程 https://docs.mongodb.com/manual/tutorial/install-mongodb-on-os-x/ 使用第三方 brew package manager 在 ...
- foobar2000 v1.6.10 汉化版(2022.05.01)
foobar2000 v1.6.10 汉化版 -----------------------[软件截图]---------------------- -----------------------[软 ...
- SMMU中stage1 和stage2 的意思
ARM SMMU(System Memory Management Unit)是一种用于ARM架构的内存管理单元,它支持两阶段的地址转换机制,即Stage 1和Stage 2.这种机制允许操作系统和虚 ...