9.Nginx常用模块
1.nginx开启目录浏览 提供下载功能
默认情况下,网站返回index指定的主页,若该网站不存在主页,则将请求交给autoindex模块
如果开启autoindex模块,则提供一个下载的页面, 如果没有开启autoindex 则会报错 403
[root@web01 centos]# cat /etc/nginx/conf.d/mirr.cheng.com.conf

server {

	listen 80;

	server_name mirror.cheng.com;

	charset utf8;					#字符集

	location / {

		root /code;

		index index.html;

		autoindex on;				#开启目录索引,提供下载

		autoindex_exact_size off;	#以人性化方式显示大小

		autoindex_localtime on;		#与本地时间保持一致

	}

}
2.nginx实现访问控制
实战一.基于来源IP控制、允许特定的IP访问,其他全部拒绝
1. 仅允许ip10.0.0.1 可以正常访问 /centos
[root@web01 code]# cat /etc/nginx/conf.d/mirr.cheng.com.conf

server {

	listen 80;

	server_name mirr.cheng.com;

	charset utf8;

	root /code;

	autoindex on;                 #开启目录索引(提供下载)

	autoindex_exact_size off;     #以人性化方式显示

	autoindex_localtime on;	      #与本地时间保持一致

	location / {

		index index.html;

	}

	location /centos {

		allow 10.0.0.1/32;         #仅允许10.0.0.1访问

		deny all;			       #其他全拒绝

	}

}
2. 拒绝特定的IP访问(10.0.0.100),其他全部允许
[root@web01 code]# cat /etc/nginx/conf.d/mirr.cheng.com.conf

server {

	listen 80;

	server_name mirr.cheng.com;

	charset utf8;

	root /code;

	autoindex on;                 #开启目录索引(提供下载)

	autoindex_exact_size off;     #以人性化方式显示

	autoindex_localtime on;	      #与本地时间保持一致

	location / {

		index index.html;

	}

	location /centos {

		deny 10.0.0.100/32;

		allow all;

	}

}

注意: deny和allow的顺序是有影响的

    默认情况下,从第一条规则进行匹配

    如果匹配成功,则不继续匹配下面的内容

    如果匹配不成功,则继续往下寻找能匹配成功的内容
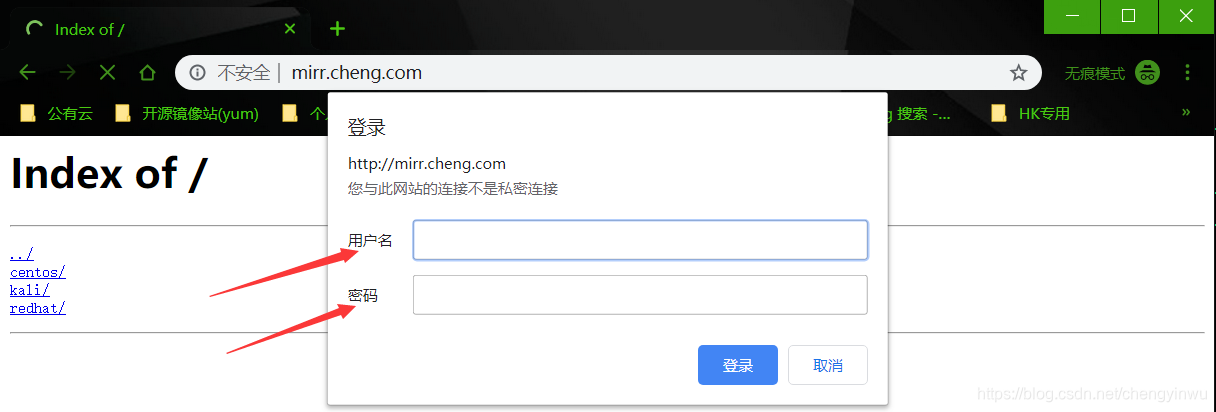
实战二.基于用户名和密码的方式限制 (个人/运维人员)
1.安装密码生成工具

[root@web01 ~]# yum install httpd-tools -y

2.生成密码

[root@web01 code]# htpasswd -b -c /etc/nginx/auth_conf chengyinwu 123456

3.修改nginx配置文件

[root@web01 code]# cat /etc/nginx/conf.d/mirr.cheng.com.conf

server {

	listen 80;

	server_name mirr.cheng.com;

	charset utf8;

	root /code;

	autoindex on;                 #开启目录索引(提供下载)

	autoindex_exact_size off;     #以人性化方式显示

	autoindex_localtime on;	      #与本地时间保持一致

	location / {

		index index.html;

	}

	location /centos {

		auth_basic "hello test";

		auth_basic_user_file "/etc/nginx/auth_conf";

	}

}
3.Nginx实现限速 ( 下载限速 限制单位时间内的Http请求 连接限制 )
1.请求频率限制(一秒内Http请求的次数(刷新频率))
[root@web01 ~]# cat /etc/nginx/conf.d/mirr.cheng.com.conf

limit_req_zone $binary_remote_addr zone=req_od:10m rate=1r/s;

server {

	listen 80;

	server_name mirr.cheng.com;

	charset utf8;

	root /code;

	autoindex on;                 #开启目录索引(提供下载)

	autoindex_exact_size off;     #以人性化方式显示

	autoindex_localtime on;	      #与本地时间保持一致

	limit_req zone=req_od burst=3 nodelay;

	location / {

		index index.html;

	}

	location /centos {

		auth_basic "hello test";

		auth_basic_user_file "/etc/nginx/auth_conf";

	}

}

limit_req_zone $binary_remote_addr zone=req_one:10m rate=1r/s;

第一个参数:$binary_remote_addr表示通过这个标识来做限制,限制同一客户端ip地址。

第二个参数:zone=req_one:10m表示生成一个大小为10M,名为req_one的内存区域,用来存储访问的频次信息。

第三个参数:rate=1r/s表示允许相同标识的客户端的访问频次,这里限制的是每秒1次,还可以30r/m。

limit_req zone=req_one burst=3 nodelay;

第一个参数:zone=req_one 设置使用哪个配置区域来做限制,与上面limit_req_zone 里的name对应。

第二个参数:burst=3,设置一个大小为3的缓冲区,当有大量请求过来时,超过了访问频次限制的请求可以先放到这个缓冲区内。

第三个参数:nodelay,超过访问频次并且缓冲区也满了的时候,则会返回503,如果没有设置,则所有请求会等待排队。
2.连接限制(同一时刻只允许一个用户下载)
[root@web01 ~]# cat /etc/nginx/conf.d/mirr.cheng.com.conf

limit_req_zone $binary_remote_addr zone=req_od:10m rate=1r/s;

limit_conn_zone $binary_remote_addr zone=conn_od:10m;

server {

	listen 80;

	server_name mirr.cheng.com;

	charset utf8;

	root /code;

	autoindex on;                 #开启目录索引(提供下载)

	autoindex_exact_size off;     #以人性化方式显示

	autoindex_localtime on;	      #与本地时间保持一致

	limit_req zone=req_od burst=3 nodelay;

	limit_conn conn_od 1;

	location / {

		index index.html;

	}

#	location /centos {                    ---->>>注释

#		auth_basic "hello test";          ---->>>注释

#		auth_basic_user_file "/etc/nginx/auth_conf";   ---->>>注释

#	}                                     ---->>>注释

}
3.下载速率限制(企业会有对应的程序控制)
[root@web01 ~]# cat /etc/nginx/conf.d/mirr.cheng.com.conf

limit_req_zone $binary_remote_addr zone=req_od:10m rate=1r/s;

limit_conn_zone $binary_remote_addr zone=conn_od:10m;

server {

	listen 80;

	server_name mirr.cheng.com;

	charset utf8;

	root /code;

	autoindex on;                 #开启目录索引(提供下载)

	autoindex_exact_size off;     #以人性化方式显示

	autoindex_localtime on;	      #与本地时间保持一致

	limit_req zone=req_od burst=3 nodelay;

	limit_conn conn_od 2;        ---->>>允许2个用户同时下载

	limit_rate_after 100m;       ---->>>100m峰值

	limit_rate 100k;             ---->>>降至100k

	location / {

		index index.html;

	}

#	location /centos {

#		auth_basic "hello test";

#		auth_basic_user_file "/etc/nginx/auth_conf";

#	}

}
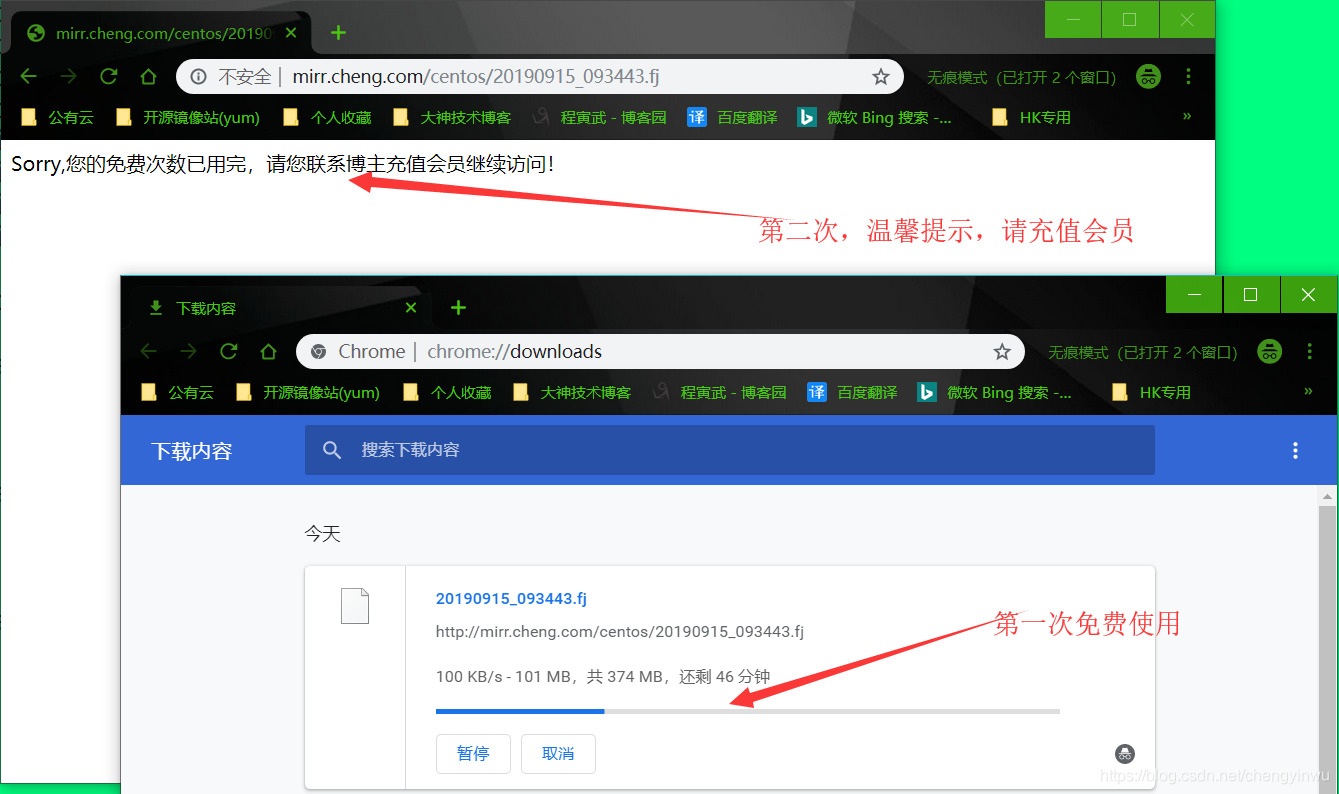
4.综合案例:限制web服务器请求数处理为1秒一个,触发值为5、限制并发连接数为1、限制下载速度为100k如果超过下载次数,则返回提示 "请充值会员"
[root@web01 ~]# cat /etc/nginx/conf.d/mirr.cheng.com.conf

limit_req_zone $binary_remote_addr zone=req_od:10m rate=1r/s;

limit_conn_zone $binary_remote_addr zone=conn_od:10m;

server {

	listen 80;

	server_name mirr.cheng.com;

	charset utf8;

	root /code;

	autoindex on;                 #开启目录索引(提供下载)

	autoindex_exact_size off;     #以人性化方式显示

	autoindex_localtime on;	      #与本地时间保持一致

	limit_req zone=req_od burst=5 nodelay;

	limit_conn conn_od 1;

	limit_rate_after 100m;

	limit_rate 100k;

	error_page 503 @errpage;

	location @errpage {

		default_type text/html;

		return 200 'Sorry,您的免费次数已用完,请您联系博主充值会员继续访问!';

	}

	location / {

		index index.html;

	}

#	location /centos {

#		auth_basic "hello test";

#		auth_basic_user_file "/etc/nginx/auth_conf";

#	}

}
4.nginx状态指标,俗称7种状态 监控Nginx
	location /nginx_status {

		stub_status;

	}

Active connections: 2

server accepts handled requests

			2     2      17

Reading: 0 Writing: 1 Waiting: 1

Active connections		活跃的连接数

accepts					总的TCP连接数

handled					成功握手的TCP连接数

accepts-handled		    失败的TCP连接数(总的减去成功的)

requests				总的请求数

Reading					读取到请求头的数量。

Writing					响应客户端到的数量。

Waiting					客户端与服务端的连接数

vim /etc/nginx/nginx.conf

	keepalive_timeout 65;		#长连接超时时间

	keepalive_timeout 0;		#模拟短连接效果
5.nginx location匹配、匹配优先级
location是用来控制用户请求的uri路径的
语法:
location [ = | ~ | ~* | ^~ ] uri { ... }
location @name { ... } #用户内部重定向
=  精确匹配

~  正则匹配

~* 正则匹配(忽略大小写)

^~ 以字符串方式匹配

/  通用匹配
编写实例:
[root@web01 conf.d]# cat location.com.conf

server {

	listen 80;

	server_name location.yinwu.com;

	location = / {

	default_type text/html;

	return 200 'location = /';

	}

	location / {

	default_type text_html;

	return 200 'location /';

	}

	location /documents/ {

	default_type text_html;

	return 200 'location /documents/';

	}

	location ^~ /images/ {

	default_type text_html;

	return 200 'localtion ^~ /images/';

	}

	location ~* \.(gif|jpg|jpeg)$ {

	default_type text/html;

	return 200 'location ~* \.(gif|jpg|jpeg)';

	}

}

测试:

	1.请求 http://location.yinwu.com/ 						会被  location =/   		匹配

	2.请求 http://location.yinwu.com/index.html				会被  location /			匹配

	3.请求 http://location.yinwu.com/documents/test.html	会被  location /documents/	匹配

	4.请求 http://location.yinwu.com/images/test.gif		会被  location ^~ /images/	匹配

	5.请求 http://location.yinwu.com/documents/1.jpg		会被  location ~* \.(gif|jpg|jpeg)$	匹配

优先级:

匹配符	匹配规则						优先级

=		精确匹配						1

^~		以某个字符串开头				2

~		区分大小写的正则匹配			3

~*		不区分大小写的正则匹配			4

/		通用匹配,任何请求都会匹配到	5

[root@web01 conf.d]# cat location2.yinwu.com.conf

server {

	listen 80;

	server_name location2.yinwu.com;

	# 通用匹配,任何请求都会匹配到

	location / {

		root html;

		index index.html;

	}

	# 精准匹配,必须请求的uri是/nginx_status

	location = /nginx_status {

		stub_status;

	}

	# 严格区分大小写,匹配以.php结尾的都走这个location

	location ~ \.php$ {

		default_type text/html;

		return 200 'php访问成功';

	}

	# 严格区分大小写,匹配以.jsp结尾的都走这个location

	location ~ \.jsp$ {

		default_type text/html;

		return 200 'jsp访问成功';

	}

	# 不区分大小写匹配,只要用户访问.jpg,gif,png,js,css 都走这条location

	location ~* \.(jpg|gif|png|js|css)$ {

		return 403;

	}

	# 不区分大小写匹配

	location ~* \.(sql|bak|tgz|tar.gz|.git)$ {

		deny all;

	}

}

	location @name { ... }

	@”前缀定义命名位置。这样的位置不用于常规请求处理,而是用于请求重定向.

	server {

		listen 80;

		mirror.yinwu.com;

		root /code;

		location / {

			index index.html;

		}

		#如果出现异常,则重新定向到@error_404这个location上

		error_page 404  @error_404;

		location @error_404 {

			default_type text/html;

			return 200 '你可能是瞎访问,走丢了。但是不要以为瞎访问就能找到Bug.....';

		}

	}
6.nginx 日志、访问日志、错误日志、日志过滤、日志切割
	统计 分析  那个 uri请求的次数最多

	错误日志     用来排除故障

    log_format  main  '$remote_addr - $remote_user [$time_local] "$request" '

                      '$status $body_bytes_sent "$http_referer" '

                      '"$http_user_agent" "$http_x_forwarded_for"';

	log_format  ttt   '$remote_addr - $remote_user [$time_local] "$request" '

                      '$status $body_bytes_sent';

	access_log /var/log/nginx/access.log main;

$remote_addr			# 来源的客户端IP			 		(   user--->web  )

$remote_user			# 登录的用户名 Http基本认证才会有 -

[$time_local]			# 时间

$request				# 请求uri 请求的方法 请求的协议

$status					# 状态码

$body_bytes_sent		# 发送的字节

$http_referer			# 从那个url过来的

$http_user_agent		# 来源的设备

$http_x_forwarded_for	# 记录真实的客户端IP  				(   user--->proxy--->web  )

日志过滤

location = /favicon.ico {

        access_log off;

        access_log /dev/null;

}

错误日志:
9.Nginx常用模块的更多相关文章
- nginx常用模块(三)
Nginx常用模块(三) ngx_http_proxy_module模块配置(http或https协议代理) proxy_pass URL; 应用上下文:location, if in locatio ...
- Nginx 常用模块
Nginx 常用模块 1. ngx_http_autoindex_module # ngx_http_autoindex_module模块处理以斜杠字符(' / ')结尾的请求,并生成一个目录列表. ...
- (转)nginx 常用模块整理
原文:http://blog.51cto.com/arm2012/1977090 1. 性能相关配置 worker_processes number | auto: worker进程的数量:通常应该为 ...
- nginx常用模块(一)
1.Nginx目录索引 1.1Nginx默认是不允许列出整个目录浏览下载.Syntax: autoindex on | off;Default: autoindex off;Context: http ...
- Nginx常用模块安装命令
将目录切换至Nginx安装包目录下,使用./configure命令进行安装.一些第三方模块需要先下载过来,指定下解压后的目录即可. ./configure --prefix=/usr/local/ng ...
- nginx常用模块
Nginx模块介绍 核心模块:core module 标准模块:stand modules HTTP modules: Standard HTTP modules Optional HTTP modu ...
- Nginx常用模块及作用
Nginx模块详解 nginx模块分为两种,官方和第三方,我们通过命令 nginx -V 查看 nginx已经安装的模块! [root@localhost ~]# nginx -V nginx ver ...
- 07 . Nginx常用模块及案例
访问控制 用户访问控制 ngx_http_auth_basic_module 有时我们会有这么一种需求,就是你的网站并不想提供一个公共的访问或者某些页面不希望公开,我们希望的是某些特定的客户端可以访问 ...
- NGINX常用模块(二)
5.Nginx日志配置 Nginx有非常灵活的日志记录模式.每个级别的配置可以有各自独立的访问日志.日志格式 通过log_format命令定义格式 1.log_format指令 # 配置语法:包括:e ...
随机推荐
- 05:videoToolbox:硬解码
videoToolbox:硬解码 前言:VTDecompressionSession 工作流程: 1:创建解压的会话. 2:配置会话属性. 3:解压视频帧数据. 4:释放会话.释放资源. 介绍 VT ...
- Netty源码分析 (十一)----- 拆包器之LengthFieldBasedFrameDecoder
本篇文章主要是介绍使用LengthFieldBasedFrameDecoder解码器自定义协议.通常,协议的格式如下: LengthFieldBasedFrameDecoder是netty解决拆包粘包 ...
- [Leetcode] 第357题 计算各个位数不同的数字个数
一.题目描述 给定一个非负整数 n,计算各位数字都不同的数字 x 的个数,其中 0 ≤ x < 10n . 示例: 输入: 2 输出: 91 解释: 答案应为除去 11,22,33,44,55, ...
- JMeter 压测Server Agent无法监控资源问题,PerfMon Metrics Collector报Waiting for sample,Error loading results file - see file log, Can't accept UDP connections java.net.BindException: Address already in use 各种疑难杂症
如何安装插件此博主已经说得很详细了. https://www.cnblogs.com/saryli/p/6596647.html 但是需注意几点: 1.修改默认端口,这样可以避免掉一个问题.Serve ...
- 推荐5款自学手机APP,请低调收藏,让你变得越来越优秀
现在的手机APP真的是太多了,但里面的功能同类性又非常大,很难找到实用并且符合要求的APP.接下来就为小伙伴们推荐5款非常实用的APP软件,保证你会爱不释手,轻松秒变手机达人. 1.清爽视频编辑器 一 ...
- 设计模式-Builder和Factory模式区别
Builder和Factory模式区别 Builder模式结构: Factory模式一进一出,Builder模式是分步流水线作业.当你需要做一系列有序的工作或者按照一定的逻辑来完成创建一个对象时 Bu ...
- 浏览器端获取短信验证码java实现——阿里云短信服务
需求:浏览器端输入手机号,获取验证码.点击登录,验证验证码是否输入错误.是否超时等情况,一旦校验通过,将用户数据保存到数据中(业务逻辑). 前提:注册阿里用户,开通短信服务,申请key.秘钥.签名.短 ...
- jenkins+svn+Ant+tomcat+非maven项目构建
首先,输入项目名称,创建一个自由风格的项目; 然后,配置旧项目的策略参数,目的是防止构建项目太多,占用资源. 下一步,jdk版本选择: 下一步,关联svn项目. 下一步:配置ant 看不清,再来一张. ...
- Flask基础(11)-->http的无状态协议解决办法二(服务端session)
session的交互流程 Session 对于敏感.重要的信息,建议存在服务器端,不能存储在浏览器中,比如用户名,密码,余额,验证码等信息 在服务器端进行状态保持的方案就是Session Sessio ...
- 如何将腾讯视频的qlv格式转换为mp4格式
基本上每个视频app都会有自己固有的视频播放格式,比如优酷的KUX.爱奇艺的QSV和腾讯的QLV等.而今天我们重点介绍腾讯的QLV格式如何转换为MP4格式,小便也是经过多次的摸索多次的软件试用,发现的 ...