
分布式远程调用SpringCloud-Feign的两种具体操作方式(精华)
一 前言
几大RPC框架介绍
spring cloud远程调用方式---Feign
Feign是一个声明似的web服务客户端,它使得编写web服务客户端变得更加容易。使用Fegin创建一个接口并对它进行注解。它具有可插拔的注解支持包括Feign注解与JAX-RS注解,Feign还支持可插拔的编码器与解码器,Spring Cloud 增加了对 Spring MVC的注解,Spring Web 默认使用了HttpMessageConverters, Spring Cloud 集成 Ribbon 和 Eureka 提供的负载均衡的HTTP客户端 Feign。
官方解释: Feign is a Java to HTTP client binder inspired by Retrofit, JAXRS-2.0, and WebSocket. Feign's first goal was reducing the complexity of binding Denominator uniformly to HTTP APIs regardless of ReSTfulness.
Feign的两种调用方式
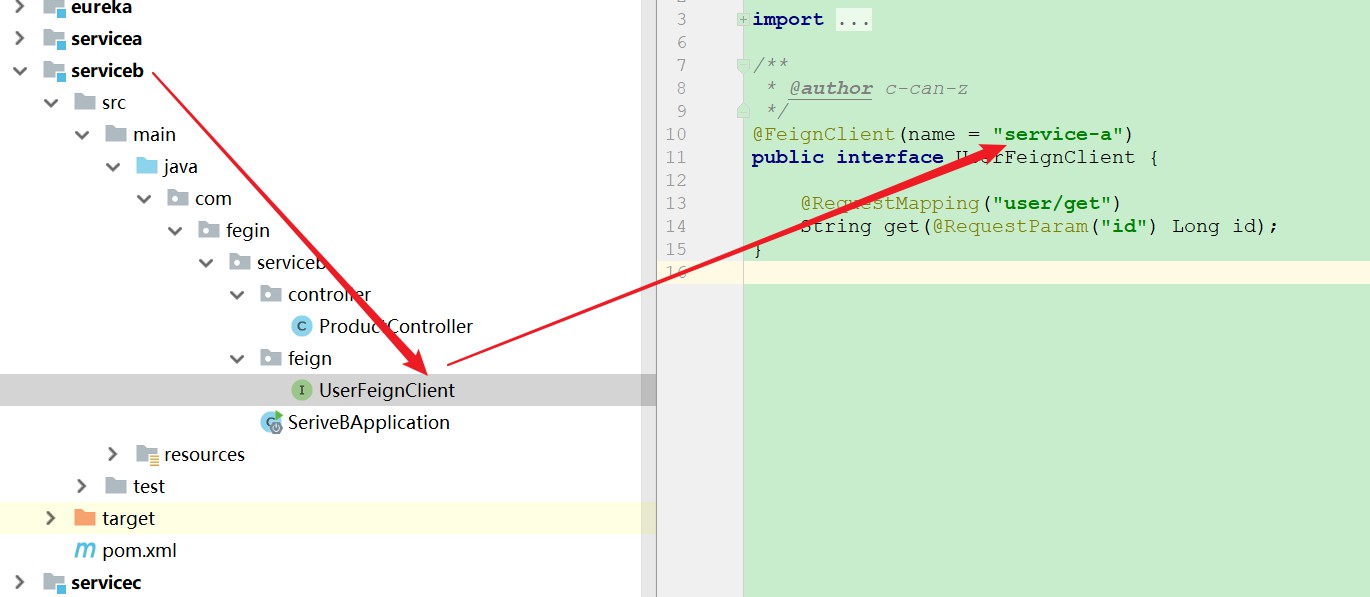
1 直接在调用者声明Feign客户端
如下图所示, service-b 声明一个接口, 去调用路径为 /user/get 的服务 service-a 的服务
2 在被调用者接口Api中声明Feign客户端
如下图, 在被调用者中声明接口, 去调用自己, 这种方法遵循面向接口编程, 而且使用起来, 就类似dubbo一样, @Autowire直接注入就可以使用了.

以上可能看得读者一头雾水, 以下具体的代码流程, 可以方便更加具体的了解
二 案例1直接在调用者声明Feign客户端代码实现
以下步骤为手把手教学, 请明白我的良苦用心
步骤0 创建一个SpringCloud-Eureka注册中心
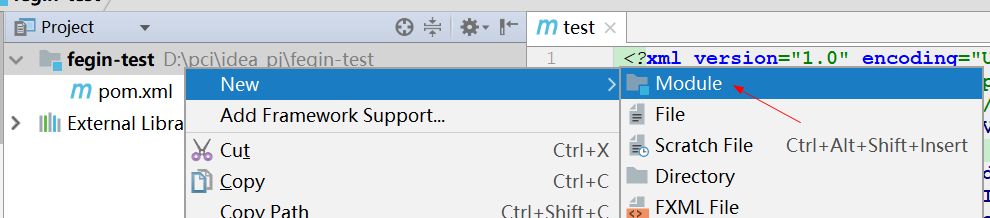
首先创建一个父项目
把其他都删除, 剩下pom文件
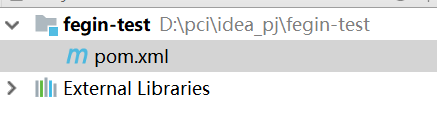
以下为父项目的依赖
<?xml version="1.0" encoding="UTF-8"?>

<project xmlns="http://maven.apache.org/POM/4.0.0" xmlns:xsi="http://www.w3.org/2001/XMLSchema-instance"

    xsi:schemaLocation="http://maven.apache.org/POM/4.0.0 https://maven.apache.org/xsd/maven-4.0.0.xsd">

    <modelVersion>4.0.0</modelVersion>

    <groupId>com.fegin</groupId>

    <artifactId>test</artifactId>

    <version>0.0.1-SNAPSHOT</version>

    <packaging>pom</packaging>

    <!--springboot version 2.1.4-->

    <parent>

        <groupId>org.springframework.boot</groupId>

        <artifactId>spring-boot-starter-parent</artifactId>

        <version>2.1.4.RELEASE</version>

        <relativePath/> <!-- lookup parent from repository -->

    </parent>

    <properties>

        <java.version>1.8</java.version>

        <spring-cloud.version>Greenwich.SR1</spring-cloud.version>

    </properties>

    <!--springcloud version Greenwish.SR1-->

    <dependencyManagement>

        <dependencies>

            <dependency>

                <groupId>org.springframework.cloud</groupId>

                <artifactId>spring-cloud-dependencies</artifactId>

                <version>${spring-cloud.version}</version>

                <type>pom</type>

                <scope>import</scope>

            </dependency>

        </dependencies>

    </dependencyManagement>

</project>
创建eureka项目
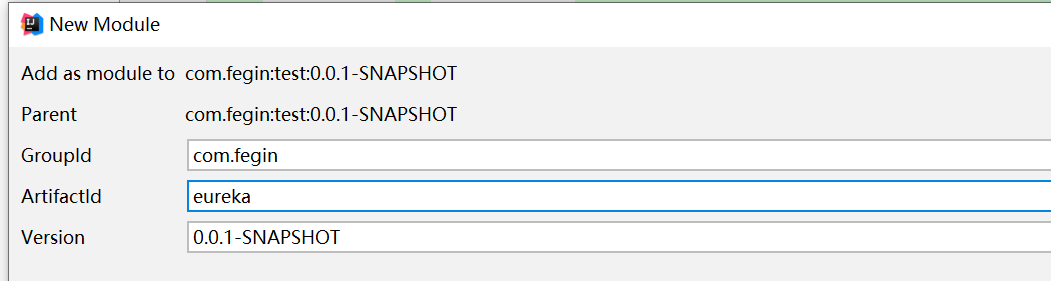
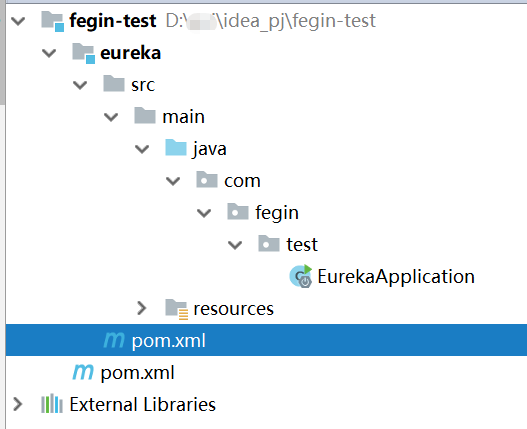
项目结构如图
添加eureka的依赖
<?xml version="1.0" encoding="UTF-8"?>

<project xmlns="http://maven.apache.org/POM/4.0.0"

         xmlns:xsi="http://www.w3.org/2001/XMLSchema-instance"

         xsi:schemaLocation="http://maven.apache.org/POM/4.0.0 http://maven.apache.org/xsd/maven-4.0.0.xsd">

    <parent>

        <artifactId>test</artifactId>

        <groupId>com.fegin</groupId>

        <version>0.0.1-SNAPSHOT</version>

    </parent>

    <modelVersion>4.0.0</modelVersion>

    <artifactId>eureka</artifactId>

    <!--eureka服务端配置-->

    <dependencies>

        <dependency>

            <groupId>org.springframework.cloud</groupId>

            <artifactId>spring-cloud-starter-netflix-eureka-server</artifactId>

        </dependency>

    </dependencies>

</project>
添加application.yml
server:

  port: 8761

eureka:

  instance:

    hostname: localhost

  client:

    # 是否把自己作为服务注册到其他服务注册中心

    registerWithEureka: false

    # 是否从其他的服务中心同步服务列表

    fetchRegistry: false

    serviceUrl:

      defaultZone: http://${eureka.instance.hostname}:${server.port}/eureka/

  server:

    # 关闭保护机制,默认true

    enable-self-preservation: false

    # 剔除失效服务间隔,默认60000

    eviction-interval-timer-in-ms: 3000
添加启动类代码EurekaApplication
/**

 * @author c-can-z

 */

@EnableEurekaServer

@SpringBootApplication

public class EurekaApplication {

    public static void main(String[] args) {

        SpringApplication.run(EurekaApplication.class,args);

    }

}
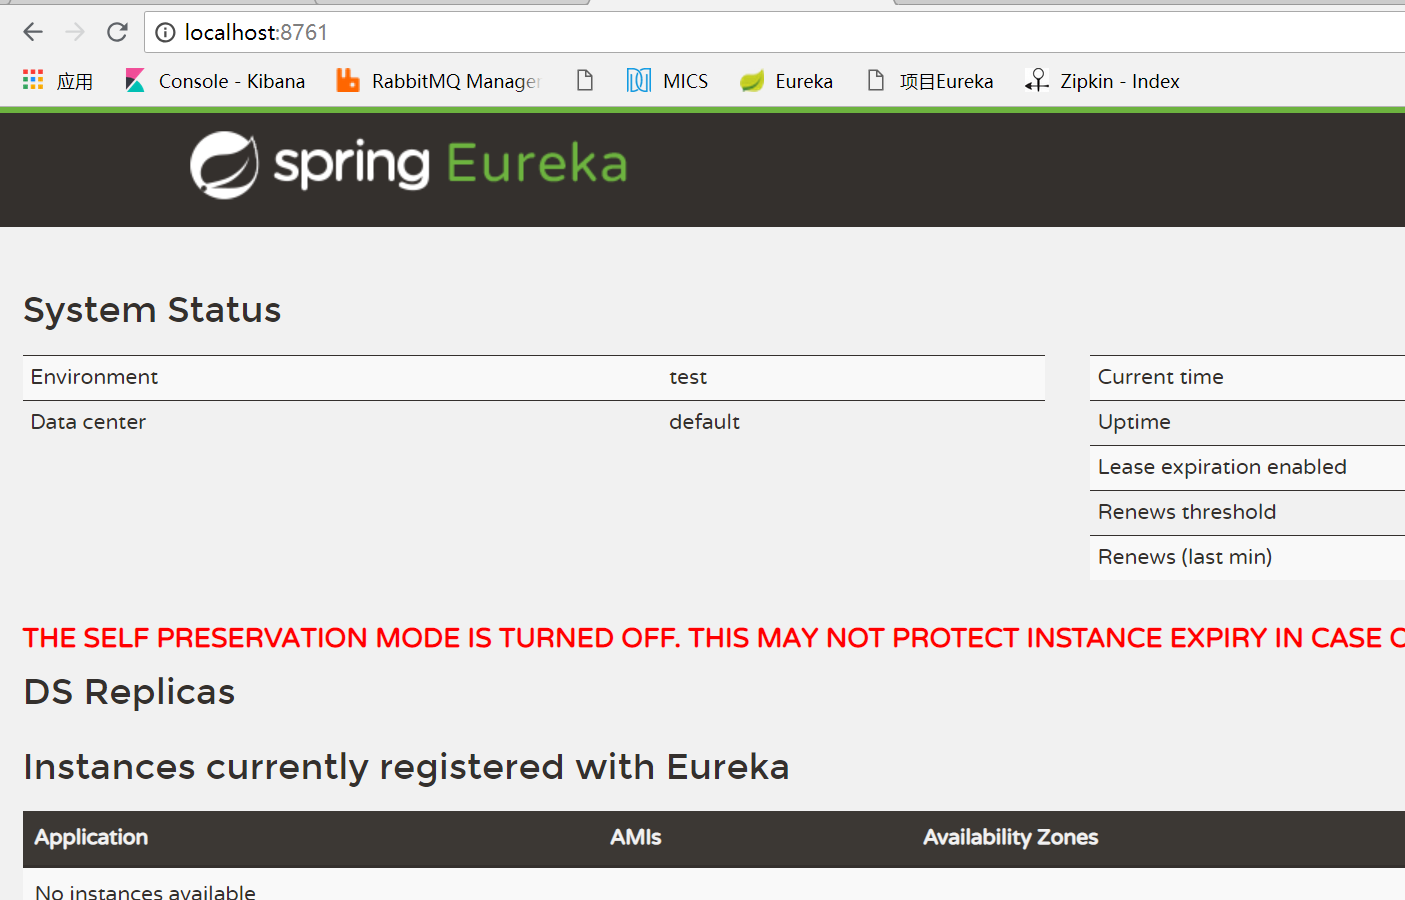
浏览器输入 http://localhost:8761/
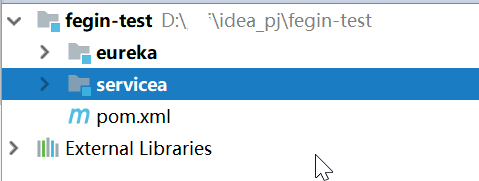
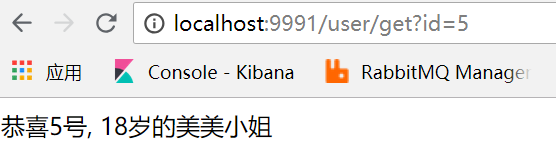
步骤1 准备一个服务servicea --- 该服务为被调用者
步骤2 准备一个服务serviceb --- 该服务为调用者
创建一个serviceb
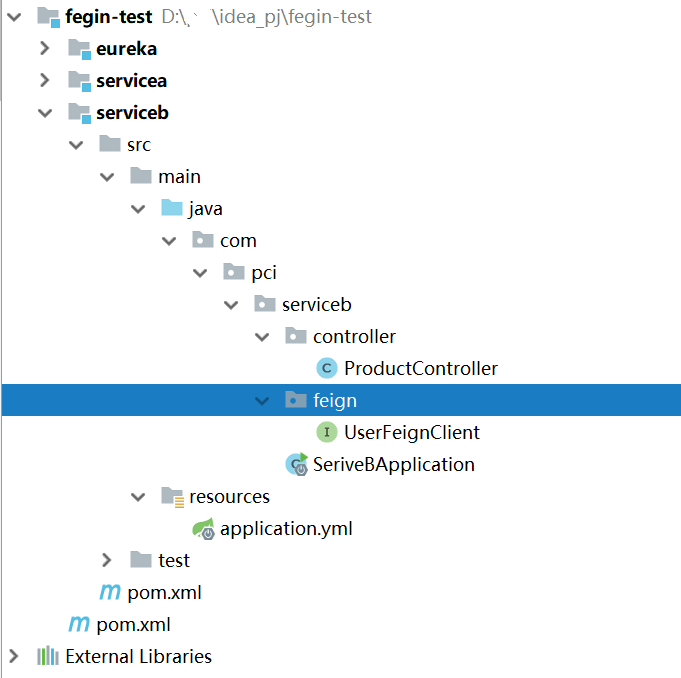
添加一下serviceb必须的依赖
<?xml version="1.0" encoding="UTF-8"?>

<project xmlns="http://maven.apache.org/POM/4.0.0"

         xmlns:xsi="http://www.w3.org/2001/XMLSchema-instance"

         xsi:schemaLocation="http://maven.apache.org/POM/4.0.0 http://maven.apache.org/xsd/maven-4.0.0.xsd">

    <parent>

        <artifactId>test</artifactId>

        <groupId>com.fegin</groupId>

        <version>0.0.1-SNAPSHOT</version>

    </parent>

    <modelVersion>4.0.0</modelVersion>

    <artifactId>serviceb</artifactId>

    <dependencies>

        <!--springboot web-->

        <dependency>

            <groupId>org.springframework.boot</groupId>

            <artifactId>spring-boot-starter-web</artifactId>

        </dependency>

        <!--springboot 测试-->

        <dependency>

            <groupId>org.springframework.boot</groupId>

            <artifactId>spring-boot-starter-test</artifactId>

            <scope>test</scope>

        </dependency>

        <!--lombok-->

        <dependency>

            <groupId>org.projectlombok</groupId>

            <artifactId>lombok</artifactId>

        </dependency>

        <!--eureka客户端配置-->

        <dependency>

            <groupId>org.springframework.cloud</groupId>

            <artifactId>spring-cloud-starter-netflix-eureka-client</artifactId>

        </dependency>

        <dependency>

            <groupId>org.springframework.cloud</groupId>

            <artifactId>spring-cloud-starter-netflix-ribbon</artifactId>

        </dependency>

        <!--微服务调用-->

        <dependency>

            <groupId>org.springframework.cloud</groupId>

            <artifactId>spring-cloud-starter-openfeign</artifactId>

        </dependency>

        <!--zipkin客户端配置, 已经包含sleuth-->

        <dependency>

            <groupId>org.springframework.cloud</groupId>

            <artifactId>spring-cloud-starter-zipkin</artifactId>

        </dependency>

    </dependencies>

</project>
把 application.properties 修改为 application.yml, 本服务名称为 service-b 端口为 9992
server:

  port: 9992

spring:

  application:

    name: service-b

  zipkin:

    base-url: http://localhost:9411

  sleuth:

    sampler:

      probability: 1

eureka:

  client:

    serviceUrl:

      defaultZone: http://localhost:8761/eureka/

    registry-fetch-interval-seconds: 5 #eureka client刷新本地缓存时间,默认30

  instance:

    prefer-ip-address: true

    #Eureka客户端向服务端发送心跳的时间间隔,单位为秒(客户端告诉服务端自己会按照该规则),默认30

    lease-renewal-interval-in-seconds: 5

    #Eureka服务端在收到最后一次心跳之后等待的时间上限,单位为秒,超过则剔除(客户端告诉服务端按照此规则等待自己),默认90

    lease-expiration-duration-in-seconds: 7

feign:

  client:

    config:

      default:

        connectTimeout: 7000

        readTimeout: 7000

service-b:

  ribbon:

    NFLoadBalancerRuleClassName: com.netflix.loadbalancer.RandomRule

logging:

  level:

    root: info
导入启动类文件
@SpringBootApplication

@EnableFeignClients

public class SeriveBApplication {

    public static void main(String[] args) {

        SpringApplication.run(SeriveBApplication.class,args);

    }

}
创建Feign客户端
//在创建该步骤的时候, 需要关注一下步骤1的说明

//@FeignClient(name = "service-a")注解来绑定该接口对应servic-a服务

@FeignClient(name = "service-a")

public interface UserFeginClient {

    //service-a服务对应资源路径.必须加上@RequestParam, 否则会报错,返回参数也必须对应上

    @RequestMapping("user/get")

    String get(@RequestParam("id")Long id);

}
在controller中直接进行调用
@RestController

@RequestMapping("/product")

public class ProductController {

    @Autowired

    private UserFeginClient userFeginClient;

    @RequestMapping("/get")

    public String get(Long id){

        return "产品服务抽奖: "+userFeginClient.get(id);

    }

}
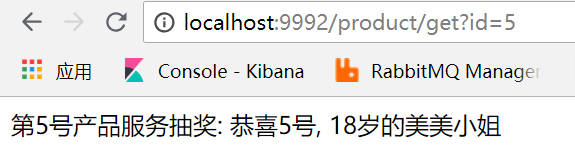
步骤3 测试Feign调用效果
三 案例2 在被调用者接口Api中声明Feign客户端代码实现
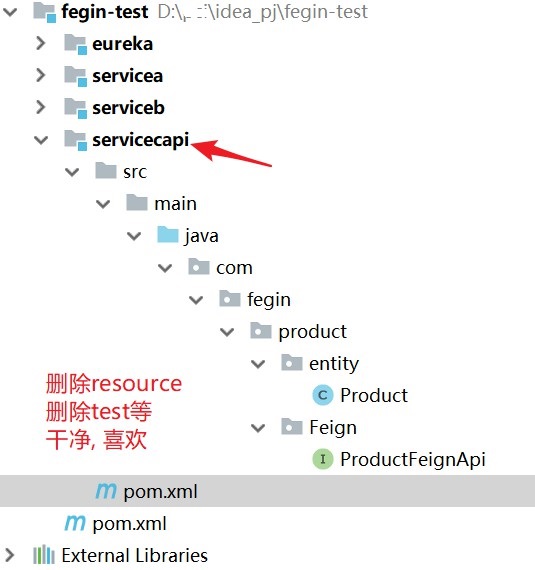
步骤1 创建servicecapi, 该Api用来创建Feign客户端
<?xml version="1.0" encoding="UTF-8"?>

<project xmlns="http://maven.apache.org/POM/4.0.0"

         xmlns:xsi="http://www.w3.org/2001/XMLSchema-instance"

         xsi:schemaLocation="http://maven.apache.org/POM/4.0.0 http://maven.apache.org/xsd/maven-4.0.0.xsd">

    <parent>

        <artifactId>test</artifactId>

        <groupId>com.fegin</groupId>

        <version>0.0.1-SNAPSHOT</version>

    </parent>

    <modelVersion>4.0.0</modelVersion>

    <artifactId>servicec-api</artifactId>

    <dependencies>

        <!--lombok-->

        <dependency>

            <groupId>org.projectlombok</groupId>

            <artifactId>lombok</artifactId>

        </dependency>

        <!--微服务调用-->

        <dependency>

            <groupId>org.springframework.cloud</groupId>

            <artifactId>spring-cloud-starter-openfeign</artifactId>

        </dependency>

    </dependencies>

</project>
实体类product
public class Product implements Serializable {

    private Long id;

    private String name;

    public Long getId() {

        return id;

    }

    public void setId(Long id) {

        this.id = id;

    }

    public String getName() {

        return name;

    }

    public void setName(String name) {

        this.name = name;

    }
}
feign客户端
/**

 * 服务名称

 * @author c-can-z

 */

@FeignClient(name="service-c")

public interface ProductFeignApi {

    //动态代理需要的地址, 但是我们实际操作不到

    @RequestMapping("/servicec/get")

    Product get(@RequestParam("id") Long id);

}
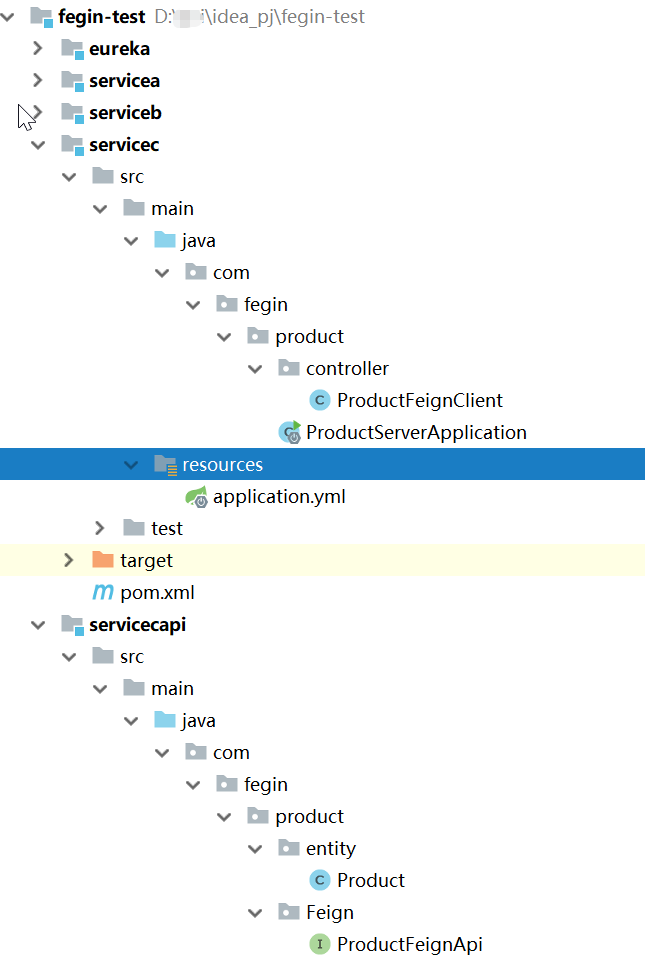
步骤2 创建servicec服务
项目结构
service项目依赖
<?xml version="1.0" encoding="UTF-8"?>

<project xmlns="http://maven.apache.org/POM/4.0.0"

         xmlns:xsi="http://www.w3.org/2001/XMLSchema-instance"

         xsi:schemaLocation="http://maven.apache.org/POM/4.0.0 http://maven.apache.org/xsd/maven-4.0.0.xsd">

    <parent>

        <artifactId>test</artifactId>

        <groupId>com.fegin</groupId>

        <version>0.0.1-SNAPSHOT</version>

    </parent>

    <modelVersion>4.0.0</modelVersion>

    <artifactId>servicec</artifactId>

    <dependencies>

        <!--springboot web-->

        <dependency>

            <groupId>org.springframework.boot</groupId>

            <artifactId>spring-boot-starter-web</artifactId>

        </dependency>

        <!--eureka客户端配置-->

        <dependency>

            <groupId>org.springframework.cloud</groupId>

            <artifactId>spring-cloud-starter-netflix-eureka-client</artifactId>

        </dependency>

        <!--zipkin客户端配置, 已经包含sleuth-->

        <dependency>

            <groupId>org.springframework.cloud</groupId>

            <artifactId>spring-cloud-starter-zipkin</artifactId>

        </dependency>

        <!--springboot 测试-->

        <dependency>

            <groupId>org.springframework.boot</groupId>

            <artifactId>spring-boot-starter-test</artifactId>

            <scope>test</scope>

        </dependency>

        <!--导入api-->

        <dependency>

            <groupId>com.fegin</groupId>

            <artifactId>servicec-api</artifactId>

            <version>0.0.1-SNAPSHOT</version>

        </dependency>

    </dependencies>

</project>
servicec的 application.yml
server:

  port: 9993

spring:

  application:

    name: service-c

  zipkin:

    base-url: http://localhost:9411

  sleuth:

    sampler:

      probability: 1

eureka:

  client:

    serviceUrl:

      defaultZone: http://localhost:8761/eureka/

    registry-fetch-interval-seconds: 5 #eureka client刷新本地缓存时间,默认30

  instance:

    prefer-ip-address: true

    #Eureka客户端向服务端发送心跳的时间间隔,单位为秒(客户端告诉服务端自己会按照该规则),默认30

    lease-renewal-interval-in-seconds: 5

    #Eureka服务端在收到最后一次心跳之后等待的时间上限,单位为秒,超过则剔除(客户端告诉服务端按照此规则等待自己),默认90

    lease-expiration-duration-in-seconds: 7

feign:

  client:

    config:

      default:

        connectTimeout: 7000

        readTimeout: 7000

logging:

  level:

    root: info
实现Feign客户端接口, 也是该文章的核心代码
采用实现的方式
/**

 * 远程调用接口的实现类

 * @author c-can-z

 */

@RestController

public class ProductFeignClient implements ProductFeignApi {

    @Override

    public Product get(Long id) {

        Product product = new Product();

        product.setId(id);

        product.setName("我是服务C");

        return product;

    }

}
servicec的启动类
@SpringBootApplication

public class ProductServerApplication {

    public static void main(String[] args) {

        SpringApplication.run(ProductServerApplication.class, args);

    }

}
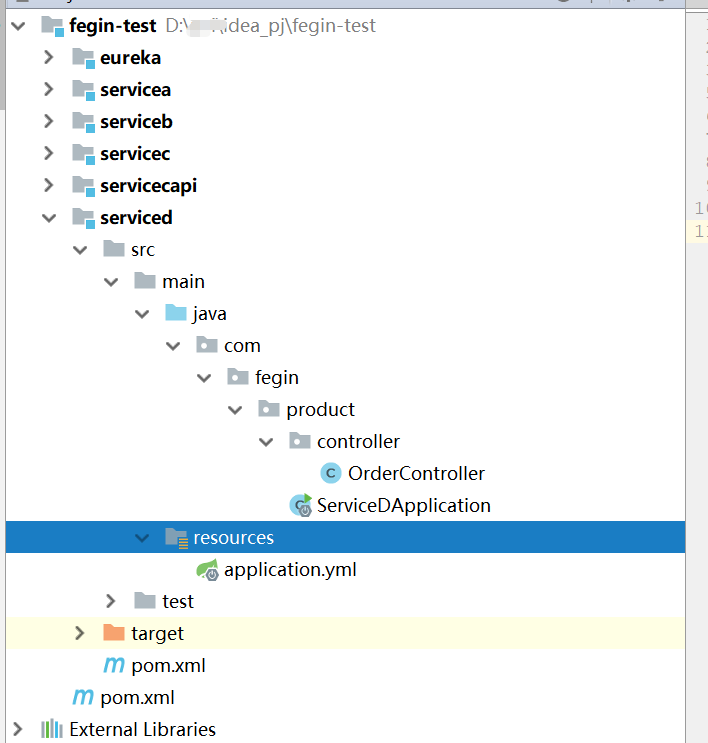
步骤3 创建serviced服务去调用servicec
项目结构
注意启动类的位置, servicecapi的路径必须被启动类扫描到
serviced的依赖,
注意, 必须引入servicec的api, 有人会说有代码侵入的问题, 但是对比案例1, 如果多个项目调用, 要创建多个Feign客户端, 孰是孰非, 还得看项目的具体需求
<?xml version="1.0" encoding="UTF-8"?>

<project xmlns="http://maven.apache.org/POM/4.0.0"

         xmlns:xsi="http://www.w3.org/2001/XMLSchema-instance"

         xsi:schemaLocation="http://maven.apache.org/POM/4.0.0 http://maven.apache.org/xsd/maven-4.0.0.xsd">

    <parent>

        <artifactId>test</artifactId>

        <groupId>com.fegin</groupId>

        <version>0.0.1-SNAPSHOT</version>

    </parent>

    <modelVersion>4.0.0</modelVersion>

    <artifactId>serviced</artifactId>

    <dependencies>

        <!--springboot web-->

        <dependency>

            <groupId>org.springframework.boot</groupId>

            <artifactId>spring-boot-starter-web</artifactId>

        </dependency>

        <!--springboot 测试-->

        <dependency>

            <groupId>org.springframework.boot</groupId>

            <artifactId>spring-boot-starter-test</artifactId>

            <scope>test</scope>

        </dependency>

        <!--lombok-->

        <dependency>

            <groupId>org.projectlombok</groupId>

            <artifactId>lombok</artifactId>

        </dependency>

        <!--eureka客户端配置-->

        <dependency>

            <groupId>org.springframework.cloud</groupId>

            <artifactId>spring-cloud-starter-netflix-eureka-client</artifactId>

        </dependency>

        <!--微服务调用-->

        <dependency>

            <groupId>org.springframework.cloud</groupId>

            <artifactId>spring-cloud-starter-openfeign</artifactId>

        </dependency>

        <!--zipkin客户端配置, 已经包含sleuth-->

        <dependency>

            <groupId>org.springframework.cloud</groupId>

            <artifactId>spring-cloud-starter-zipkin</artifactId>

        </dependency>

        <dependency>

            <groupId>com.fegin</groupId>

            <artifactId>servicec-api</artifactId>

            <version>0.0.1-SNAPSHOT</version>

        </dependency>

    </dependencies>

</project>
serviced的 application.yml
server:

  port: 9994

spring:

  application:

    name: service-d

  zipkin:

    base-url: http://localhost:9411

  sleuth:

    sampler:

      probability: 1

eureka:

  client:

    serviceUrl:

      defaultZone: http://localhost:8761/eureka/

    registry-fetch-interval-seconds: 5 #eureka client刷新本地缓存时间,默认30

  instance:

    prefer-ip-address: true

    #Eureka客户端向服务端发送心跳的时间间隔,单位为秒(客户端告诉服务端自己会按照该规则),默认30

    lease-renewal-interval-in-seconds: 5

    #Eureka服务端在收到最后一次心跳之后等待的时间上限,单位为秒,超过则剔除(客户端告诉服务端按照此规则等待自己),默认90

    lease-expiration-duration-in-seconds: 7

feign:

  client:

    config:

      default:

        connectTimeout: 7000

        readTimeout: 7000

logging:

  level:

    root: info
serviced的控制类
/**

 * @author c-can-z

 */

@RestController

@RequestMapping("/order")

public class OrderController {

    @Autowired

    private ProductFeignApi productFeignApi;

    @RequestMapping("/get")

    public String get(Long id){

        Product product = productFeignApi.get(id);

        return "订单为: 货品:" + product.getName() + ", 货品id:"+product.getId();

    }

}
serviced的启动类
/**

 * @author c-can-z

 */

@SpringBootApplication

@EnableFeignClients

public class ServiceDApplication {

    public static void main(String[] args) {

        SpringApplication.run(ServiceDApplication.class,args);

    }

}
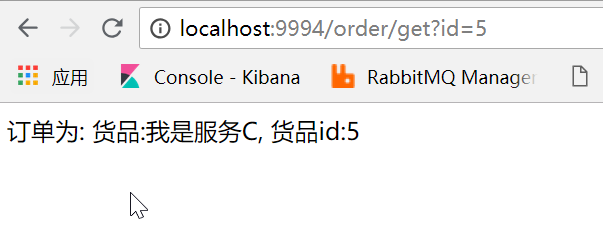
步骤4 测试Feign调用效果
http://localhost:9994/order/get?id=5
四 总结
到了这里, 不知道你是否理解 直接在调用者声明Feign客户端 或者 在被调用者接口Api中声明Feign客户端
直接在调用者声明Feign客户端:
每一个服务调用其他服务, 就需要创建一个客户端, 从代码方面来说, 相对比较麻烦
在被调用者接口Api中声明Feign客户端:
从调用者来看, 使用起来就跟使用淘宝的dubbo一样方便, 但是每一个服务调用其他服务, 就需要引入其他服务的api依赖, 从项目之间的互相依赖来看, 相对来说, 也会比较麻烦.
分布式远程调用SpringCloud-Feign的两种具体操作方式(精华)的更多相关文章
- Atitit.分布式远程调用 rpc rmi CORBA的关系
Atitit.分布式远程调用 rpc rmi CORBA的关系 1. 远程调用(包括rpc,rmi,rest)1 2. 分布式调用大体上就分为两类,RPC式的,REST式的1 3. RPC(远程 ...
- WCF 客户端调用服务操作的两种方法
本节的主要内容:1.通过代理类的方式调用服务操作.2.通过通道的方式调用服务操作.3.代码下载 一.通过代理类的方式调用服务操作(两种方式添加代理类) 1.手动编写代理类,如下: 客户端契约: usi ...
- C#动态调用WCF接口,两种方式任你选。
写在前面 接触WCF还是它在最初诞生之处,一个分布式应用的巨作. 从开始接触到现在断断续续,真正使用的项目少之又少,更谈不上深入WCF内部实现机制和原理去研究,最近自己做一个项目时用到了WCF. 从这 ...
- SoapUI调用webservice实现的两种方式
SoapUI用来做测试,已经是很多人做过的事情了,而且网上教程也很多.不过还是写下来,对比webservice协议与http协议脚本编写的不同. 首先测接口得有一个服务,刚好笔者所在项目做ESB集成. ...
- java中调用dll文件的两种方法
一中是用JNA方法,另外是用JNative方法,两种都是转载来的, JNA地址:http://blog.csdn.net/shendl/article/details/3589676 JNativ ...
- JGit与远程仓库链接使用的两种验证方式(ssh和https)
JGit是使用JAVA的API来操控Git仓库的库,由Eclipse公司维护.他提供的API分成两个层次,底层命令和高层命令.底层API是直接作用于低级的仓库对象,高层的API是一个面向普通用户级别功 ...
- rsync 远程同步 实时同步备份 两种免交互的方式实现实时备份
rsync 远程同步: 一款快速增量备份工具 Remote Sync,远程同步 支持本地复制,或者与其他SSH.rsync主机同步 作用:做数据备份 备份方式: 完全备份 增量备份 ...
- JGit与远程仓库链接使用的两种验证方式(ssh和https)
JGit是使用JAVA的API来操控Git仓库的库,由Eclipse公司维护.他提供的API分成两个层次,底层命令和高层命令.底层API是直接作用于低级的仓库对象,高层的API是一个面向普通用户级别功 ...
- C++调用C代码的两种方式
由于C++支持函数重载,在编译函数代码的时候会加上参数类型的信息,而C编译只有函数名信息,导致C++直接调用C代码在链接的时候会出现函数未定义的问题.解决这种问题有两种方法.方法一:在写C代码的时候考 ...
随机推荐
- Python调试工具
1. 日志 通过日志或者print来打印变量.必要时可以打印locals()和globals() 建议使用logging.debug()来代替print,这样到了正式环境,就可以统一删除这些日志. 2 ...
- Java 生成在线二维码 以Base64返回前端、或者写入到本地磁盘
思路 现阶段遇到这样一个问题,在原有的产品上加入线下优惠券模式,用户领取优惠券以后,获取到一个唯一的ID作为领取凭证,但是在线下用扫码枪进行扫码的时候,总不能让人手动输入吧 于是乎就想出了一个办法,后 ...
- 学习笔记05一般处理程序ashx
1.获取由表单传过来的参数var value1 = HttpContext.Request["健"]; 2.使得网站目录下的相对路径转化为绝对路径:(用于文件操作)var file ...
- 自闭版节奏大C
1,2,3,4打碟 #include <bits/stdc++.h> #include <conio.h> #include <windows.h> using n ...
- Kong06-Kong 的集群怎么用
Kong 集群允许您通过添加更多的机器来处理更多的传入请求来横向扩展系统.它们将共享相同的配置,因为它们指向相同的数据库.指向相同数据存储的 Kong 节点将属于相同的 Kong 集群. 您需要在Ko ...
- CSPS模拟 64
觉悟试炼场 暴力没打满有点遗憾 T2莫队没想到有点遗憾 T1 Trade 反悔贪心? 赛时猜了个解法,结果过样例过对拍就交了. 贪心依据:如果目前买入a有机会在b卖出赚钱,则a在任何最优方案中都被购买 ...
- VM 使用问题 | 安装失败->>注册表
下午乌龙了一回,本来就知道注册表都卸载的乱乱的 以为安装上即可,越弄越糊涂 无法安装.... 查了注册表,发现那些都删除了 手动安装实在太过麻烦,弄了一早上. 如图:未能解决 后使用了清洁 ...
- Python 定义动态变量
问题描述 在做数据处理时,对一些分组得来的数据,所做的操作大同小异,变量的命名也都拥有相同的结构,比如对每个月份的数据求均值.方差等统计量,变量的命名可取为“n月的均值”,“n月的方差”,抽象出来就是 ...
- python手册学习笔记2
笔记2 > http://www.pythondoc.com/pythontutorial3/datastructures.html 列表操作 list.append(x) 把一个元素添加到列表 ...
- Pandas进阶笔记 (一) Groupby 重难点总结
如果Pandas只是能把一些数据变成 dataframe 这样优美的格式,那么Pandas绝不会成为叱咤风云的数据分析中心组件.因为在数据分析过程中,描述数据是通过一些列的统计指标实现的,分析结果也需 ...