
用 vs 2017创建 windows 服务
转载自:http://www.cnblogs.com/xujie/p/5695673.html
1、新建windows服务项目,我这里选择的是Framework4.0,没有选择高版本是为了防止在服务在一些低版本系统上无法正常运行。
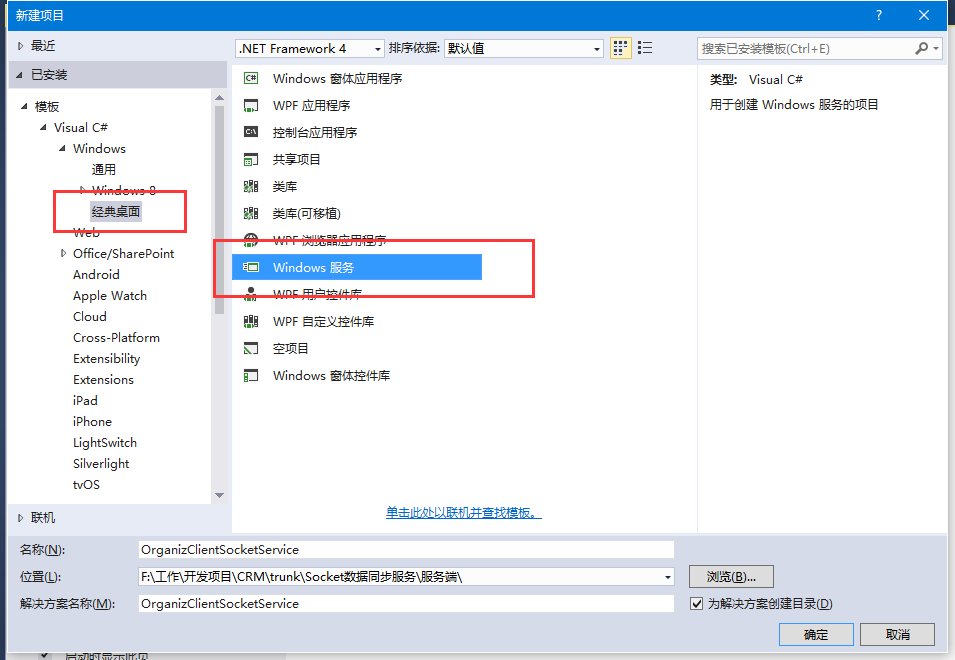
2、添加Windows服务的安装程序。
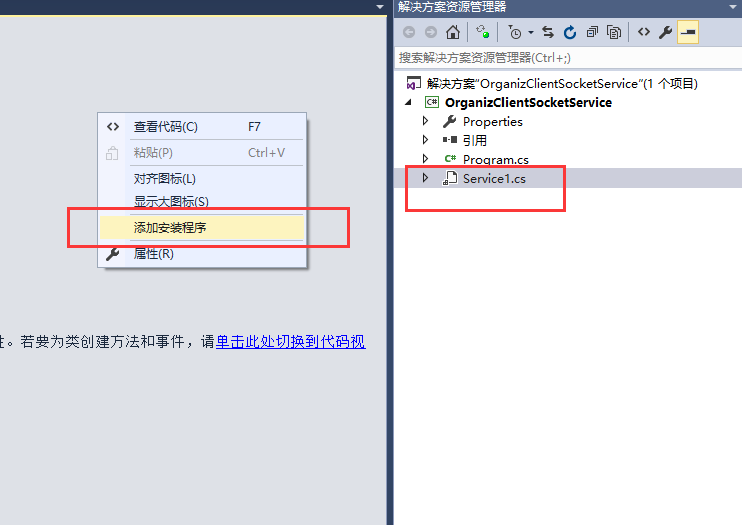
在默认Service1设计器界面空白处点击右键->添加安装程序,系统会自动新建一个带有默认配置的安装程序类,如下图:
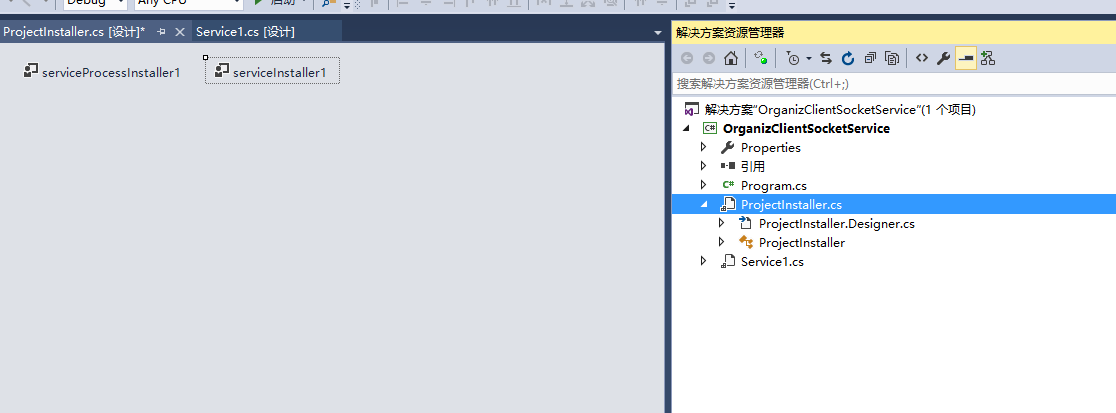
新建完安装程序后,需要给默认的serviceInstaller1和serviceProcessInstaller1做一些基本的属性设置。如下图:
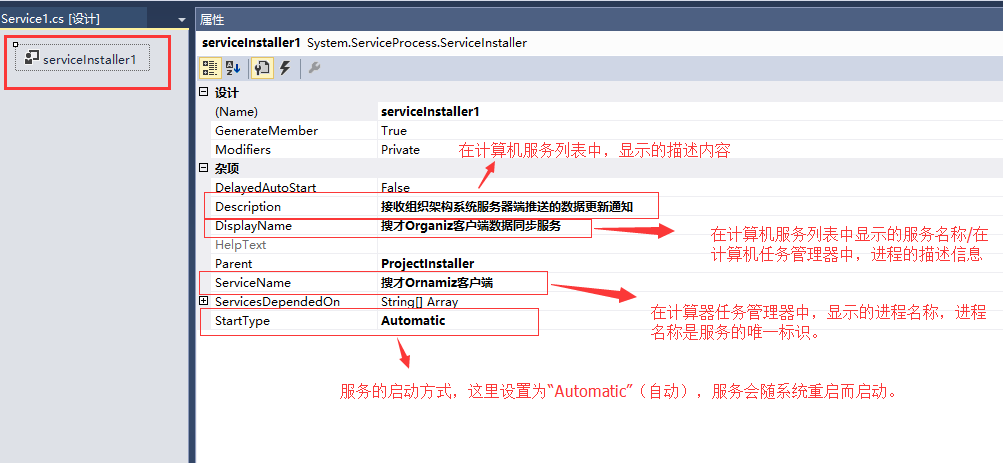
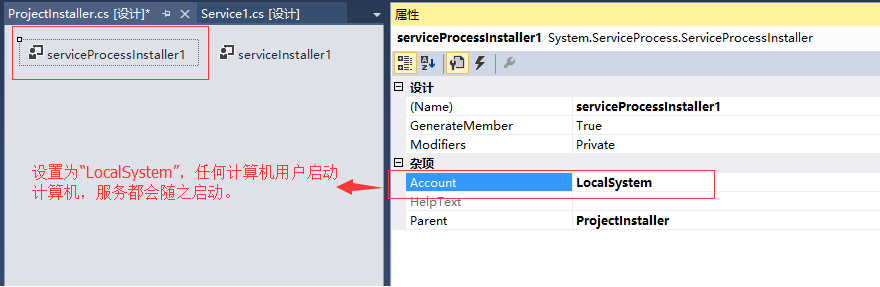
以上工作完成,安装程序配置完毕。
注意:如果不给服务添加安装程序,后面是没法把服务安装至windows系统里的。
3、添加应用程序配置文件(如果有需要的话)。
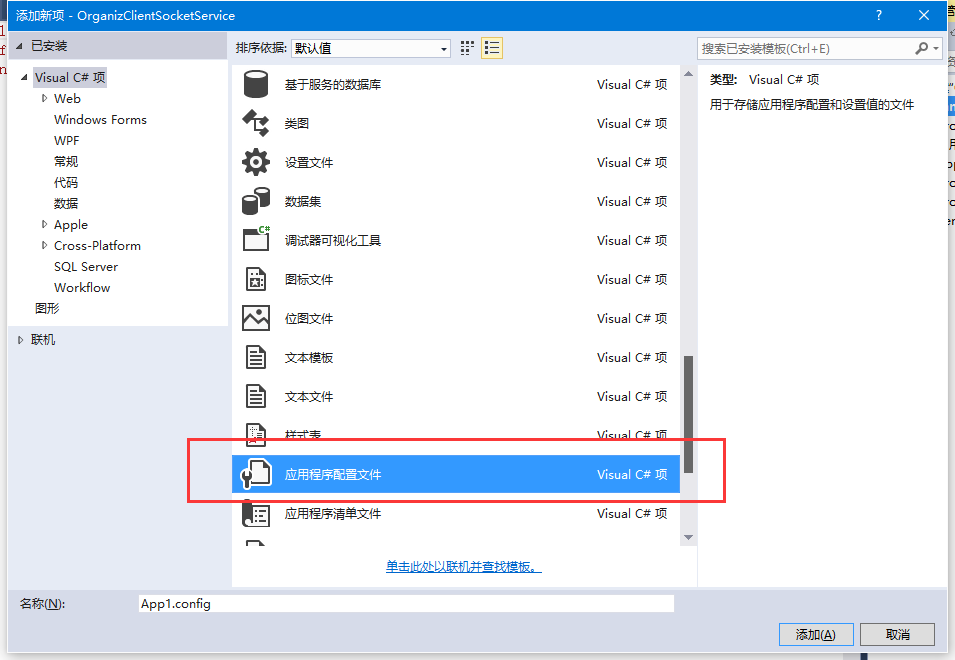
如果项目有需要,一些应用程序的配置参数可以设置在此文件里(例如:数据库连接字符串)。
4、编写windows服务主代码
- using System;
- using System.Collections.Generic;
- using System.ComponentModel;
- using System.Data;
- using System.Diagnostics;
- using System.IO;
- using System.Linq;
- using System.ServiceProcess;
- using System.Text;
- using System.Threading.Tasks;
- namespace WinServiceTest
- {
- public partial class Service1 : ServiceBase
- {
- public Service1()
- {
- InitializeComponent();
- System.Timers.Timer timer = new System.Timers.Timer();
- timer.Elapsed += new System.Timers.ElapsedEventHandler(TimedEvent);
- timer.Interval = 5000;//每5秒执行一次
- timer.Enabled = true;
- }
- public int count = 0;
- //定时执行事件
- private void TimedEvent(object sender, System.Timers.ElapsedEventArgs e)
- {
- //业务逻辑代码
- EmailClass mail = new EmailClass();
- mail.Email(count++);
- }
- protected override void OnStart(string[] args)
- {
- this.WriteLog("\n当前时间:" + DateTime.Now.ToString("yyyy-MM-dd hh-mm-ss") + "\n");
- this.WriteLog("客户端数据同步服务:【服务启动】");
- }
- protected override void OnStop()
- {
- this.WriteLog("\n当前时间:" + DateTime.Now.ToString("yyyy-MM-dd hh-mm-ss")+ "\n");
- this.WriteLog("客户端数据同步服务:【服务停止】");
- }
- protected override void OnShutdown()
- {
- this.WriteLog("\n当前时间:" + DateTime.Now.ToString("yyyy-MM-dd hh-mm-ss") + "\n");
- this.WriteLog("客户端数据同步服务:【计算机关闭】");
- }
- #region 记录日志
- /// <summary>
- /// 记录日志
- /// </summary>
- /// <param name="msg"></param>
- private void WriteLog(string msg)
- {
- //string path = @"C:\log.txt";
- //该日志文件会存在windows服务程序目录下
- string path = AppDomain.CurrentDomain.BaseDirectory + "\\log.txt";
- FileInfo file = new FileInfo(path);
- if (!file.Exists)
- {
- FileStream fs;
- fs = File.Create(path);
- fs.Close();
- }
- using (FileStream fs = new FileStream(path, FileMode.Append, FileAccess.Write))
- {
- using (StreamWriter sw = new StreamWriter(fs))
- {
- sw.WriteLine(DateTime.Now.ToString() + " " + msg);
- }
- }
- }
- #endregion
- }
- }
4、安装与卸载服务
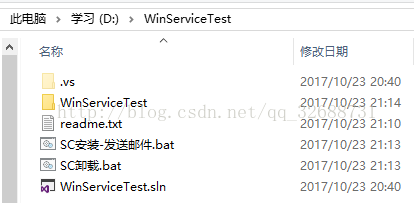
- 请将【WinServiceTest】拷贝到D盘或C盘根目录;
- 安装服务【管理员身份】运行【SC安装-发送邮件】即可;
- 卸载服务【管理员身份】运行【SC卸载】即可;
SC安装-发送邮件:
- @echo.请稍等,服务启动......
- @echo off
- @sc create GX_To_EMAIL binPath= "D:\WinServiceTest\WinServiceTest\bin\Debug\WinServiceTest.exe"
- DisplayName=每隔一段时间发送邮件的服务 start= auto
- @sc description GX_To_EMAIL 定时发送邮件
- @sc start GX_To_EMAIL
- @echo off
- @echo.启动完毕!
- @pause
SC卸载:
- @echo.服务卸载......
- @echo off
- @sc stop GX_To_EMAIL
- @sc delete GX_To_EMAIL
- @sc stop GX_To_EMAIL
- @echo off
- @echo.卸载完毕!
- @pause
用 vs 2017创建 windows 服务的更多相关文章
- 用C#创建Windows服务(Windows Services)
用C#创建Windows服务(Windows Services) 学习: 第一步:创建服务框架 创建一个新的 Windows 服务项目,可以从Visual C# 工程中选取 Windows 服务(W ...
- 玩转Windows服务系列——创建Windows服务
创建Windows服务的项目 新建项目->C++语言->ATL->ATL项目->服务(EXE) 这样就创建了一个Windows服务项目. 生成的解决方案包含两个项目:Servi ...
- .Net创建windows服务入门
本文主要记录学习.net 如何创建windows服务. 1.创建一个Windows服务程序 2.新建安装程序 3.修改service文件 代码如下 protected override void On ...
- C# 创建Windows服务
创建windows服务项目 2 右键点击Service1.cs,查看代码, 用于编写操作逻辑代码 3 代码中OnStart用于执行服务事件,一般采用线程方式执行方法,便于隔一段事件执行一回 END ...
- 使用Topshelf创建Windows服务
概述 Topshelf是创建Windows服务的另一种方法,老外的一篇文章Create a .NET Windows Service in 5 steps with Topshelf通过5个步骤详细的 ...
- [转]C#创建Windows服务与安装
本文档用于创建windows服务说明,使用vs2010系统平台 创建项目 1 创建windows服务项目 2 右键点击Service1.cs,查看代码, 用于编写操作逻辑代码 3 代码中OnStart ...
- [Solution] Microsoft Windows 服务(2) 使用Topshelf创建Windows服务
除了通过.net提供的windows服务模板外,Topshelf是创建Windows服务的另一种方法. 官网教程:http://docs.topshelf-project.com/en/latest/ ...
- 在64位windows下使用instsrv.exe和srvany.exe创建windows服务
在64位windows下使用instsrv.exe和srvany.exe创建windows服务 在32位的windows下,包括windows7,windows xp以及windows 2003, ...
- 使用Topshelf 5步创建Windows 服务 z
使用Topshelf创建Windows 服务简要的介绍了创建Windows服务的另一种方法,老外的一篇文章Create a .NET Windows Service in 5 steps with T ...
随机推荐
- 关于"undefined reference"错误
这个错误换句话说: 链接的时候找不到实现的文件(谨记从这个入手!). 可能导致的原因有: 1. 没有链接库文件,包括静态库或动态库. 2. 链接文件的顺序问题,先后依赖问题,把被依赖的放后面. 3. ...
- windows系统如何真正隐藏文件夹[转载]
方法一(推荐)eg:现需隐藏e盘bak目录下的tools文件夹e:\bak\tools运行:cmd键入:attrib +s +a +h +r e:\bak\tools然后,你再进去看e盘bak目录下, ...
- 关于swift语言中导入OC三方类找不到头文件的解决方法
首先我遇到的问题是这样的: 我之前封装的OC类,我导入现在的swift工程中,然后建立桥接文件,在Swift的控制器中可以找到这个OC写的东西. 但是问题来了,当你使用cocoapods导入的OC三方 ...
- silverlight的Datagrid控件列绑定属性笔记
<data:DataGridTemplateColumn Header="给作者留言"> <data:DataGridTemplateColumn.CellTem ...
- 原生 JS 实现移动端 Touch 滑动反弹
什么是 Touch滑动?就是类似于 PC端的滚动事件,但是在移动端是没有滚动事件的,所以就要用到 Touch事件结合 js去实现,效果如下: 1. 准备工作 什么是移动端的 Touch事件?在移动端 ...
- IE浏览器调用jquery需要注意的小问题
今天在进行前端重构的时候发现了一个非常奇怪的浏览器兼容性问题,我想在网页上放一个JS的特效,于是下载了jquery-easyui,经过修改完成所需要的效果后,准备放入项目中,发现在IE浏览器中无法运行 ...
- [原创汉化] 价值990美元的顶级专业数据恢复软件O&O DiskRecovery 11(技术员版)汉化绿色版
百度没搜索到11有汉化版的,有空就把它汉化了,大部分借鉴的是以前汉化版的词条.另外,顺便做了个二合一的单文件版给有需要的朋友. 运行环境: 可用于 Windows 2000/XP/2003/Vista ...
- HDU 2089 不要62 (递推+暴力或者数位DP)
题意:中文题. 析:暴力先从1到1000000,然后输出就好了. 代码如下: #include <iostream> #include <cstdio> #include &l ...
- linux上安装jdk1.8
开发环境centos7, jdk1.8 首先去官网下载jdk1.8的linux64位安装包 进入目录/usr/local/mypackage/java 利用winscp上传jdk安装包 命令tar - ...
- Mouse Touch Stylus
Mouse操作: preview mouse down, StylusDevice:null mouse down,StylusDevice:null preview mouse up, Stylus ...