spring学习(四)spring的jdbcTemplate(增删改查封装)
Spring的jdbcTemplate操作
1、Spring框架一站式框架
(1)针对javaee三层,每一层都有解决技术
(2)到dao 层,使用 jdbcTemplate
2、Spring对不同的持久化都进行了封装
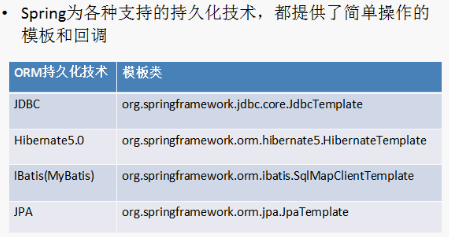
(1)jdbcTemplate 对 jdbc 进行封装
3、jdbcTemplate 使用和 dbutils 使用很相似,都是对数据库进行 crud 操作
4、使用jdbcTemplate 实现增删改查操作
增加:
1、导入 jdbcTemplate 相关jar 包

一定要导入相关数据库驱动的 jar 包
2、创建对象,设置数据库信息
3、创建jdbcTemplate 对象,设置数据源
4、调用 jdbcTemplate 对象里面的方法实现操作
//1、增加操作

    @Test

    public void add(){

        //创建对象,设置数据库信息

        DriverManagerDataSource dataSource=new DriverManagerDataSource();

        dataSource.setDriverClassName("com.mysql.jdbc.Driver");

        dataSource.setUrl("jdbc:mysql://localhost:3306/url_data");

        dataSource.setUsername("root");

        dataSource.setPassword("123");

        //创建jdbcTemplate 对象,设置数据源

        JdbcTemplate jdbcTemplate=new JdbcTemplate(dataSource);

        //调用 jdbcTemplate 对象里面的方法实现操作

        //c创建sql语句

        String sql="insert into user values(?,?)";

        int row=jdbcTemplate.update(sql, "zhansan","man");

        System.out.println("JdbcTemplateDemo1.add()"+row);

    }
修改:
    // 2、修改操作

    @Test

    public void update() {

        // 创建对象,设置数据库信息

        DriverManagerDataSource dataSource = new DriverManagerDataSource();

        dataSource.setDriverClassName("com.mysql.jdbc.Driver");

        dataSource.setUrl("jdbc:mysql://localhost:3306/url_data");

        dataSource.setUsername("root");

        dataSource.setPassword("123");

        // 创建jdbcTemplate 对象,设置数据源

        JdbcTemplate jdbcTemplate = new JdbcTemplate(dataSource);

        // 调用 jdbcTemplate 对象里面的方法实现操作

        // c创建sql语句

        String sql = "update user set sex=? where name=?";

        int row = jdbcTemplate.update(sql, "woman","zhangsan");

        System.out.println("JdbcTemplateDemo1.add()=" + row);

    }
删除:
    // 3、删除操作

    @Test

    public void delete() {

        DriverManagerDataSource dataSource = new DriverManagerDataSource();

        dataSource.setDriverClassName("com.mysql.jdbc.Driver");

        dataSource.setUrl("jdbc:mysql://localhost:3306/url_data");

        dataSource.setUsername("root");

        dataSource.setPassword("123");

        // 创建jdbcTemplate 对象,设置数据源

        JdbcTemplate jdbcTemplate = new JdbcTemplate(dataSource);

        // 调用 jdbcTemplate 对象里面的方法实现操作

        // c创建sql语句

        String sql = "delete from user where name=?";

        int row = jdbcTemplate.update(sql, "zhangsan");

        System.out.println("JdbcTemplateDemo1.add()=" + row);

    }
查看:
jdbcutil  用于 jdbcTemplate 的区别

    /*

     * (1)jdbcutils

     *  QueryRunner  runner = new QueryRunner(datasource);

     *

     *  返回对象

     *  runner.query(sql, new BeanHandler<User>(User.class));

     *

     *  返回list

     *  runner.query(sql, new BeanListHandler<User>(User.class));

     *

     * (2)jdbcTemplate实现查询,有接口RowMapper

     * jdbcTemplate针对这个接口没有实现具体的类,得到不同类型的数据需要自己心境数据的封装

     */
(1)查询返回某一个值
public void count() {

        DriverManagerDataSource dataSource = new DriverManagerDataSource();

        dataSource.setDriverClassName("com.mysql.jdbc.Driver");

        dataSource.setUrl("jdbc:mysql://localhost:3306/url_data");

        dataSource.setUsername("root");

        dataSource.setPassword("123");

        // 创建jdbcTemplate 对象,设置数据源

        JdbcTemplate jdbcTemplate = new JdbcTemplate(dataSource);

        String sql="select count(*) from user";

        //第一个参数是sql 语句

        //迭戈参数 返回类型的class

        int count=jdbcTemplate.queryForObject(sql, Integer.class);

        System.out.println(count);

    }
(2)查询返回某一个对象
原始方式:
//原始方式

public void testJdbc() throws SQLException {

        Connection conn=null;

        PreparedStatement pstmt=null;

        ResultSet rs=null;

        //加载驱动

        try {

            Class.forName("com.mysql.jdbc.Driver");

            //创建连接

            conn=(Connection) DriverManager.getConnection("jdbc:mysql://localhost/url_data", "root", "123");

            String sql="select * from user where username=?";

            //预编译

            pstmt=(PreparedStatement) conn.prepareStatement(sql);

            pstmt.setString(1, "lisi");

            rs=pstmt.executeQuery();

            //遍历结果集

            while(rs.next()){

                //得到返回的结果值

                String name=rs.getString("username");

                String sex=rs.getString("sex");

                User user=new User();

                user.setUsername(name);

                user.setSex(sex);

                System.out.println(user);

            }

        } catch (ClassNotFoundException e) {

            e.printStackTrace();

        } catch (SQLException e) {

            e.printStackTrace();

        }finally{

                rs.close();

                pstmt.close();

                conn.close();

        }

    }
jdbc 方式:
    @Test

    public void FindObject() {

        DriverManagerDataSource dataSource = new DriverManagerDataSource();

        dataSource.setDriverClassName("com.mysql.jdbc.Driver");

        dataSource.setUrl("jdbc:mysql://localhost:3306/url_data");

        dataSource.setUsername("root");

        dataSource.setPassword("123");

        // 创建jdbcTemplate 对象,设置数据源

        JdbcTemplate jdbcTemplate = new JdbcTemplate(dataSource);

        String sql="select * from user where name=?";

        //调用jdbcTemplate

        //第一个参数:sql语句

        //第二个人参数:类似于 dbutils 中的接口RowMapper,需要自己写实现类,实现具体方法,实现数据封装

        //第三个参数: 可变参数(sql中传的值)

        User user = jdbcTemplate.queryForObject(sql, new MyRowMapper(),"lisi");

        System.out.println(user.getName());

    }
写一个非public class
class MyRowMapper implements RowMapper<User>{

    //num:行号

    public User mapRow(ResultSet rs, int index) throws SQLException {

        //1、从结果集里面把数据得到

        String name=rs.getString("name");

        String sex=rs.getString("sex");

        //2、把没我们得到的数据封装到对象里面

        User user=new User();

        user.setName(name);

        user.setSex(sex);

        return user;

    }

}
匿名内部类
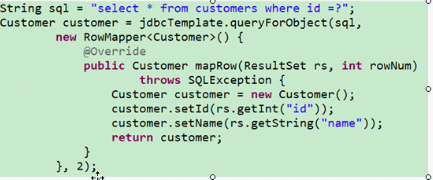
(3)查询返回 list 集合
    public void FindList(){

        DriverManagerDataSource dataSource = new DriverManagerDataSource();

        dataSource.setDriverClassName("com.mysql.jdbc.Driver");

        dataSource.setUrl("jdbc:mysql://localhost:3306/url_data");

        dataSource.setUsername("root");

        dataSource.setPassword("123");

        // 创建jdbcTemplate 对象,设置数据源

        JdbcTemplate jdbcTemplate = new JdbcTemplate(dataSource);

        String sql="select * from user";

        //调用jdbcTemplate

        //第一个参数:sql 语句

        //第二个参数RowMapper 接口

        //第三个参数:可变参数,可以省略

        List<User> list=jdbcTemplate.query(sql, new MyRowMapperList());

        for(int i=0;i<list.size();i++){

            System.out.println(list.get(i));

        }

    }
实现RowMapper类
class MyRowMapperList implements RowMapper<User>{

    //index:行号

    public User mapRow(ResultSet rs, int index) throws SQLException {

        //1、从结果集里面把数据得到

        String name=rs.getString("name");

        String sex=rs.getString("sex");

        //2、把没我们得到的数据封装到对象里面

        User user=new User();

        user.setName(name);

        user.setSex(sex);

        return user;

    }
5、Spring 配置 c3p0 连接池 和dao 使用jdbcTemplate
(1)Spring 配置 c3p0 连接池
- 导入 jar 包

原始的 c3p0 写法
        ComboPooledDataSource datasource=new ComboPooledDataSource();

        datasource.setDriverClass("com.mysql.jdbc.Driver");

        datasource.setJdbcUrl("jdbc:mysql://localhost:3306/url_data");

        datasource.setUser("root");

        datasource.setPassword("123");
在xml中配置 c3p0
		<!-- 配置  c3p0 -->

		<bean id="dataSource" class="com.mchange.v2.c3p0.ComboPooledDataSource">

			<!-- 注入属性值 -->

			<property name="driverClass" value="com.mysql.jdbc.Driver"></property>

			<property name="jdbcUrl" value="jdbc:mysql://localhost:3306/url_data"></property>

			<property name="user" value="root"></property>

			<property name="password" value="123"></property>

		</bean>
(2)dao 使用jdbcTemplate
1、创建 service 和 dao 对象,配置 service 和 dao 对象
2、创建 JdbcTemplate 对象,把 模板对象注入到 dao 里面
3、在 jdbcTemplate 对象里面注入 dataSource 对象
Service类
package cn.itcast.c3p0;

public class UserService {

    private UserDao userDao;

    public void setUserDao(UserDao userDao) {

        this.userDao = userDao;

    }

    public void add(){

        System.out.println("service add.....");

        userDao.add();

    }

}
dao类
package cn.itcast.c3p0;

import org.springframework.jdbc.core.JdbcTemplate;

public class UserDao {

    //要得到jdbcTemplate 对象

    private JdbcTemplate jdbcTemplate;
public void setJdbcTemplate(JdbcTemplate jdbcTemplate) {
this.jdbcTemplate = jdbcTemplate;
}
public void add(){

        String sql="insert into user values(?,?)";

        jdbcTemplate.update(sql,"大力","man");

    }

}
c3p0.xml 配置:
<?xml version="1.0" encoding="UTF-8"?>

<beans xmlns="http://www.springframework.org/schema/beans"

    xmlns:xsi="http://www.w3.org/2001/XMLSchema-instance"

    xmlns:content="http://www.springframework.org/schema/context"

    xmlns:aop="http://www.springframework.org/schema/aop"

    xmlns:tx="http://www.springframework.org/schema/tx"

    xsi:schemaLocation="

        http://www.springframework.org/schema/beans http://www.springframework.org/schema/beans/spring-beans.xsd

        http://www.springframework.org/schema/tx http://www.springframework.org/schema/tx/spring-tx.xsd

        http://www.springframework.org/schema/aop http://www.springframework.org/schema/aop/spring-aop.xsd

        http://www.springframework.org/schema/tx http://www.springframework.org/schema/tx/spring-tx.xsd">

        <!-- bean definitions here -->

        <!-- 配置  c3p0 -->

        <bean id="dataSource" class="com.mchange.v2.c3p0.ComboPooledDataSource">

            <!-- 注入属性值 -->

            <property name="driverClass" value="com.mysql.jdbc.Driver"></property>

            <property name="jdbcUrl" value="jdbc:mysql://localhost:3306/url_data"></property>

            <property name="user" value="root"></property>

            <property name="password" value="123"></property>

        </bean>

        <!-- 创建service 和 Dao。在Service 中调用dao -->

        <bean id="userService" class="cn.itcast.c3p0.UserService">

            <!-- 注入Dao -->

            <property name="userDao" ref="userDao"></property>

        </bean>

        <bean id="userDao" class="cn.itcast.c3p0.UserDao">

            <!-- 注入jdbctemplate对象 -->

            <property name="jdbcTemplate" ref="jdbcTemplate"></property>

        </bean>

        <!-- 创建JdbcTemplate对象 -->

        <bean id="jdbcTemplate" class="org.springframework.jdbc.core.JdbcTemplate">

            <!-- 把dataSource 传到 jdbcTemplate里面-->

            <property name="dataSource" ref="dataSource"></property>

        </bean>

</beans>
测试:
    public void testC(){

        ApplicationContext context=new ClassPathXmlApplicationContext("c3p0.xml");

        UserService userService=(UserService) context.getBean("userService");

        userService.add();

    }
测试结果:
在数据库 user 表里添加一条数据
spring学习(四)spring的jdbcTemplate(增删改查封装)的更多相关文章
- Django基础学习四_数据库的增删改查
今天主要学习两个东西 1.如何对数据库做增删改查 2.如果将数据库中的数据用html的方式返回到前台 一.对数据库中增删改查操作 1.首先需要先见表,见表的方法我们在“http://www.cnblo ...
- ssm学习(四)--完整的增删改查demo
上一篇文章简要介绍了将sping mvc加入整个框架,算是完成了ssm的集成.本节继续前面的内容,结合spring mvc做一个简单的增删改查demo. 1.首先,重写一下GeckoList.jsp页 ...
- Mysql学习笔记(六)增删改查
PS:数据库最基本的操作就是增删改查了... 学习内容: 数据库的增删改查 1.增...其实就是向数据库中插入数据.. 插入语句 insert into table_name values(" ...
- Spring Boot 使用Mybatis注解开发增删改查
使用逆向工程是遇到的错误 错误描述 org.apache.ibatis.binding.BindingException: Invalid bound statement (not found): c ...
- MVC3+EF4.1学习系列(二)-------基础的增删改查和持久对象的生命周期变化
上篇文章中 我们已经创建了EF4.1基于code first的例子 有了数据库 并初始化了一些数据 今天这里写基础的增删改查和持久对象的生命周期变化 学习下原文先把运行好的原图贴来上~~ 一.创建 ...
- springboot整合mybatis增删改查(四):完善增删改查及整合swgger2
接下来就是完成增删改查的功能了,首先在config包下配置Druid数据连接池,在配置之前先把相关配置在application.preperties中完善 application.preperties ...
- MongoDB学习总结(二) —— 基本操作命令(增删改查)
上一篇介绍了MongoDB在Windows平台下的安装,这一篇介绍一下MongoDB的一些基本操作命令. 下面我们直奔主题,用简单的实例依次介绍一下. > 查看所有数据库 (show dbs) ...
- mongodb数据库学习【安装及简单增删改查】
//@desn:mongodb数据库学习 //@desn:码字不宜,转载请注明出处 //@author:张慧源 <turing_zhy@163.com> //@date:2018/08/ ...
- mysql学习笔记一 —— 数据的增删改查
1.连接mysql mysql 直接回车(是以root身份,密码空,登陆的是本机localhost) [root@www mysql]# mysql -uroot -p123 -S /var/lib/ ...
随机推荐
- Linux不停往外发包
一台Linux这两天不停往外发包,造成外部无法访问. [root@ct-nat ~]# watch ifconfig-------------查看数据包新增情况 Every 2.0s: ifconfi ...
- Hyperledger fablic 0.6 在centos7环境下的安装与部署
原文:http://blog.csdn.net/zhaoliang1131/article/details/54617274 Hyperledger Fabric超级账本 项目约定共同遵守的 基本原则 ...
- electron将网站打包成桌面应用
需求同 NW.js将网站打包成桌面应用 1. 从github上克隆electron示例项目 git clone https://github.com/electron/electron-quick-s ...
- linux命令-zip压缩unzip解压缩
和windows的zip的压缩文件是通用的 可以解压缩 压缩文件 /////////////////////////////////////////////////////////// [root@ ...
- RubyGems 镜像 - 淘宝网
为什么有这个? 由于国内网络原因(你懂的),导致 rubygems.org 存放在 Amazon S3 上面的资源文件间歇性连接失败.所以你会与遇到 gem install rack 或 bundle ...
- 【vue2.X+iview2.x】iView在非 template/render 模式下标签的转化
iView在非 template/render 模式下标签的转化. 以下组件,在非 template/render 模式下组件名要分隔: DatePicker:date-picker FormItem ...
- 17. PHP+Mysql注入防护与绕过
黑名单关键字过滤与绕过 过滤关键字and.or PHP匹配函数代码如下: preg_match('/(and|or)/i', $id) 如何Bypass,过滤注入测试语句: 1 or 1 = 1 ...
- sqlserver2012——存储过程
存储过程:是一组为了完成特定功能的SQL语句,经编译后存储在数据库中. 他们可以接受参数.输出参数.返回单个或者多个结果集以及返回值 存储过程种类 1.用户自定义存储过程 2.系统存储过程 3.扩展存 ...
- linux下编译Boost库
下载源码 boost_1_66_0.tar.gz 生成编译工具 # tar axf boost_1_66_0.tar.gz # cd boost_1_66_0 # yum install gcc gc ...
- 如何给自己的开源项目选择和添加 License
License 的作用:开源 == 为所欲为? 开源并不等于为所欲为! 代码的用途,修改之后的代码有什么要求,开源程序对于原作者的权利和责任等等,都是需要明确的. 开源协议 License 就是这么一 ...