
通用权限系统-Spring-Boot-Starter
Spring-Boot-Starter
自定义Starter
案例一:读取application.yml中的参数
1、创建
1、创建maven工程hello-spring-boot-starter
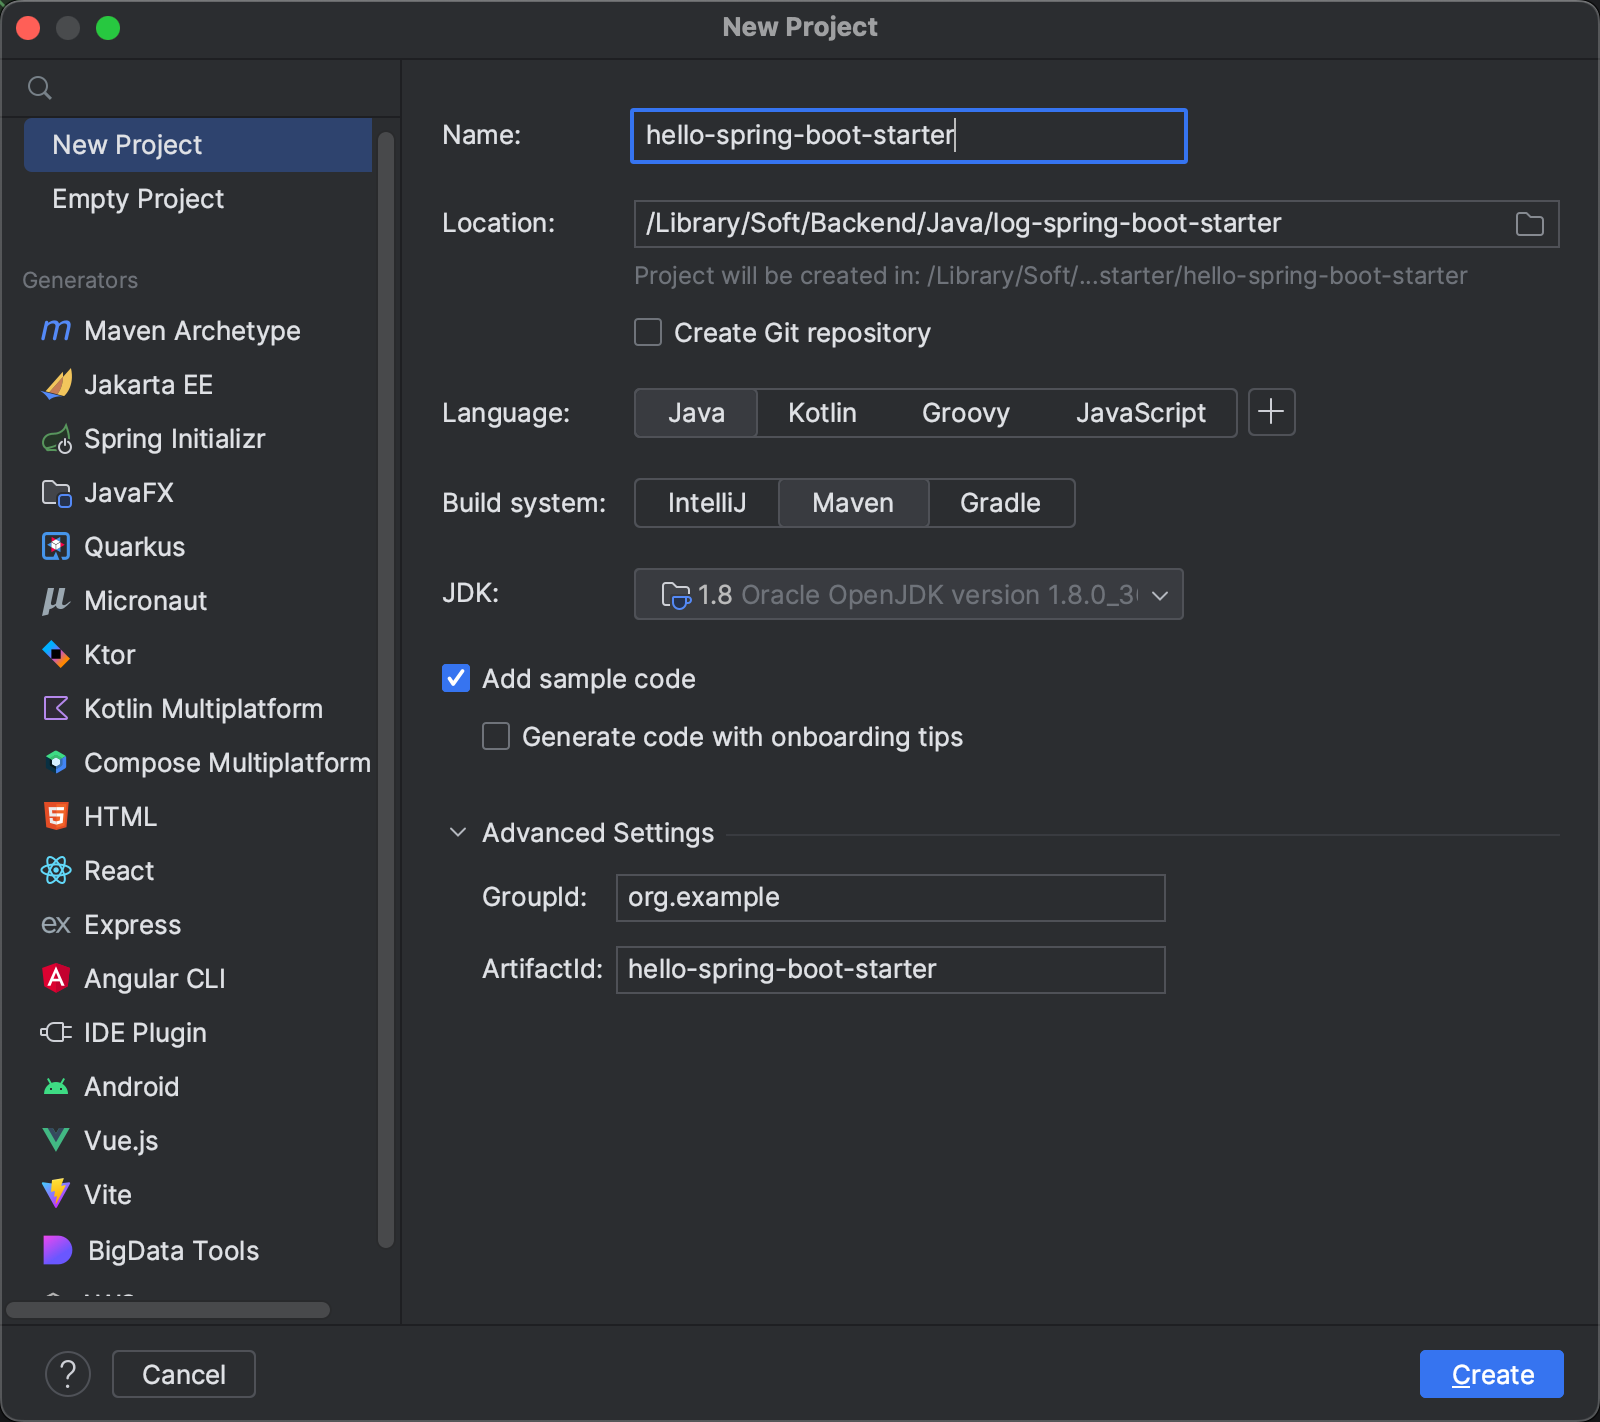
2、pom中添加依赖
<?xml version="1.0" encoding="UTF-8"?>

<project xmlns="http://maven.apache.org/POM/4.0.0"

         xmlns:xsi="http://www.w3.org/2001/XMLSchema-instance"

         xsi:schemaLocation="http://maven.apache.org/POM/4.0.0 http://maven.apache.org/xsd/maven-4.0.0.xsd">

    <modelVersion>4.0.0</modelVersion>

    <groupId>org.example</groupId>

    <artifactId>hello-spring-boot-starter</artifactId>

    <version>1.0-SNAPSHOT</version>

    <properties>

        <maven.compiler.source>8</maven.compiler.source>

        <maven.compiler.target>8</maven.compiler.target>

        <project.build.sourceEncoding>UTF-8</project.build.sourceEncoding>

    </properties>

    <parent>

        <groupId>org.springframework.boot</groupId>

        <artifactId>spring-boot-starter-parent</artifactId>

        <version>2.2.2.RELEASE</version>

        <relativePath/>

    </parent>

    <dependencies>

        <dependency>

            <groupId>org.springframework.boot</groupId>

            <artifactId>spring-boot-starter</artifactId>

        </dependency>

        <dependency>

            <groupId>org.springframework.boot</groupId>

            <artifactId>spring-boot-autoconfigure</artifactId>

        </dependency>

    </dependencies>

</project>
3、创建HelloProperties
配置属性类,用于封装配置文件中配置的参数信息
package org.example.config;

import org.springframework.boot.context.properties.ConfigurationProperties;

/**

 * TODO 配置属性类,用于封装配置文件中配置的参数信息

 *

 * @author ss_419

 * @version 1.0

 * @date 2023/7/8 13:55

 */

@ConfigurationProperties(prefix = "hello")

public class HelloProperties {

    private String name;

    private String address;

    public String getName() {

        return name;

    }

    public void setName(String name) {

        this.name = name;

    }

    public String getAddress() {

        return address;

    }

    public void setAddress(String address) {

        this.address = address;

    }

    @Override

    public String toString() {

        return "HelloProperties{" +

                "name='" + name + '\'' +

                ", address='" + address + '\'' +

                '}';

    }

}
4、创建HelloService
这个类用于对读取到的参数进行一些业务上的操作
package org.example.service;

/**

 * TODO

 *

 * @author ss_419

 * @version 1.0

 * @date 2023/7/8 14:03

 */

public class HelloService {

    private String name;

    private String address;

    public HelloService(String name, String address) {

        this.name = name;

        this.address = address;

    }

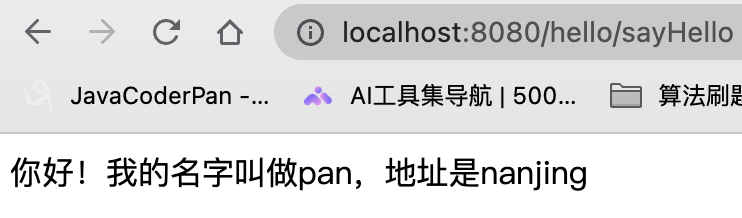
    public String sayHello(){

        return "你好!我的名字叫做"+name+",地址是" + address;

    }

}
5、创建HelloServiceAutoConfiguration(用于自动配置HelloService对象)
package org.example.config;

import org.example.service.HelloService;

import org.springframework.beans.factory.annotation.Autowired;

import org.springframework.boot.autoconfigure.condition.ConditionalOnMissingBean;

import org.springframework.boot.context.properties.EnableConfigurationProperties;

import org.springframework.context.annotation.Bean;

import org.springframework.context.annotation.Configuration;

/**

 * TODO 自动配置类

 * 通过@Configuration + @Bean 实现自动创建对象

 *

 * @author ss_419

 * @version 1.0

 * @date 2023/7/8 14:06

 */

@Configuration

// 一定要加上这个注解,否则Spring找不到这个配置类

@EnableConfigurationProperties(value = HelloProperties.class)

public class HelloServiceAutoConfiguration {

    private HelloProperties helloProperties;

    // 通过构造方法注入配置属性对象HelloProperties

    public HelloServiceAutoConfiguration(HelloProperties helloProperties) {

        this.helloProperties = helloProperties;

    }

    // 实例化HelloService并载入Spring IOC 容器

    @Bean

    @ConditionalOnMissingBean// Spring中没有这个实例的时候再去创建

    public HelloService helloService(){

        return new HelloService(helloProperties.getName(), helloProperties.getAddress());

    }

}
6、在resources目录下创建META-INF/spring.factories
org.springframework.boot.autoconfigure.EnableAutoConfiguration=\

org.example.config.HelloServiceAutoConfiguration
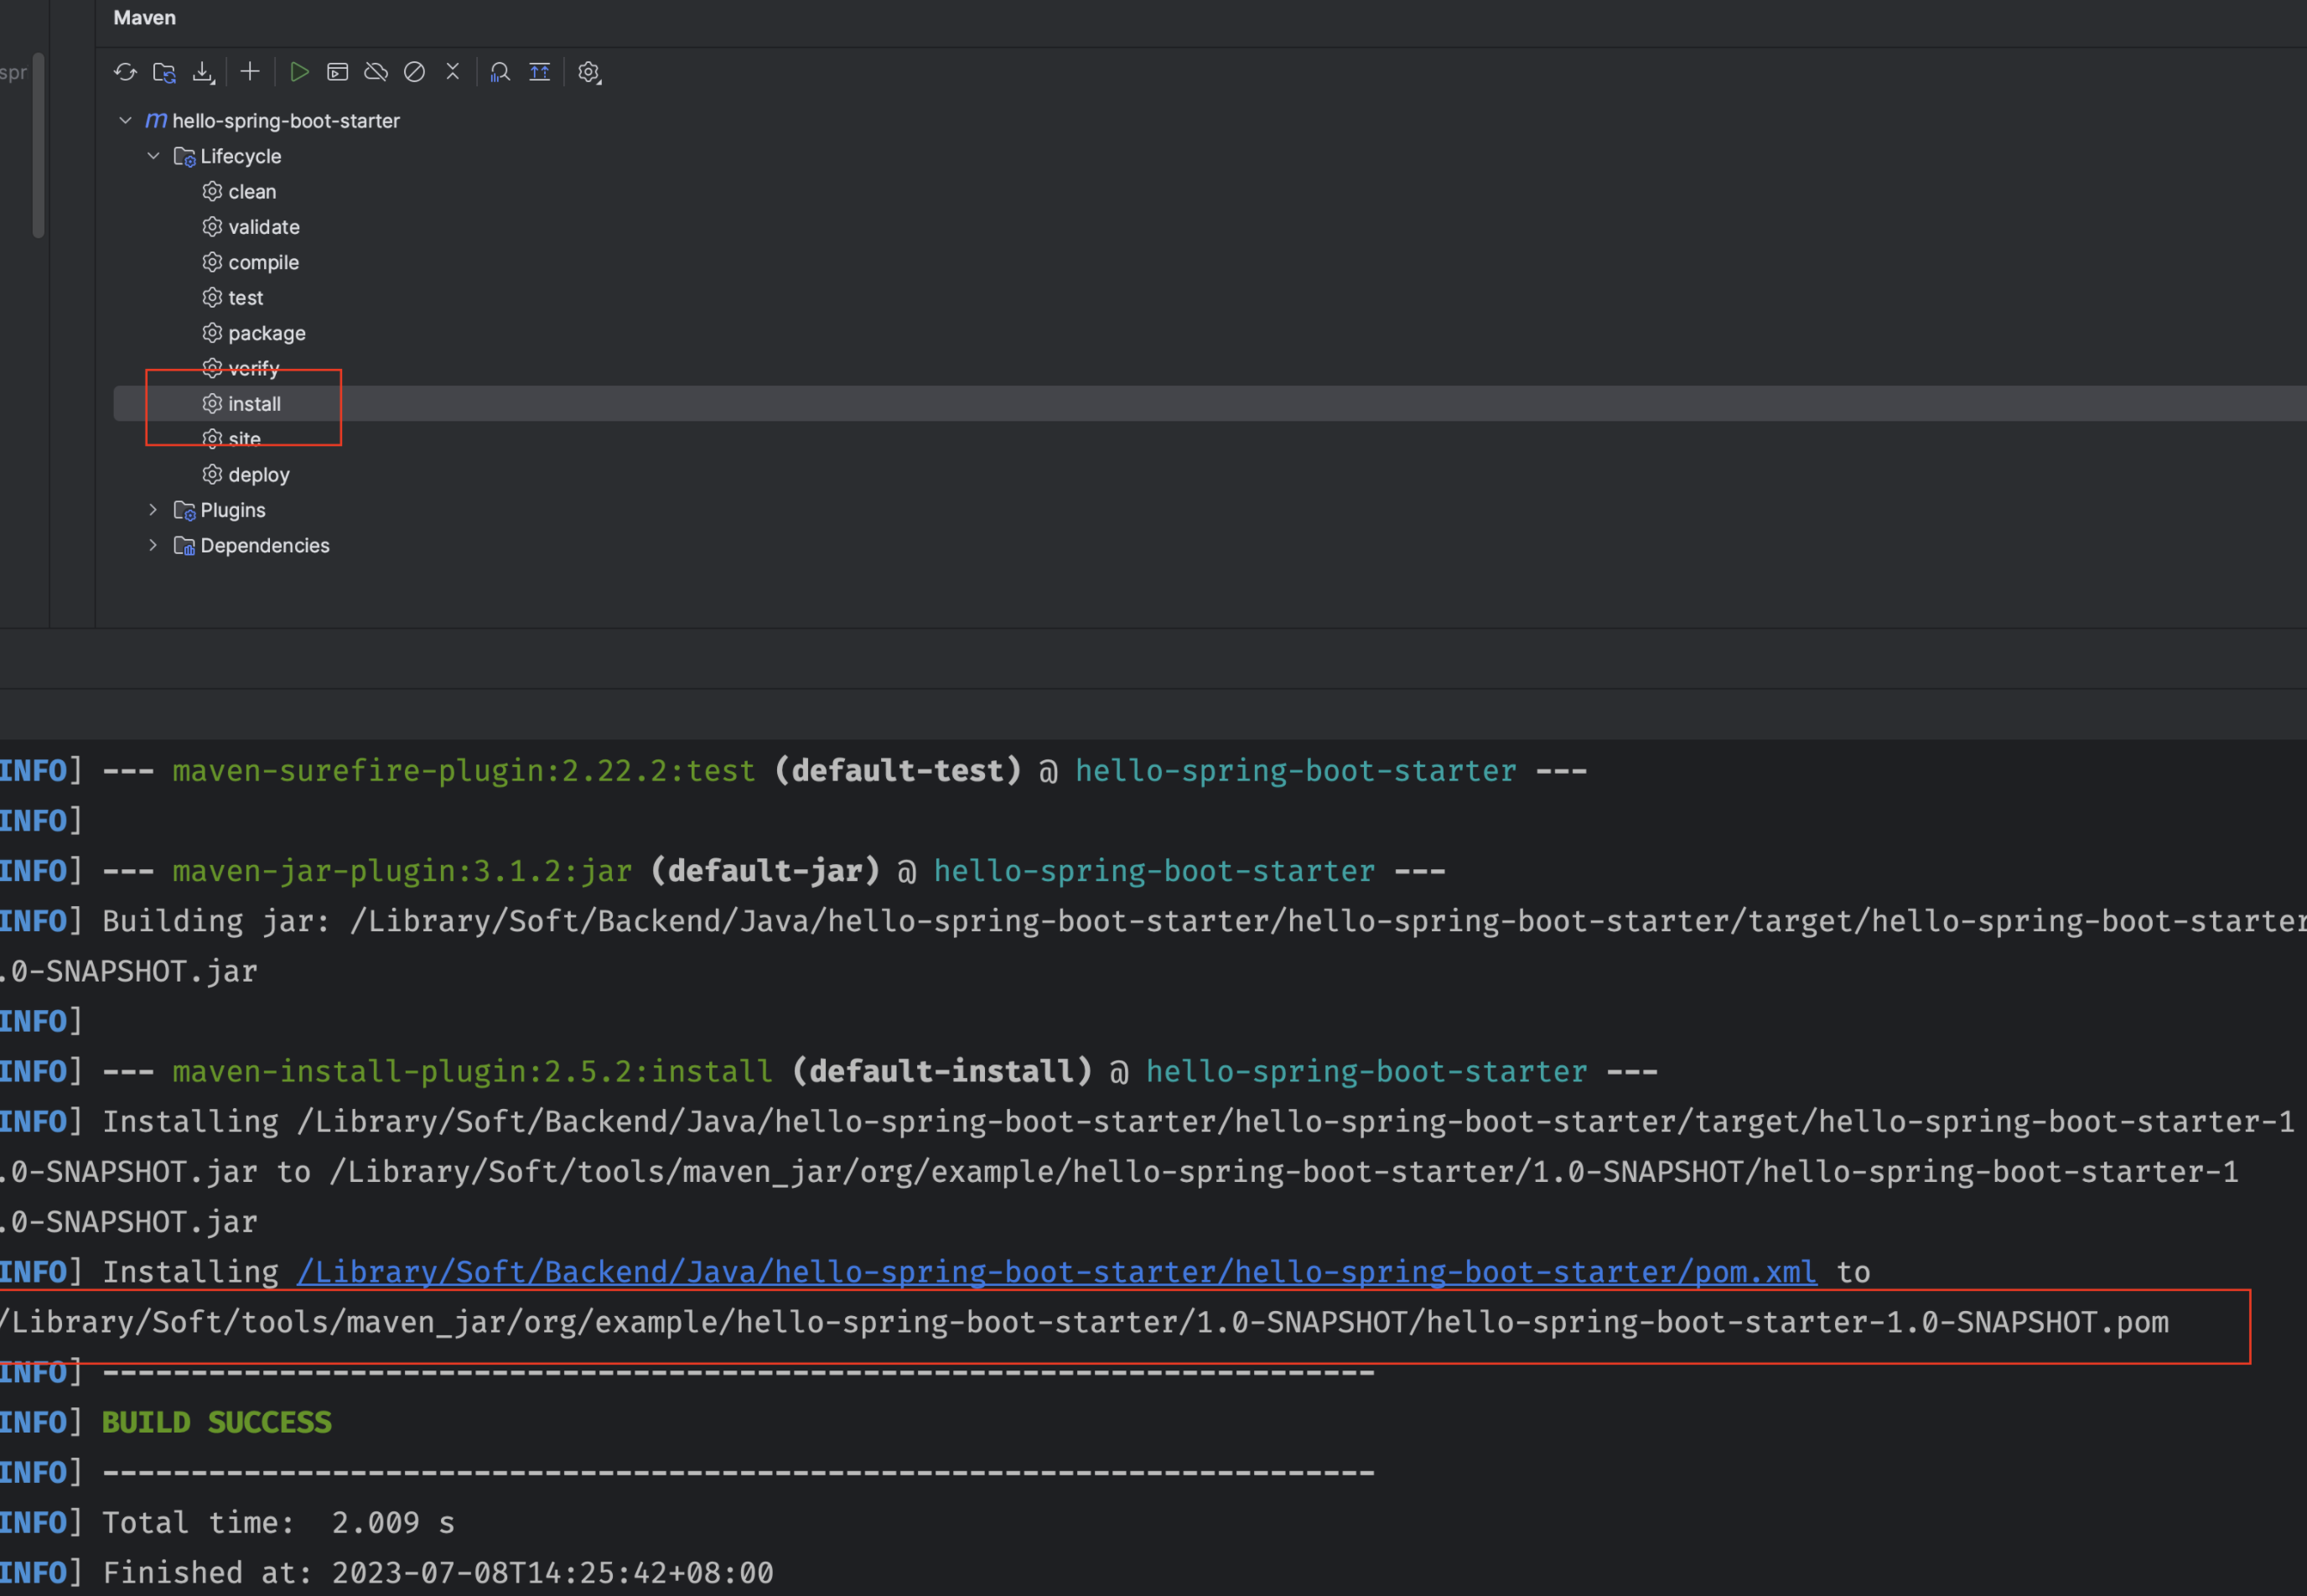
7、将工程打包到maven仓库中
2、使用
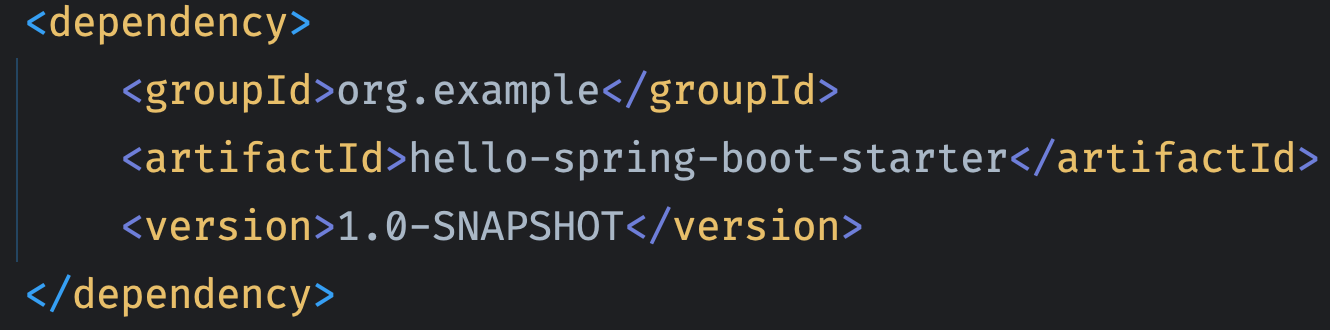
1、创建项目,导入自定义starter
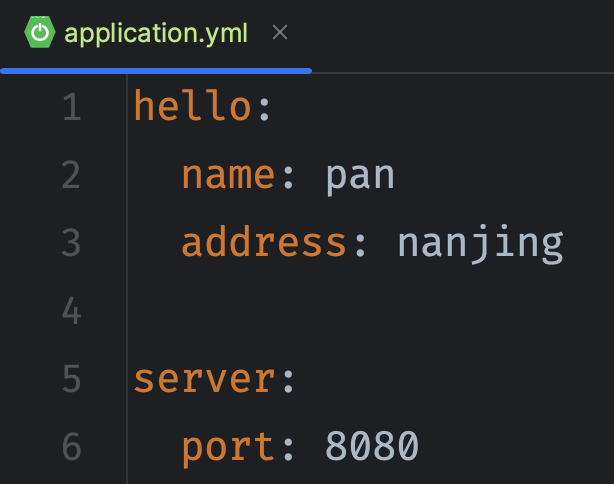
2、创建application.yml配置文件
3、创建启动类
package org.example;

import org.springframework.boot.SpringApplication;

import org.springframework.boot.autoconfigure.SpringBootApplication;

/**

 * TODO

 *

 * @author ss_419

 * @version 1.0

 * @date 2023/7/8 14:39

 */

@SpringBootApplication

public class HelloApplication {

    public static void main(String[] args) {

        SpringApplication.run(HelloApplication.class,args);

    }

}
4、创建测试Controller
package org.example.controller;

import org.example.annotaion.MyLog;

import org.example.service.HelloService;

import org.springframework.beans.factory.annotation.Autowired;

import org.springframework.web.bind.annotation.GetMapping;

import org.springframework.web.bind.annotation.RequestMapping;

import org.springframework.web.bind.annotation.RestController;

/**

 * TODO

 *

 * @author ss_419

 * @version 1.0

 * @date 2023/7/8 14:36

 */

@RestController

@RequestMapping("/hello")

public class HelloController {

    @Autowired

    private HelloService helloService;

    @GetMapping("/sayHello")

    public String sayHello() {

     return helloService.sayHello();

    }

}
5、测试
案例二:通过自动配置来创建一个拦截器对象,通过此拦截器对象来实现记录日志功能
1、创建
1、创建maven项目并且引入依赖
<?xml version="1.0" encoding="UTF-8"?>

<project xmlns="http://maven.apache.org/POM/4.0.0"

         xmlns:xsi="http://www.w3.org/2001/XMLSchema-instance"

         xsi:schemaLocation="http://maven.apache.org/POM/4.0.0 http://maven.apache.org/xsd/maven-4.0.0.xsd">

    <modelVersion>4.0.0</modelVersion>

    <parent>

        <groupId>org.springframework.boot</groupId>

        <artifactId>spring-boot-starter-parent</artifactId>

        <version>2.2.2.RELEASE</version>

        <relativePath/>

    </parent>

    <groupId>org.example</groupId>

    <artifactId>log-spring-boot-starter</artifactId>

    <version>1.0-SNAPSHOT</version>

    <properties>

        <maven.compiler.source>8</maven.compiler.source>

        <maven.compiler.target>8</maven.compiler.target>

        <project.build.sourceEncoding>UTF-8</project.build.sourceEncoding>

    </properties>

    <dependencies>

        <dependency>

            <groupId>org.springframework.boot</groupId>

            <artifactId>spring-boot-starter</artifactId>

        </dependency>

        <dependency>

            <groupId>org.springframework.boot</groupId>

            <artifactId>spring-boot-autoconfigure</artifactId>

        </dependency>

        <dependency>

            <groupId>org.springframework.boot</groupId>

            <artifactId>spring-boot-starter-web</artifactId>

        </dependency>

    </dependencies>

</project>
2、创建MyLog注解
package org.example.annotaion;

import java.lang.annotation.ElementType;

import java.lang.annotation.Retention;

import java.lang.annotation.RetentionPolicy;

import java.lang.annotation.Target;

@Target(ElementType.METHOD)

@Retention(RetentionPolicy.RUNTIME)

public @interface MyLog {

    /**

     * 方法描述

     * @return

     */

    String desc() default "";

}
3、创建日志拦截器
package org.example.interceptor;

import org.example.annotaion.MyLog;

import org.springframework.web.method.HandlerMethod;

import org.springframework.web.servlet.ModelAndView;

import org.springframework.web.servlet.handler.HandlerInterceptorAdapter;

import javax.servlet.http.HttpServletRequest;

import javax.servlet.http.HttpServletResponse;

import java.lang.reflect.Method;

/**

 * TODO 自定义日志拦截器

 *

 * @author ss_419

 * @version 1.0

 * @date 2023/7/8 17:43

 */

public class MyLogInterceptor extends HandlerInterceptorAdapter {

    private static final ThreadLocal<Long> startTimeThreadLocal = new ThreadLocal<>();// 记录时间毫秒值

    /**

     * 执行之前

     * @param request

     * @param response

     * @param handler

     * @return

     * @throws Exception

     */

    @Override

    public boolean preHandle(HttpServletRequest request, HttpServletResponse response, Object handler) throws Exception {

        // 进行转换

        HandlerMethod handlerMethod = (HandlerMethod) handler;

        Method method = handlerMethod.getMethod();

        // 获取方法上的注解MyLog

        MyLog annotation = method.getAnnotation(MyLog.class);

        if(annotation != null){

            // 说明当前拦截到的方法上加入了MyLog注解

            long currentTimeMillis = System.currentTimeMillis();

            startTimeThreadLocal.set(currentTimeMillis);

        }

        return true;

    }

    /**

     * 执行之后

     * @param request

     * @param response

     * @param handler

     * @param modelAndView

     * @throws Exception

     */

    @Override

    public void postHandle(HttpServletRequest request, HttpServletResponse response, Object handler, ModelAndView modelAndView) throws Exception {

        HandlerMethod handlerMethod = (HandlerMethod) handler;

        Method method = handlerMethod.getMethod();

        // 获取方法上的注解MyLog

        MyLog annotation = method.getAnnotation(MyLog.class);

        if(annotation != null){

            // 说明当前拦截到的方法上加入了MyLog注解

            Long startTime = startTimeThreadLocal.get();

            long endTime = System.currentTimeMillis();

            long optTime =  endTime - startTime;

            String requestUri = request.getRequestURI();

            String methodName = method.getDeclaringClass().getName() + "."+

                                method.getName()+"()";

            String methodDesc = annotation.desc();

            System.out.println("请求uri:"+requestUri);

            System.out.println("请求方法名:"+methodName);

            System.out.println("方法描述:"+methodDesc);

            System.out.println("方法执行时间:"+optTime+"ms");

        }

        super.postHandle(request, response, handler, modelAndView);

    }

}
4、创建自动装配对象
package org.example.config;

import org.example.interceptor.MyLogInterceptor;

import org.springframework.context.annotation.Configuration;

import org.springframework.web.servlet.config.annotation.InterceptorRegistry;

import org.springframework.web.servlet.config.annotation.WebMvcConfigurer;

/**

 * TODO

 *

 * @author ss_419

 * @version 1.0

 * @date 2023/7/8 18:08

 */

@Configuration

public class MyLogAutoConfiguration implements WebMvcConfigurer {

    /**

     * 注册自定义日志拦截器

     * @param registry

     */

    @Override

    public void addInterceptors(InterceptorRegistry registry) {

        registry.addInterceptor(new MyLogInterceptor());

    }

}
5、在resources下创建META-INF,在该文件夹下创建spring.factories
该配置文件用于扫描自动装配类
org.springframework.boot.autoconfigure.EnableAutoConfiguration=\

org.example.config.MyLogAutoConfiguration
2、使用
1、创建一个web项目,并且引入依赖,pom.xml如下:
<?xml version="1.0" encoding="UTF-8"?>

<project xmlns="http://maven.apache.org/POM/4.0.0"

         xmlns:xsi="http://www.w3.org/2001/XMLSchema-instance"

         xsi:schemaLocation="http://maven.apache.org/POM/4.0.0 http://maven.apache.org/xsd/maven-4.0.0.xsd">

    <modelVersion>4.0.0</modelVersion>

    <groupId>org.example</groupId>

    <artifactId>use-my-spring-boot-starter-demo</artifactId>

    <version>1.0-SNAPSHOT</version>

    <parent>

        <groupId>org.springframework.boot</groupId>

        <artifactId>spring-boot-starter-parent</artifactId>

        <version>2.2.2.RELEASE</version>

        <relativePath/>

    </parent>

    <properties>

        <maven.compiler.source>8</maven.compiler.source>

        <maven.compiler.target>8</maven.compiler.target>

        <project.build.sourceEncoding>UTF-8</project.build.sourceEncoding>

    </properties>

    <dependencies>

        <dependency>

            <groupId>org.example</groupId>

            <artifactId>log-spring-boot-starter</artifactId>

            <version>1.0-SNAPSHOT</version>

        </dependency>

        <dependency>

            <groupId>org.springframework.boot</groupId>

            <artifactId>spring-boot-starter-web</artifactId>

        </dependency>

        <dependency>

            <groupId>org.example</groupId>

            <artifactId>hello-spring-boot-starter</artifactId>

            <version>1.0-SNAPSHOT</version>

        </dependency>

    </dependencies>

</project>
2、创建测试Controller
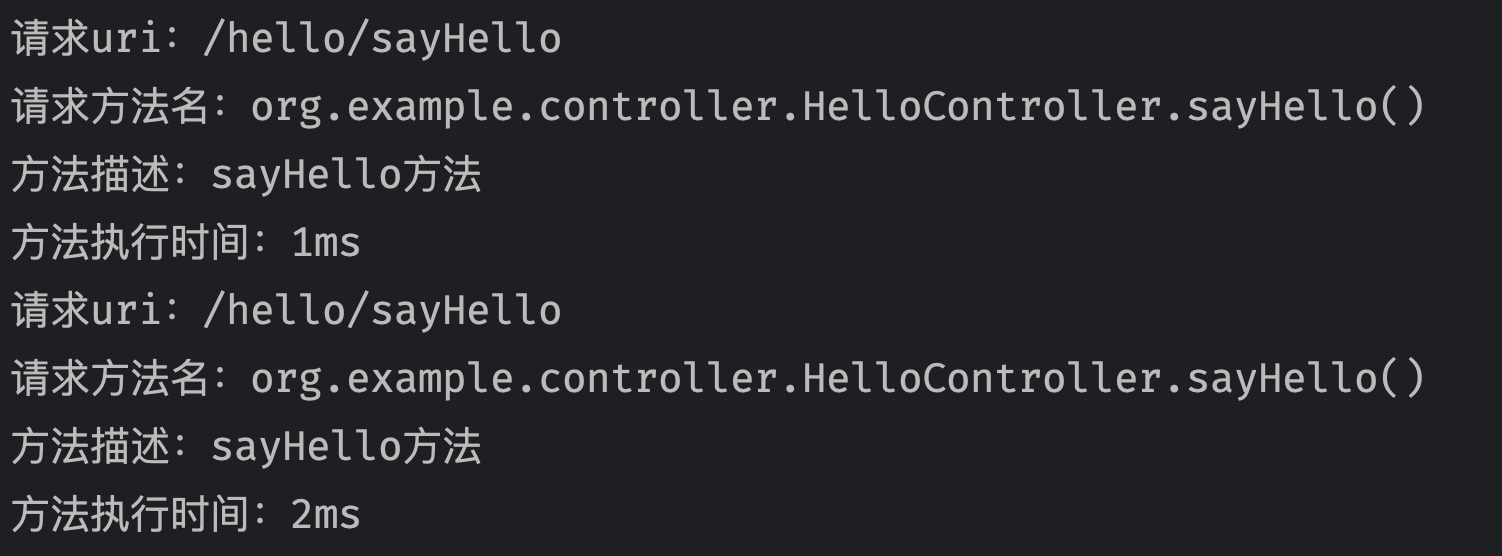
在测试的方法上添加上自定义的MyLog注解,当该方法执行的时候就会在控制台输出对应信息
package org.example.controller;

import org.example.annotaion.MyLog;

import org.example.service.HelloService;

import org.springframework.beans.factory.annotation.Autowired;

import org.springframework.web.bind.annotation.GetMapping;

import org.springframework.web.bind.annotation.RequestMapping;

import org.springframework.web.bind.annotation.RestController;

/**

 * TODO

 *

 * @author ss_419

 * @version 1.0

 * @date 2023/7/8 14:36

 */

@RestController

@RequestMapping("/hello")

public class HelloController {

    @Autowired

    private HelloService helloService;

    @GetMapping("/sayHello")

    @MyLog(desc = "sayHello方法")

    public String sayHello() {

     return helloService.sayHello();

    }

}
3、测试
到这里,对于自定义starter的案例就结束了。
通用权限系统-Spring-Boot-Starter的更多相关文章
- spring -boot s-tarter 详解
Starter POMs是可以包含到应用中的一个方便的依赖关系描述符集合.你可以获取所有Spring及相关技术的一站式服务,而不需要翻阅示例代码,拷贝粘贴大量的依赖描述符.例如,如果你想使用Sprin ...
- SpringBoot 之Spring Boot Starter依赖包及作用
Spring Boot 之Spring Boot Starter依赖包及作用 spring-boot-starter 这是Spring Boot的核心启动器,包含了自动配置.日志和YAML. spri ...
- Spring Boot Starter列表
转自:http://blog.sina.com.cn/s/blog_798f713f0102wiy5.html Spring Boot Starter 基本的一共有43种,具体如下: 1)spring ...
- 创建自己的Spring Boot Starter
抽取通用模块作为项目的一个spring boot starter.可参照mybatis的写法. IDEA创建Empty Project并添加如下2个module,一个基本maven模块,另一个引入sp ...
- 手把手教你手写一个最简单的 Spring Boot Starter
欢迎关注微信公众号:「Java之言」技术文章持续更新,请持续关注...... 第一时间学习最新技术文章 领取最新技术学习资料视频 最新互联网资讯和面试经验 何为 Starter ? 想必大家都使用过 ...
- Spring Boot Starter 和 ABP Module
Spring Boot 和 ABP 都是模块化的系统,分别是Java 和.NET 可以对比的框架.模块系统是就像乐高玩具一样,一块一块零散积木堆积起一个精彩的世界.每种积木的形状各不相同,功能各不相同 ...
- 三分钟实战手写Spring Boot Starter
1 背景 在平时的开发中,开发的同学会把一些通用的方法,写成一个工具类,例如日期转换的,JSON转换的等等,方便业务后续调用,使代码更容易维护. 如果一些更常用的方法,例如鉴权的,加解密的等等,几乎每 ...
- Spring Boot Starter 介绍
http://www.baeldung.com/spring-boot-starters 作者:baeldung 译者:http://oopsguy.com 1.概述 依赖管理是任何复杂项目的关键部分 ...
- Spring Boot (一): Spring Boot starter自定义
前些日子在公司接触了spring boot和spring cloud,有感于其大大简化了spring的配置过程,十分方便使用者快速构建项目,而且拥有丰富的starter供开发者使用.但是由于其自动化配 ...
- Spring boot starter pom的依赖关系说明
Spring Boot 通过starter依赖为项目的依赖管理提供帮助.starter依赖起始就是特殊的maven依赖,利用了传递依赖解析,把常用库聚合在一起,组成了几个为特定功能而定制的依赖. sp ...
随机推荐
- day30:TCP&UDP:socket
目录 1.TCP协议和UDP协议 2.什么是socket? 3.socket正文 1.TCP基本语法 2.TCP循环发消息 3.UDP基本语法 4.UDP循环发消息 4.黏包 5.解决黏包问题 1.解 ...
- oracle数据对比--用户,索引,分区,dblink,同义词,视图
问题描述:需要对比用户数据一般在数据库迁移之后,需要对比一下两个库之间的差距,如果登上去一条命令的执行,去统计,就会比较麻烦,这里整理了一些脚本可用.通过创建dblink的方式快速查询,也可以整合到一 ...
- scikit-learn 中 Boston Housing 数据集问题解决方案
scikit-learn 中 Boston Housing 数据集问题解决方案 在部分旧教程或教材中是 sklearn,现在[2023]已经变更为 scikit-learn 作用:开源机器学习库,支持 ...
- Android Studio 样式和主题背景
样式和主题背景 转载自 Styles and Themes | Android Developers 借助 Android 中的样式和主题背景,您可以将应用设计的细节与界面的结构和行为分开,其 ...
- 【LeetCode动态规划#07】01背包问题一维写法(状态压缩)实战,其二(目标和、零一和)
目标和(放满背包的方法有几种) 力扣题目链接(opens new window) 难度:中等 给定一个非负整数数组,a1, a2, ..., an, 和一个目标数,S.现在你有两个符号 + 和 -.对 ...
- 前端获取不到环境变量NODE_ENV
有时候我们期望通过执行不同的 npm script 来区分诸如 dev.prod.uat.sit等多环境下使用的不同变量 今天我也在整环境变量,碰到一个小小的bug.装了 cross-env 但还是没 ...
- 推荐一个基于.Net Framework开发的Windows右键菜单管理工具
平常在我们电脑,我们都会安装非常多的软件,很多软件默认都会向系统注册右键菜单功能,这样方便我们快捷打开.比如图片文件,通过右键的方式,快捷选择PS软件打开. 如果我们电脑安装非常多的软件,就会导致我们 ...
- Oracle 定时任务job实际应用
目录 一.Oracle定时任务简介 二.dbms_job涉及到的知识点 三.初始化相关参数job_queue_processes 四.实际创建一个定时任务(一分钟执行一次),实现定时一分钟往表中插入数 ...
- 2022-12-12:有n个城市,城市从0到n-1进行编号。小美最初住在k号城市中 在接下来的m天里,小美每天会收到一个任务 她可以选择完成当天的任务或者放弃该任务 第i天的任务需要在ci号城市完成,
2022-12-12:有n个城市,城市从0到n-1进行编号.小美最初住在k号城市中 在接下来的m天里,小美每天会收到一个任务 她可以选择完成当天的任务或者放弃该任务 第i天的任务需要在ci号城市完成, ...
- 2020-03-01:给定一个非负数组arr,代表直方图。返回直方图的最大长方形面积。
2020-03-01:给定一个非负数组arr,代表直方图.返回直方图的最大长方形面积. 福哥答案2020-03-01: 单调栈,大压小.有代码. 代码用golang编写,代码如下: package m ...