Tkinter 之磁盘搜索工具实战
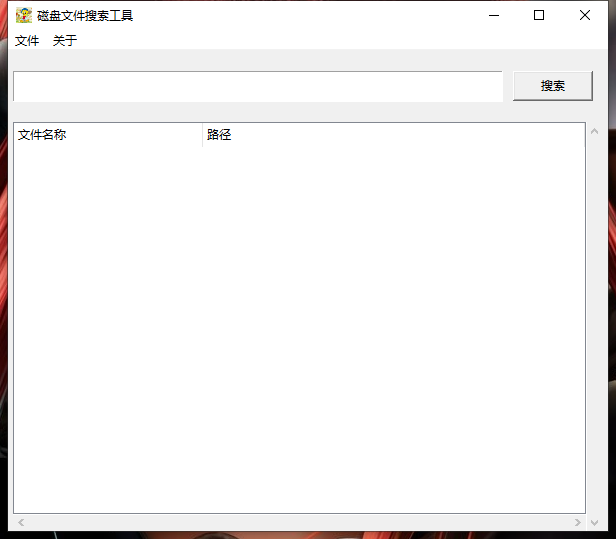
一、效果图

二、代码
miniSearch.py
from tkinter import *
from tkinter import ttk, messagebox, filedialog
from threading import Thread
import os
import queue
import loadingDialog
import re class Application_UI(object):
# 默认查找路径
search_path = os.path.abspath("./")
# 是否开始查找标志
is_start = 0 def __init__(self):
# 设置UI界面
self.window = Tk()
win_width = 600
win_height = 500
screen_width = self.window.winfo_screenwidth()
screen_height = self.window.winfo_screenheight()
x = int((screen_width - win_width) / 2)
y = int((screen_height - win_height) / 2)
self.window.title("磁盘文件搜索工具")
self.window.geometry("%sx%s+%s+%s" % (win_width, win_height, x, y))
# 最好用绝对路径
self.window.iconbitmap(r"G:\PyCharm 2019.1\project\TK\项目\磁盘搜索工具\icon.ico")
# top_frame = Frame(self.window)
top_frame.pack(side = TOP, padx = 5, pady = 20, fill = X) self.search_val = StringVar()
entry = Entry(top_frame, textvariable = self.search_val)
entry.pack(side = LEFT, expand = True, fill = X, ipady = 4.5) search_btn = Button(top_frame, text = "搜索", width = 10, command = self.search_file)
search_btn.pack(padx = 10) bottom_frame = Frame(self.window) bottom_frame.pack(side = LEFT, expand = True, fill = BOTH, padx = 5) tree = ttk.Treeview(bottom_frame, show = "headings", columns = ("name", "path"))
self.treeView = tree
y_scroll = Scrollbar(bottom_frame)
y_scroll.config(command = tree.yview)
y_scroll.pack(side = RIGHT, fill = Y)
x_scroll = Scrollbar(bottom_frame)
x_scroll.config(command = tree.yview, orient = HORIZONTAL)
x_scroll.pack(side = BOTTOM, fill = X)
tree.config(xscrollcommand = x_scroll.set, yscrollcommand = y_scroll.set) tree.column("name", anchor = "w", width = 8)
tree.column("path", anchor = "w")
tree.heading("name", text = "文件名称", anchor = "w")
tree.heading("path", text = "路径", anchor = "w")
tree.pack(side = LEFT, fill = BOTH, expand = True, ipady = 20) menu = Menu(self.window)
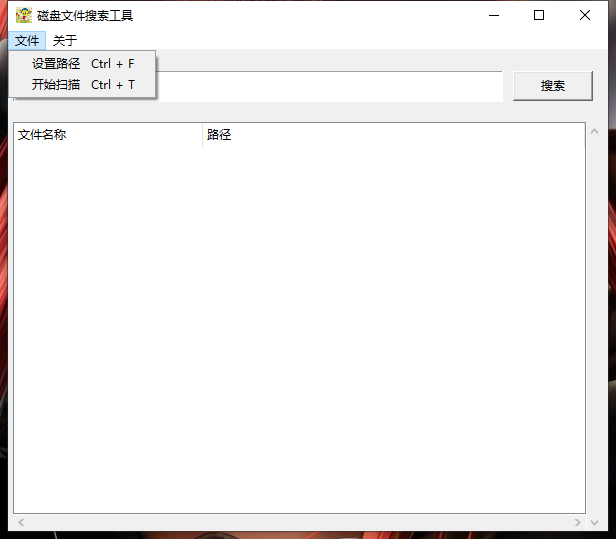
self.window.config(menu = menu) set_path = Menu(menu, tearoff = 0)
set_path.add_command(label = "设置路径", accelerator="Ctrl + F", command = self.open_dir)
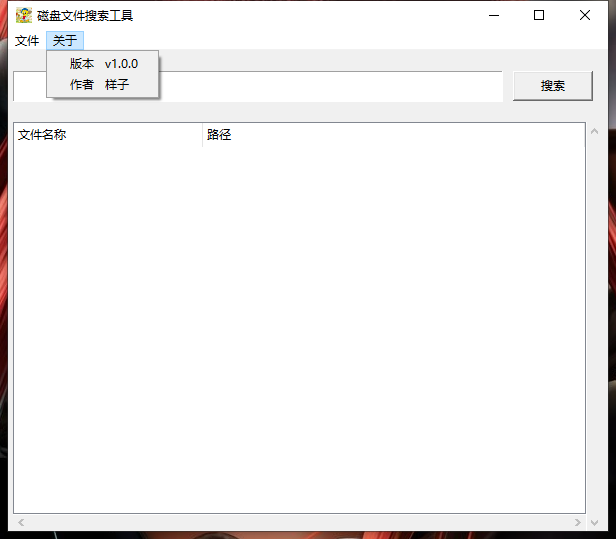
set_path.add_command(label = "开始扫描", accelerator="Ctrl + T", command = self.search_file) menu.add_cascade(label = "文件", menu = set_path) about = Menu(menu, tearoff = 0)
about.add_command(label = "版本", accelerator = "v1.0.0")
about.add_command(label = "作者", accelerator = "样子")
menu.add_cascade(label = "关于", menu = about) self.progressbar = loadingDialog.progressbar()
# 设置队列,保存查找完毕标志
self.queue = queue.Queue()
# 开始监听进度条
self.listen_progressBar() self.window.bind("<Control-Key-f>", lambda event: self.open_dir())
self.window.bind("<Control-Key-r>", lambda event: self.search_file())
self.window.protocol("WM_DELETE_WINDOW", self.call_close_window)
self.window.mainloop() class Application(Application_UI):
def __init__(self):
Application_UI.__init__(self) def call_close_window(self):
self.progressbar.exit_()
self.window.destroy() ''' 监听进度条'''
def listen_progressBar(self):
# 窗口每隔一段时间执行一个函数
self.window.after(400, self.listen_progressBar)
while not self.queue.empty():
queue_data = self.queue.get()
if queue_data == 1:
# 关闭进度条
self.progressbar.exit_()
self.is_start = 0 ''' 设置默认搜索路径'''
def open_dir(self):
path = filedialog.askdirectory(title = u"设置目录", initialdir = self.search_path)
print("设置路径:"+path)
self.search_path = path ''' 开始搜索'''
def search_file(self):
def scan(self, keyword):
# 清空表格数据
for _ in map(self.treeView.delete, self.treeView.get_children()):
pass # 筛选文件
self.find_file_insert(keyword) # 设置查找完毕标志
self.queue.put(1) if self.is_start == 0:
# 获取查找关键词
keyword = str.strip(self.search_val.get())
if not keyword:
messagebox.showerror("提示", "请输入文件名称")
self.search_val.set("")
return # 设置已经开始查找状态
self.is_start = 1
# 开启线程
self.thread = Thread(target = scan, args = (self, keyword))
self.thread.setDaemon(True)
self.thread.start() # 显示进度条
self.progressbar.start()
else:
pass ''' 查找设置目录下所有文件并插入表格'''
def find_file_insert(self, keyword):
try:
for root, dirs, files in os.walk(self.search_path, topdown = True):
for file in files:
match_result = self.file_match(file, keyword)
if match_result is True:
file_path = os.path.join(root, file)
# 插入数据到表格
self.treeView.insert('', END, values = (file, file_path))
# 更新表格
self.treeView.update()
except Exception as e:
print(e) return True ''' 名称匹配'''
def file_match(self, file, keyword):
print("文件匹配:",keyword, file)
result = re.search(r'(.*)'+keyword+'(.*)', file, re.I)
if result:
return True
return False if __name__ == "__main__":
Application()
loadingDialog.py
。。。
有需要这个文件的可以评论联系我哦
有兴趣的可以做磁盘文件内容查找功能:
1、获取磁盘下所有文件
2、打开文件进行正则查找,找到匹配的放入一个列表
3、用TreeView展示文件地址等信息
Tkinter 之磁盘搜索工具实战的更多相关文章
- python实现文件搜索工具(简易版)
在python学习过程中有一次需要进行GUI 的绘制, 而在python中有自带的库tkinter可以用来简单的GUI编写,于是转而学习tkinter库的使用. 学以致用,现在试着编写一个简单的磁文件 ...
- 揭开Faiss的面纱 探究Facebook相似性搜索工具的原理
https://www.leiphone.com/news/201703/84gDbSOgJcxiC3DW.html 本月初雷锋网报道,Facebook 开源了 AI 相似性搜索工具 Faiss.而在 ...
- 8.1 fdisk:磁盘分区工具
fdisk 是Linux下常用的磁盘分区工具.受mbr分区表的限制,fdisk工具只能给小于2TB的磁盘划分分区.如果使用fdisk对大于2TB的磁盘进行分区,虽然可以分区,但其仅识别2TB的空间,所 ...
- ElasticSearch7.X.X-初见-模仿京东搜索的实战
目录 简介 聊聊Doug Cutting ES&Solr&Lucene ES的安装 安装可视化界面ES head插件 了解ELK 安装Kibana ES核心概念 文档 类型 索引 倒排 ...
- 用python制作文件搜索工具,深挖电脑里的【学习大全】
咳咳~懂得都懂啊 点击此处找管理员小姐姐领取正经资料~ 开发环境 解释器: Python 3.8.8 | Anaconda, Inc. 编辑器: pycharm 专业版 先演示效果 开始代码,先导入模 ...
- 如何在Windows Server 2008 R2没有磁盘清理工具的情况下使用系统提供的磁盘清理工具
今天,刚好碰到服务器C盘空间满的情况,首先处理了临时文件和有关的日志文件后空间还是不够用,我知道清理C盘的方法有很多,但今天只分享一下如何在Windows Server 2008 R2没有磁盘清理工具 ...
- centos locate搜索工具
locate搜索工具 [root@localhost ~]# yum install mlocate [root@localhost ~]# locate passwd locate: can not ...
- FileSeek文件内容搜索工具下载
Windows 内建的搜索功能十分简单,往往不能满足用户的需要.很多的第三方搜索工具因此诞生,比如 Everything,Locate32等. 而FileSeek也是一款不错的搜索工具,其不同于其他搜 ...
- 命令行的全文搜索工具--ack
想必大家在命令行环境下工作时候,一定有想要查找当前目录下的源代码文件中的某些字符的需求,这时候如果使用传统方案,你可能需要输入一长串的命令,比如这样: 1. grep -R 'string' dir/ ...
随机推荐
- 查看MacOS中的Swift版本和SDK版本
查看MacOS中的Swift版本和SDK版本 来源 https://juejin.im/post/5cde5a62f265da1bc55230e5 # 查看Swift版本 xcrun swift -v ...
- Nginx四个作用
本文只针对Nginx在不加载第三方模块的情况能处理哪些事情,由于第三方模块太多所以也介绍不完. Nginx能做什么 ——反向代理 ——负载均衡 ——HTTP服务器(动静分离) ——正向代理 以上就是我 ...
- stack + positioned
stack 下套container, 发现最大的显示,小的都没显示, 把所有都套个POSITIONED, 都正常显示了.
- 平衡二叉树详解——PHP代码实现
一.什么是平衡二叉树 平衡二叉树(Self-Balancing Binary Search Tree 或者 Height-Balancing Binary Search Tree)译为 自平衡的二叉查 ...
- Django——Xadmin中的功能
app_label 功能 如果不在标准models.py里面定义model,则必须指定这个model归属于哪个app. 使用 app_label = 'oms' actions 功能 Action插件 ...
- mysql简单优化的一些总结
mysql对cpu的利用特点: 5.1之前,多核支持较弱:5.1可利用4个核:5.5可利用24核:5.6可利用64个核:每个连接对应一个线程,每个并发query只能使用一个核 mysql对内存的利用特 ...
- ubbuntu---多媒体播放器VLC
VLC多媒体播放器:Video LAN Client 信息载体:可见光通信技术(Visible Light Communication,VLC).@ https://baike.baidu.com/i ...
- spark-submit python egg 解决三方件依赖问题
假设spark里用到了purl这个三方件,https://github.com/ultrabluewolf/p.url,他还额外依赖futures这个三方件(six的话,anaconda2自带). p ...
- K8S集群证书已过期且etcd和apiserver已不能正常使用下的恢复方案
在这种比较极端的情况下,要小心翼翼的规划和操作,才不会让集群彻底死翘翘.首先,几个ca根证书是10年期,应该还没有过期.我们可以基于这几个根证书,来重新生成一套可用的各组件认证证书. 前期,先制定以下 ...
- idea的基础设置
1. 在idea.exe.vmoptions文件里,如图进行修改即可,, 优化的原理就是调用更多的运行内存来加载他,所以4G的话本身会不够,就会造成其他应用很卡. 2. 下面是进行一些基本的配置 ...