
MYSQL数据的安装、配置
linux安装mysql服务分两种安装方法:
1、源码安装,优点是安装包比较小,只有十多M,缺点是安装依赖的库多,安装编译时间长,安装步骤复杂容易出错。
2、使用官方编译好的二进制文件安装,优点是安装速度快,安装步骤简单,缺点是安装包很大,376M左右。我这里官方编译好的Linux二进制包安装mysql。
(记的第一次安装MYSQL是在学习Hadoop的时候,部署Hive,用到了,再往后就没有用过MYSQL一直用的Oracle,这一次几方面原因,再次安装Mysql,记录下来过程,最主要的是自己电脑上的内容太多,又不是连续操作,怕忘记端口、密码等等,顺便学习Python操作Mysql时用。)
一、软件下载
到mysql官网下载mysql编译好的二进制安装包,在下载页面Select Platform:选项选择linux-generic,然后把页面拉到底部,64位系统下载Linux - Generic (glibc 2.5) (x86, 64-bit)。
地址:https://dev.mysql.com/downloads/mysql/
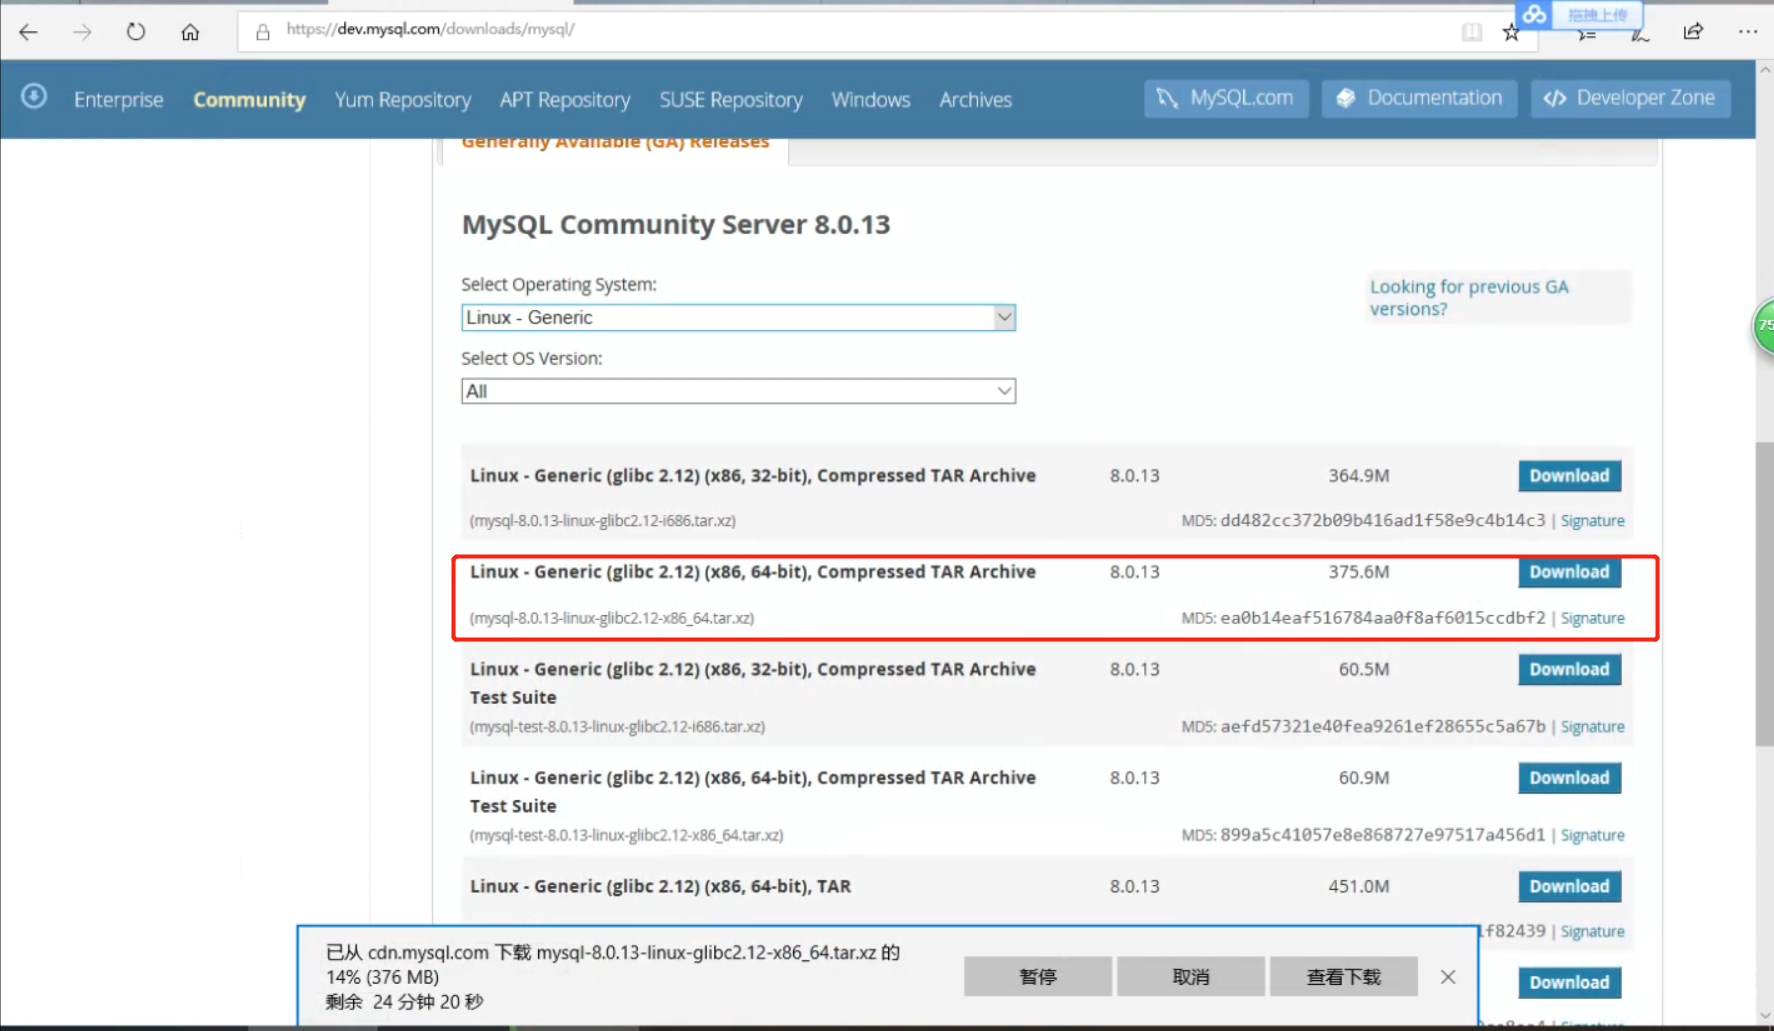
软件包上传、解压步骤略......
二、安装环境检查(初次安装可忽略)
1.检查是否有rpm包,如果没有用rpm安装过mysql,不应该有残留,如果有,需要删掉
检查语法: rpm -qa|grep -i mysql
删除语法: rpm -e <包的名字>
如果遇到依赖,无法删除,使用 rpm -e --nodeps <包的名字> 不检查依赖,直接删除rpm包。
2.卸载系统自带的mariadb
检查语法: rpm -qa|grep Mariadb
删除语法: rpm -e <包的名字>
3.查看所有的 mysql目录 ,并删除
find / -name mysql
三、安装
1.创建mysql用户组和mysql用户
groupadd mysql //创建mysql 用户组
useradd -g mysql mysql //创建一个用户名为mysql的用户并加入mysql用户组
2.通过ssh工具,将MySQL安装包 mysql-8.0.13-linux-glibc2.12-x86_64.tar.xz 拖拽到 /software目录下并解压
解压指令tar -xvf mysql-8.0.13-linux-glibc2.12-x86_64.tar.xz
3.将解压后的安装包复制到/opt 目录下,并重命名mysql
cp -Rf mysql-8.0.13-linux-glibc2.12-x86_64 /opt/mysql
4.修改权限
cd /opt/mysql
chown –R mysql //把当前目录下的文件及目录的属性改为mysql用户
chgrp –R mysql //把当前目录下的文件所属的组件改为mysql组
5.创建data目录,作为数据库存储位置
mkdir /opt/mysql/data
6.配置my.cnf文件
此文件非常重要,初始化之前一定要把此文件放到 /etc 目录下,
此文件内容如下(路径根据自己的实际情况):
[root@centos04 mysql]# vim /etc/my.cnf
添加/修改如下:
[client]

  port =

  socket = /tmp/mysql.sock

[mysqld]

  character_set_server=utf8

  init_connect='SET NAMES utf8'

  basedir=/opt/mysql

  datadir=/opt/mysql/data

  socket=/tmp/mysql.sock
7.初始化mysql
/opt/mysql/bin/mysqld --initialize --user=mysql --basedir=/opt/mysql --datadir=/opt/mysql/data
[root@centos04 opt]# /opt/mysql/bin/mysqld --initialize --user=mysql --basedir=/opt/mysql --datadir=/opt/mysql/data
2018-11-23T05:37:20.419244Z 0 [Warning] [MY-011070] [Server] 'Disabling symbolic links using --skip-symbolic-links (or equivalent) is the default.
                  Consider not using this option as it' is deprecated and will be removed in a future release.
2018-11-23T05:37:20.435233Z 0 [System] [MY-013169] [Server] /opt/mysql/bin/mysqld (mysqld 8.0.13) initializing of server in progress as process 18027
2018-11-23T05:37:20.456938Z 0 [Warning] [MY-013242] [Server] --character-set-server: 'utf8' is currently an alias for the character set UTF8MB3,
                  but will be an alias for UTF8MB4 in a future release. Please consider using UTF8MB4 in order to be unambiguous.
2018-11-23T05:37:23.561315Z 5 [Note] [MY-010454] [Server] A temporary password is generated for root@localhost: ti_g<4t/ZvcC
2018-11-23T05:37:25.859931Z 0 [System] [MY-013170] [Server] /opt/mysql/bin/mysqld (mysqld 8.0.13) initializing of server has completed
[root@centos04 opt]#
注意:把初始密码拷贝下来,备份
chown -R root . //把当前目录下的文件及目录的属性改为root 用户
chown -R mysql data
四、启动并检查
1.启动mysql,并查看是否已经启动成功
/opt/mysql/bin/mysqld_safe --user=mysql &
[root@centos04 opt]# /opt/mysql/bin/mysqld_safe --user=mysql &

[]

[root@centos04 opt]# --23T03::.200011Z mysqld_safe Logging to '/var/log/mysqld.log'.

--23T03::.240320Z mysqld_safe Starting mysqld daemon with databases from /opt/mysql/data
中间启动失败了。错误如下:
[root@centos04 opt]# --23T03::.579575Z mysqld_safe Logging to '/var/log/mysqld.log'.

--23T03::.616041Z mysqld_safe Starting mysqld daemon with databases from /opt/mysql/data

--23T03::.237984Z mysqld_safe mysqld from pid file /var/run/mysqld/mysqld.pid ended
原因为:socket的路径mysql用户没有write的权限。报错如下:
--23T03::.746257Z  [ERROR] [MY-] [Server] A message intended for a client cannot be sent there as no client-session is attached.
            Therefore, we're sending the information to the error-log instead: MY-000001 - Can't create/write to file '/var/run/mysqld/mysqld.pid'
             (OS errno  - Permission denied)

--23T03::.746285Z  [ERROR] [MY-] [Server] Can't start server: can't create PID file: Permission denied
对该路径修改所属合写入权限:
[root@centos04 mysql]# chown -Rf mysql.mysql  /var/run/mysqld

[root@centos04 mysql]# chmod   /var/run/mysqld
2.通过初始密码登录mysql,并修改密码
/opt/mysql/bin/mysqladmin -uroot -p password
-----这里有问题一直登录不上,后面解决。
3.设置开机自启
cp /opt/mysql/support-files/mysql.server /etc/rc.d/init.d/mysqld
chmod +x /etc/rc.d/init.d/mysqld

chkconfig  --add mysqld

chkconfig  --list mysqld
[root@centos04 opt]# cp /opt/mysql/support-files/mysql.server  /etc/rc.d/init.d/mysql

[root@centos04 opt]# chmod +x /etc/rc.d/init.d/mysqld

[root@centos04 opt]# chkconfig  --add mysqld

[root@centos04 opt]# chkconfig  --list mysqld

            mysqld          :off   :off   :off   :off   :off   :off   :off
执行service mysqld stop关闭命令
[root@centos04 opt]# service mysqld stop

--23T04::.201042Z mysqld_safe mysqld from pid file /var/run/mysqld/mysqld.pid ended

Stopping mysqld:                                           [  OK  ]

[]+  Done                    /opt/mysql/bin/mysqld_safe --user=mysql

[root@centos04 opt]#
然后在执行service mysqld start启动命令
[root@centos04 opt]# service mysqld start

MySQL Daemon failed to start.

Starting mysqld:                                           [FAILED]
启动失败,日志如下:
 :: mysqld_safe Starting mysqld daemon with databases from /opt/mysql/data

/usr/libexec/mysqld: Table 'mysql.plugin' doesn't exist

 :: [ERROR] Can't open the mysql.plugin table. Please run mysql_upgrade to create it.

 ::  InnoDB: Initializing buffer pool, size = 8.0M

 ::  InnoDB: Completed initialization of buffer pool

InnoDB: Error: log file ./ib_logfile0 is of different size   bytes

InnoDB: than specified in the .cnf file   bytes!

 :: [ERROR] Plugin 'InnoDB' init function returned error.

 :: [ERROR] Plugin 'InnoDB' registration as a STORAGE ENGINE failed.

 :: [ERROR] Fatal error: Can't open and lock privilege tables: Table 'mysql.host' doesn't exist

 :: mysqld_safe mysqld from pid file /var/run/mysqld/mysqld.pid ended
一直不明白这个问题。
执行以下命令解决问题:mysql_install_db --user=mysql --basedir=/usr/ --ldata=/opt/mysql/data/
[root@centos04 bin]# mysql_install_db --user=mysql --basedir=/usr/ --ldata=/opt/mysql/data/
Installing MySQL system tables...
OK
Filling help tables...
OK

To start mysqld at boot time you have to copy
support-files/mysql.server to the right place for your system

PLEASE REMEMBER TO SET A PASSWORD FOR THE MySQL root USER !
To do so, start the server, then issue the following commands:

/usr//bin/mysqladmin -u root password 'new-password'
/usr//bin/mysqladmin -u root -h centos04 password 'new-password'

Alternatively you can run:
/usr//bin/mysql_secure_installation

which will also give you the option of removing the test
databases and anonymous user created by default.  This is
strongly recommended for production servers.

See the manual for more instructions.

You can start the MySQL daemon with:
cd /usr/ ; /usr//bin/mysqld_safe &

You can test the MySQL daemon with mysql-test-run.pl
cd /usr//mysql-test ; perl mysql-test-run.pl

Please report any problems with the /usr//scripts/mysqlbug script!

[root@centos04 bin]#
然后在执行service mysqld start启动命令
[root@centos04 opt]# service mysqld start

Starting mysqld:                                           [  OK  ]

[root@centos04 opt]#
查看启动进程,ps -ef | grep mysql
[root@centos04 opt]# ps -ef|grep mysql

root           : pts/    :: tail -f mysqld.log

root             : pts/    :: /bin/sh /usr/bin/mysqld_safe --datadir=/opt/mysql/data
                            --socket=/var/lib/mysql/mysql.sock --pid-file=/var/run/mysqld/mysqld.pid --basedir=/usr --user=mysql

mysql        : pts/    :: /usr/libexec/mysqld --basedir=/usr --datadir=/opt/mysql/data --user=mysql --log-error=/var/log/mysqld.log
                            --pid-file=/var/run/mysqld/mysqld.pid --socket=/var/lib/mysql/mysql.sock

root         : pts/    :: grep mysql

[root@centos04 opt]#
4.解决前面登录修改密码失败
以root用户登录,mysql -u root
[root@centos04 opt]# mysql -u root

Welcome to the MySQL monitor.  Commands end with ; or \g.

Your MySQL connection id is

Server version: 5.1. Source distribution

Copyright (c) , , Oracle and/or its affiliates. All rights reserved.

Oracle is a registered trademark of Oracle Corporation and/or its

affiliates. Other names may be trademarks of their respective

owners.

Type 'help;' or '\h' for help. Type '\c' to clear the current input statement.

mysql>
修改root密码
mysql> use mysql

Reading table information for completion of table and column names

You can turn off this feature to get a quicker startup with -A

Database changed

mysql> UPDATE user SET Password=PASSWORD('Root#2018') where USER='root' and host='root' or host='localhost';

Query OK,  rows affected (0.00 sec)

Rows matched:   Changed:   Warnings:

mysql>
5.防火墙添加端口
我这里是关闭了防火墙的。
6.将user表的 host 改为 %,否则外网通过客户端工具会链接不上
mysql> use mysql

Reading table information for completion of table and column names

You can turn off this feature to get a quicker startup with -A

Database changed

mysql> UPDATE user SET Password=PASSWORD('Root#2018') where USER='root' and host='root' or host='localhost';

Query OK,  rows affected (0.00 sec)

Rows matched:   Changed:   Warnings:

mysql> use mysql

Database changed

mysql> update user set host ='%'where user ='root' and host ='localhost';

Query OK,  row affected (0.01 sec)

Rows matched:   Changed:   Warnings:

mysql> flush privileges;

Query OK,  rows affected (0.00 sec)

mysql>
加上过程问题处理,这次用时3个小时,时间太长了.......
在linux下安装mysql(mysql-5.0.87-linux-i686-glibc23)
1、把 下载好的 压缩文件mysql-5.0.87-linux-i686-glibc23.tar.zip 放到 /usr/local 下
2、解压文件
(1)指令: unzip mysql-5.0.87-linux-i686-glibc23.tar.zip
(2)再次解压,指令: tar zxvf mysql-5.0.87-linux-i686-glibc23.tar.gz
3、进入到 mysql-5.0.87-linux-i686-glibc23 文件 ,然后 vi INSTALL-BINARY 进去看看,里面有我们安装的一些步骤
4、加用户组mysql,以及用户mysql
groupadd mysql
useradd -g mysql mysql
5、对MySQL进行初始化
scripts/mysql_install_db --user=mysql
6、变更所有权;该命令无需修改
shell> chown -R root .
shell> chown -R mysql data
shell> chgrp -R mysql .
7、 启动MySQL服务器
bin/mysqld_safe --user=mysql &
8、进入mysql-5.0.87-linux-i686-glibc23目录下的bin目录,运行命令./mysql -u root -p。此时将出现password:(要求输入密码),但默认情况下root用户没有密码,所以回车即可。此时就进入mysql界面
9、简单使用MySQL
在MySQL环境中运行命令show databases;,将会显示已经有的数据库(如test);运行命令use test,将进入test数据库
mysql>user mysql
mysql>quit //退出
关闭mysql:
bin/mysqladmin shutdown
MYSQL数据的安装、配置的更多相关文章
- Windows 8.1下 MySQL绿色版安装配置与使用
原文:Windows 8.1下 MySQL绿色版安装配置与使用 Mysql-5.6.17-winx64操作步骤: 一.安装MySQL数据库 1.下载. 下载地址:http://downloads.my ...
- EF连接MySQL数据Web.Config配置
EF连接MySQL数据Web.Config配置 <?xml version="1.0" encoding="utf-8"?> <configu ...
- Ubuntu16.04中Mysql 5.7 安装配置
记录在Ubuntu 16.04安装Mysql 5.7时遇到的一些问题. Mysql安装 使用如下命令进行安装: 1 sudo apt-get install mysql-server mysql-cl ...
- 3-STM32物联网开发WIFI(ESP8266)+GPRS(Air202)系统方案数据篇(安装配置数据库,使用Navicat for MySQL和手机APP 连接测试)
2-STM32物联网开发WIFI(ESP8266)+GPRS(Air202)系统方案数据篇(数据库简单说明) https://www.mysql.com/ 咱用安装版的 我把自己下载的放在了这里 现在 ...
- mysql cluster (mysql 集群)安装配置方案(转)
一.准备 1.准备服务器 计划建立有5个节点的MySQL CLuster体系,需要用到5台服务器,但是我们做实验时没有这么多机器,可以只用2台,我就是一台本机,一台虚拟机搭建了有5个节点的MySQL ...
- MySQL zip版安装配置
文章出处:http://www.cnblogs.com/winstic/,请保留此连接 这段时间在学习Python 数据库操作知识,简单整理MySQL zip文件安装方法 下载 在MySQL官网htt ...
- mysql集群安装配置
看网上很多人说mysql集群不是很稳定,因此这2天做了下mysql的集群,打算配置没有什么问题了,过2天做下相关的性能测试,我的配置环境如下: 操作系统: Centos5.2 软件 ...
- Linux下python3、virtualenv、Mysql、redis安装配置
一.在Linux安装python解释器 1.下载python3源码包 cd /opt/ wget https://www.python.org/ftp/python/3.6.2/Python-3.6. ...
- mysql group replication 安装&配置详解
一.原起: 之前也有写过mysql-group-replication (mgr) 相关的文章.那时也没有什么特别的动力要写好它.主要是因为在 mysql-5.7.20 之前的版本的mgr都有着各种各 ...
随机推荐
- Codeforces Beta Round #95 (Div. 2) D. Subway 边双联通+spfa
D. Subway A subway scheme, classic for all Berland cities is represented by a set of n stations co ...
- bzoj4887: [Tjoi2017]可乐
一眼暴力宽搜(最近比赛想暴力想疯了... 很明显的矩乘,然后自爆可以看作走向向一个无出边的点 然后没啥难的了吧. #include<cstdio> #include<iostream ...
- 利用SQLite在android上创建数据库
利用SQLite在android上创建数据库 方法: 1.创建我们的数据库类继承SQLiteOpenHelper类 完成相关函数的重写和数据库对象的初始化 public MySQLiteOpenHel ...
- hdoj--1151--Air Raid(最大独立集)
Air Raid Time Limit: 2000/1000 MS (Java/Others) Memory Limit: 65536/32768 K (Java/Others) Total S ...
- Oracle 11g RAC for LINUX rhel 6.X silent install(静默安装)
一.前期规划 1.硬件环境 CPU: Intel(R) Xeon(R) CPU E7-4820 v4 @ 2.00GHz 8*10核 内存:512GB OCR:2147*5 MB DATA1:2TB ...
- Polyfill 与 Shim
Polyfill 与 Shim polyfill 的概念是 Remy Sharp 在2010年提出的. polyfill,或 polyfiller ,表示为开发人员提供旧浏览器没有原生支持的较新功能的 ...
- BZOJ 1507 splay
写完维修数列 这不是水题嘛233333 //By SiriusRen #include <cstdio> #include <cstring> #include <alg ...
- (转) 50个CSS技巧
这里我工作中收集了10个很不错的CSS技巧,你可以用在你的项目上.它可以帮你很好地整理你的元素并让他们看起来蛮酷的.下面开始我们的内容,希望你会喜欢它.下面是我收集的CSS技巧,希望能帮助到你,感觉收 ...
- 关于CommandTimeOut
指示在终止尝试和产生错误之前执行命令期间需等待的时间. 设置和返回值 设置或返回长整型值,该值指示等待命令执行的时间(单位为秒).默认值为 30. 说明 Connection 对象或Command 上 ...
- Photoshop扣除特定颜色背景
步骤:打开ps--打开图片---选择--选择色彩范围---取样颜色(用吸管选定颜色)-- ( )再按delete键删除--点击文件--点击储存为PSD. 这样就抠除了特定范围色彩内的背景.