【Ray Tracing The Next Week 超详解】 光线追踪2-6 Cornell box
Chapter 6:Rectangles and Lights
今天,我们来学习长方形区域光照
先看效果
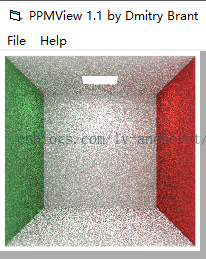
light
首先我们需要设计一个发光的材质
/// light.hpp // -----------------------------------------------------
// [author] lv
// [begin ] 2019.1
// [brief ] the areaLight-class for the ray-tracing project
// from the 《ray tracing the next week》
// ----------------------------------------------------- #pragma once namespace rt
{ //the statement of areaLight class class areaLight :public material
{
public:
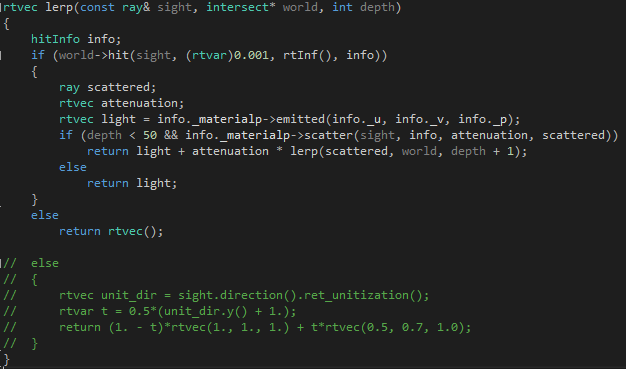
areaLight() { } areaLight(texture* mat) :_emit(mat) { } virtual bool scatter(const ray& InRay, const hitInfo& info, rtvec& attenuation, ray& scattered)const { return false; } virtual rtvec emitted(rtvar u, rtvar v, const rtvec& p)const { return _emit->value(u, v, p); } private:
texture* _emit;
}; } // rt namespace
关于设计方面,我们需要把发光函数设为可继承虚函数,基类也要添加,但是不是所有的材质都需要发光,所以,基类中的发光函数并不需要设置为纯虚
/// material.hpp

// -----------------------------------------------------

// [author]        lv

// [begin ]        2018.12

// [brief ]        the material-class for the ray-tracing project

//                from the 《ray tracing in one week》

// -----------------------------------------------------

#pragma once

namespace rt

{

// the statement of material class

class material

    {

public:

    /*

    @brief: produce a scattered ray

    @param: InRay -> Incident light

            info -> the information of intersect-point(hit-point)

            attenuation -> when scattered, how much the ray should be attenuated by tis reflectance R

            scattered -> as we talk, it is a new sight; or

                         it is the scattered ray with the intersect-point

    @retur: the function calculate a scattered ray or not

    */

    virtual bool scatter(const ray& InRay, const hitInfo& info, rtvec& attenuation, ray& scattered)const = ;

    /*

    @brief: 自发光

    @param: 纹理所需信息

    @retur: 纹理像素值

    */

    virtual rtvec emitted(rtvar u, rtvar v, const rtvec& p)const { return rtvec(); }

    };

}
这样的话,一般的材质继承之后,发光为黑色即不发光,较为合理
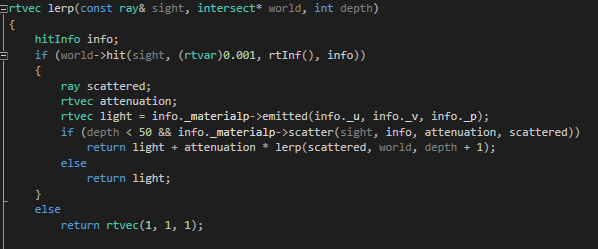
我们既然添加了光照,那么计算插值函数时候也要将它加进去
到此,我们的发光材质就设置妥当了
rectangle
我们定义的长方形均为平行于轴的
(引用书上一张图)
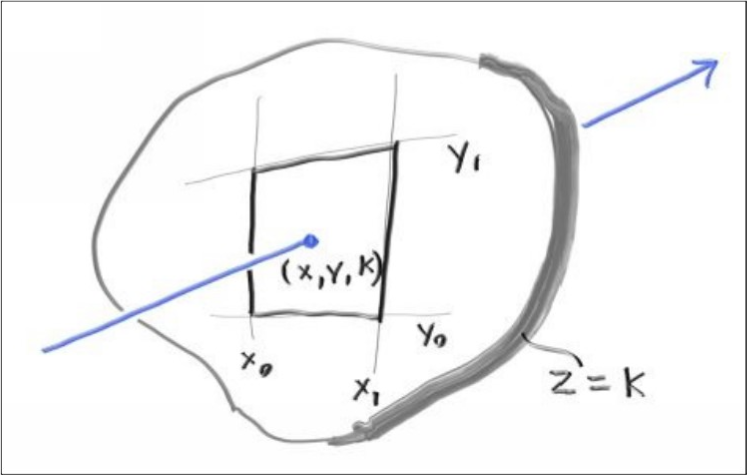
假设长方形位于 z = k 平面,x和y边界如上,交点为P(x,y,k)
我们如何确定光线参数t?
已知:
光线:p(t) = eye + t * direction
则,z方向的方程为:z(t) = eye.z + t * direction.z
那么,若满足z = k,则
t = (k - eye.z) / direction.z
同理可得x和y的等式
如果,得到的x坐标或者y坐标不在边界之内,那么就没有相交,反之则光线和长方形相交
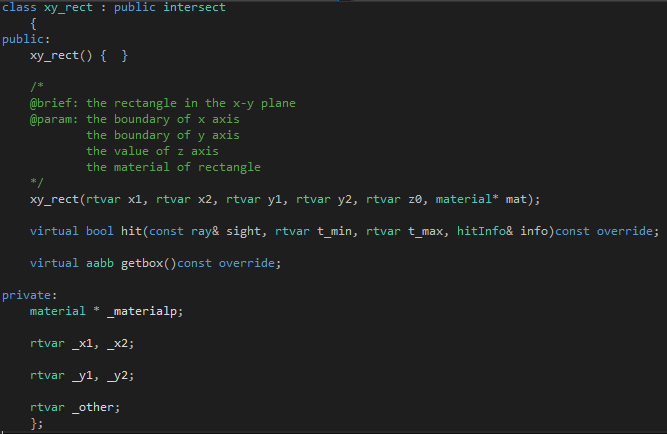

上面的代码都比较简单,那个 hit 呢,就是,根据已知的一个分量求出t,然后,把这个解带入求出对应的其他两个分量,如果其他两个分量不在边界内,那么返回false
反之,我们求取该点的纹理坐标,以及其他碰撞点信息记录之
获取包围盒嘛,理论上面无厚薄,线无粗细,但是实际中面有厚薄,我们可以将厚度设置为0.0002,以此模拟理论厚度
同理写出其他两个平面类即可。
这个没什么问题,我们就往下进行
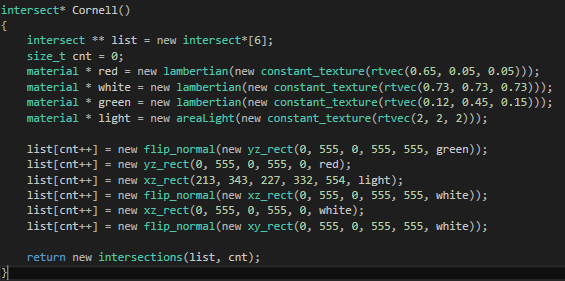
我们来做Cornell box

相机参数设置:

得到的图如下:
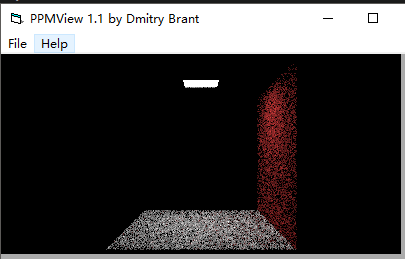
有几个面是黑色的??也就是根本没画出来
我们细细看一下,发现,长方形的法向量是关键
比如画出来的红墙,对面与之平行的面的法线是朝左边的,展现在我们视线中的是背面
所以,我们有时候需要反转一下法向量
/// flip_normal.hpp

// -----------------------------------------------------

// [author]        lv

// [begin ]        2019.1

// [brief ]        the flip_normal-class for the ray-tracing project

//                from the 《ray tracing the next week》

// -----------------------------------------------------

#pragma once

namespace rt

{

class flip_normal: public intersect

    {

public:

    flip_normal(intersect * p) :_p(p) {  }

    virtual bool hit(const ray& sight, rtvar t_min, rtvar t_max, hitInfo& info)const override

        {

        if (_p->hit(sight, t_min, t_max, info))

            {

            info._n = -info._n;

            return true;

            }

        return false;

        }

    virtual aabb getbox()const override

        {

        return _p->getbox();

        }

private:

    intersect* _p;

    };

} // rt namespace
这样就可以了,我们改一下场景
如下:

此外,我们还需要注意的是,light对应的纹理中的数值越大光强越强
我们可以试一下
material * light = new areaLight(new constant_texture(rtvec(, , )));
如下:
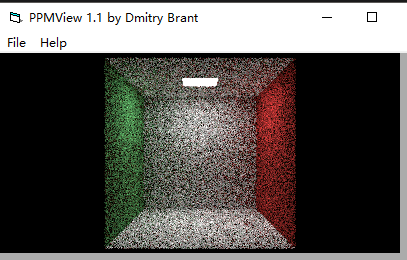
可以看出来两张图对比之下,第二张亮多了
但是我们依旧看着很不舒服,好多黑点点,太难受了
我想啊想,为什么这么多黑点??可能是因为背景是黑色的,毕竟是漫反射,如果随机反射失败那就是黑色,所以随机反射点可能产生好多黑色小点,你千万别想着换成镜面材质,那个更无语
所以啊,我想了下,把背景改为白色,那样更好,毕竟色彩中掺杂一点白色,无伤大雅
如是,我改了下,效果可观
此法只适用于Cornell box本身,具体场景下的画面优化请见下一篇

感谢您的阅读,生活愉快~
【Ray Tracing The Next Week 超详解】 光线追踪2-6 Cornell box的更多相关文章
- 【Ray Tracing The Next Week 超详解】 光线追踪2-9
我们来整理一下项目的代码 目录 ----include --hit --texture --material ----RTdef.hpp ----ray.hpp ----camera.hpp ---- ...
- 【Ray Tracing in One Weekend 超详解】 光线追踪1-4
我们上一篇写了Chapter5 的第一个部分表面法线,那么我们来学剩下的部分,以及Chapter6. Chapter5:Surface normals and multiple objects. 我们 ...
- 【Ray Tracing The Next Week 超详解】 光线追踪2-7 任意长方体 && 场景案例
上一篇比较简单,很久才发是因为做了一些好玩的场景,后来发现这一章是专门写场景例子的,所以就安排到了这一篇 Preface 这一篇要介绍的内容有: 1. 自己做的光照例子 2. Cornell box画 ...
- 【Ray Tracing The Next Week 超详解】 光线追踪2-8 Volume
Preface 今天有两个东东,一个是体积烟雾,一个是封面图 下一篇我们总结项目代码 Chapter 8:Volumes 我们需要为我们的光线追踪器添加新的物体——烟.雾,也称为participat ...
- 【Ray Tracing The Next Week 超详解】 光线追踪2-5
Chapter 5:Image Texture Mapping 先看效果: 我们之前的纹理是利用的是撞击点p处的位置信息,比如大理石纹理 而我们今天的图片映射纹理采用2D(u,v)纹理坐标来进行. 在 ...
- 【Ray Tracing in One Weekend 超详解】 光线追踪1-8 自定义相机设计
今天,我们来学习如何设计自定义位置的相机 ready 我们只需要了解我们之前的坐标体系,或者说是相机位置 先看效果 Chapter10:Positionable camera 这一章我们直接用概念 ...
- 【Ray Tracing The Next Week 超详解】 光线追踪2-4 Perlin noise
Preface 为了得到更好的纹理,很多人采用各种形式的柏林噪声(该命名来自于发明人 Ken Perlin) 柏林噪声是一种比较模糊的白噪声的东西:(引用书中一张图) 柏林噪声是用来生成一些看似杂乱 ...
- 【Ray Tracing The Next Week 超详解】 光线追踪2-3
Preface 终于到了激动人心的纹理章节了 然鹅,看了下,并不激动 因为我们之前就接触过 当初有一个 attenuation 吗? 对了,这就是我们的rgb分量过滤器,我们画出的红色.蓝色.绿色等 ...
- 【Ray Tracing The Next Week 超详解】 光线追踪2-2
Chapter 2:Bounding Volume Hierarchies 今天我们来讲层次包围盒,乍一看比较难,篇幅也多,但是咱们一步一步来,相信大家应该都能听懂 BVH 和 Perlin text ...
随机推荐
- java中String类型
string对象常用方法 string对象比较方法: string类获取包含子串的方法: 字符串和数字的转换: String类 String对象是不可改变的,字符串一旦创建,内容不能再改变. 构造字符 ...
- JAVA中的引用
关于值类型和引用类型的话题,C++.JAVA.python.go.C#等等高级语言都有相关的概念,只要理解了其底层工作原理,可以说即使是不同的语言,在面试学习工作实践中都可以信手拈来(不要太纠集语言) ...
- kali linux 安装QQ
之前在kali上尝试过Wineqq2012,显示版本过低,放弃了.最近听说crossover比wine的支持要好,再次尝试. 1.下载 https://www.codeweavers.com/ 选择d ...
- Python 对图片进行人脸识别
import cv2 def detect(path): img = cv2.imread(path) cascade = cv2.CascadeClassifier("/vagrant/d ...
- Linux 调优方案, 修改最大连接数(ulimit命令)【转】
转自:http://blog.csdn.net/liangxiaozhang/article/details/8363435 Linux对于每个用户,系统限制其最大进程数.为提高性能,可以根据设备资源 ...
- ubuntu cron 及 crontab 自动执行任务
Add the below line (with tweaks) to the end of /etc/crontab: 30 23 * * * root shutdown -h now At 23: ...
- springboot系列八、springboot整合kafka
背景: 当业务在同一时间出现高并发的时候,这个时候我们不想无限的增加服务器,但是又想提高吞吐量.这时可以考虑使用消息异步处理,进行消峰填谷:同时还可以降低耦合度.常见的消息中间件有kafka,rabb ...
- centos6下通用二进制安装mysql5.5.33
mysql5.5通用二进制格式安装方法 1.解压到 /usr/local 目录 # tar xf mysql-5.5.33-linux2.6-x86_64.tar.gz -C /usr/local 2 ...
- Eclipse与github整合
Eclipse与github整合 Windows系统下: github官方指南:https://help.github.com/articles/set-up-git Git?是个正快速成长的版本控制 ...
- 两道SQL题目
1.查询省内所有城市气温都大于35度的省份(表名:Temp) SELECT province FROM Temp WHERE province NOT IN ( SELECT province FRO ...