
Nginx 学习笔记(二)Web 服务启用 HTTP/2
个人网站提升为HTTP2.0协议,加速访问
一、条件
1、openssl的版本必须在1.0.2e及以上
2、nginx的版本必须在1.9.5以上
二、编译安装
1、openssl 编译安装
(1)开始
wget --no-check-certificate https://www.openssl.org/source/openssl-1.0.2j.tar.gz

tar zxvf openssl-1.0.2j.tar.gz

cd openssl-1.0.2j

./config shared zlib

make && make install

mv /usr/bin/openssl /usr/bin/openssl.old

mv /usr/include/openssl /usr/include/openssl.old

ln -s /usr/local/ssl/bin/openssl /usr/bin/openssl

ln -s /usr/local/ssl/include/openssl /usr/include/openssl

echo "/usr/local/ssl/lib" >> /etc/ld.so.conf

ldconfig -v
注:
(2)查看openssl版本
www@TinywanAliYun: openssl version

OpenSSL 1.0.2j   Sep
232
2、重新编译Openresty
(1)本次将下载最新版本:openresty-1.13.6.1.tar.gz
wget https://openresty.org/download/openresty-1.13.6.1.tar.gz

tar zxvf openresty-1.13.6.1.tar.gz

cd openresty-1.13.6.1/
(2)修改加载openssl 方式
vim /home/www/build/openresty-1.13.6.1/bundle/nginx-1.13./auto/lib/openssl/conf

vim /home/www/build/openresty-1.13.6.1/build/nginx-1.13./auto/lib/openssl/conf
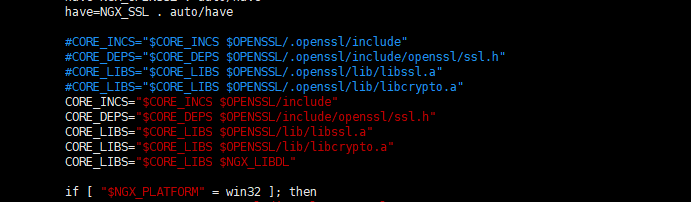
修改后内容,注意:这里是修改为两个不同目录的openssl的配置文件
# 修改前:

#CORE_INCS="$CORE_INCS $OPENSSL/.openssl/include"

#CORE_DEPS="$CORE_DEPS $OPENSSL/.openssl/include/openssl/ssl.h"

#CORE_LIBS="$CORE_LIBS $OPENSSL/.openssl/lib/libssl.a"

#CORE_LIBS="$CORE_LIBS $OPENSSL/.openssl/lib/libcrypto.a"

# 修改前:

CORE_INCS="$CORE_INCS $OPENSSL/include"

CORE_DEPS="$CORE_DEPS $OPENSSL/include/openssl/ssl.h"

CORE_LIBS="$CORE_LIBS $OPENSSL/lib/libssl.a"

CORE_LIBS="$CORE_LIBS $OPENSSL/lib/libcrypto.a"
我这里是直接注释掉,添加新的
(3)重新编译Openresty ,添加–with-openssl参数
./configure \

--user=www \

--group=www \

--prefix=/usr/local/openresty \

--with-luajit \

--with-http_v2_module \

--with-http_realip_module \

--with-http_mp4_module \

--with-stream \

--with-http_gzip_static_module \

--with-http_ssl_module \

--with-openssl=/usr/local/ssl \

--with-openssl-opt="enable-tlsext" \

--without-http_redis2_module \

--with-http_iconv_module \

--with-http_stub_status_module \

--with-http_xslt_module \

--add-dynamic-module=/home/www/build/nginx-ts-module \

--add-dynamic-module=/home/www/build/nginx-rtmp-module \

--add-dynamic-module=/home/www/build/nginx-module-vts \

--add-module=/home/www/build/ngx_cache_purge-2.3 \
...
...
make
注意:这里只要编译就可以啦,没必要make install (会覆盖原来已经安装好的内容)
(4)修改Nginx 二进制文件,如果Nginx服务正在运行,必须停止,否则无法覆盖
首先备份二进制文件一份:
cp /usr/local/openresty/nginx/sbin/nginx /usr/local/openresty/nginx/sbin/nginx.old
覆盖旧二进制文件
cp -f /home/www/build/openresty-1.13.6.1/build/nginx-1.13./objs/nginx /usr/local/openresty/nginx/sbin/nginx
如果动态编译了其他模块或者同一个模块的不同版本,则同上一并复制过去
cp -f /home/www/build/openresty-1.13.6.1/build/nginx-1.13./objs/ngx_rtmp_module.so /usr/local/openresty/nginx/modules/ngx_rtmp_module.so

cp -f /home/www/build/openresty-1.13.6.1/build/nginx-1.13./objs/ngx_http_ts_module.so /usr/local/openresty/nginx/modules/ngx_http_ts_module.so

cp -f /home/www/build/openresty-1.13.6.1/build/nginx-1.13./objs/ngx_http_vhost_traffic_status_module.so /usr/local/openresty/nginx/modules/ngx_http_vhost_traffic_status_module.so
(5)重启服务,查看配置信息
sudo systemctl start nginx
配置详情
www@TinywanAliYun:~/build/openresty-1.13.6.1/build/nginx-1.13./objs$ sudo /usr/local/openresty/nginx/sbin/nginx -V

nginx version: openresty/1.13.6.1

built by gcc 5.4.  (Ubuntu 5.4.-6ubuntu1~16.04.)

built with OpenSSL 1.0.2j   Sep

TLS SNI support enabled

configure arguments: --prefix=/usr/local/openresty/nginx --with-cc-opt=-O2 --add-module=../ngx_devel_kit-0.3.
 --with-ld-opt=-Wl,-rpath,/usr/local/openresty/luajit/lib --user=www --group=www --with-http_v2_module --with-http_realip_module
 --with-http_mp4_module --with-stream --with-http_ssl_module --with-openssl=/usr/local/ssl
 --with-openssl-opt=enable-tlsext --with-http_stub_status_module --with-http_xslt_module
 --add-dynamic-module=/home/www/build/nginx-ts-module --add-dynamic-module=/home/www/build/nginx-rtmp-module
 --add-dynamic-module=/home/www/build/nginx-module-vts
 --add-dynamic-module=/home/www/build/ngx_cache_purge-2.3
 --with-stream --with-stream_ssl_module

 --user=www --group=www --with-http_v2_module
 --with-http_ssl_module --with-openssl=/usr/local/ssl --with-openssl-opt=enable-tlsext --with-http_stub_status_module --with-http_xslt_module
--add-dynamic-module=/home/www/build/nginx-ts-module
--add-dynamic-module=/home/www/build/nginx-rtmp-module
--add-dynamic-module=/home/www/build/nginx-module-vts
--add-dynamic-module=/home/www/build/ngx_cache_purge-2.3
--with-stream --with-stream_ssl_module
三、配置Nginx.conf
    server {

        listen        ssl http2;

        server_name  www.tinywan.com;

        set $root_path /home/www;

        root $root_path;

        ssl on;

        ssl_certificate      /etc/letsencrypt/live/www.tinywan.com/fullchain.pem;

        ssl_certificate_key  /etc/letsencrypt/live/www.tinywan.com//privkey.pem;

        server_tokens off;

        location / {

            if (!-e $request_filename) {

                rewrite  ^(.*)$  /index.php?s=/$  last;

                break;

            }

        }

}
四、测试
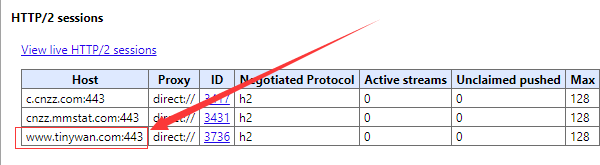
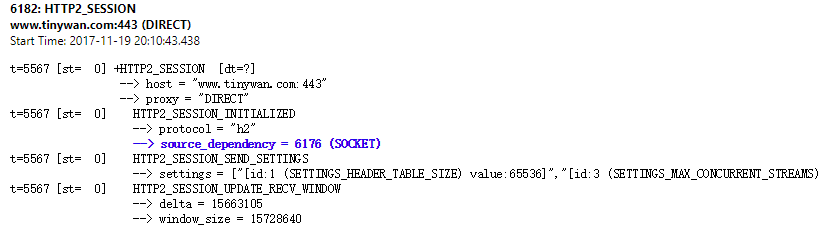
1、测试工具,Chrome 的 Net-internals 工具 (Chrome 中通过 chrome://net-internals/#http2 可以访问)
2、测试结果

浏览器Header 请求头变化

五、参考文章
3、HTTP协议简介
4、nginx的http2.0性能太逆天了,HTTPS网站性能优化
9、[翻译]Dropbox Web 服务启用 HTTP/2:经验和观察
Nginx 学习笔记(二)Web 服务启用 HTTP/2的更多相关文章
- Netty学习笔记(二) 实现服务端和客户端
在Netty学习笔记(一) 实现DISCARD服务中,我们使用Netty和Python实现了简单的丢弃DISCARD服务,这篇,我们使用Netty实现服务端和客户端交互的需求. 前置工作 开发环境 J ...
- nginx学习笔记二
一,nginx架构在Linux系统中以daemon(守护进程)的方式在后台运行,后台进程包含一个master进程和多个worker进程(多进程的工作方式) master进程 | 信号 | | ---- ...
- Nginx学习笔记二基本配置
1.Nginx的配置文件默认在Nginx程序安装目录的conf二级目录下,主配置文件为nginx.conf.假设您的Nginx安装 在/usr/local/webserver/nginx/目录下,那么 ...
- nginx学习笔记(二)
nginx变量 Nginx 变量值容器的生命期是与当前正在处理的请求绑定的,而与 location 无关. 通过 set 指令隐式创建的 Nginx 变量.这些变量我们一般称为"用户自定义变 ...
- dubbo学习笔记二(服务调用)
项目结构 代码示例 由于之前的IEchoService 的一个方法只是在服务端控制台打印,不便在浏览器测试,所以新添加的方法 api和服务端代码变更 public interface IEchoSer ...
- amazeui学习笔记二(进阶开发5)--Web 组件开发规范Rules
amazeui学习笔记二(进阶开发5)--Web 组件开发规范Rules 一.总结 1.见名知意:见那些class名字知意,见函数名知意,见文件名知意 例如(HISTORY.md Web 组件更新历史 ...
- amazeui学习笔记二(进阶开发2)--Web组件简介Web Component
amazeui学习笔记二(进阶开发2)--Web组件简介Web Component 一.总结 1.amaze ui:amaze ui是一个web 组件, 由模板(hbs).样式(LESS).交互(JS ...
- AJax 学习笔记二(onreadystatechange的作用)
AJax 学习笔记二(onreadystatechange的作用) 当发送一个请求后,客户端无法确定什么时候会完成这个请求,所以需要用事件机制来捕获请求的状态XMLHttpRequest对象提供了on ...
- nginx 学习笔记(2) nginx新手入门
这篇手册简单介绍了nginx,并提供了一些可以操作的简单的工作.前提是nginx已经被安装到你的服务器上.如果没有安装,请阅读上篇:nginx 学习笔记(1) nginx安装.这篇手册主要内容:1. ...
随机推荐
- [转帖] SQL参数化的优点 CopyFrom https://www.cnblogs.com/-lzb/articles/4840671.html
梦在远方的小猪 感谢原作者... 后面总结的五点感觉挺好的.. 自己之前的知识点一直没有串起来. 转帖记录一下感谢. sql参数化参数化 说来惭愧,工作差不多4年了,直到前些日子被DBA找上门让我优 ...
- python 协程库gevent学习--gevent数据结构及实战(三)
gevent学习系列第三章,前面两章分析了大量常用几个函数的源码以及实现原理.这一章重点偏向实战了,按照官方给出的gevent学习指南,我将依次分析官方给出的7个数据结构.以及给出几个相应使用他们的例 ...
- [IOI2018]会议——分治+线段树
题目链接: [IOI2018]meetings 题目大意:有$n$座山峰,每座山峰有一个高度,有$q$次询问,每次需要确定一个开会山峰使$[l,r]$所有山峰上的人都前往开会山峰,一个山峰的人去开会的 ...
- BZOJ2843极地旅行社&BZOJ1180[CROATIAN2009]OTOCI——LCT
题目描述 给出n个结点以及每个点初始时对应的权值wi.起始时点与点之间没有连边.有3类操作: 1.bridge A B:询问结点A与结点B是否连通. 如果是则输出“no”.否则输出“yes”,并且在 ...
- Hopcroft-Carp 算法模板 自用
#include <iostream> #include <cstdio> #include <cstring> #include <queue> #d ...
- Leetcode 190.颠倒二进制位 By Python
颠倒给定的 32 位无符号整数的二进制位. 示例: 输入: 43261596 输出: 964176192 解释: 43261596 的二进制表示形式为 000000101001010000011110 ...
- 自学Linux Shell9.3-基于Red Hat系统工具包:RPM属性依赖的解决方式-YUM在线升级
点击返回 自学Linux命令行与Shell脚本之路 9.3-基于Red Hat系统工具包:RPM属性依赖的解决方式-YUM在线升级 本节主要介绍基于Red Had的系统(测试系统centos) yum ...
- 自学Aruba1.5-Aruba体系结构-Aruba通讯过程
点击返回:自学Aruba之路 自学Aruba1.5-Aruba体系结构-Aruba通讯过程 1. Aruba通讯过程 Aruba 通讯过程: ①AP连接到现有网络的交换机端口,加电起动后,获得IP地址 ...
- Java 实现金额转换 代码示例
金额转换,阿拉伯数字的金额转换成中国传统的形式如: (¥1011)→(壹仟零壹拾壹元整)输出. 分析: 金额转换,在开发财务相关软件时会经常用到,也是软件本地化的一个需要.一般开发公司或者团队都有相应 ...
- shell(1)-磁盘shell
查看硬盘的大小脚本[root@localhost ~]# vi repboot.sh#!/bin/bash# To show usage of /boot directory and mode of ...