服务注册和发现(Consul)
使用Consul提供注册和发现服务
什么是 Consul
Consul 是 HashiCorp 公司推出的开源工具,用于实现分布式系统的服务发现与配置。与其它分布式服务注册与发现的方案,Consul 的方案更“一站式”,内置了服务注册与发现框架、分布一致性协议实现、健康检查、Key/Value 存储、多数据中心方案,不再需要依赖其它工具(比如 ZooKeeper 等)。使用起来也较为简单。Consul 使用 Go 语言编写,因此具有天然可移植性(支持Linux、windows和Mac OS X);安装包仅包含一个可执行文件,方便部署,与 Docker 等轻量级容器可无缝配合。
Consul 安装
访问 Consul 官网 ,根据操作系统类型,选择下载 Consul 的最新版本。我这里选择windows版本。

下载下来是一个zip压缩包,解压之后,是一个exe可执行文件。

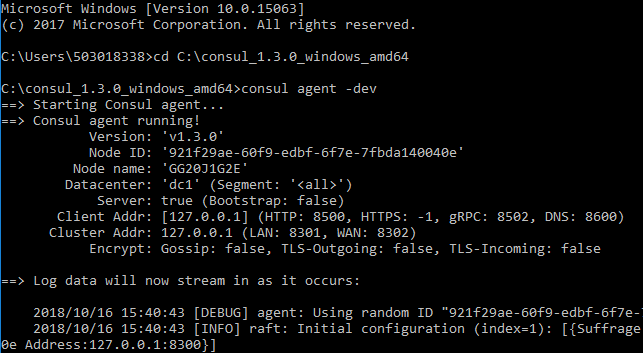
打开CMD终端,进入consul.exe所在目录,执行如下命令启动Consul服务。
cd C:\consul_1.3.0_windows_amd64  # 进入consul.exe所在目录

consul agent -dev        # 启动服务, -dev 表示开发模式运行,另外还有 -server 表示服务模式运行
启动过程信息如下图所示。
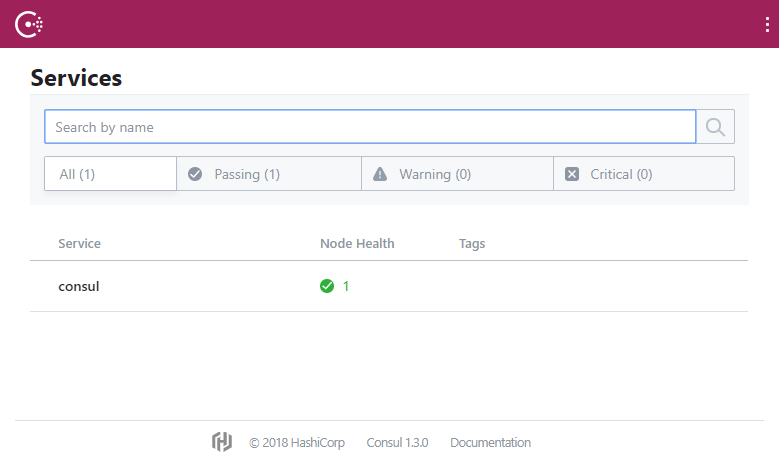
启动成功之后,访问 http://localhost:8500 , 可以查看 Consul 管理界面。
Consul 服务提供者
服务注册发现中心有了,现在我们来开发服务提供者。
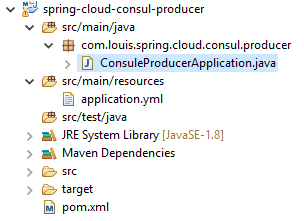
新建项目 spring-cloud-consul-producer,添加以下依赖。
pom.xml

<dependencies>

    <dependency>

        <groupId>org.springframework.boot</groupId>

        <artifactId>spring-boot-starter-actuator</artifactId>

    </dependency>

    <dependency>

        <groupId>org.springframework.cloud</groupId>

        <artifactId>spring-cloud-starter-consul-discovery</artifactId>

    </dependency>

    <dependency>

        <groupId>org.springframework.boot</groupId>

        <artifactId>spring-boot-starter-web</artifactId>

    </dependency>

    <dependency>

        <groupId>org.springframework.boot</groupId>

        <artifactId>spring-boot-starter-test</artifactId>

        <scope>test</scope>

    </dependency>

</dependencies>
说明:
spring-boot-starter-actuator 健康检查依赖于此包。
spring-cloud-starter-consul-discovery Spring Cloud Consul 的支持。
注意添加Spring Cloud的依赖配置,完整内容参见源码pom文件。
  <dependencyManagement>

        <dependencies>

            <dependency>

                <groupId>org.springframework.cloud</groupId>

                <artifactId>spring-cloud-dependencies</artifactId>

                <version>${spring-cloud.version}</version>

                <type>pom</type>

                <scope>import</scope>

            </dependency>

        </dependencies>

    </dependencyManagement>
添加配置
在配置文件添加内容如下。
application.yml
server:

  port: 8511

spring:

  application:

    name: spring-cloud-consul-producer

  cloud:

    consul:

      host: localhost

      port: 8500

      discovery:

        serviceName: service-producer    # 注册到consul的服务名称
Consul 的地址和端口号默认是 localhost:8500 ,如果不是这个地址可以自行配置,consul服务会占用8502接口,所以不要用8501、8502。spring.cloud.consul.discovery.serviceName 是指注册到 Consul 的服务名称,后期客户端会根据这个名称来进行服务调用。
修改启动类
修改启动器类,添加 @EnableDiscoveryClient 注解,开启服务发现支持。
package com.louis.spring.cloud.consul.producer;

import org.springframework.boot.SpringApplication;

import org.springframework.boot.autoconfigure.SpringBootApplication;

import org.springframework.cloud.client.discovery.EnableDiscoveryClient;

@EnableDiscoveryClient

@SpringBootApplication

public class ConsuleProducerApplication {

    public static void main(String[] args) {

        SpringApplication.run(ConsuleProducerApplication.class, args);

    }

}
添加服务
新建 HelloController,提供 hello 接口, 返回 hello consul 字符串。
package com.louis.spring.cloud.consul.producer.controller;

import org.springframework.web.bind.annotation.RequestMapping;

import org.springframework.web.bind.annotation.RestController;

@RestController

public class HelloController {

    @RequestMapping("/hello")

    public String hello() {

        return "hello consul.";

    }

}
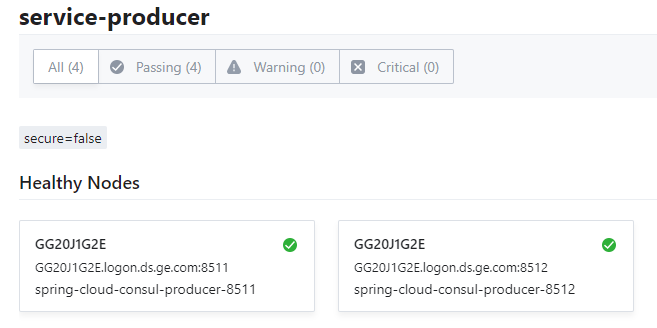
为了模拟注册均衡负载,复制一份上面的项目,重命名为 spring-cloud-consul-producer2 ,修改对应的端口为 8512,修改 hello 方法的返回值为:"helle consul two",修改完成后依次启动两个项目,启动成功之后刷新Consul管理界面,发现我们注册的service-producer服务,并有2个节点实例。
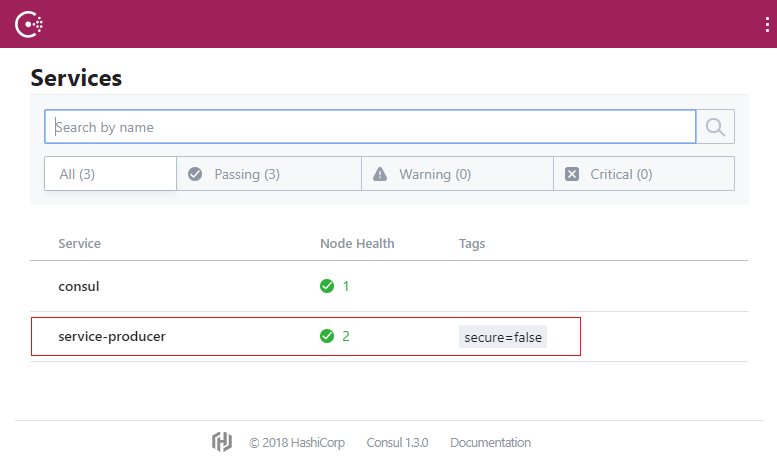
点击进入节点详情页面,可以看到我们注册的8511和8512两个服务提供者节点实例。
Consul 消费者
服务注册发现中心有了,服务提供者也有了,现在我们来开发服务消费者。
新建项目 spring-cloud-consul-comsumer,依赖同提供者。
添加配置
修改配置文件如下。
application.yml
server:

  port: 8521

spring:

  application:

    name: spring-cloud-consul-consumer

  cloud:

    consul:

      host: localhost

      port: 8500

      discovery:

        register: false    #设置不需要注册到 consul 中
客户端可以设置是否注册到 Consul 中,具体需要根据我们的业务来选择,一般在需要对外提供服务时进行注册。
启动器类
ConsuleConsumerApplication.java
package com.louis.spring.cloud.consul.producer;

import org.springframework.boot.SpringApplication;

import org.springframework.boot.autoconfigure.SpringBootApplication;

@SpringBootApplication

public class ConsuleConsumerApplication {

    public static void main(String[] args) {

        SpringApplication.run(ConsuleConsumerApplication.class, args);

    }

}
服务消费者
添加消费服务测试类,添加两个接口,一个查询所有我们注册的服务,另一个从我们注册的服务中选取一个服务,采用轮询的方式。
ServiceController.java
package com.louis.spring.cloud.consul.producer.controller;

import org.springframework.beans.factory.annotation.Autowired;

import org.springframework.cloud.client.discovery.DiscoveryClient;

import org.springframework.cloud.client.loadbalancer.LoadBalancerClient;

import org.springframework.web.bind.annotation.RequestMapping;

import org.springframework.web.bind.annotation.RestController;

@RestController

public class ServiceController {

    @Autowired

    private LoadBalancerClient loadBalancerClient;

    @Autowired

    private DiscoveryClient discoveryClient;

   /**

     * 获取所有服务

     */

    @RequestMapping("/services")

    public Object services() {

        return discoveryClient.getInstances("service-producer");

    }

    /**

     * 从所有服务中选择一个服务(轮询)

     */

    @RequestMapping("/discover")

    public Object discover() {

        return loadBalancerClient.choose("service-producer").getUri().toString();

    }

}
添加完成之后,启动项目, 访问 http://localhost:8521/services,返回两个服务,分别是我们注册的8511和8512。
[{

    "serviceId": "service-producer",

    "host": "GG20J1G2E.logon.ds.ge.com",

    "port": 8511,

    "secure": false,

    "metadata": {

        "secure": "false"

    },

    "uri": "http://GG20J1G2E.logon.ds.ge.com:8511",

    "scheme": null

}, {

    "serviceId": "service-producer",

    "host": "GG20J1G2E.logon.ds.ge.com",

    "port": 8512,

    "secure": false,

    "metadata": {

        "secure": "false"

    },

    "uri": "http://GG20J1G2E.logon.ds.ge.com:8512",

    "scheme": null

}]
反复访问 http://localhost:8521/discover,结果交替返回服务8511和8512,因为默认的负载均衡器是采用轮询的方式。
http://GG20J1G2E.logon.ds.ge.com:8511
http://GG20J1G2E.logon.ds.ge.com:8512
...
8511 和 8512 两个服务会交替出现,从而实现了获取服务端地址的均衡负载。
大多数情况下我们希望使用均衡负载的形式去获取服务端提供的服务,因此使用第二种方法来模拟调用服务端提供的 hello 方法。
创建 CallHelloController.java
package com.louis.spring.cloud.consul.producer.controller;

import org.springframework.beans.factory.annotation.Autowired;

import org.springframework.cloud.client.ServiceInstance;

import org.springframework.cloud.client.loadbalancer.LoadBalancerClient;

import org.springframework.web.bind.annotation.RequestMapping;

import org.springframework.web.bind.annotation.RestController;

import org.springframework.web.client.RestTemplate;

@RestController

public class CallHelloController {

    @Autowired

    private LoadBalancerClient loadBalancer;

    @RequestMapping("/call")

    public String call() {

        ServiceInstance serviceInstance = loadBalancer.choose("service-producer");

        System.out.println("服务地址:" + serviceInstance.getUri());

        System.out.println("服务名称:" + serviceInstance.getServiceId());

        String callServiceResult = new RestTemplate().getForObject(serviceInstance.getUri().toString() + "/hello", String.class);

        System.out.println(callServiceResult);

        return callServiceResult;

    }

}
使用 RestTemplate 进行远程调用。添加完之后重启 spring-cloud-consul-consumer 项目。
在浏览器中访问地址:http://localhost:8521/call,依次返回结果如下:
helle consul
helle consul two
...
服务注册和发现(Consul)的更多相关文章
- 分布式服务注册和发现consul 简要介绍
Consul是HashiCorp公司推出的开源工具,用于实现分布式系统的服务发现与配置.与其他分布式服务注册与发现的方案,Consul的方案更"一站式",内置了服务注册与发现框 架 ...
- 微服务之服务注册与发现--Consul(转载)
http://blog.csdn.net/buxiaoxia/article/details/69788114 https://www.cnblogs.com/xiaohanlin/p/8016803 ...
- 5.服务注册与发现Consul,简学API,手动注册和删除服务
package main import ( httptransport "github.com/go-kit/kit/transport/http" mymux "git ...
- C#使用Consul集群进行服务注册与发现
前言 我个人觉得,中间件的部署与使用是非常难记忆的:也就是说,如果两次使用中间件的时间间隔比较长,那基本上等于要重新学习使用. 所以,我觉得学习中间件的文章,越详细越好:因为,这对作者而言也是一份珍贵 ...
- 温故知新,.Net Core遇见Consul(HashiCorp),实践分布式服务注册与发现
什么是Consul 参考 https://www.consul.io https://www.hashicorp.com 使用Consul做服务发现的若干姿势 ASP.NET Core 发布之后通过命 ...
- Spring Cloud Consul 实现服务注册和发现
Spring Cloud 是一个基于 Spring Boot 实现的云应用开发工具,它为基于 JVM 的云应用开发中涉及的配置管理.服务发现.断路器.智能路由.微代理.控制总线.全局锁.决策竞选.分布 ...
- 基于 Consul 实现 MagicOnion(GRpc) 服务注册与发现
0.简介 0.1 什么是 Consul Consul是HashiCorp公司推出的开源工具,用于实现分布式系统的服务发现与配置. 这里所谓的服务,不仅仅包括常用的 Api 这些服务,也包括软件开发过程 ...
- Docker+Consul+Registrator 实现服务注册与发现
Docker+Consul+Registrator实现服务注册与发现 逻辑图 实现nginx节点自动化加入容器IP代理 1.三台Consul agent server作为高可用通过Consul Tem ...
- Spring Boot + Spring Cloud 构建微服务系统(一):服务注册和发现(Consul)
使用Consul提供注册和发现服务 什么是 Consul Consul 是 HashiCorp 公司推出的开源工具,用于实现分布式系统的服务发现与配置.与其它分布式服务注册与发现的方案,Consul ...
随机推荐
- 《剑指offer》第四十七题(礼物的最大价值)
// 面试题47:礼物的最大价值 // 题目:在一个m×n的棋盘的每一格都放有一个礼物,每个礼物都有一定的价值 // (价值大于0).你可以从棋盘的左上角开始拿格子里的礼物,并每次向左或 // 者向下 ...
- pipenv安装.whl
windows下很多库安装不方便,主要是编译C之类的. 之前这样做: 1去https://www.lfd.uci.edu/~gohlke/pythonlibs/ 下载各种版本编译好的.whl 2 pi ...
- Java se基础(类的属性及关键字)
public:说明该类的访问类型是公有的,它生成的对象能被其他的对象调用! abstract:用来声明抽象类! final;如果一个类被声明成final类型,那么就不能再由它派生出子类. 可以简单的看 ...
- 大数据新手之路四:联合使用Flume和Kafka
Ubuntu16.04+Kafka1.0.0+Flume1.8.0 1.目标 ①使用Flume作为Kafka的Producer: ②使用Kafka作为Flume的Sink: 其实以上两点是同一个事情在 ...
- Codeforces 985 F - Isomorphic Strings
F - Isomorphic Strings 思路:字符串hash 对于每一个字母单独hash 对于一段区间,求出每个字母的hash值,然后排序,如果能匹配上,就说明在这段区间存在字母间的一一映射 代 ...
- repeater绑定dropdownlist,jquery+ajax页面无刷新,修改dropdownlist默认值
html代码: <td> <asp:HiddenField ID="hiddenchuli" Value='< ...
- Enable SMB2 on the Client
HKEY_LOCAL_MACHINE\System\CurrentControlSet\Services\LanmanWorkstation edit DependOnService and add ...
- lombok插件:Data自动get/set方法, Slf4j实现Logger的调用
lombok插件:Data自动get/set方法, Slf4j实现Logger的调用 lombok.Data import lombok.Data; import org.hibernate.anno ...
- 雷林鹏分享:C# 类型转换
C# 类型转换 类型转换从根本上说是类型铸造,或者说是把数据从一种类型转换为另一种类型.在 C# 中,类型铸造有两种形式: 隐式类型转换 - 这些转换是 C# 默认的以安全方式进行的转换.例如,从小的 ...
- 关于如何获取Google 官方 NavgationView中的控件的方法
最近在想要寻找一个好集成的SlidingMenu,看上了官方的DrawLayout,简单易集成 然后如果想动态改变DrawLayout头部的HeaderVIew的资源的话需要先获取到控件 方法如下 n ...