使用Vagrant搭建本地python开发环境
使用Vagrant搭建本地python开发环境
关于vagrant:
Vagrant是一个基于Ruby的工具,用于创建和部署虚拟化开发环境,它使用Oracle的开源VirtualBox虚拟化系统
也可以使用vmware来搭配使用,因为配置较为繁琐放弃了(貌似需要安装一个收费插件,还不如直接安装virtualbox)
详细操作步骤:
工具及环境介绍:
工具及环境 版本 下载地址
宿主机环境 win10 x86_64 家庭版 http://msdn.itellyou.cn/
VirtualBox VirtualBox-5.2.0 https://www.virtualbox.org/
vagrant vagrant_2.0.1 http://www.vagrantup.com/
box centos-6.6-x86_64.box http://www.vagrantup.com/
xshell xshell_5.0 build 1326 http://www.netsarang.com/download/main.html
1.下载并安装软件
①下载virtualbox虚拟机,很简单就不赘述(中途需要断网,需要注意)
http://download.virtualbox.org/virtualbox/5.2.0/VirtualBox-5.2.0-118431-Win.exe
②下载并安装Vagrant
https://releases.hashicorp.com/vagrant/2.0.1/vagrant_2.0.1_x86_64.msi
③centos-6.6-x86_64.box具体地址
https://github.com/tommy-muehle/puppet-vagrant-boxes/releases/download/1.0.0/centos-6.6-x86_64.box
2.将VirtualBox的路径配置到高级环境变量中
D:\Program Files\Oracle\VirtualBox\
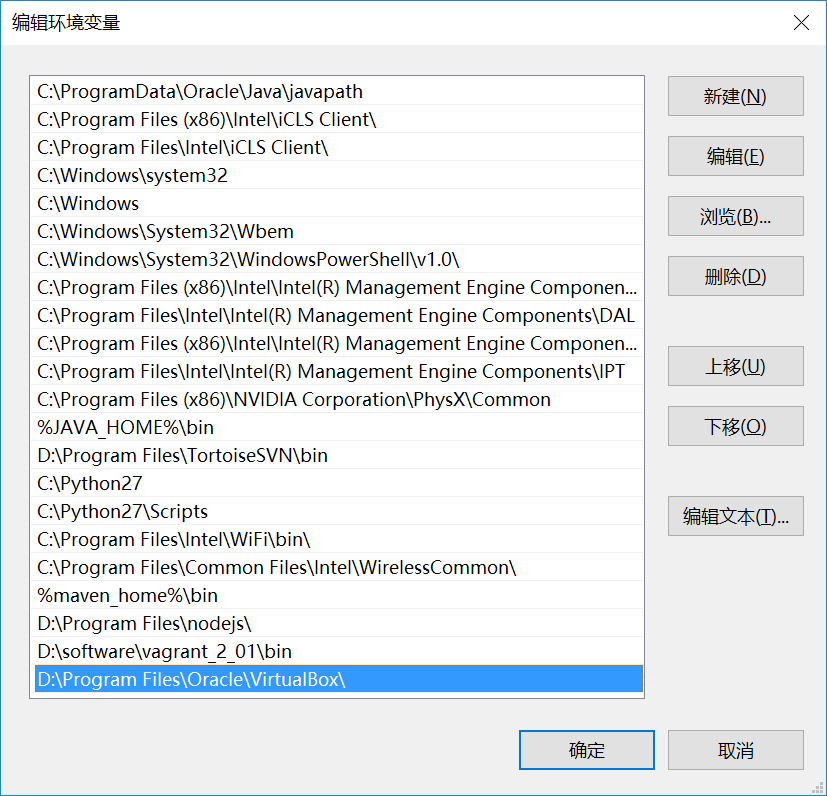
通过cmd直接运行VBoxManage.exe可以启动virtualbox虚拟机程序
3.下载centos-6.6-x86_64.box放到d:/data目录下
cmd命令窗口下:
d:
cd data
①创建centos6.6-x86_64镜像
D:\data>vagrant box add "centos6.6-x86_64" centos-6.6-x86_64.box
==> box: Box file was not detected as metadata. Adding it directly...
==> box: Adding box 'centos6.6-x86_64' (v0) for provider:
box: Unpacking necessary files from: file://D:/data/centos-6.6-x86_64.box
box:
==> box: Successfully added box 'centos6.6-x86_64' (v0) for 'virtualbox'!
# 查看虚拟机列表
D:\data>vagrant box list
centos6.6-x86_64 (virtualbox, 0)
③cd到devops2目录下初始化一个box
D:\data>cd devops2
D:\data\devops2>vagrant init "centos6.6-x86_64"
A `Vagrantfile` has been placed in this directory. You are now
ready to `vagrant up` your first virtual environment! Please read
the comments in the Vagrantfile as well as documentation on
`vagrantup.com` for more information on using Vagrant.
④启动虚拟机
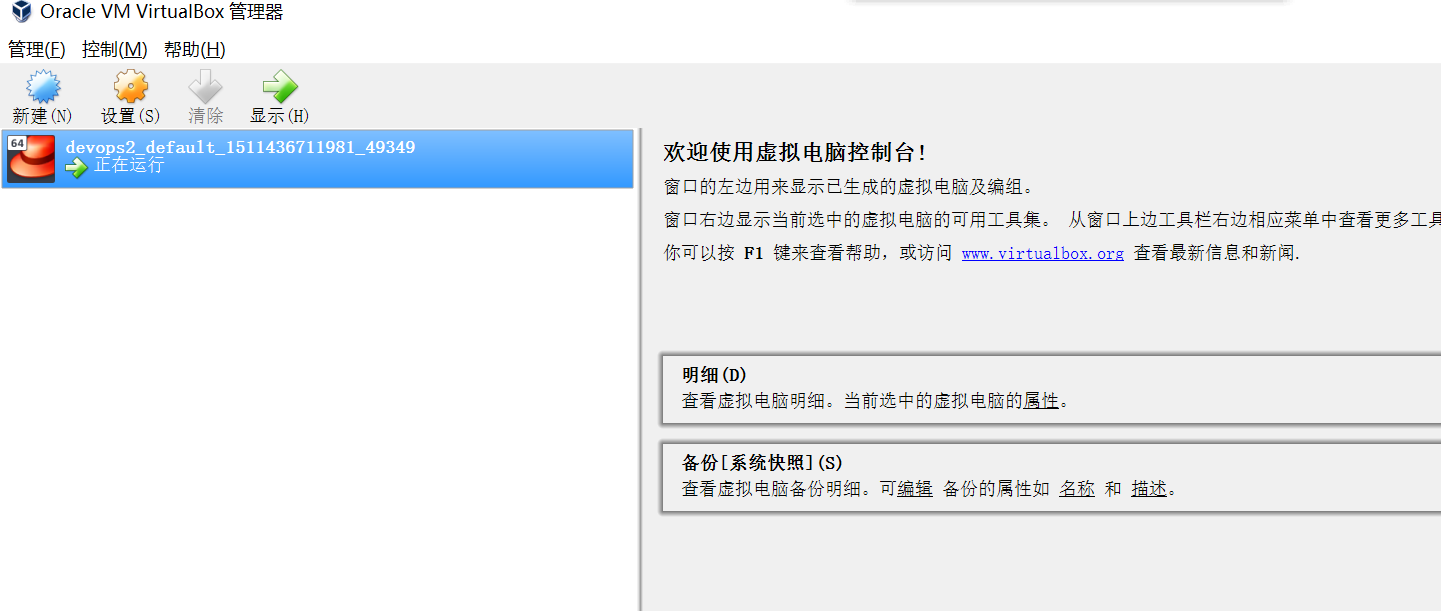
D:\data\devops2>vagrant up
Bringing machine 'default' up with 'virtualbox' provider...
==> default: Importing base box 'centos6.6-x86_64'...
==> default: Matching MAC address for NAT networking...
==> default: Setting the name of the VM: devops2_default_1511436711981_49349
==> default: Clearing any previously set forwarded ports...
==> default: Clearing any previously set network interfaces...
==> default: Preparing network interfaces based on configuration...
default: Adapter 1: nat
==> default: Forwarding ports...
default: 22 (guest) => 2222 (host) (adapter 1)
==> default: Booting VM...
==> default: Waiting for machine to boot. This may take a few minutes...
default: SSH address: 127.0.0.1:2222
default: SSH username: vagrant
default: SSH auth method: private key
default: Warning: Connection reset. Retrying...
default: Warning: Connection aborted. Retrying...
default: Warning: Remote connection disconnect. Retrying...
default: Warning: Connection reset. Retrying...
default: Warning: Connection aborted. Retrying...
default: Warning: Remote connection disconnect. Retrying...
default: Warning: Connection aborted. Retrying...
default: Warning: Connection reset. Retrying...
default: Warning: Connection aborted. Retrying...
default: Warning: Connection reset. Retrying...
default: Warning: Connection aborted. Retrying...
default: Warning: Remote connection disconnect. Retrying...
default:
default: Vagrant insecure key detected. Vagrant will automatically replace
default: this with a newly generated keypair for better security.
default:
default: Inserting generated public key within guest...
default: Removing insecure key from the guest if it's present...
default: Key inserted! Disconnecting and reconnecting using new SSH key...
==> default: Machine booted and ready!
==> default: Checking for guest additions in VM...
default: The guest additions on this VM do not match the installed version of
default: VirtualBox! In most cases this is fine, but in rare cases it can
default: prevent things such as shared folders from working properly. If you see
default: shared folder errors, please make sure the guest additions within the
default: virtual machine match the version of VirtualBox you have installed on
default: your host and reload your VM.
default:
default: Guest Additions Version: 4.3.28
default: VirtualBox Version: 5.2
==> default: Mounting shared folders...
default: /vagrant => D:/data/devops2
# 可以看到启动了虚拟机
④启动ssh
D:\data\devops2>vagrant ssh
Last login: Sat May 30 12:27:44 2015 from 10.0.2.2
Welcome to your Vagrant-built virtual machine.
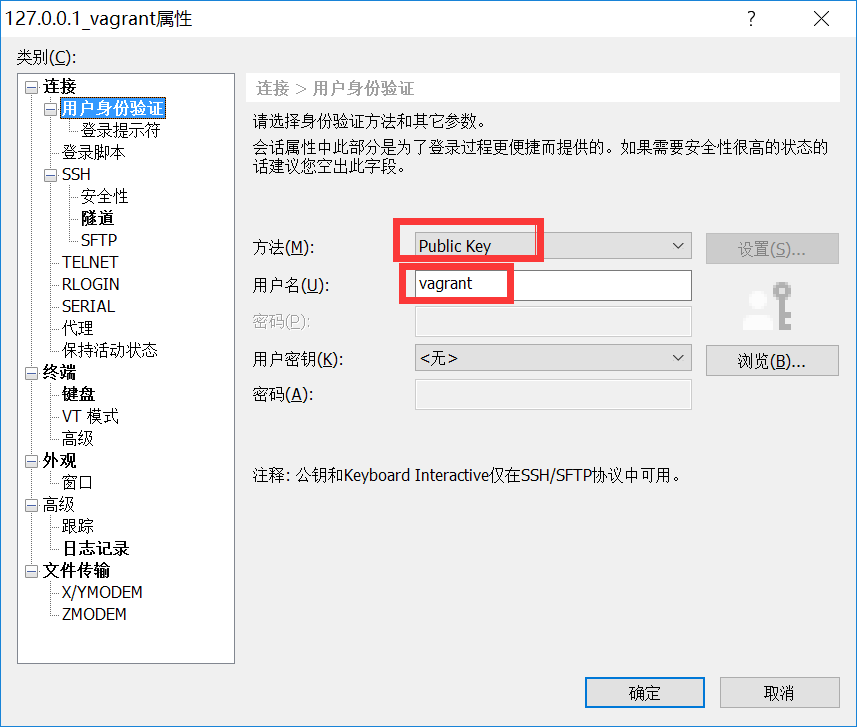
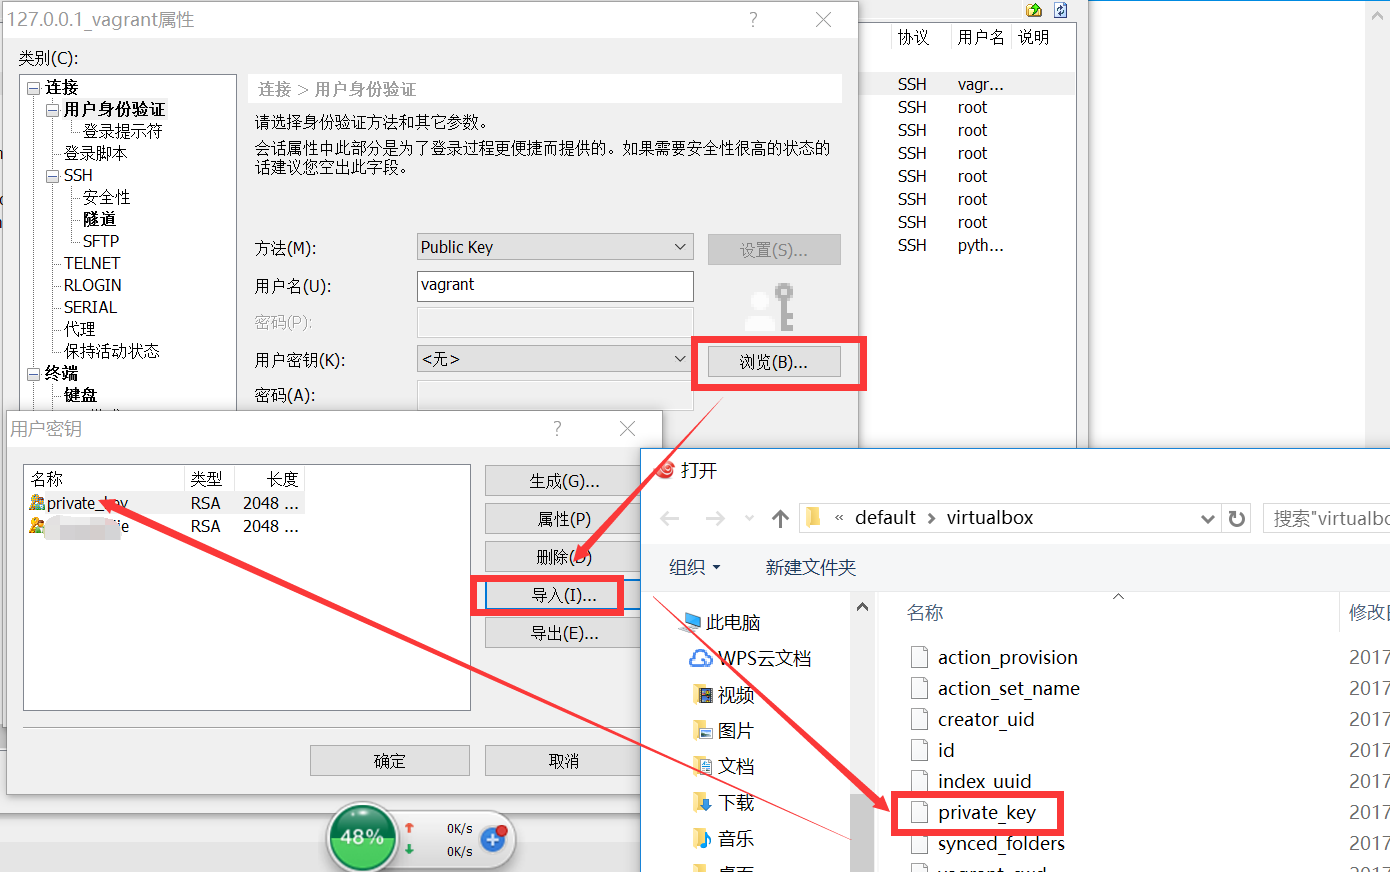
也可以通过ssh工具连接比如xshell连接127.0.0.1 的2222端口,用户名为vagrant密码选择public key选择安装目录的private_key导入即可

[vagrant@localhost ~]$ pwd
/home/vagrant
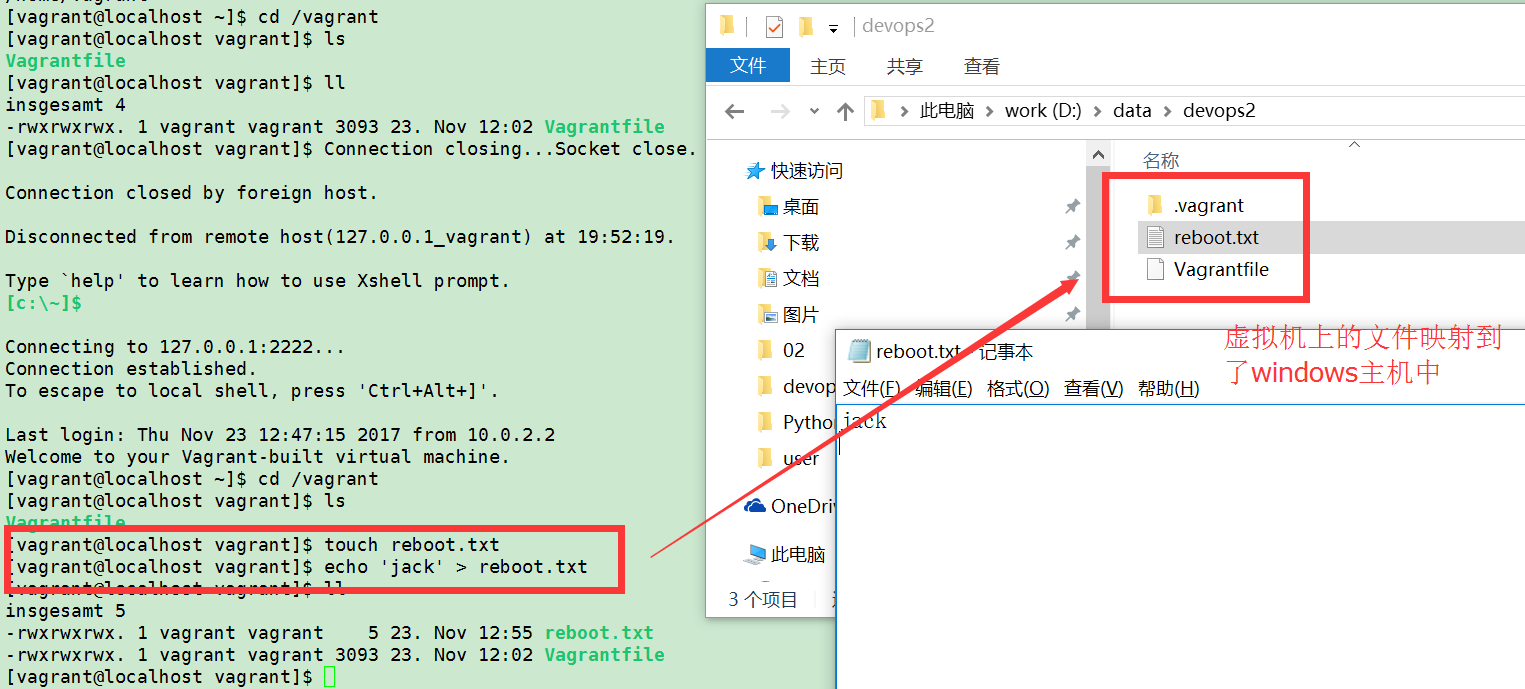
[vagrant@localhost ~]$ cd /vagrant

# 默认会把目录映射到/vagrant目录下
[vagrant@localhost vagrant]$ ll
insgesamt 4
-rwxrwxrwx. 1 vagrant vagrant 3093 23. Nov 12:02 Vagrantfile
[vagrant@localhost vagrant]$ touch reboot.txt
[vagrant@localhost vagrant]$ echo 'jack' > reboot.txt
[vagrant@localhost vagrant]$ ll
insgesamt 5
-rwxrwxrwx. 1 vagrant vagrant 5 23. Nov 12:55 reboot.txt
-rwxrwxrwx. 1 vagrant vagrant 3093 23. Nov 12:02 Vagrantfile
⑤关闭虚拟机
关机D:\data\devops2>vagrant halt
使用Vagrant搭建本地python开发环境的更多相关文章
- 【转】Eclipse和PyDev搭建完美Python开发环境(Ubuntu篇)
原文网址:http://www.cnblogs.com/Realh/archive/2010/10/10/1847251.html 前两天在Windows下成功地搭好了一个Python开发环境,这次转 ...
- Eclipse和PyDev搭建完美Python开发环境(Windows篇)(转)
摘要:本文讲解了用Eclipse和PyDev搭建Python的开发环境. 十一长假在家闲着没事儿,准备花点时间学习一下Python. 今儿花了一个下午搭建Python的开发环境,不禁感叹————开 ...
- windows下搭建spark+python 开发环境
有时候我们会在windows 下开发spark程序,测试程序运行情况,再部署到真实服务器中运行. 那么本文介绍如何在windows 环境中搭建简单的基于hadoop 的spark 环境. 我的wind ...
- Eclipse和PyDev搭建完美Python开发环境 Windows篇
1,安装Python Python是一个跨平台语言,Python从3.0的版本的语法很多不兼容2版本,官网找到最新的版本并下载:http://www.python.org, 因为之前的一个项目是2版本 ...
- Eclipse和PyDev搭建完美Python开发环境(Windows篇)
目录安装Pythonpython for eclipse插件安装配置PyDev插件测试 安装Python从网站上下载最新的版本,从http://python.org/download/下载.安装过程与 ...
- Windows7下搭建Eclipse+Python开发环境
机器: Windows7_x86_64 前提: 机器已成功安装Python2.7,并配置好环境变量. 步骤: 一.Eclipse的安装 Eclipse是基于java的一个应用程序,因此需要一个java ...
- 如何使用 aph-cli 搭建本地静态开发环境(server + proxy + mock)
前提资源 1.aph系统使用说明 2.aph-cli 使用说明 ================================== 一.如何使用aph-cli简单起一个服务 1.在APH管理系统注册 ...
- window下搭建python开发环境
搭建一个python开发环境比较简单,所以就稍微记录一下. 1.下载python然后安装 2.配置环境变量 3.在eclipse添加PyDev插件 1.下载python 官网:https://www. ...
- CentOS搭建python开发环境
装了个CentOS 5.5,想在上面搭个python的开发环境,可是还是遇到了很多问题,记录一下过程: 1.python升级 查看python版本 python -V Python 2.4.3 因为p ...
随机推荐
- OPCServer:使用Matrikon OPC Server Simulation
实验用模拟OPCServer 旧版(50M):Matrikon OPC Server Simulation(v1.5.0.0),百度网盘,密码: mcur 新版(157M):Matrikon OPC ...
- 定时调度篇之Quartz.Net详解(被替换)
一. 背景 我们在日常开发中,可能你会遇到这样的需求:"每个月的3号给用户发信息,提醒用户XXX "."每天的0点需要统计前一天的考勤记录"."每个月 ...
- window.open post
前端代码 expExcel(){ window.open(PreURL+'company_list_exp?keyword='+this.keyword+'&area_code='+this. ...
- Newtonsoft.Json添加项
JObject jo = (JObject)JsonConvert.DeserializeObject(result); ") { string domain=(jo["data& ...
- Image转Base64
今天和一个朋友联调图片转Base64时发现一个问题 public static string ImageToBase64(Image img) { BinaryFormatter binFormatt ...
- HDB3编码器
一.HDB3 码介绍 三阶高密度双极性码(英语:High Density Bipolar of Order 3 code,简称:HDB3码)是一种适用于基带传输的编码方式.它是一种 AMI 码的改进型 ...
- 数据库面试题之COUNT(*),COUNT(字段),CONUT(DISTINCT 字段)的区别
COUNT(*).明确的返回数据表中的数据个数,是最准确的 COUNT(列),返回数据表中的数据个数,不统计值为null的字段 COUNT(DISTINCT 字段) 返回数据表中不重复的的数据个数,不 ...
- c# 读取excels
DataTable ExcelTable; DataSet ds = new DataSet(); //Excel 文件一般都保存为统一的xls的连接 其 ...
- Docker 空间大小设置 - 十
一.容器启动 默认存储大小: 1.一种在启动项 docker.service 中配置. 2.在启动项配置调用的 docker-storage 配置文件中配置: 二.Docker 容器默认启动文件: / ...
- SpringBoot学习笔记<一>入门与基本配置
毕业实习项目技术学习笔记 参考文献 学习视频 2小时学会Spring Boot:https://www.imooc.com/learn/767 学习资料 SpringBoot入门:https://bl ...