android之intent显式,显式学习
intent,意图 当从一个Activity到另一个Activity时调用,这里重点学习显式,隐式的使用
使用语句上的区别:
隐式意图: 显式意图:
setAction 跳转到其他应用:setClassName
setData 跳转到自己应用:setClass
addCategory(当为DEFAULT时可无)
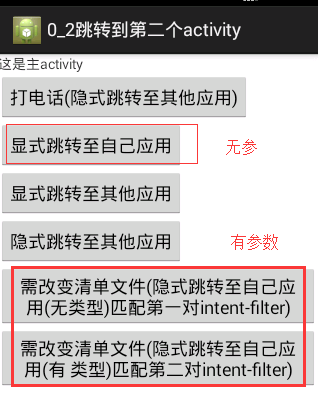
一、无参时的显式、隐式举例
显式-到自己应用(最简单情况):
/*

    * 跳转到自己的应用activity

    * 在本应用中跳转:ActivitySecond.java

    * 显式跳转:直接指定目标Activity的包名和类名

    */

   public void onClick2(View v){

       Intent intent = new Intent();

       //上下文对象:this

       //cls:直接指定目标Activity的类名:ActivitySecond

       intent.setClass(this, ActivitySecond.class);

       startActivity(intent);

   }
显式-到其他应用(记得加权限):
  /*

    * 显式跳转至拨号器

    */

   public void onClick3(View v){

       Intent intent = new Intent();

       //指定目标的Activity的包名和类名

       intent.setClassName("com.android.dialer", "com.android.dialer.DialtactsActivity");

       startActivity(intent);

   }
隐式(无参数传递,最简单情况)
  /*

    * 隐式跳转至拨号器

    */

   public void onClick4(View v){

       Intent intent = new Intent();

       //隐式设置拨号器的动作

       intent.setAction(Intent.ACTION_DIAL);

       startActivity(intent);

   }
二、有参数时隐式传递
三个参数:清单文件的:name 《=====》java文件的setAction
scheme《=====》 setData
mimeType《=====》 setType
必须保证一一匹配,必须一一对应
当然还有两个并列原则:
(1)外部: <intent-filter > </intent-filter >和<intent-filter > </intent-filter >并列
(2)内部:<intent-filter > </intent-filter >中如
<action android:name="com.wsq.dial"/>
<action android:name="com.wsq.dial1"/>
<data android:scheme="wsq" />
<data android:scheme="wsq1" />两个中任意匹配一个即可
举例说明:
1)需改变清单文件(隐式跳转至自己应用(无类型)匹配第一对intent-filter
此时清单文件第一对intent-filter:
   <!-- 并列匹配第一种情况 (没有加类型) -->

             <intent-filter >

                 <action android:name="com.wsq.dial"/>

                 <action android:name="com.wsq.dial1"/>

                 <data android:scheme="wsq" />

                 <data android:scheme="wsq1" />

                 <category android:name="android.intent.category.DEFAULT"></category>

             </intent-filter>
java中对应代码为:
/*

    * 隐式跳转至拨号器

    * 需要在清单文件添加东西

    */

   public void onClick5(View v){

       Intent intent = new Intent();

     //下面两/三条语句的形参必须和清单文件中保持一致

       //隐式设置拨号器的动作

       //name=dial/dial1 ,scheme=wsq:**/wsq1:**任意匹配即可

       intent.setAction("com.wsq.dial");

       intent.setData(Uri.parse("wsq1:only "));

     //系统会自动添加默认的category(可有可无)

       intent.addCategory(Intent.CATEGORY_DEFAULT);

       startActivity(intent);

   }
2)需改变清单文件(隐式跳转至自己应用(有 类型)匹配第二对intent-filter)
此时清单文件第二对intent-filter:
 <!-- 并列匹配第二种情况 加类型 -->

             <intent-filter >

                 <action android:name="com.wsq.dial3"/>

                 <data android:scheme="wsq3" android:mimeType="text/username"/>

                 <category android:name="android.intent.category.DEFAULT"></category>

             </intent-filter>
java中对应代码为:
/*

    * 有类型参数传递

    * 隐式跳转至SecondActivity

    * 需要在清单文件添加东西

    * name=dial3 ,scheme=wsq:**,mimeType="text/username"

    */

   public void onClick6(View v){

       Intent intent = new Intent();

       //下面两/三条语句的形参必须和清单文件中保持一致

       //隐式设置拨号器的动作

       intent.setAction("com.wsq.dial3");

     /*

      * 该两者不能共生,所以使用一个综合性的方法替代

      * intent.setData(Uri.parse("wsq:paopao"));

        intent.setType("text/username");

      */

       intent.setDataAndType(Uri.parse("wsq3:paopao"), "text/username");

       //系统会自动添加默认的category(可有可无)

       intent.addCategory(Intent.CATEGORY_DEFAULT);

       startActivity(intent);

   }
注意的是intent.setData和intent.setType不能同时存在,使用综合方法代替了
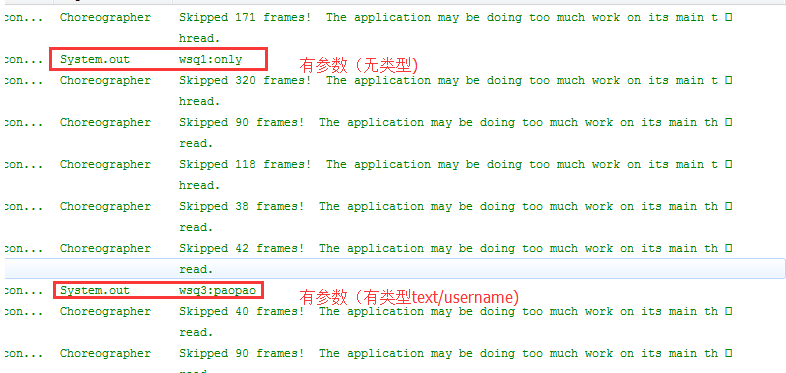
三、对上述两种传参的响应:
在SecondActivity.java中接收意图intent,获取到启动这个Activity的意图:MainActivity中的Intent
   //,只针对5,6按钮,不针对第二个按钮因为无数据传过来,如果点击发生错误

            //获取到启动这个Activity的意图:MainActivity中的Intent

            Intent intent  = getIntent();

            Uri uri =intent.getData();

            //打印显示按钮6传过来的参数

            System.out.println(uri.toString());
需要注意的是,第二个按钮(最简单情况无参传递)是无参的,所以该响应不能接收到数据,所以该响应只针对上述两种有参数传递的意图
四、效果:
有参数的响应:
五、代码:
package com.wsq.jumpSecondactivity;

import android.app.Activity;

import android.content.Intent;

import android.net.Uri;

import android.os.Bundle;

import android.view.Menu;

import android.view.MenuItem;

import android.view.View;

public class MainActivity extends Activity {

    @Override

    protected void onCreate(Bundle savedInstanceState) {

        super.onCreate(savedInstanceState);

        setContentView(R.layout.activity_main);

    }

   /*

    * 跳转到第二个activity:打电话

    * 隐式跳转

    * 使用setAction和setData

    */

   public void onClick1(View v){

       Intent intent = new Intent();

       //

       intent.setAction(Intent.ACTION_CALL);

       intent.setData(Uri.parse("tel:110")); //英文字符

       //跳转

       startActivity(intent);

   }

   /*

    * 跳转到自己的应用activity

    * 在本应用中跳转:ActivitySecond.java

    * 显式跳转:直接指定目标Activity的包名和类名

    */

   public void onClick2(View v){

       Intent intent = new Intent();

       //上下文对象:this

       //cls:直接指定目标Activity的类名:ActivitySecond

       intent.setClass(this, ActivitySecond.class);

       startActivity(intent);

   }

   /*

    * 显式跳转至拨号器

    */

   public void onClick3(View v){

       Intent intent = new Intent();

       //指定目标的Activity的包名和类名

       intent.setClassName("com.android.dialer", "com.android.dialer.DialtactsActivity");

       startActivity(intent);

   }

   /*

    * 隐式跳转至拨号器

    */

   public void onClick4(View v){

       Intent intent = new Intent();

       //隐式设置拨号器的动作

       intent.setAction(Intent.ACTION_DIAL);

       startActivity(intent);

   }

   /*

    * 隐式跳转至拨号器

    * 需要在清单文件添加东西

    */

   public void onClick5(View v){

       Intent intent = new Intent();

     //下面两/三条语句的形参必须和清单文件中保持一致

       //隐式设置拨号器的动作

       //name=dial/dial1 ,scheme=wsq:**/wsq1:**任意匹配即可

       intent.setAction("com.wsq.dial");

       intent.setData(Uri.parse("wsq1:only "));

     //系统会自动添加默认的category(可有可无)

       intent.addCategory(Intent.CATEGORY_DEFAULT);

       startActivity(intent);

   }

   /*

    * 有类型参数传递

    * 隐式跳转至SecondActivity

    * 需要在清单文件添加东西

    * name=dial3 ,scheme=wsq:**,mimeType="text/username"

    */

   public void onClick6(View v){

       Intent intent = new Intent();

       //下面两/三条语句的形参必须和清单文件中保持一致

       //隐式设置拨号器的动作

       intent.setAction("com.wsq.dial3");

     /*

      * 该两者不能共生,所以使用一个综合性的方法替代

      * intent.setData(Uri.parse("wsq:paopao"));

        intent.setType("text/username");

      */

       intent.setDataAndType(Uri.parse("wsq3:paopao"), "text/username");

       //系统会自动添加默认的category(可有可无)

       intent.addCategory(Intent.CATEGORY_DEFAULT);

       startActivity(intent);

   }

}
MainActivity.java
package com.wsq.jumpSecondactivity;

import android.app.Activity;

import android.content.Intent;

import android.net.Uri;

import android.os.Bundle;

public class ActivitySecond extends Activity {

     @Override

        protected void onCreate(Bundle savedInstanceState) {

            super.onCreate(savedInstanceState);

            setContentView(R.layout.activity_second);

            //,只针对5,6按钮,不针对第二个按钮因为无数据传过来,如果点击发生错误

            //获取到启动这个Activity的意图:MainActivity中的Intent

            Intent intent  = getIntent();

            Uri uri =intent.getData();

            //打印显示按钮6传过来的参数

            System.out.println(uri.toString());

        }

}
ActivitySecond.java
<?xml version="1.0" encoding="utf-8"?>

<manifest xmlns:android="http://schemas.android.com/apk/res/android"

    package="com.wsq.jumpSecondactivity"

    android:versionCode="1"

    android:versionName="1.0" >

    <uses-sdk

        android:minSdkVersion="14"

        android:targetSdkVersion="19" />

    <uses-permission android:name="android.permission.CALL_PHONE"/>

    <application

        android:allowBackup="true"

        android:icon="@drawable/ic_launcher"

        android:label="@string/app_name"

        android:theme="@style/AppTheme" >

        <!-- 主入口 -->

        <activity

            android:name=".MainActivity"

            android:label="@string/app_name" >

            <intent-filter>

                <action android:name="android.intent.action.MAIN" />

                <category android:name="android.intent.category.LAUNCHER" />

            </intent-filter>

        </activity>

        <!-- 第二个入口, -->

        <!--.ActivitySecond 等价于android.intent.action.ActivitySecond  -->

        <activity android:name=".ActivitySecond">

             <intent-filter >

                 <category android:name="android.intent.category.DEFAULT"></category>

             </intent-filter>

            <!-- 并列匹配第一种情况 (没有加类型) -->

             <intent-filter >

                 <action android:name="com.wsq.dial"/>

                 <action android:name="com.wsq.dial1"/>

                 <data android:scheme="wsq" />

                 <data android:scheme="wsq1" />

                 <category android:name="android.intent.category.DEFAULT"></category>

             </intent-filter>

             <!-- 并列匹配第二种情况 加类型 -->

             <intent-filter >

                 <action android:name="com.wsq.dial3"/>

                 <data android:scheme="wsq3" android:mimeType="text/username"/>

                 <category android:name="android.intent.category.DEFAULT"></category>

             </intent-filter>

        </activity>"

    </application>

</manifest>
清单文件.xml
<?xml version="1.0" encoding="utf-8"?>

<LinearLayout xmlns:android="http://schemas.android.com/apk/res/android"

    android:layout_width="match_parent"

    android:layout_height="match_parent"

    android:orientation="vertical" >

     <TextView

        android:layout_width="wrap_content"

        android:layout_height="wrap_content"

        android:text="这是主activity" />

     <Button

        android:layout_width="wrap_content"

        android:layout_height="wrap_content"

        android:text="打电话(隐式跳转至其他应用)"

        android:onClick="onClick1" />

     <Button

        android:layout_width="wrap_content"

        android:layout_height="wrap_content"

        android:text="显式跳转至自己应用"

        android:onClick="onClick2" />

     <Button

        android:layout_width="wrap_content"

        android:layout_height="wrap_content"

        android:text="显式跳转至其他应用"

        android:onClick="onClick3" />

      <Button

        android:layout_width="wrap_content"

        android:layout_height="wrap_content"

        android:text="隐式跳转至其他应用"

        android:onClick="onClick4" />

         <Button

        android:layout_width="wrap_content"

        android:layout_height="wrap_content"

        android:text="需改变清单文件(隐式跳转至自己应用(无类型)匹配第一对intent-filter)"

        android:onClick="onClick5" />

          <Button

        android:layout_width="wrap_content"

        android:layout_height="wrap_content"

        android:text="需改变清单文件(隐式跳转至自己应用(有 类型)匹配第二对intent-filter)"

        android:onClick="onClick6" />

</LinearLayout>
Main布局文件
<?xml version="1.0" encoding="utf-8"?>

<LinearLayout xmlns:android="http://schemas.android.com/apk/res/android"

    android:layout_width="match_parent"

    android:layout_height="match_parent"

    android:orientation="vertical" >

    <TextView

        android:id="@+id/editText1"

        android:layout_width="match_parent"

        android:layout_height="wrap_content"

        android:hint="第二个activity"

        android:ems="10" >

    </TextView>

</LinearLayout>
Second布局文件
android之intent显式,显式学习的更多相关文章
- Android开发:显式/隐式Intent
显式跳转 是在已知包名和类名的情况下常用的跳转方法: Intent mIntent = new Intent(); mIntent.setClassName("com.android.set ...
- Android沉浸式(侵入式)标题栏(状态栏)Status(一)
Android沉浸式(侵入式)标题栏(状态栏)Status(一) 现在越来越多的APP设计采用这种称之为沉浸式状态栏(Status)的设计,这种沉浸式状态栏又称之"侵入式"状 ...
- Android沉浸式(侵入式)标题栏(状态栏)Status(三)
Android沉浸式(侵入式)标题栏(状态栏)Status(三) 从附录文章1,2可以看到,依靠Android系统提供的标准方案,状态栏即便在透明状态下,仍然有些半透明而不是全透明.本文是And ...
- Android沉浸式(侵入式)标题栏(状态栏)Status(二)
Android沉浸式(侵入式)标题栏(状态栏)Status(二) 附录1以xml写style实现了Android沉浸式(侵入式)状态栏(标题栏),同样以上层Java代码实现.在附录文章1的基础上 ...
- .NetCore微服务Surging新手傻瓜式 入门教程 学习日志---先让程序跑起来(一)
原文:.NetCore微服务Surging新手傻瓜式 入门教程 学习日志---先让程序跑起来(一) 写下此文章只为了记录Surging微服务学习过程,并且分享给广大想学习surging的基友,方便广大 ...
- .NetCore微服务Surging新手傻瓜式 入门教程 学习日志---结构简介(二)
原文:.NetCore微服务Surging新手傻瓜式 入门教程 学习日志---结构简介(二) 先上项目解决方案图: 以上可以看出项目结构可以划分为4大块,1是surging的核心底层,2,3,4都可以 ...
- Android 自动取色并设置沉浸式状态栏
Android 自动取色并设置沉浸式状态栏 - Stars-One的杂货小窝 最近在进行产品的优化,也是研究了下沉浸式状态栏的实现方法及自动取色,记录一下笔记 设置沉浸式状态栏 1.添加依赖 这里,是 ...
- 一起学Android之Intent
本文简述在Android开发中Intent的常见应用,仅供学习分享使用. 什么是Intent? Intent负责对应用中一次操作的动作.动作涉及数据.附加数据进行描述,Android则根据此Inten ...
- Android 之 Intent(意图)
Intent是 Android中重要的桥梁之一,它分为显式意图和隐式意图.接下来分别针对这两种意图进行讲解. 显式意图:通过指定一组数据或动作,激活应用内部的 activity:(相比隐式意图,此做法 ...
随机推荐
- VC2010编写Dll文件(转)
源:VC2010编写Dll文件 1. 打开VS2010[Flie / New / Project / Visual C++ / Win32 / Win32 Console Application]在下 ...
- STM32驱动DS18B20
DS18B20 是由 DALLAS 半导体公司推出的一种的“一线总线”接口的温度传感器.与传 统的热敏电阻等测温元件相比,它是一种新型的体积小.适用电压宽.与微处理器接口简单的 数字化温度传感器.一线 ...
- jquery $提示缺少对象$提示缺少对象
jquery $提示缺少对象 项目中存在不同版本的jquery,有1.4也有1.2, 之前运行项目不会报错 " $提示缺少对象 ",但是我的IE9重置之后就报错,从网上找了一大堆, ...
- Swift去除两边的特定字符(空格或其它)
var str_trim = " !hi !23 !" str_trim.stringByTrimmingCharactersInSet(NSCharacterSet.w ...
- 解压文件--linux
linux下不同的文件格式用不同的命令解压. 对于tar.gz文件,用以下命令. .tar.gz 和 .tgz解压:tar zxvf FileName.tar.gz压缩:tar zcvf FileNa ...
- 超强JavaScript编辑器WebStorm代码提示迟缓问题及其它想到的
去D2后发现 Hedger 的js编辑器是webStorm,便下载来试试,结果发现: 虽然WebStorm的js的提示远远不如aptana那么强悍(输入字母d不提示document),但是做为 Int ...
- MySQL安装 MySQL5.7.10免安装版配置,mysql5.7.10免安装版
MySQL5.7.10免安装版配置,mysql5.7.10免安装版 最新版的 Mysql 不提供图形界面的安装了, 下载下来是一个压缩包的形式, 那么我们如何来使用它呢, 让它为我们工作呢? 环境: ...
- js架构设计模式——从angularJS看MVVM
javascript厚积薄发走势异常迅猛,导致现在各种MV*框架百家争雄,MVVM从MVC演变而来,为javascript注入了全新的活力.我工作的业务不会涉及到 angularJS[ng] 这么重量 ...
- 利用Navicat实现MySQL数据库结构对比和同步
在生产环境中,我们总会因为这样或那样的原因导致主从不同步,亦或者是测试环境要和生产环境进行同步,利用Navicat结构同步工具,不但能找出库结构差异,还可以针对create.modify.drop等进 ...
- iOS 之UICollectionView 开发步骤 之 OC
说起来容易做起来难. 那么我就不说了,来做吧.这就是我的style. 鉴于现在的主流还是OC,那么示例程序还用OC来写,后续补写Swift程序,这里先占个坑. 废话不多说,下面开发步骤来了: 1. 创 ...