10个工具让你的 shell 脚本更强大
很多人误以为shell脚本只能在命令行下使用。其实shell也可以调用一些GUI组件,例如菜单,警告框,进度条等等。你可以控制最终的输出,光标位 置还有各种输出效果。下面我将介绍一些工具,帮助你创建强大的,互动的,用户友好的 Unix/Linux shell脚本。我在FreeBSD和Linux下测试过这些工具,不过其他UNIX系列的操作系统应该都支持的。
1. notify-send 命令
这个命令可以让你通过通知进程发送一个桌面通知给用户。这可以用来向用户发送提示,或者显示一些信息而不用打断用户工作。你需要安装如下软件包:
|
1
|
$ sudo apt-get install libnotify-bin |
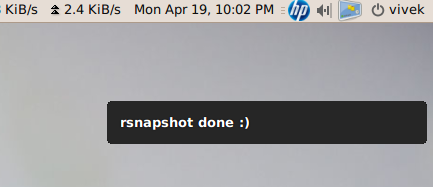
下面这个例子展示了如何从命令行向桌面发送一个简单的消息:
|
1
|
notify-send "rsnapshot done :)" |
输出:
下面是一个复杂一点的例子:
|
1
2
3
4
5
|
....alert=18000live=$(lynx --dump http://money.rediff.com/ | grep 'BSE LIVE' | awk '{ print $5}' | sed 's/,//g;s/\.[0-9]*//g')[ $notify_counter -eq 0 ] && [ $live -ge $alert ] && { notify-send -t 5000 -u low -i "BSE Sensex touched 18k"; notify_counter=1; }... |
输出:
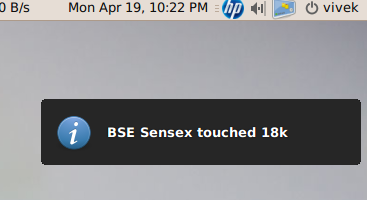
这里的参数解释如下:
- -t 5000:指定超时的时间,毫秒
- -u low:设置是否紧急
- -i gtk-dialog-info:通知图标,你可以指定图标 -i /path/to/your-icon.png
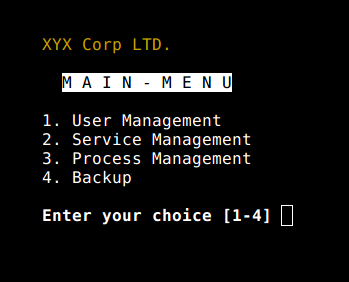
2. tput 命令
这个命令是用来设置终端特性的:
- 移动光标
- 获得终端信息
- 设置前景和背景色
- 设置粗体模式
- 设置反模式等等
举例:
|
1
2
3
4
5
6
7
8
9
10
11
12
13
14
15
16
17
18
19
20
21
22
23
24
25
26
27
28
29
30
31
32
33
34
35
36
37
38
39
|
#!/bin/bash # clear the screentput clear # Move cursor to screen location X,Y (top left is 0,0)tput cup 3 15 # Set a foreground colour using ANSI escapetput setaf 3echo "XYX Corp LTD."tput sgr0 tput cup 5 17# Set reverse video modetput revecho "M A I N - M E N U"tput sgr0 tput cup 7 15echo "1. User Management" tput cup 8 15echo "2. Service Management" tput cup 9 15echo "3. Process Management" tput cup 10 15echo "4. Backup" # Set bold modetput boldtput cup 12 15read -p "Enter your choice [1-4] " choice tput cleartput sgr0tput rc |
输出:
3. setleds 命令
这个命令可以让你控制键盘灯,例如打开数字键盘灯:
|
1
|
setleds -D +num |
关闭数字键盘灯:
|
1
|
setleds -D -num |
- -caps: 清除大写灯
- +caps:打开大写灯
- -scroll:清除滚动锁
- +scroll:打开滚动锁
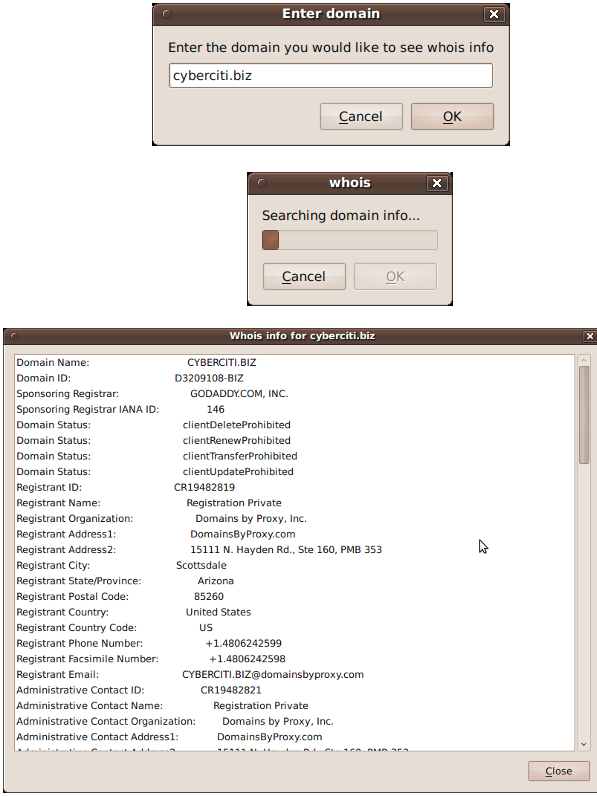
4. zenity 命令
这个命令可以显示GTK+的对话框,然后返回用户的输入。你可以用这个命令在脚本中显示信息,并要求用户输入信息。下面这段代码就是域名的whois查询:
|
1
2
3
4
5
6
7
8
9
10
11
12
13
14
15
16
17
18
19
20
21
22
23
24
|
#!/bin/bash# Get domain name_zenity="/usr/bin/zenity"_out="/tmp/whois.output.$$"domain=$(${_zenity} --title "Enter domain" \ --entry --text "Enter the domain you would like to see whois info" ) if [ $? -eq 0 ]then # Display a progress dialog while searching whois database whois $domain | tee >(${_zenity} --width=200 --height=100 \ --title="whois" --progress \ --pulsate --text="Searching domain info..." \ --auto-kill --auto-close \ --percentage=10) >${_out} # Display back output ${_zenity} --width=800 --height=600 \ --title "Whois info for $domain" \ --text-info --filename="${_out}"else ${_zenity} --error \ --text="No input provided"fi |
输出:
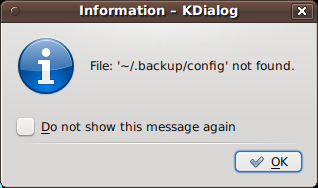
5. kdialog 命令
这个命令和zenity很想,只不过它是为KDE/QT应用准备的。使用方法如下:
|
1
|
kdialog --dontagain myscript:nofilemsg --msgbox "File: '~/.backup/config' not found." |
输出
你可以查看
shell scription with KDE Dialogs 来获取更多信息
6. Dialog
这个命令可以在shell脚本中显示文本组件。它使用了curses和ncurses类库。示例代码:
|
1
2
3
4
5
6
7
8
9
10
11
12
13
14
15
|
>#!/bin/bashdialog --title "Delete file" \--backtitle "Linux Shell Script Tutorial Example" \--yesno "Are you sure you want to permanently delete \"/tmp/foo.txt\"?" 7 60 # Get exit status# 0 means user hit [yes] button.# 1 means user hit [no] button.# 255 means user hit [Esc] key.response=$?case $response in 0) echo "File deleted.";; 1) echo "File not deleted.";; 255) echo "[ESC] key pressed.";;esac |
7. logger 命令
这个命令可以让你写入系统日志例如 /var/log/messages:
|
1
2
3
4
|
logger "MySQL database backup failed."tail -f /var/log/messageslogger -t mysqld -p daemon.error "Database Server failed"tail -f /var/log/syslog |
输出:
Apr 20 00:11:45 vivek-desktop kernel: [38600.515354] CPU0: Temperature/speed normal
Apr 20 00:12:20 vivek-desktop mysqld: Database Server failed
8. setterm 命令
这个命令可以设置中断的属性。下面的例子是强制屏幕全黑15分钟,并且60分钟后把显示器设为待机状态:
|
1
|
setterm -blank 15 -powersave powerdown -powerdown 60 |
下面这段命令可以在中断显示加下划线的文字:
|
1
2
3
|
setterm -underline on;echo "Add Your Important Message Here"setterm -underline off |
或者你可以关闭光标:
|
1
|
setterm -cursor off |
9. smbclient:向 MS-Windows 系统发送消息
smbclient可以和 SMB/CIFS服务器通信。它可以向MS-Windows系统的指定用户发送消息:
|
1
2
3
4
5
6
|
smbclient -M WinXPPro <<EOFMessage 1Message 2.....EOF |
或者
|
1
|
echo "${Message}" | smbclient -M salesguy2 |
10. Bash Socket 编程
你可以在bash中开启一个socket链接,并且传输数据。Bash有两个特殊的设备文件:
- /dev/tcp/host/port - 如果hostname,和port是合法的话,bash会尝试开启一个TCP连接。
- /dev/udp/host/port - 如果hostname和port是合法的话,bash会开启一个UDP连接。
你可以利用这个技术来测试一台主机的端口是否是开启的,而不需要使用nmap或者port扫描器:
|
1
2
|
# find out if TCP port 25 open or not(echo >/dev/tcp/localhost/25) &>/dev/null && echo "TCP port 25 open" || echo "TCP port 25 close" |
你可以
使用循环来查找开着的端口:
|
1
2
3
4
5
|
echo "Scanning TCP ports..."for p in {1..1023}do (echo >/dev/tcp/localhost/$p) >/dev/null 2>&1 && echo "$p open"done |
输出:
Scanning TCP ports...
22 open
53 open
80 open
139 open
445 open
631 open
下面的这个例子让你的脚本扮演HTTP客户端:
|
1
2
3
4
5
6
7
8
9
10
11
12
13
14
15
16
|
#!/bin/bashexec 3<> /dev/tcp/${1:-www.cyberciti.biz}/80 printf "GET / HTTP/1.0\r\n" >&3printf "Accept: text/html, text/plain\r\n" >&3printf "Accept-Language: en\r\n" >&3printf "User-Agent: nixCraft_BashScript v.%s\r\n" "${BASH_VERSION}" >&3printf "\r\n" >&3 while read LINE <&3do # do something on $LINE # or send $LINE to grep or awk for grabbing data # or simply display back data with echo command echo $LINEdone |
关于GUITools和Cronjob
如果你使用cronjob来调用你的脚本的话,你要通过“
export DISPLAY=[user's machine]:0 ”命令来设置本地的 display/input 服务。例如调用 /home/vivek/scripts/monitor.stock.sh脚本,它使用了 zenity 工具:
|
1
|
@hourly DISPLAY=:0.0 /home/vivek/scripts/monitor.stock.sh |
所有的命令你都可以通过“man”来查询详细的使用方式。
from: http://www.oschina.net/question/28_39527
10个工具让你的 shell 脚本更强大的更多相关文章
- Android内存优化9 内存检测工具3 MAT比Menmery Monitor更强大
在Android性能优化第(一)篇---基本概念中讲了JAVA的四大引用,讲了一下GCRoot,第二篇Memory Monitor检测内存泄露仅仅说了Menmery Monitor的使用,这篇博客谈一 ...
- 利用这10个工具,你可以写出更好的Python代码
我每天都使用这些实用程序来使我的Python代码可显示. 它们是免费且易于使用的. 编写漂亮的Python比看起来难. 作为发布工作流程的一部分,我使用以下工具使代码可显示并消除可避免的错误. 很多人 ...
- 8.Jmeter 快速入门教程 -- 如何使测试脚本更强大
添加基本的elements例如Sampler 或者一些监听器,就可以完成基本的测试.但有时需要更复杂的测试场景,所以还有更多其他的元素.清看下表,了解各种单元组的用途. 可添加的单元组 用途 Sa ...
- 浅谈自底向上的Shell脚本编程及效率优化
作者:沐星晨 出处:http://blog.csdn.net/sosodream/article/details/6276758 浅谈自底向上的Shell脚本编程及效率优化 小论文,大家多批评指导:) ...
- 常用的主机监控Shell脚本
最近时不时有朋友问我关于服务器监控方面的问题,问常用的服务器监控除了用开源软件,比如:cacti,nagios监控外是否可以自己写shell脚本呢?根据自己的需求写出的shell脚本更能满足需求,更能 ...
- shell脚本等的操作
1.命令替换:`` 反向单引号,也称重音符.键盘上和~键在一起的那个键呦,千万不要敲成单引号. A. 使用了``后,shell首先替换输出中``括起来的date命令,然后执行整个输出命令. B.命令替 ...
- Shell脚本生成网页版相册浏览器
今天学到了一招,那就是使用脚本制作一款网页版相册浏览器.先上图吧. 必备基础 操作系统: 以linux为内核的操作系统都行 编程语言:Shell(bash)脚本,相关基础知识即可 下载工具:wget ...
- 【springboot】之利用shell脚本优雅启动,关闭springboot服务
springbot开发api接口服务,生产环境中一般都是运行独立的jar,在部署过程中涉及到服务的优雅启动,关闭, springboot官方文档给出的有两种方式, 1.使用http shutdown ...
- 自动化部署-从maven到shell脚本到jenkins
Java代码自动部署 [ ①Java代码自动部署-总结简介] 代码部署是每一个软件开发项目组都会有的一个流程,也是从开发环节到发布功能必不可少的环节.对于Java开发者来说,Java代码的发布部署也是 ...
随机推荐
- 关于selenium中的sendKeys()隔几秒发送一个字符
看一下你的IEDriverServer.exe是不是64位的,我也遇到了这样的问题,换成32位的IEDriverServer.exe,瞬间速度快了
- Git本地版本控制备忘
首先git是一个版本控制工具,类似于SVN 笔记包括两部分,git本地版本控制和git远程协助 一.Git本地版本控制 以git windows版本msysgit为例,下载地址http://msysg ...
- "V租房"搭建微信租房平台,让租房人发起求租需求并接收合适房源回复,提高租房效率 | 36氪
"V租房"搭建微信租房平台,让租房人发起求租需求并接收合适房源回复,提高租房效率 | 36氪 "V租房"搭建微信租房平台,让租房人发起求租需求并接收合适房源回复 ...
- Java单元测试工具:JUnit4(一)(二)(三)(四)
Java单元测试工具:JUnit4(一)--概述及简单例子 Java单元测试工具:JUnit4(二)--JUnit使用详解 Java单元测试工具:JUnit4(三)--JUnit详解之运行流程及常用注 ...
- MVC 控制器详解
Controller: Controllers 文件夹包含负责处理用户输入和响应的控制器类. MVC 要求所有控制器的名称必须以 "Controller" 结尾. 控制器的职责: ...
- 手动同步chrome浏览器
chrome浏览器每次设置好的标签在重新开机后都会变回设置前的状态,崩溃,每次设置好后还是手动同步一下吧. 1. 点击 工具(右上角的三个点)-->设置 2. 点击 高级同步设置 3. 点击 使 ...
- 使用vue-cli脚手架安装的eslint 容易犯错的地方
1. 函数名字与括号之间要有空格. 2. 不要使用双引号 3. 不要有多月的空行 4.函数参数的逗号后要有空格 5.每个结束语句以后不用加“分号”
- Android : 如何在WebView显示的页面中查找内容
Android : 如何在WebView显示的页面中查找内容 Author : Aoyousatuo Zhao http://blog.sina.com.cn/aoyousatuo WebView是A ...
- jQuery的ajax jsonp跨域请求
了解:ajax.json.jsonp.“跨域”的关系 要弄清楚以上ajax.json.jsonp概念的关系,我觉得弄清楚ajax是“干什么的”,“怎么实现的”,“有什么问题”,“如果解决存在的问题”等 ...
- iOS 8 Auto Layout界面自动布局系列5-自身内容尺寸约束、修改约束、布局动画
首先感谢众多网友的支持,最近我实在是事情太多,所以没有写太多.不过看到大家的反馈和评价,我还是要坚持挤出时间给大家分享我的经验.如果你对我写的东西有任何建议.意见或者疑问,请到我的CSDN博客留言: ...