pytest测试实战和练习
开头
经过前面几章的学习,这时候要来个测试实战会比较好巩固一下学过的知识
任务要求
1、实现计算器(加法,除法)的测试用例
2、使用数据驱动完成测试用例的自动生成
3、在调用测试方法之前打印【开始计算】,在调用测试方法之后打印【计算结束】
目录结构
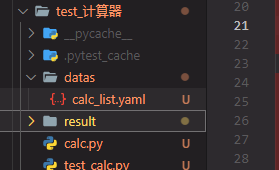
目录解析
datas/calc_list.yaml yaml文件用来保存相关的测试用例 要使用yaml先得安装yaml相关的包 pyyaml
result目录为pytest生成的来存放测试报告的目录
calc.py 为 计算器通用函数的一个类
test_cala.py 执行pytest测试用例的文件
calc_list.yaml
# 计算器的测试用例合集

calc_case:

  add_list:

      - [1,2,3]

      - [100,200,300]

      - [0.1,0.2,0.3]

      - [-1,-2,-3]

      - [-0.1, 0.2, 0.3]

  sub_list:

      - [2,1,1]

      - [300,200,100]

      - [0.1,0.2,-0.1]

      - [-1,-2, 1]

      - [-0.1, -0.2, 0.3]

  mul_list:

      - [1,2,2]

      - [100,200,20000]

      - [0.1,0.2,0.02]

      - [-1,-2,2]

      - [-0.1, 0.2, 0.2]

  div_list:

      - [1,2,0.5]

      - [100,200,0.5]

      - [0.1,0.2,0.5]

      - [-1,-2,0.5]

      - [-0.1, 0, 0]

  all_ids:

      - 'int'

      - 'bigint'

      - 'float'

      - 'negative'

      - 'fail'
calc.py
# 计算器

class Calculator:

    def add(self, a, b):

        return a + b

    def sub(self, a, b):

        return a - b

    def mul(self, a, b):

        return a * b

    def division(self, a, b):

        return a / b
test_calc.py
from calc import Calculator

import yaml

import pytest

import allure

with open('./datas/calc_list.yaml', 'r', encoding='utf-8') as f:

    datas = yaml.safe_load(f)['calc_case']

    add_list = datas['add_list']  # 加法测试用例

    sub_list = datas['sub_list']  # 减法测试用例

    mul_list = datas['mul_list']  # 乘法测试用例

    div_list = datas['div_list']  # 除法测试用例

    ids = datas['all_ids']  # 全部的标签

    print(datas)

@allure.feature("计算器模块")

class TestCalc:

    def setup_class(self):

        print("计算器开始计算")

        self.calc = Calculator()

    def teardown_class(self):

        print("计算器结束计算")

    @allure.story("加法运算")

    @pytest.mark.parametrize("a, b, expect", add_list, ids=ids)

    def test_add(self, a, b, expect):

        with allure.step(f"输入测试用例{a}, {b}, 预期结果为{expect}"):

            result = self.calc.add(a, b)

            if isinstance(result, float):  # 判断浮点数

                result = round(result, 2)

        assert expect == result

    @allure.story("减法运算")

    @pytest.mark.parametrize("a, b, expect", sub_list, ids=ids)

    def test_sub(self, a, b, expect):

        with allure.step(f"输入测试用例{a}, {b}, 预期结果为{expect}"):

            result = self.calc.sub(a, b)

            if isinstance(result, float):  # 判断浮点数

                result = round(result, 2)

        assert expect == result

    @allure.story("乘法运算")

    @pytest.mark.parametrize("a, b, expect", mul_list, ids=ids)

    def test_mul(self, a, b, expect):

        with allure.step(f"输入测试用例{a}, {b}, 预期结果为{expect}"):

            result = self.calc.mul(a, b)

            if isinstance(result, float):  # 判断浮点数

                result = round(result, 2)

        assert expect == result

    @allure.story("除法运算")

    @pytest.mark.parametrize("a, b, expect", div_list, ids=ids)

    def test_div(self, a, b, expect):

        with allure.step(f"输入测试用例{a}, {b}, 预期结果为{expect}"):

            result = self.calc.division(a, b)

            if isinstance(result, float):  # 判断浮点数

                result = round(result, 2)

        assert expect == result

if __name__ == '__main__':

    # pytest.main(["-vs", "test_calc.py::TestCalc::test_div"])  # 不需要allure的时候执行, 指定某个测试用例

    pytest.main(["--alluredir=result/2", "test_calc.py"])  # 生成allure

    # 查看allure用例 allure serve .\result\2\
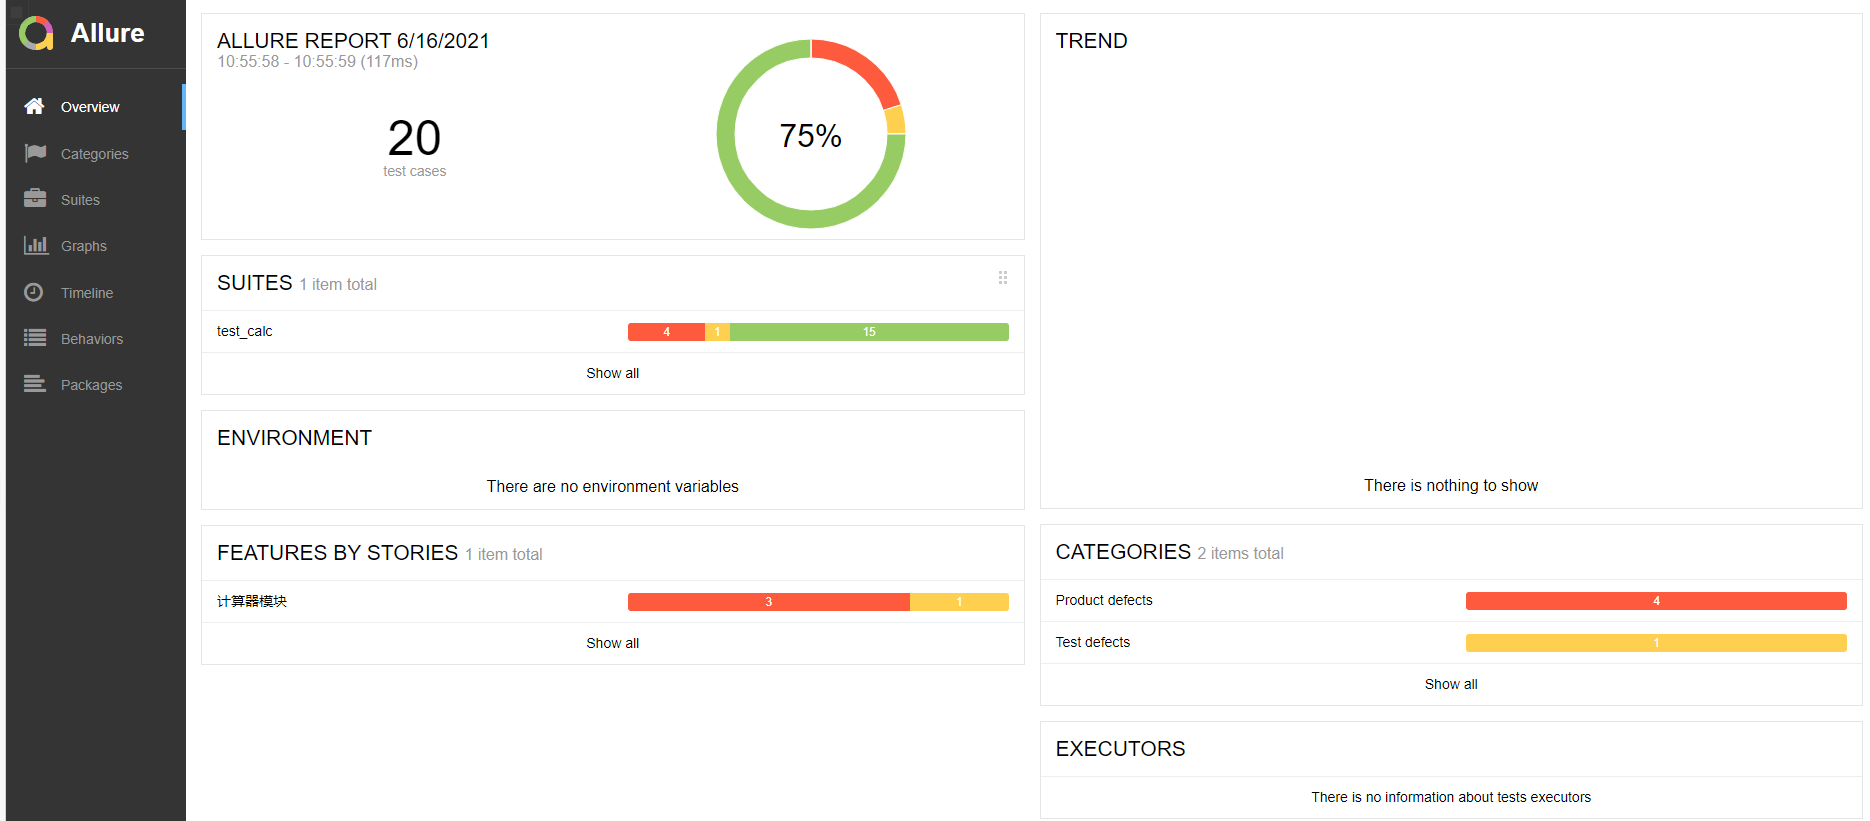
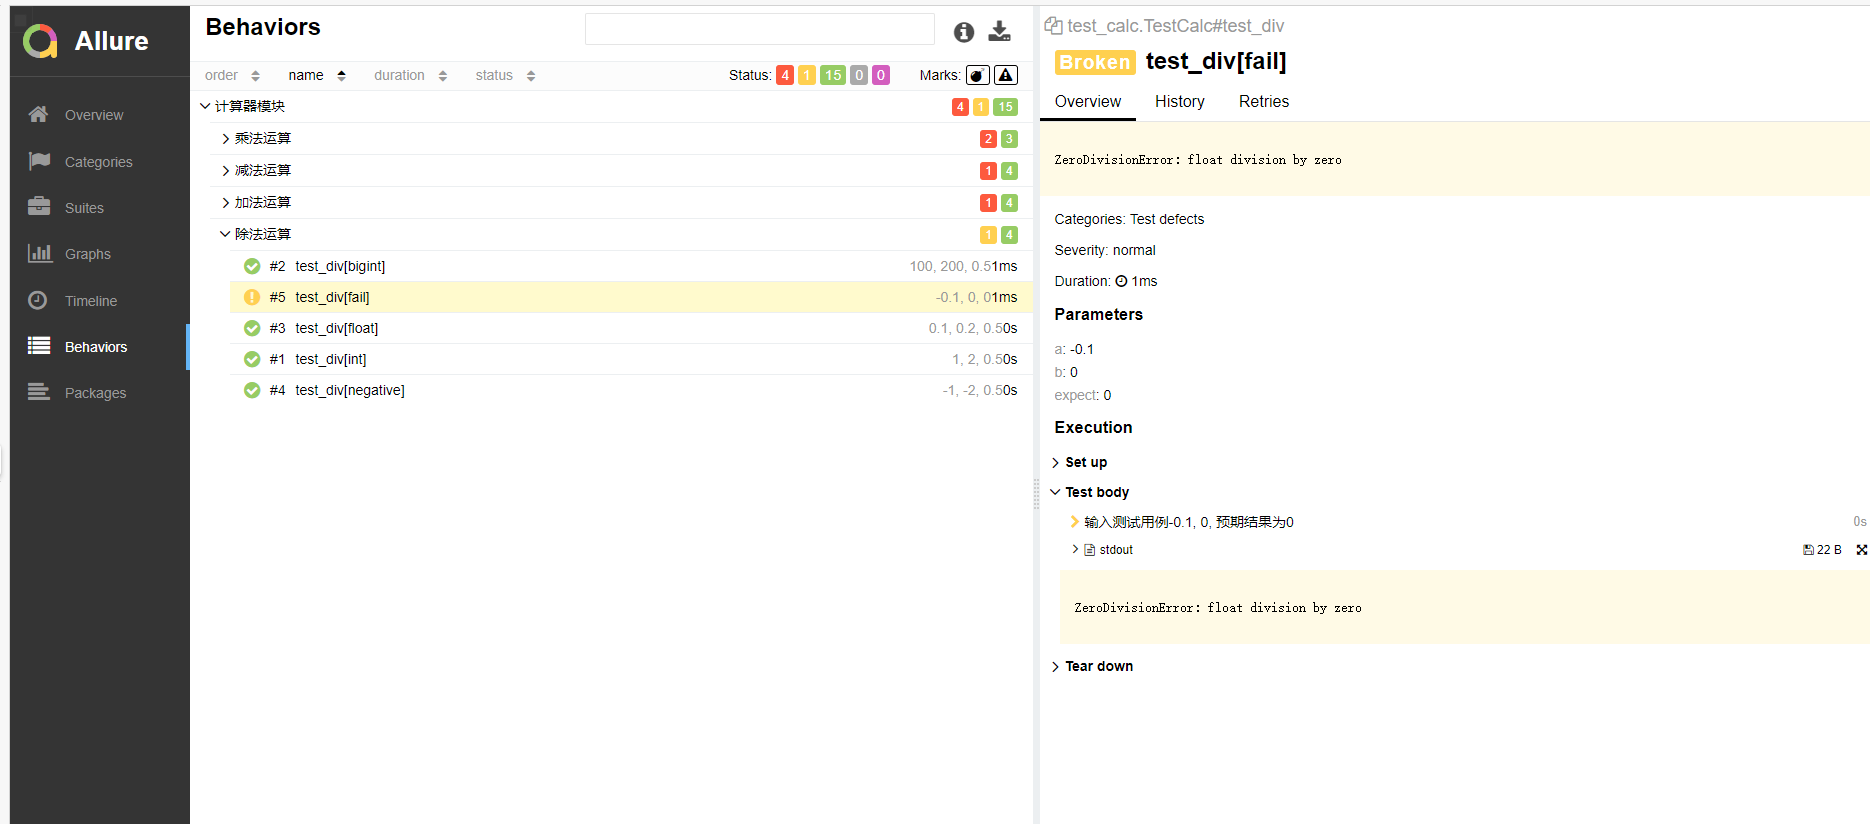
生成的allure如图所示
任务改写2
1、改造 计算器 测试用例,使用fixture函数获取计算器的实例
2、计算之前打印开始计算,计算之后打印结束计算
3、添加用例日志,并将日志保存到日志文件目录下
4、生成测试报告,展示测试用例的标题,用例步骤,与测试日志,截图附到课程贴下
目录结构

目录解析
datas/calc_list.yaml yaml文件用来保存相关的测试用例 要使用yaml先得安装yaml相关的包 pyyaml
result目录为pytest生成的来存放测试报告的目录
calc.py 为 计算器通用函数的一个类
test_cala2.py 执行pytest测试用例的文件
conftest.py 为所有测试用例执行前都会执行到这个的文件,要有__init__.py文件跟在同目录下
pytest.ini pytest框架的一个设置, 可以设置开启日志
conftest.py 用fixture改写:
import pytest

from .calc import Calculator

@pytest.fixture(scope="class")

def get_cal():

    print("====实例化计算器, 开始计算===")

    cal = Calculator()

    yield cal

    print("====计算完成====")
pytest.ini 增加保存的日志
[pytest]

log_cli=true

log_level=NOTSET

log_format = %(asctime)s %(levelname)s %(message)s

log_date_format = %Y-%m-%d %H:%M:%S

addopts = -vs

log_file = ./test.log

log_file_level = info

log_file_format = %(asctime)s %(levelname)s %(message)s

log_file_date_format = %Y-%m-%d %H:%M:%S
test_cala2.py 改写第一部分
import yaml

import allure

import pytest

import logging

logging.basicConfig(level=logging.info)

logger = logging.getLogger()

with open('./datas/calc_list.yaml', 'r', encoding='utf-8') as f:

    datas = yaml.safe_load(f)['calc_case']

    add_list = datas['add_list']  # 加法测试用例

    sub_list = datas['sub_list']  # 减法测试用例

    mul_list = datas['mul_list']  # 乘法测试用例

    div_list = datas['div_list']  # 除法测试用例

    ids = datas['all_ids']  # 全部的标签

    print(datas)

@allure.feature("计算器模块")

class TestCalc2:

    @allure.story("加法运算")

    @pytest.mark.parametrize("a, b, expect", add_list, ids=ids)

    def test_add(self, a, b, expect, get_cal):

        logger.info('增加加法日志')

        with allure.step(f"输入测试用例{a}, {b}, 预期结果为{expect}"):

            result = get_cal.add(a, b)

            if isinstance(result, float):  # 判断浮点数

                result = round(result, 2)

        assert expect == result

    @allure.story("减法运算")

    @pytest.mark.parametrize("a, b, expect", sub_list, ids=ids)

    def test_sub(self, a, b, expect, get_cal):

        with allure.step(f"输入测试用例{a}, {b}, 预期结果为{expect}"):

            result = get_cal.sub(a, b)

            if isinstance(result, float):  # 判断浮点数

                result = round(result, 2)

        assert expect == result

    @allure.story("乘法运算")

    @pytest.mark.parametrize("a, b, expect", mul_list, ids=ids)

    def test_mul(self, a, b, expect, get_cal):

        with allure.step(f"输入测试用例{a}, {b}, 预期结果为{expect}"):

            result = get_cal.mul(a, b)

            if isinstance(result, float):  # 判断浮点数

                result = round(result, 2)

        assert expect == result

    @allure.story("除法运算")

    @pytest.mark.parametrize("a, b, expect", div_list, ids=ids)

    def test_div(self, a, b, expect, get_cal):

        with allure.step(f"输入测试用例{a}, {b}, 预期结果为{expect}"):

            result = get_cal.division(a, b)

            if isinstance(result, float):  # 判断浮点数

                result = round(result, 2)

                print(result)

        assert expect == result

if __name__ == '__main__':

    # pytest.main(["-vs", "test_calc2.py::TestCalc2::test_add"])  # 不需要allure的时候执行, 指定某个测试用例

    pytest.main(["--alluredir=result/3", "test_calc2.py"])  # 生成allure

    # 查看allure用例 allure serve .\result\2\
最后完结。
pytest测试实战和练习的更多相关文章
- 关于《精通移动App测试实战:技术、工具和案例》图书勘误信息
首先,对由于我们工作的疏忽向<精通移动App测试实战:技术.工具和案例>读者朋友们表示歉意,同时已将这些问题反馈给了出版社编辑同志,再版时将会统一修正: 其次,勘误信息请参看附件pdf文档 ...
- Jmeter分布式测试实战
一.Jmeter分布式测试基础 1.Jmeter分布式测试原因: 在使用Jmeter进行接口的性能测试时,由于Jmeter 是JAVA应用,对负载机的CPU和内存消耗比较大.所以当需要模拟数以万计的并 ...
- Pytest 测试框架
一 . Pytest 简介 Pytest是python的一种单元测试框架. 1. pytest 特点 入门简单,文档丰富 支持单元测试,功能测试 支持参数化,重复执行,部分执行,测试跳过 兼容其他测试 ...
- 《Web安全攻防 渗透测试实战指南 》 学习笔记 (五)
Web安全攻防 渗透测试实战指南 学习笔记 (五) 第四章 Web安全原理解析 (一) (一)SQL注入的原理 1.web应用程序对用户输入数据的合法性没有判断. 2.参数用户可控:前端传给 ...
- 《Web安全攻防 渗透测试实战指南》 学习笔记 (四)
Web安全攻防 渗透测试实战指南 学习笔记 (四) Nmap Network Mapper 是一款开放源代码的网 ...
- 《Web安全攻防 渗透测试实战指南 》 学习笔记 (三)
Web安全攻防 渗透测试实战指南 学习笔记 (三) burp suite详解 是一款集成化渗透测试工 ...
- 《Web安全攻防 渗透测试实战指南》 学习笔记 (二)
Web安全攻防 渗透测试实战指南 学习笔记 (二) 第二章 漏洞环境及实践
- 《Web安全攻防 渗透测试实战指南》 学习笔记(一)
Web安全攻防 渗透测试实战指南 学习笔记 (一) 第一章 信息收集 在信息收集中,最重要是收集服务器的配置信息和网站敏感信息(域名及子域名信息目标网站系统.CMS指纹.目标网站真实I ...
- pytest测试框架 -- 简介
一.pytest测试框架简介: (1)pytest是python的第三方测试框架,是基于unittest的扩展框架,比unittest更简洁,更高效. (2)pytest框架可以兼容unittest用 ...
- pytest测试框架入门
安装pytest 命令行输入: pip install -U pytest 检查是否安装了正确的版本: λ pytest --version This is pytest version 5.3.5, ...
随机推荐
- 在app中如何使weib-view不铺满全屏,自适应页面
// #ifdef APP-PLUS //自建webview var currentWebview = this.$scope.$getAppWebview(); var height = this. ...
- 后台运行&和nohup使用
这里首先先介绍一下 ctrl+z bg fg jobs 命令 下面为了观察效果,test1.sh脚本不停的输出hello ctrl + z ,会使一个正在运行的进程挂起(暂停)到后台,而且执行jobs ...
- Android studio手机界面的显示
终于显示出来啦! 前几天因为SDK的地址错误一直不显示,现在终于显示出来啦! 关于报错原因的话,我也不太清楚是咋解决的,就改了改Android studio软件里面下载SDK的地址,就出来啦!(只要报 ...
- 在Linux中安装containerd作为kubernetes的容器运行时
概述 从kubernetes1.24开始的版本移除了内置的docker支持,用户可以自行选择需要使用的容器运行时,比如containerd.CRI-O.Docker Engine等等,这里我们采用二进 ...
- 关于wx.panel中添加wx.button按钮无显示问题记录
本次出现按钮不显示的原因为pos坐标理解出错: 1.按钮之所没有出现,是因为将全局坐标作为按钮pos的定位,导致在有限的panel布局内无法显示出按钮: 2.经过调试发现当pos=(-1,-1)时,按 ...
- 重学c#系列—— explicit、implicit与operator[三十四]
前言 我们都知道operator 可以对我们的操作符进行重写,那么explicit 和 implicit 就是对转换的重写. 正文 explicit 就是强制转换,然后implicit 就是隐式转换. ...
- 快速傅里叶变换应用(FFT Applications)
1. 3-SUM 1.1 问题描述 Given three sets \(X\), \(Y\), and $Z $ of \(n\) integers each, determine whether ...
- 使用 Netty 实现简单的 RPC 框架
Dubbo 底层使用 Netty 作为网络通信框架.[网络传输问题]:相对于传统的 RPC 或者 RMI 等方式的远程服务过程调用采用了同步阻塞IO,当客户端的并发压力或者网络时延增长之后,同步阻塞 ...
- 100 多个常用免费 API 接口推荐与分享,收藏备用
写在最前 各类免费 API 接口整理,主要是 APISpace 上和其他各类开放平台上的一些,有需要的赶紧收藏备用. 高德地图 标准图层 TileLayer 卫星图层 TileLayer.Sate ...
- android使用---->常用组件1
在TextView中创建空心文字 <TextView android:layout_width="wrap_content" android:layout_height=&q ...