分布式存储系统之Ceph集群启用Dashboard及使用Prometheus监控Ceph
前文我们了解了Ceph之上的RadosGW基础使用相关话题,回顾请参考https://www.cnblogs.com/qiuhom-1874/p/16768998.html;今天我们来聊一聊Ceph启用Dashboard和使用Prometheus监控Ceph相关话题;
MGR组件作用
Ceph在早些版本(L版之前)都是没有MGR这个组件的,L版之前,ceph集群相关监控数据都是靠mon节点完成,为了减轻mon节点的压力,ceph集群相关状态数据的功能在L版之后被独立出来,用MGR来负责,MGR主要作用是用于责跟踪运行时指标和Ceph集群的当前状态,包括存储利用率,当前性能指标和系统负载等,Ceph集群信息;
MGR是一个高度模块化的组件,很多功能都可以通过启用或禁用模块来实现;其中Dashboard这个模块也被MGR所管理,默认情况下该模块并没有被启用;dashboard从字面意思就能知道该模块是提供一个面板;该面板能够显示ceph集群相关状态数据,比如有集群的健康状态、osd有多少个、存储池有多少个,msd、mgr等等相关组件的状态信息;
Ceph mgr 模块管理
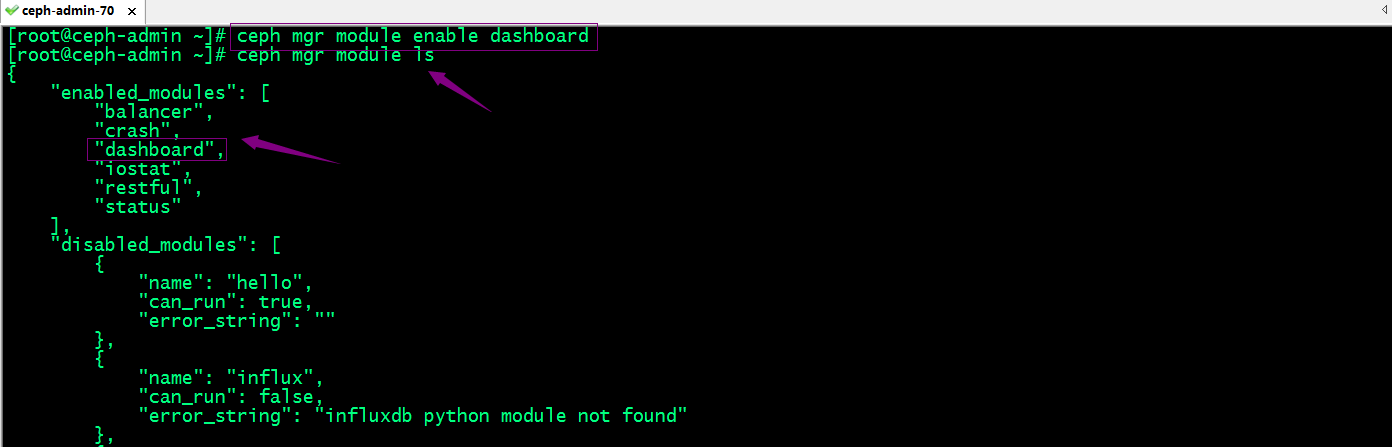
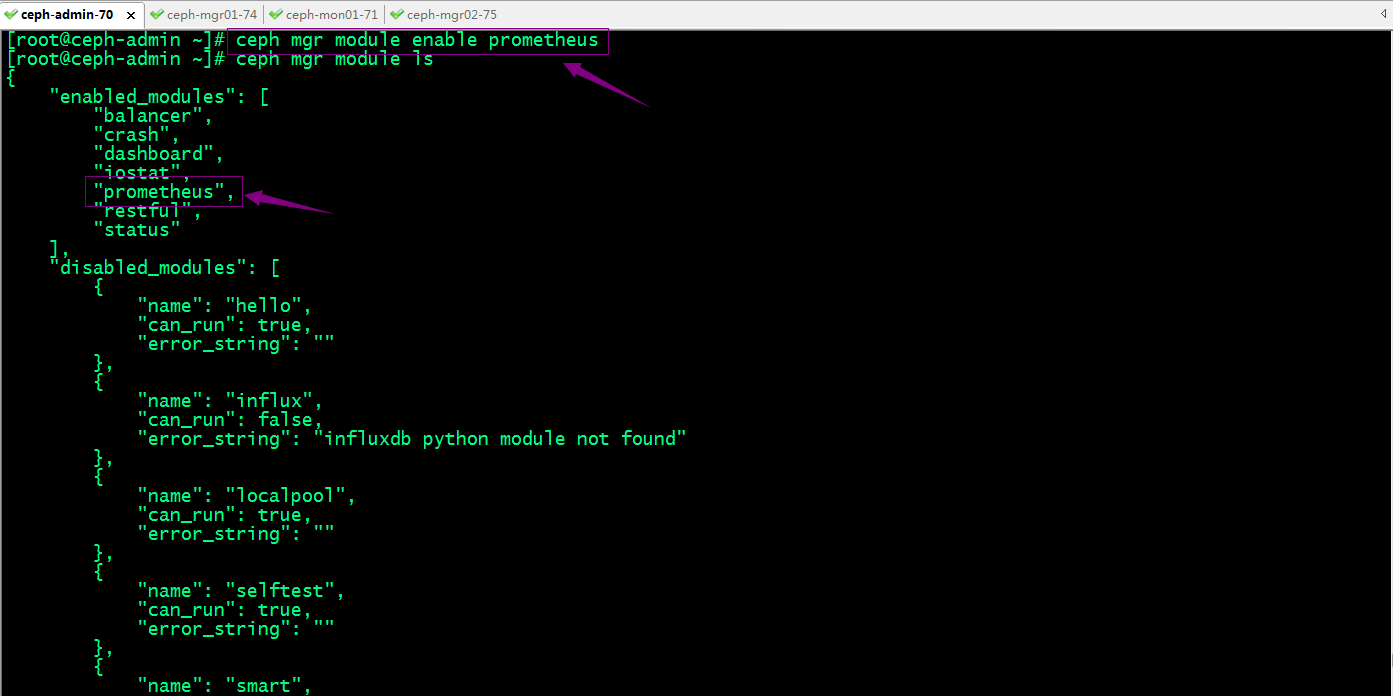
列出mgr全部模块
[root@ceph-admin ~]# ceph mgr module ls

{

    "enabled_modules": [

        "balancer",

        "crash",

        "iostat",

        "restful",

        "status"

    ],

    "disabled_modules": [

        {

            "name": "dashboard",

            "can_run": true,

            "error_string": ""

        },

        {

            "name": "hello",

            "can_run": true,

            "error_string": ""

        },

        {

            "name": "influx",

            "can_run": false,

            "error_string": "influxdb python module not found"

        },

        {

            "name": "localpool",

            "can_run": true,

            "error_string": ""

        },

        {

            "name": "prometheus",

            "can_run": true,

            "error_string": ""

        },

        {

            "name": "selftest",

            "can_run": true,

            "error_string": ""

        },

        {

            "name": "smart",

            "can_run": true,

            "error_string": ""

        },

        {

            "name": "telegraf",

            "can_run": true,

            "error_string": ""

        },

        {

            "name": "telemetry",

            "can_run": true,

            "error_string": ""

        },

        {

            "name": "zabbix",

            "can_run": true,

            "error_string": ""

        }

    ]

}

[root@ceph-admin ~]#
提示:ceph mgr module ls命令显示了集群启用的模块和禁用的模块信息;其中禁用模块中can_run值为true表示支持对应模块,但未启用;can_run值为false表示不支持对应模块,error_string的值就是用来描述为什么该模块不被支持;
Ceph mgr启用dashboard模块
提示:dashboard模块默认是以https向外展示ceph集群状态相关数据;这意味着我们需要向dashboard提供证书,对应服务才能正常使用;或者我们禁用dashboard的ssl功能,让其以http的方式对外提供服务;
禁用dashboard的ssl功能
ceph config set mgr mgr/dashboard/ssl false
提示:当然这种方式并不推荐;如果要使用ssl能够我们就必须给dashboard提供证书,具体步骤如下;
使用自签名证书
[root@ceph-admin ~]# ceph dashboard create-self-signed-cert

Self-signed certificate created

[root@ceph-admin ~]#
提示:使用自签名证书,我们执行上述命令,对应ceph会自动生成一个自签名证书给dashboard进行使用;
使用自定义证书
生成证书
[root@ceph-admin ~]# openssl req -new -nodes -x509 -subj "/O=IT/CN=ceph-mgr-dashboard"  -days 3650 -keyout dashboard.key -out dashboard.crt -extensions v3_ca

Generating a 2048 bit RSA private key

.....................................................................................................+++

.............+++

writing new private key to 'dashboard.key'

-----

[root@ceph-admin ~]# ls

CentOS-7-x86_64-Minimal-1708.iso  client.abc.keyring            client.libvirt-secret.xml  dashboard.crt

centos7.xml                       client.admin.cluster.keyring  client.test.keyring        dashboard.key

ceph-deploy-ceph.log              client.admin.keyring          client.usera.keyring       fsclient.key

[root@ceph-admin ~]#
提示:可以看到在当前目录生成了一个key文件和证书文件;
配置dashboard加载证书
[root@ceph-admin ~]# ceph config-key set mgr mgr/dashboard/crt -i dashboard.crt

set mgr

[root@ceph-admin ~]# ceph config-key set mgr mgr/dashboard/key -i dashboard.key

set mgr

[root@ceph-admin ~]#
配置dashboard监听的地址和端口
[root@ceph-admin ~]# ceph config set mgr mgr/dashboard/server_addr 0.0.0.0

[root@ceph-admin ~]# ceph config set mgr mgr/dashboard/server_port 8443

[root@ceph-admin ~]#
验证:查看mgr所在主机是否正常监听8443呢?
[root@ceph-admin ~]# ceph -s

  cluster:

    id:     7fd4a619-9767-4b46-9cee-78b9dfe88f34

    health: HEALTH_OK

  services:

    mon: 3 daemons, quorum ceph-mon01,ceph-mon02,ceph-mon03

    mgr: ceph-mgr01(active), standbys: ceph-mon01, ceph-mgr02

    mds: cephfs-2/2/2 up  {0=ceph-mon01=up:active,1=ceph-mon02=up:active}, 1 up:standby-replay

    osd: 10 osds: 10 up, 10 in

    rgw: 2 daemons active

  data:

    pools:   12 pools, 480 pgs

    objects: 515  objects, 847 MiB

    usage:   13 GiB used, 887 GiB / 900 GiB avail

    pgs:     480 active+clean

  io:

    client:   1.2 KiB/s rd, 2 op/s rd, 0 op/s wr

[root@ceph-admin ~]# ssh ceph-mgr01 'ss -tnlp|grep 8443'

LISTEN     0      5         [::]:8443                  [::]:*                   users:(("ceph-mgr",pid=1091,fd=53))

[root@ceph-admin ~]#
提示:可以看到当前活动的mgr所在主机已经正常监听8443端口;
当然我们也可分别设置不同mgr监听不同ip地址和端口
ceph config set mgr mgr/dashboard/$name/server_addr $IP

ceph config set mgr mgr/dashboard/$name/server_port $PORT
提示:我们只需将上述命令中$name更改成对应mgr实例的名称,把$IP、$PORT更改为对应ip地址和端口即可;
访问对应主机的8443端口,看看对应服务是否可用?
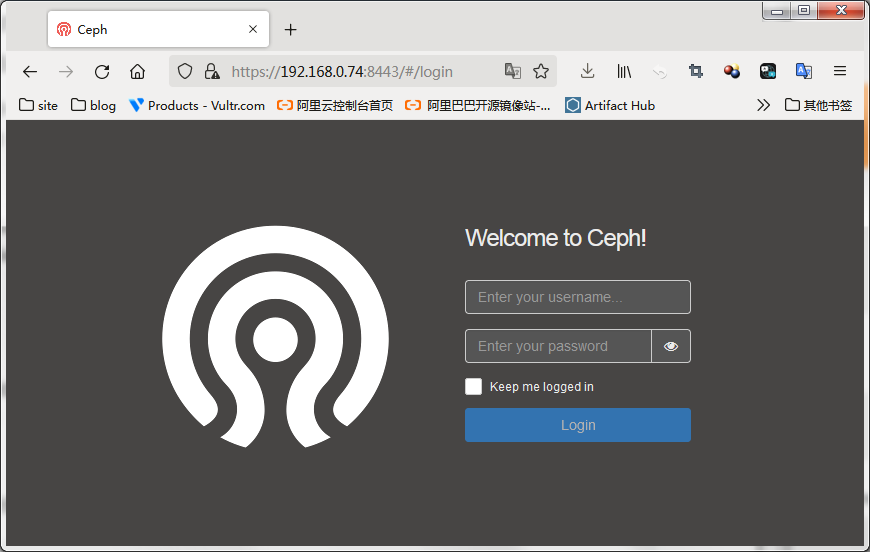
提示:可以看到现在访问mgr所在主机的8443端口,对应服务是可以正常通过https访问的;
当然我们可以使用ceph mgr servers来确认对应访问dashboard的url
[root@ceph-admin ~]# ceph mgr services

{

    "dashboard": "https://ceph-mgr01.ilinux.io:8443/"

}

[root@ceph-admin ~]#
提示:这里直接使用主机名的方式和对应监听端口组成的url,在客户端访问要确定对应客户端主机能够解析对应主机名;
重启Dashboard、
[root@ceph-admin ~]# ceph mgr module disable dashboard

[root@ceph-admin ~]# ceph mgr module enable dashboard

[root@ceph-admin ~]#
配置管理员认证信息
命令格式:ceph dashboard set-login-credentials <username> <password>
[root@ceph-admin ~]# ceph dashboard set-login-credentials admin admin

Username and password updated

[root@ceph-admin ~]#
验证:使用用户名为admin,密码为admin看看对应dashboard是否可登录?
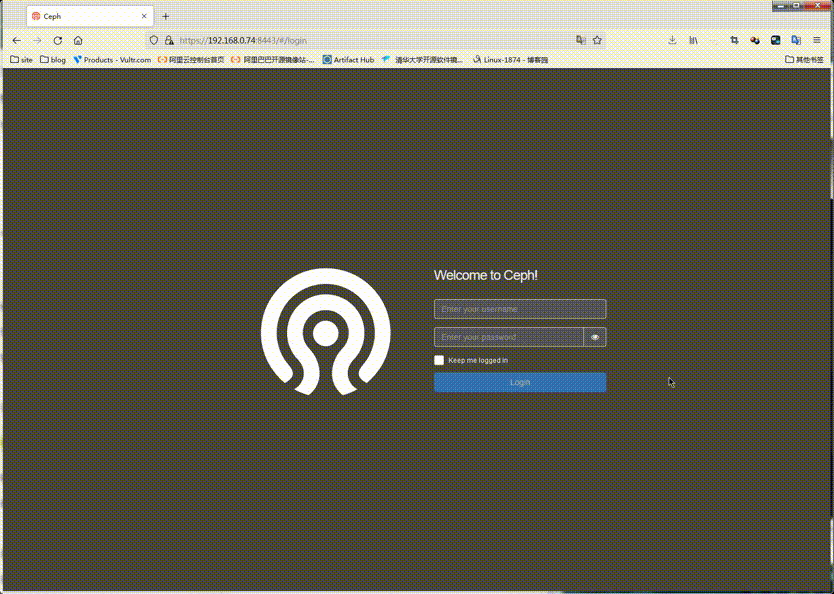
提示:可以看到使用admin用户和admin密码是可以正常登录面板的;到此面板的启用就到此为止;简单说下这个面板吧,这个面板主要输出一些监控指标数据,比如像存储池,主机,rdb,cephfs等等信息,它可以让我们一目了然的了解ceph集群各组件状态,以及存储状态等等信息;就是一个监控面板,其他没有别的东西了;
使用Prometheus监控Ceph
Prometheus简介
Prometheus是一套用go语言研发的开源的系统监控报警框架;它启发于Google的borgmon监控系统,由工作在SoundCloud的Google前员工在2012年创建,作为社区开源项目进行开发,并于2015年正式发布;2016年,Prometheus正式加入CNCF(Cloud Native Computing Foundation),成为受欢迎度仅次于iKubernetes的项目;作为新一代的监控框架,Prometheus具有以下特点;
1、强大的多维度数据模型;
1.1、时间序列数据通过metric名和键值对来区分;
1.2、所有的metrics都可以设置任意的多维标签;
1.3、数据模型更随意,不需要刻意设置为以点分割的字符串;
1.4、可以对数据模型进行聚合,切割和切片操作;
1.5、持双精度浮点类型,标签可以设置为全unicode;
2、灵活而强大的查询语句(ProQL):在同一个查询语句,可以对多个metrics进行乘法、加法、连接、取分数位等操作;
3、易于管理:Prometheus Server是一个单独的二进制文件,可直接在本地工作,不依赖于分布式存储;
4、高效:平均每个采样点仅占3.5bytes,且一个Prometheus server可以处理百万的metrics;
5、使用pull模式采集时间序列数据,这样不仅有利于本机测试而且可以避免有问题的服务器推送坏的metrics;
6、可以采用 push gateway的方式把时间序列数据推送至Prometheus server端;
7、可以通过服务器发现或者静态配置去获取监控的targets;有多种可视化图形界面;易于伸缩;
需要指出的是,由于数据采集可能会有丢失,所以Prometheus 不适合对采集数据要100%精准的情形;但如果用于记录时间序列数据,Prometheus具有很大的查询优势,此外,Prometheus 适用于微服务体系架构;
Prometheus架构图
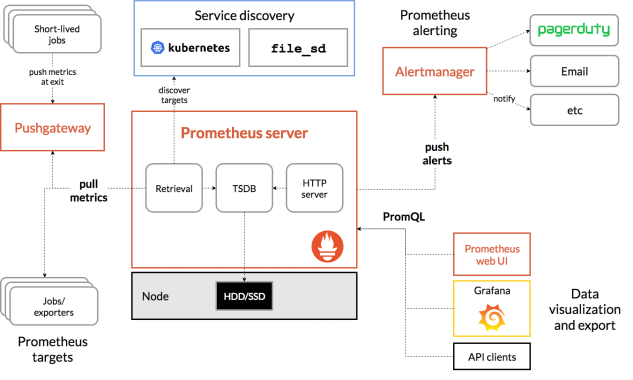
prometheus server:主服务,接受外部http请求,收集、存储与查询数据等;
prometheus targets: 静态收集的目标服务数据;
service discovery:动态发现服务;
prometheus alerting:报警通知组件,用于处理告警信息;
pushgateway:数据收集代理服务器(类似于zabbix proxy);
data visualization and export: 数据可视化与数据导出(访问客户端)
exporter:该组件主要作用是用来收集对应节点上的应用或主机指标数据的;不同应用有不同的export,比如,我们要收集mysql的指标数据,我们可以在对应mysql所在主机上部署mysql_exporter,我们要收集redis的指标数据,我们可以在对应主机上部署redis_exporter,要收集某个Linux节点主机的指标数据,我们可以部署node_exporter到对应主机;即我们要收集什么指标数据,部署对应的exporter即可;
部署二进制Prometheus server
下载Prometheus
[root@ceph-mgr02 ~]# wget https://github.com/prometheus/prometheus/releases/download/v2.37.1/prometheus-2.37.1.linux-amd64.tar.gz
创建运行Prometheus Server进程的系统用户,并为其创建家目录/var/lib/prometheus作为数据存储目录
[root@ceph-mgr02 ~]# useradd -r -m -d /var/lib/prometheus prometheus

[root@ceph-mgr02 ~]# ll /var/lib/prometheus

total 0

[root@ceph-mgr02 ~]# ll /var/lib/prometheus -d

drwx------ 2 prometheus prometheus 62 Oct  9 21:40 /var/lib/prometheus

[root@ceph-mgr02 ~]#
解压Prometheus并做软连接
[root@ceph-mgr02 ~]# tar xf prometheus-2.37.1.linux-amd64.tar.gz -C /usr/local/

[root@ceph-mgr02 ~]# cd /usr/local/

[root@ceph-mgr02 local]# ls

bin  etc  games  include  lib  lib64  libexec  prometheus-2.37.1.linux-amd64  sbin  share  src

[root@ceph-mgr02 local]# ln -s prometheus-2.37.1.linux-amd64 prometheus

[root@ceph-mgr02 local]# ll

total 0

drwxr-xr-x. 2 root root   6 Apr 11  2018 bin

drwxr-xr-x. 2 root root   6 Apr 11  2018 etc

drwxr-xr-x. 2 root root   6 Apr 11  2018 games

drwxr-xr-x. 2 root root   6 Apr 11  2018 include

drwxr-xr-x. 2 root root   6 Apr 11  2018 lib

drwxr-xr-x. 2 root root   6 Apr 11  2018 lib64

drwxr-xr-x. 2 root root   6 Apr 11  2018 libexec

lrwxrwxrwx  1 root root  29 Oct  9 21:42 prometheus -> prometheus-2.37.1.linux-amd64

drwxr-xr-x  4 3434 3434 132 Sep 12 21:08 prometheus-2.37.1.linux-amd64

drwxr-xr-x. 2 root root   6 Apr 11  2018 sbin

drwxr-xr-x. 5 root root  49 Apr 11  2018 share

drwxr-xr-x. 2 root root   6 Apr 11  2018 src

[root@ceph-mgr02 local]#
创建Prometheus专用的Unit File
[root@ceph-mgr02 prometheus]# cat /usr/lib/systemd/system/prometheus.service

[Unit]

Description=The Prometheus 2 monitoring system and time series database.

Documentation=https://prometheus.io

After=network.target

[Service]

EnvironmentFile=-/etc/sysconfig/prometheus

User=prometheus

ExecStart=/usr/local/prometheus/prometheus \

--storage.tsdb.path=/var/lib/prometheus \

--config.file=/usr/local/prometheus/prometheus.yml \

--web.listen-address=0.0.0.0:9090 \

--web.external-url=

Restart=on-failure

StartLimitInterval=1

RestartSec=3

[Install]

WantedBy=multi-user.target

[root@ceph-mgr02 prometheus]#
启动Prometheus server
[root@ceph-mgr02 prometheus]# systemctl daemon-reload

[root@ceph-mgr02 prometheus]# systemctl start prometheus

[root@ceph-mgr02 prometheus]# systemctl status prometheus

● prometheus.service - The Prometheus 2 monitoring system and time series database.

   Loaded: loaded (/usr/lib/systemd/system/prometheus.service; disabled; vendor preset: disabled)

   Active: active (running) since Sun 2022-10-09 21:46:09 CST; 4s ago

     Docs: https://prometheus.io

 Main PID: 2258 (prometheus)

   CGroup: /system.slice/prometheus.service

           └─2258 /usr/local/prometheus/prometheus --storage.tsdb.path=/var/lib/prometheus --config.file=/usr/local/prometh...

Oct 09 21:46:09 ceph-mgr02.ilinux.io prometheus[2258]: ts=2022-10-09T13:46:09.691Z caller=head.go:536 level=info compo…6.545µs

Oct 09 21:46:09 ceph-mgr02.ilinux.io prometheus[2258]: ts=2022-10-09T13:46:09.691Z caller=head.go:542 level=info compo...hile"

Oct 09 21:46:09 ceph-mgr02.ilinux.io prometheus[2258]: ts=2022-10-09T13:46:09.691Z caller=head.go:613 level=info compo...ent=0

Oct 09 21:46:09 ceph-mgr02.ilinux.io prometheus[2258]: ts=2022-10-09T13:46:09.691Z caller=head.go:619 level=info compo…6.765µs

Oct 09 21:46:09 ceph-mgr02.ilinux.io prometheus[2258]: ts=2022-10-09T13:46:09.692Z caller=main.go:993 level=info fs_ty...MAGIC

Oct 09 21:46:09 ceph-mgr02.ilinux.io prometheus[2258]: ts=2022-10-09T13:46:09.692Z caller=main.go:996 level=info msg="...rted"

Oct 09 21:46:09 ceph-mgr02.ilinux.io prometheus[2258]: ts=2022-10-09T13:46:09.692Z caller=main.go:1177 level=info msg=...s.yml

Oct 09 21:46:09 ceph-mgr02.ilinux.io prometheus[2258]: ts=2022-10-09T13:46:09.693Z caller=main.go:1214 level=info msg="Comp…µs

Oct 09 21:46:09 ceph-mgr02.ilinux.io prometheus[2258]: ts=2022-10-09T13:46:09.693Z caller=main.go:957 level=info msg="...sts."

Oct 09 21:46:09 ceph-mgr02.ilinux.io prometheus[2258]: ts=2022-10-09T13:46:09.693Z caller=manager.go:941 level=info co...r..."

Hint: Some lines were ellipsized, use -l to show in full.

[root@ceph-mgr02 prometheus]# ss -tnl

State      Recv-Q Send-Q                  Local Address:Port                                 Peer Address:Port

LISTEN     0      128                      172.16.30.75:6800                                            *:*

LISTEN     0      128                      192.168.0.75:6800                                            *:*

LISTEN     0      128                      172.16.30.75:6801                                            *:*

LISTEN     0      128                      192.168.0.75:6801                                            *:*

LISTEN     0      128                      192.168.0.75:6802                                            *:*

LISTEN     0      128                      172.16.30.75:6802                                            *:*

LISTEN     0      128                      192.168.0.75:6803                                            *:*

LISTEN     0      128                      172.16.30.75:6803                                            *:*

LISTEN     0      128                                 *:22                                              *:*

LISTEN     0      100                         127.0.0.1:25                                              *:*

LISTEN     0      5                                   *:8443                                            *:*

LISTEN     0      128                              [::]:22                                           [::]:*

LISTEN     0      100                             [::1]:25                                           [::]:*

LISTEN     0      128                              [::]:9090                                         [::]:*

[root@ceph-mgr02 prometheus]#
提示:Prometheus默认监听在tcp9090端口;使用systemd的方式启动Prometheus,如果没有报错,对应端口又处于监听状态说明Prometheus server就搭建好了;
部署node_exporter 收集ceph-mon01主机上的指标数据,以测试Prometheus 服务是否正常可用
[root@ceph-mon01 ~]# wget https://github.com/prometheus/node_exporter/releases/download/v1.4.0/node_exporter-1.4.0.linux-amd64.tar.gz
创建运行node_exporter进程的系统用户,并为其创建家目录/var/lib/prometheus作为数据存储目录
[root@ceph-mon01 ~]# useradd -r -m -d /var/lib/prometheus prometheus

[root@ceph-mon01 ~]# ll /var/lib/prometheus/ -d

drwx------ 2 prometheus prometheus 62 Oct  9 21:51 /var/lib/prometheus/

[root@ceph-mon01 ~]#
解压压缩包并做软连接
[root@ceph-mon01 ~]# tar xf node_exporter-1.4.0.linux-amd64.tar.gz -C /usr/local/

[root@ceph-mon01 ~]# cd /usr/local/

[root@ceph-mon01 local]# ll

total 0

drwxr-xr-x. 2 root root  6 Apr 11  2018 bin

drwxr-xr-x. 2 root root  6 Apr 11  2018 etc

drwxr-xr-x. 2 root root  6 Apr 11  2018 games

drwxr-xr-x. 2 root root  6 Apr 11  2018 include

drwxr-xr-x. 2 root root  6 Apr 11  2018 lib

drwxr-xr-x. 2 root root  6 Apr 11  2018 lib64

drwxr-xr-x. 2 root root  6 Apr 11  2018 libexec

drwxr-xr-x  2 3434 3434 56 Sep 26 20:39 node_exporter-1.4.0.linux-amd64

drwxr-xr-x. 2 root root  6 Apr 11  2018 sbin

drwxr-xr-x. 5 root root 49 Apr 11  2018 share

drwxr-xr-x. 2 root root  6 Apr 11  2018 src

[root@ceph-mon01 local]# ln -s node_exporter-1.4.0.linux-amd64 node_exporter

[root@ceph-mon01 local]# ll

total 0

drwxr-xr-x. 2 root root  6 Apr 11  2018 bin

drwxr-xr-x. 2 root root  6 Apr 11  2018 etc

drwxr-xr-x. 2 root root  6 Apr 11  2018 games

drwxr-xr-x. 2 root root  6 Apr 11  2018 include

drwxr-xr-x. 2 root root  6 Apr 11  2018 lib

drwxr-xr-x. 2 root root  6 Apr 11  2018 lib64

drwxr-xr-x. 2 root root  6 Apr 11  2018 libexec

lrwxrwxrwx  1 root root 31 Oct  9 21:52 node_exporter -> node_exporter-1.4.0.linux-amd64

drwxr-xr-x  2 3434 3434 56 Sep 26 20:39 node_exporter-1.4.0.linux-amd64

drwxr-xr-x. 2 root root  6 Apr 11  2018 sbin

drwxr-xr-x. 5 root root 49 Apr 11  2018 share

drwxr-xr-x. 2 root root  6 Apr 11  2018 src

[root@ceph-mon01 local]#
创建Unit File
[root@ceph-mon01 local]# cat /usr/lib/systemd/system/node_exporter.service

[Unit]

Description=Prometheus exporter for machine metrics, written in Go with pluggable metric collectors.

Documentation=https://github.com/prometheus/node_exporter

After=network.target

[Service]

EnvironmentFile=-/etc/sysconfig/node_exporter

User=prometheus

ExecStart=/usr/local/node_exporter/node_exporter \

$NODE_EXPORTER_OPTS

Restart=on-failure

StartLimitInterval=1

RestartSec=3

[Install]

WantedBy=multi-user.target

[root@ceph-mon01 local]#
启动node_exporter
[root@ceph-mon01 local]# systemctl daemon-reload

[root@ceph-mon01 local]# systemctl start node_exporter

[root@ceph-mon01 local]# systemctl status node_exporter.service

● node_exporter.service - Prometheus exporter for machine metrics, written in Go with pluggable metric collectors.

   Loaded: loaded (/usr/lib/systemd/system/node_exporter.service; disabled; vendor preset: disabled)

   Active: active (running) since Sun 2022-10-09 21:58:12 CST; 6s ago

     Docs: https://github.com/prometheus/node_exporter

 Main PID: 3247 (node_exporter)

   CGroup: /system.slice/node_exporter.service

           └─3247 /usr/local/node_exporter/node_exporter

Oct 09 21:58:12 ceph-mon01.ilinux.io node_exporter[3247]: ts=2022-10-09T13:58:12.121Z caller=node_exporter.go:115 level...zone

Oct 09 21:58:12 ceph-mon01.ilinux.io node_exporter[3247]: ts=2022-10-09T13:58:12.121Z caller=node_exporter.go:115 level...time

Oct 09 21:58:12 ceph-mon01.ilinux.io node_exporter[3247]: ts=2022-10-09T13:58:12.121Z caller=node_exporter.go:115 level...imex

Oct 09 21:58:12 ceph-mon01.ilinux.io node_exporter[3247]: ts=2022-10-09T13:58:12.121Z caller=node_exporter.go:115 level...eues

Oct 09 21:58:12 ceph-mon01.ilinux.io node_exporter[3247]: ts=2022-10-09T13:58:12.121Z caller=node_exporter.go:115 level...name

Oct 09 21:58:12 ceph-mon01.ilinux.io node_exporter[3247]: ts=2022-10-09T13:58:12.121Z caller=node_exporter.go:115 level...stat

Oct 09 21:58:12 ceph-mon01.ilinux.io node_exporter[3247]: ts=2022-10-09T13:58:12.121Z caller=node_exporter.go:115 level...=xfs

Oct 09 21:58:12 ceph-mon01.ilinux.io node_exporter[3247]: ts=2022-10-09T13:58:12.121Z caller=node_exporter.go:115 level...=zfs

Oct 09 21:58:12 ceph-mon01.ilinux.io node_exporter[3247]: ts=2022-10-09T13:58:12.121Z caller=node_exporter.go:199 level...9100

Oct 09 21:58:12 ceph-mon01.ilinux.io node_exporter[3247]: ts=2022-10-09T13:58:12.121Z caller=tls_config.go:195 level=in...alse

Hint: Some lines were ellipsized, use -l to show in full.

[root@ceph-mon01 local]# ss -tnl

State      Recv-Q Send-Q                  Local Address:Port                                 Peer Address:Port

LISTEN     0      128                      172.16.30.71:6803                                            *:*

LISTEN     0      128                      192.168.0.71:6803                                            *:*

LISTEN     0      128                      192.168.0.71:6804                                            *:*

LISTEN     0      128                                 *:22                                              *:*

LISTEN     0      128                                 *:7480                                            *:*

LISTEN     0      100                         127.0.0.1:25                                              *:*

LISTEN     0      5                                   *:8443                                            *:*

LISTEN     0      128                      192.168.0.71:6789                                            *:*

LISTEN     0      128                      172.16.30.71:6800                                            *:*

LISTEN     0      128                      192.168.0.71:6800                                            *:*

LISTEN     0      128                      172.16.30.71:6801                                            *:*

LISTEN     0      128                      192.168.0.71:6801                                            *:*

LISTEN     0      128                      172.16.30.71:6802                                            *:*

LISTEN     0      128                      192.168.0.71:6802                                            *:*

LISTEN     0      128                              [::]:22                                           [::]:*

LISTEN     0      100                             [::1]:25                                           [::]:*

LISTEN     0      128                              [::]:9100                                         [::]:*

[root@ceph-mon01 local]#
提示:node_exporter默认监听在tcp的9100,通过这个端口加/metrics可以输出对应采集到的指标数据;
验证,访问ceph-mon01的9100,看看对应指标数据是否采集到了?

提示:可以看到访问192.168.0.71:9100/metrics能够输出很多指标数据,说明node_exproter部署没有问题;
将node_exporter的指标数据导入Prometheus server
在导入node_exporter的指标数据之前,我们先来了解下Prometheus 配置文件
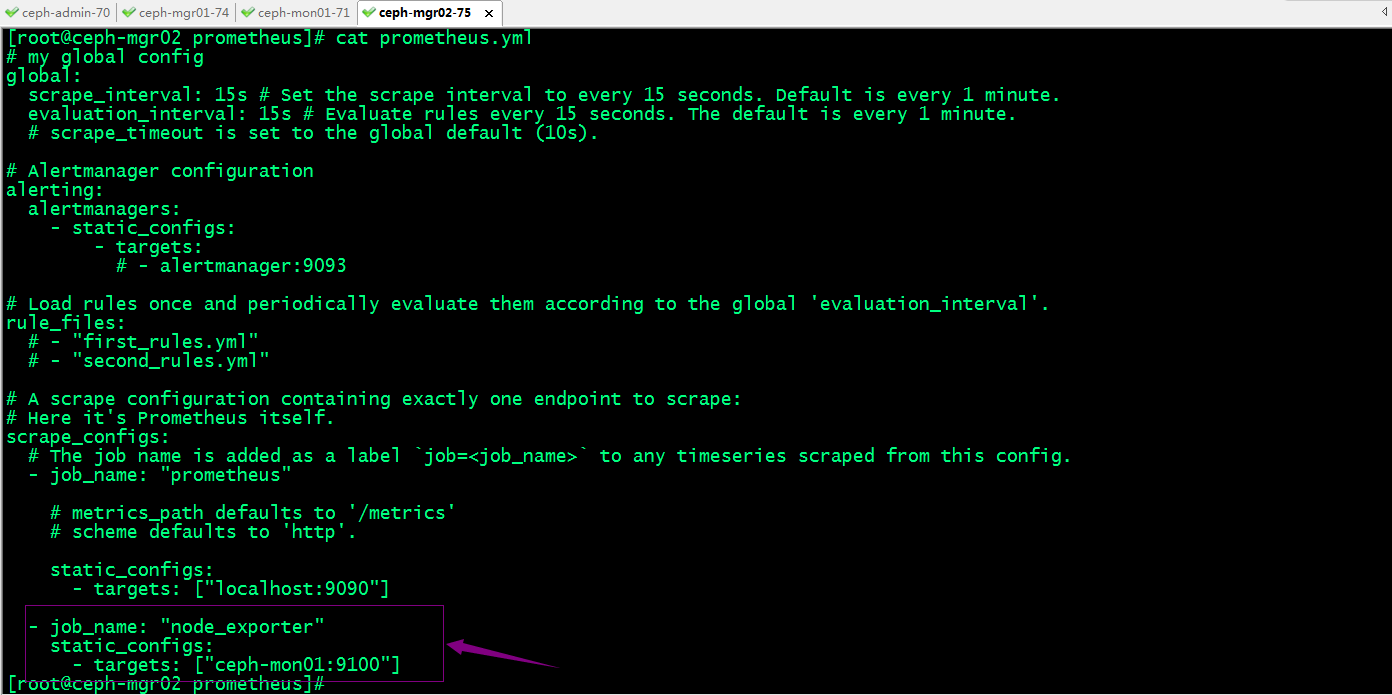
[root@ceph-mgr02 prometheus]# cat prometheus.yml

# my global config

global:

  scrape_interval: 15s # Set the scrape interval to every 15 seconds. Default is every 1 minute.

  evaluation_interval: 15s # Evaluate rules every 15 seconds. The default is every 1 minute.

  # scrape_timeout is set to the global default (10s).

# Alertmanager configuration

alerting:

  alertmanagers:

    - static_configs:

        - targets:

          # - alertmanager:9093

# Load rules once and periodically evaluate them according to the global 'evaluation_interval'.

rule_files:

  # - "first_rules.yml"

  # - "second_rules.yml"

# A scrape configuration containing exactly one endpoint to scrape:

# Here it's Prometheus itself.

scrape_configs:

  # The job name is added as a label `job=<job_name>` to any timeseries scraped from this config.

  - job_name: "prometheus"

    # metrics_path defaults to '/metrics'

    # scheme defaults to 'http'.

    static_configs:

      - targets: ["localhost:9090"]

[root@ceph-mgr02 prometheus]#
提示:Prometheus 配置文件主要由global、rule_files、scrape_configs、alerting、remote_write和remote_read几个配置段组成;global:全局配置段;scrape_configs:scrape配置集合,用于定义监控的目标对象(target)的集合,以及描述如何抓取(scrape)相关指标数据的配置参数;通常,每个scrape配置对应于一个单独的作业(job),而每个targets可通过静态配置(static_configs)直接给出定义,也可基于Prometheus支持的服务发现机制进行自动配置;alertmanager_configs:可由Prometheus使⽤的Alertmanager实例的集合,以及如何同这些Alertmanager交互的配置参数;每个Alertmanager可通过静态配置(static_configs)直接给出定义,也可基于Prometheus⽀持的服务发现机制进行自动配置;remote_write:配置“远程写”机制,Prometheus需要将数据保存于外部的存储系统(例如InfluxDB)时定义此配置段,随后Prometheus将样本数据通过HTTP协议发送给由URL指定适配器(Adaptor);remote_read:配置“远程读”机制,Prometheus将接收到的查询请求交给由URL指定适配器Adpater)执行,Adapter将请求条件转换为远程存储服务中的查询请求,并将获取的响应数据转换为Prometheus可用的格式;
常用的全局配置参数
global:

# How frequently to scrape targets by default.

[ scrape_interval: <duration> | default = 1m ]

# How long until a scrape request times out.

[ scrape_timeout: <duration> | default = 10s ]

# How frequently to evaluate rules.

[ evaluation_interval: <duration> | default = 1m ]

# The labels to add to any time series or alerts when communicating with

# external systems (federation, remote storage, Alertmanager).

external_labels:

[ <labelname>: <labelvalue> ... ]

# Rule files specifies a list of globs. Rules and alerts are read from

# all matching files.

rule_files:

[ - <filepath_glob> ... ]

# A list of scrape configurations.

scrape_configs:

[ - <scrape_config> ... ]

# Alerting specifies settings related to the Alertmanager.

alerting:

alert_relabel_configs:

[ - <relabel_config> ... ]

alertmanagers:

[ - <alertmanager_config> ... ]

# Settings related to the remote write feature.

remote_write:

[ - <remote_write> ... ]

# Settings related to the remote read feature.

remote_read:

[ - <remote_read> ... ]
scrape配置段中,使用static_configs配置Job的语法格式
# The targets specified by the static config.

targets:

[ - '<host>' ]

# Labels assigned to all metrics scraped from the targets.

labels:

[ <labelname>: <labelvalue> ... ]
使用file_sd_configs配置Job的语法格式
[

  {

    "targets": [ "<host>", ... ],

    "labels": {

      "<labelname>": "<labelvalue>", ...

    }

  },

...

]
将node_exporter指标数据纳入Prometheus server中
提示:默认node_exporter是以/metrics输出指标数据,如果需要修改了输出路径,需要在prometheus配置文件中用metrics_path来指定其路径;
重启Prometheus server
[root@ceph-mgr02 prometheus]# systemctl restart prometheus.service

[root@ceph-mgr02 prometheus]# systemctl status prometheus.service

● prometheus.service - The Prometheus 2 monitoring system and time series database.

   Loaded: loaded (/usr/lib/systemd/system/prometheus.service; disabled; vendor preset: disabled)

   Active: active (running) since Sun 2022-10-09 22:20:41 CST; 9s ago

     Docs: https://prometheus.io

 Main PID: 2344 (prometheus)

   CGroup: /system.slice/prometheus.service

           └─2344 /usr/local/prometheus/prometheus --storage.tsdb.path=/var/lib/prometheus --config.file=/usr/local/prometh...

Oct 09 22:20:41 ceph-mgr02.ilinux.io prometheus[2344]: ts=2022-10-09T14:20:41.163Z caller=head.go:542 level=info compo...hile"

Oct 09 22:20:41 ceph-mgr02.ilinux.io prometheus[2344]: ts=2022-10-09T14:20:41.179Z caller=head.go:613 level=info compo...ent=1

Oct 09 22:20:41 ceph-mgr02.ilinux.io prometheus[2344]: ts=2022-10-09T14:20:41.179Z caller=head.go:613 level=info compo...ent=1

Oct 09 22:20:41 ceph-mgr02.ilinux.io prometheus[2344]: ts=2022-10-09T14:20:41.179Z caller=head.go:619 level=info compo…19721ms

Oct 09 22:20:41 ceph-mgr02.ilinux.io prometheus[2344]: ts=2022-10-09T14:20:41.180Z caller=main.go:993 level=info fs_ty...MAGIC

Oct 09 22:20:41 ceph-mgr02.ilinux.io prometheus[2344]: ts=2022-10-09T14:20:41.180Z caller=main.go:996 level=info msg="...rted"

Oct 09 22:20:41 ceph-mgr02.ilinux.io prometheus[2344]: ts=2022-10-09T14:20:41.180Z caller=main.go:1177 level=info msg=...s.yml

Oct 09 22:20:41 ceph-mgr02.ilinux.io prometheus[2344]: ts=2022-10-09T14:20:41.181Z caller=main.go:1214 level=info msg="Comp…µs

Oct 09 22:20:41 ceph-mgr02.ilinux.io prometheus[2344]: ts=2022-10-09T14:20:41.181Z caller=main.go:957 level=info msg="...sts."

Oct 09 22:20:41 ceph-mgr02.ilinux.io prometheus[2344]: ts=2022-10-09T14:20:41.181Z caller=manager.go:941 level=info co...r..."

Hint: Some lines were ellipsized, use -l to show in full.

[root@ceph-mgr02 prometheus]# ss -tnl

State      Recv-Q Send-Q                  Local Address:Port                                 Peer Address:Port

LISTEN     0      128                      172.16.30.75:6800                                            *:*

LISTEN     0      128                      192.168.0.75:6800                                            *:*

LISTEN     0      128                      172.16.30.75:6801                                            *:*

LISTEN     0      128                      192.168.0.75:6801                                            *:*

LISTEN     0      128                      192.168.0.75:6802                                            *:*

LISTEN     0      128                      172.16.30.75:6802                                            *:*

LISTEN     0      128                      192.168.0.75:6803                                            *:*

LISTEN     0      128                      172.16.30.75:6803                                            *:*

LISTEN     0      128                                 *:22                                              *:*

LISTEN     0      100                         127.0.0.1:25                                              *:*

LISTEN     0      5                                   *:8443                                            *:*

LISTEN     0      128                              [::]:22                                           [::]:*

LISTEN     0      100                             [::1]:25                                           [::]:*

LISTEN     0      128                              [::]:9090                                         [::]:*

[root@ceph-mgr02 prometheus]#
访问Prometheus server所在主机的9090端口
提示:可以看到访问Prometheus 所在主机的9090端口,对应能够查到node_exporter采集到数据;说明Prometheus server和node_exporter是部署是没有问题;
Ceph mgr启用Prometheus模块
Ceph Manager内置了众多模块,包括prometheus模块,用于直接输出Prometheus⻛格的指标数据。
提示:Prometheus模块默认监听于TCP协议的9283端口;这里需要说明一下,ceph只要启用了Prometheus模块以后,只要运行的有mgr的节点,对应都会监听9283端口;
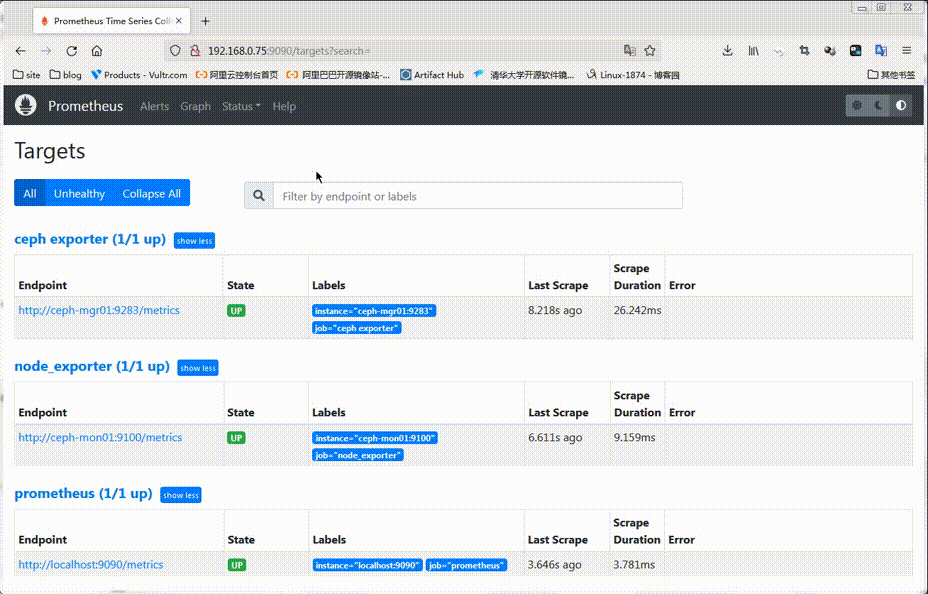
验证:查看mgr运行主机是否监听9283端口?对应端口是否可访问?
[root@ceph-admin ~]# ceph mgr services

{

    "dashboard": "https://0.0.0.0:8443/",

    "prometheus": "http://ceph-mgr01.ilinux.io:9283/"

}

[root@ceph-admin ~]# ssh ceph-mgr01 'ss -tnl'

State      Recv-Q Send-Q Local Address:Port               Peer Address:Port

LISTEN     0      5            *:8443                     *:*

LISTEN     0      128    172.16.30.74:6800                     *:*

LISTEN     0      128    192.168.0.74:6800                     *:*

LISTEN     0      128    192.168.0.74:6801                     *:*

LISTEN     0      128    172.16.30.74:6801                     *:*

LISTEN     0      128    172.16.30.74:6802                     *:*

LISTEN     0      128    192.168.0.74:6802                     *:*

LISTEN     0      128    192.168.0.74:6803                     *:*

LISTEN     0      128    172.16.30.74:6803                     *:*

LISTEN     0      128    192.168.0.74:6804                     *:*

LISTEN     0      128          *:22                       *:*

LISTEN     0      100    127.0.0.1:25                       *:*

LISTEN     0      5         [::]:9283                  [::]:*

LISTEN     0      128       [::]:22                    [::]:*

LISTEN     0      100      [::1]:25                    [::]:*

[root@ceph-admin ~]# curl http://ceph-mgr01.ilinux.io:9283/

<!DOCTYPE html>

<html>

        <head><title>Ceph Exporter</title></head>

        <body>

                <h1>Ceph Exporter</h1>

                <p><a href='/metrics'>Metrics</a></p>

        </body>

</html>[root@ceph-admin ~]#
提示:可以看到对应ceph-mgr01的9283是处于监听状体,并且也是可以正常访问的;
将ceph exporter纳入Prometheus server中去

重启Prometheus server
[root@ceph-mgr02 prometheus]# systemctl restart prometheus.service

[root@ceph-mgr02 prometheus]# systemctl status prometheus.service

● prometheus.service - The Prometheus 2 monitoring system and time series database.

   Loaded: loaded (/usr/lib/systemd/system/prometheus.service; disabled; vendor preset: disabled)

   Active: active (running) since Sun 2022-10-09 22:37:16 CST; 5s ago

     Docs: https://prometheus.io

 Main PID: 2481 (prometheus)

   CGroup: /system.slice/prometheus.service

           └─2481 /usr/local/prometheus/prometheus --storage.tsdb.path=/var/lib/prometheus --config.file=/usr/local/prometh...

Oct 09 22:37:16 ceph-mgr02.ilinux.io prometheus[2481]: ts=2022-10-09T14:37:16.347Z caller=head.go:613 level=info compo...ent=2

Oct 09 22:37:16 ceph-mgr02.ilinux.io prometheus[2481]: ts=2022-10-09T14:37:16.387Z caller=head.go:613 level=info compo...ent=2

Oct 09 22:37:16 ceph-mgr02.ilinux.io prometheus[2481]: ts=2022-10-09T14:37:16.393Z caller=head.go:613 level=info compo...ent=2

Oct 09 22:37:16 ceph-mgr02.ilinux.io prometheus[2481]: ts=2022-10-09T14:37:16.393Z caller=head.go:619 level=info compo…77763ms

Oct 09 22:37:16 ceph-mgr02.ilinux.io prometheus[2481]: ts=2022-10-09T14:37:16.394Z caller=main.go:993 level=info fs_ty...MAGIC

Oct 09 22:37:16 ceph-mgr02.ilinux.io prometheus[2481]: ts=2022-10-09T14:37:16.394Z caller=main.go:996 level=info msg="...rted"

Oct 09 22:37:16 ceph-mgr02.ilinux.io prometheus[2481]: ts=2022-10-09T14:37:16.394Z caller=main.go:1177 level=info msg=...s.yml

Oct 09 22:37:16 ceph-mgr02.ilinux.io prometheus[2481]: ts=2022-10-09T14:37:16.395Z caller=main.go:1214 level=info msg="Comp…µs

Oct 09 22:37:16 ceph-mgr02.ilinux.io prometheus[2481]: ts=2022-10-09T14:37:16.395Z caller=main.go:957 level=info msg="...sts."

Oct 09 22:37:16 ceph-mgr02.ilinux.io prometheus[2481]: ts=2022-10-09T14:37:16.395Z caller=manager.go:941 level=info co...r..."

Hint: Some lines were ellipsized, use -l to show in full.

[root@ceph-mgr02 prometheus]# ss -tnl

State      Recv-Q Send-Q                  Local Address:Port                                 Peer Address:Port

LISTEN     0      128                      172.16.30.75:6800                                            *:*

LISTEN     0      128                      192.168.0.75:6800                                            *:*

LISTEN     0      128                      172.16.30.75:6801                                            *:*

LISTEN     0      128                      192.168.0.75:6801                                            *:*

LISTEN     0      128                      192.168.0.75:6802                                            *:*

LISTEN     0      128                      172.16.30.75:6802                                            *:*

LISTEN     0      128                      192.168.0.75:6803                                            *:*

LISTEN     0      128                      172.16.30.75:6803                                            *:*

LISTEN     0      128                                 *:22                                              *:*

LISTEN     0      100                         127.0.0.1:25                                              *:*

LISTEN     0      5                                   *:8443                                            *:*

LISTEN     0      128                              [::]:22                                           [::]:*

LISTEN     0      100                             [::1]:25                                           [::]:*

LISTEN     0      128                              [::]:9090                                         [::]:*

LISTEN     0      5                                [::]:9283                                         [::]:*

[root@ceph-mgr02 prometheus]#
访问Prometheus server的9090端口,看看对应ceph exporter的指标数据是否已经有了?
提示:可以看到现在访问prometheus server 的9090端口多了许多以ceph开头的指标,说明ceph exporter已经将数据发送给Prometheus server;
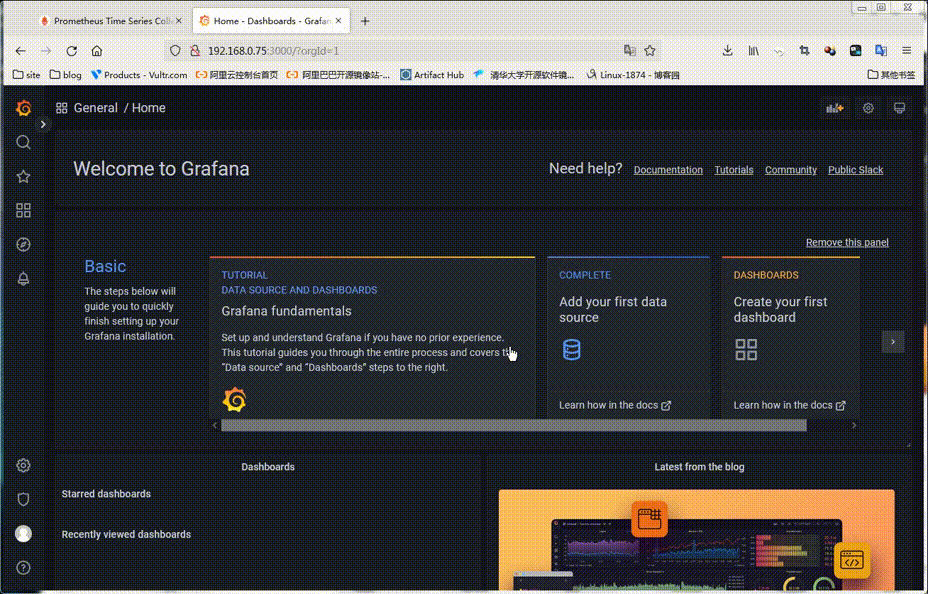
部署Grafana展示ceph 指标数据
创建grafana的仓库配置文件
[root@ceph-mgr02 prometheus]# cat /etc/yum.repos.d/grafana.repo

[grafana]

name=grafana

baseurl=https://mirrors.aliyun.com/grafana/yum/rpm

repo_gpgcheck=0

enabled=1

gpgcheck=0

[root@ceph-mgr02 prometheus]#
安装grafana
[root@ceph-mgr02 prometheus]# yum install grafana -y
启动grafana
[root@ceph-mgr02 prometheus]# systemctl start grafana-server.service

[root@ceph-mgr02 prometheus]# ss -tnl

State      Recv-Q Send-Q                  Local Address:Port                                 Peer Address:Port

LISTEN     0      128                      172.16.30.75:6800                                            *:*

LISTEN     0      128                      192.168.0.75:6800                                            *:*

LISTEN     0      128                      172.16.30.75:6801                                            *:*

LISTEN     0      128                      192.168.0.75:6801                                            *:*

LISTEN     0      128                      192.168.0.75:6802                                            *:*

LISTEN     0      128                      172.16.30.75:6802                                            *:*

LISTEN     0      128                      192.168.0.75:6803                                            *:*

LISTEN     0      128                      172.16.30.75:6803                                            *:*

LISTEN     0      128                                 *:22                                              *:*

LISTEN     0      100                         127.0.0.1:25                                              *:*

LISTEN     0      5                                   *:8443                                            *:*

LISTEN     0      128                              [::]:22                                           [::]:*

LISTEN     0      128                              [::]:3000                                         [::]:*

LISTEN     0      100                             [::1]:25                                           [::]:*

LISTEN     0      128                              [::]:9090                                         [::]:*

LISTEN     0      5                                [::]:9283                                         [::]:*

[root@ceph-mgr02 prometheus]#
提示:grafana默认监听在tcp的3000端口,如果启动没有报错,对应3000端口处于监听,说明grafana就启动起来了;
访问grafana所在主机的3000端口配置grafana
提示:grafana的默认用户名是admin,密码也是admin;第一进入要求更改密码,当然我这里测试不更改也行;不影响使用;
添加Prometheus数据源
提示:这里只需要填写Prometheus server的地址即可;如果Prometheus开启了认证,对应认证信息也是需要填写的;
导入Prometheus摸板

提示:这个模板是展示Prometheus的一个专用面板,当然我们也可以自己定义展示那些数据;
下载ceph模板:https://grafana.com/grafana/dashboards/7056-ceph-cluster/;
导入ceph模板

ok,基于Prometheus监控ceph的测试就到此为止;
分布式存储系统之Ceph集群启用Dashboard及使用Prometheus监控Ceph的更多相关文章
- 分布式存储系统之Ceph集群RBD基础使用
前文我们了解了Ceph集群cephx认证和授权相关话题,回顾请参考https://www.cnblogs.com/qiuhom-1874/p/16748149.html:今天我们来聊一聊ceph集群的 ...
- 小型ceph集群的搭建
了解ceph DFS(distributed file system)分布式存储系统,指文件系统管理的物理存储资源,不一定直接连接在本地节点上,而是通过计算机网络与节点相连,众多类别中,ceph是当下 ...
- 最新ceph集群常用命令梳理
结合网络.官网.手动查询等多方渠道,整理ceph维护管理常用命令,并且梳理常规命令在使用过程中的逻辑顺序.另外整理期间发现ceph 集群的命令体系有点乱,详细情况各自体验. 一:ceph集群启动.重启 ...
- 基于Ubuntu 18.04.5 LTS 部署Ceph集群测试及Ceph RDB的使用。
1.ceph简介 Ceph在一个统一的系统中独特地提供对象.块和文件存储 1.1 ceph官网架构图 1.2 架构解释 CEPH 对象存储 CEPH 块设备 CEPH 文件系统 RESTful 接 ...
- Ceph集群更换public_network网络
1.确保ceph集群是连通状态 这里,可以先把机器配置为以前的x.x.x.x的网络,确保ceph集群是可以通的.这里可以执行下面的命令查看是否连通,显示HEALTH_OK则表示连通 2.获取monma ...
- 记一次ceph集群的严重故障
问题:集群状态,坏了一个盘,pg状态好像有点问题[root@ceph-1 ~]# ceph -s cluster 72f44b06-b8d3-44cc-bb8b-2048f5b4acfe ...
- 记一次ceph集群的严重故障 (转)
问题:集群状态,坏了一个盘,pg状态好像有点问题[root@ceph-1 ~]# ceph -s cluster 72f44b06-b8d3-44cc-bb8b-2048f5b4acfe ...
- 分布式存储系统之Ceph集群访问接口启用
前文我们使用ceph-deploy工具简单拉起了ceph底层存储集群RADOS,回顾请参考https://www.cnblogs.com/qiuhom-1874/p/16724473.html:今天我 ...
- 分布式存储系统之Ceph集群CephX认证和授权
前文我们了解了Ceph集群存储池操作相关话题,回顾请参考https://www.cnblogs.com/qiuhom-1874/p/16743611.html:今天我们来聊一聊在ceph上认证和授权的 ...
随机推荐
- 日期字符串转为java.sql.Date
日期字符串转为java.sql.Date类型 问题引出:在将一个日期字符串通过sql语句,插入到数据表的日期字段(字段类型是DATE),时遇到一个问题,如何将一个日期字符串转成java.sql.Dat ...
- Mybatis的使用(1)
1:新建maven项目,file->project->maven 2:在建好的maven项目中,打开pom.xml文件,加入mybatis所需要的依赖: <!-- mybatis核心 ...
- devops-4:Jenkins基于k8s cloud和docker cloud动态增减节点
Jenkins管理动态节点 上文介绍Jenkins增加静态agent的步骤,除了静态增加外,还有动态管理的功能,两者最大的差异在于动态可以在有job运行时,临时加入一个agent到jenkins ma ...
- 什么是hive的静态分区和动态分区,它们又有什么区别呢?hive动态分区详解
面试官问我,什么是hive的静态分区和动态分区,这题我会呀. 简述 分区是hive存放数据的一种方式,将列值作为目录来存放数据,就是一个分区,可以有多列. 这样查询时使用分区列进行过滤,只需根据列值直 ...
- 开源深度思考 - In Community We Trust
作者 | 黄东旭,PingCAP 联合创始人&CTO 出品 | CSDN(ID:CSDNnews) 业界一直流传着黄东旭的传说:小学三年级开始写代码,四五年级学习C语言,初中毕业时,已经能够用 ...
- 介绍下Java内存区域(运行时数据区)
介绍下Java内存区域(运行时数据区) Java 虚拟机在执行 Java 程序的过程中会把它管理的内存划分成若干个不同的数据区域.JDK 1.8 和之前的版本略有不同. 下图是 JDK 1.8 对JV ...
- 在 C# 中使用 Span<T> 和 Memory<T> 编写高性能代码
目录 在 C# 中使用 Span 和 Memory 编写高性能代码 .NET 中支持的内存类型 .NET Core 2.1 中新增的类型 访问连续内存: Span 和 Memory Span 介绍 C ...
- [Golang] cgo 调用 .so 捕获异常问题
最近需要在 go 中去调用 .so 库去完成一些事情,go 方面,利用 cgo 可以顺利的调用 .so 中的方法,但是有个问题是 go 没法捕获 .so 那边出现的异常.如果 .so 那边异常了,那么 ...
- rh358 001 Linux网络与systemd设置
358 rhel7 ce ansible 部署服务 dhcp nginx vanish haproxy 打印机服务 服务管理自动化 systemd与systemctl systemctl 来管理sys ...
- QPanter 绘画
Qpainter 绘图 1 绘图事件 void paintEvent(QPaintEvent *event) 2 声明一个画家对象 QPainter painter(this) this 指定绘图设 ...