可视化—AntV G6 高亮相邻节点的两种方式
通过官方文档,可知高亮相邻节点分为两种方法,文档描述并不是很清楚,对刚接触这个库的小白并不是很友好,慢慢总结慢慢来吧
内置的高亮节点
是通过内置的Behavior activate-relations来实现,Behavior 是 G6 提供的定义图上交互事件的机制。与交互模式 Mode配合使用
activate-relations:当鼠标移到某节点时,突出显示该节点以及与其直接关联的节点和连线;
- 参数:
trigger: 'mouseenter'。表示出发机制,可以是mouseenter、click;activeState: 'active'。活跃节点状态,默认为active,可以与 graph 实例的xxxStateStyles结合实现丰富的视觉效果。inactiveState: 'inactive'。非活跃节点状态,默认值为inactive。同样可以与 graph 实例的xxxStateStyles结合实现丰富的视觉效果。- 文档上还提到了另外两个参数,但是本案例中并未使用,暂不做说明 resetSelected、shouldUpdate(e)
- 具体用法
let drawGraph = document.getElementById("drawGraph");

this.graphWidth = drawGraph.scrollWidth;

this.graphHeight = drawGraph.scrollHeight || 1200;

graphG = new this.G6.Graph({

  container: "drawGraph",

  width: this.graphWidth,

  height: this.graphHeight,

  modes: {

    default: [

      { type: "activate-relations", activeState: 'active', inactiveState: 'inactive' },

    ],

    // default: ['activate-relations']  // 由于活跃节点及非活跃节点状态均采用默认值,因此可以简写为这种形式

  },

  nodeStateStyles:{},    // 配置节点状态样式

  edgeStateStyles:{},    // 配置边状态样式

  comboStateStyles:{},   // 配置分组状态样式

}

graphG.data(data);

graphG.render();
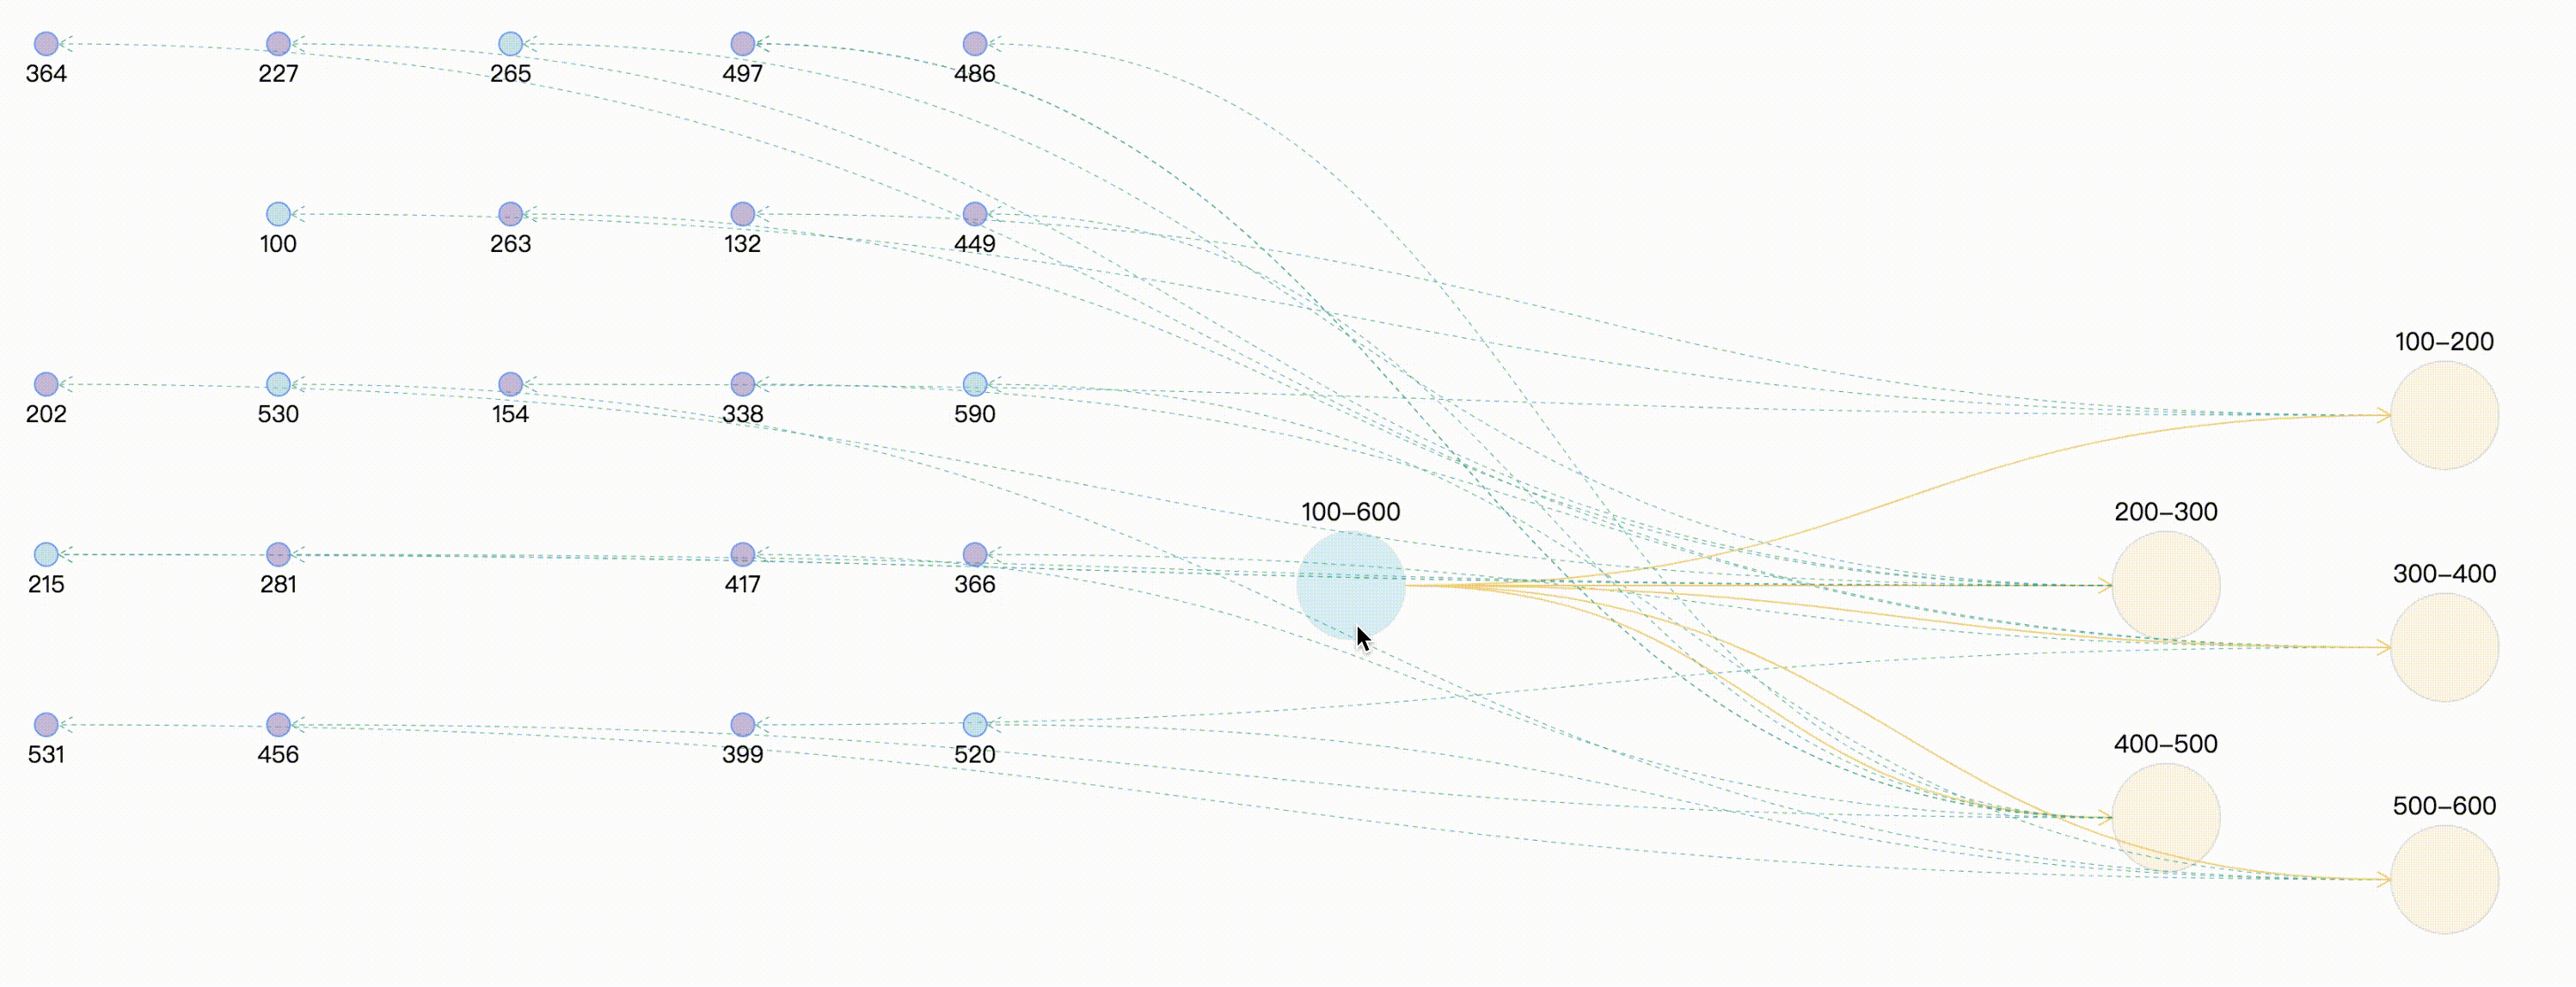
如果仅采用内置的高亮节点,会采用默认的样式,最终的渲染效果为:
自定义高亮
这种方式是通过自定义状态,在通过实例提供的setItemState、 clearItemStates设置和清除目标的状态信息,同样需要与graph 实例的 xxxStateStyles 结合实现。
graphG = new this.G6.Graph({

  container: "drawGraph",

  width: this.graphWidth,

  height: this.graphHeight,

  nodeStateStyles:{  // 配置节点状态样式,此处就先写一个,后续会有完整的案例分享

    highlight: {

        fill: "#db4437",

        shadowColor: '#fff',

        stroke: "#db4437",

        cursor: "pointer",

        'text-shape': {

          lineWidth: 1,

          fill: "#db4437",

          stroke: "#db4437",

        },

      },

  },

  edgeStateStyles:{},    // 配置边状态样式

  comboStateStyles:{},   // 配置分组状态样式

}

graphG.data(data);

graphG.render();

graphG.on("combo:mouseenter", (e) => {

  let edgeItem = e.item

  graphG.setItemState(edgeItem, 'highlight', true)

  edgeItem.getEdges().forEach(edge => {

    graphG.setItemState(edge.getTarget(), 'highlight', true)

    graphG.setItemState(edge.getSource(), 'highlight', true)

    graphG.setItemState(edge, 'highlight', true)

  })

  graphG.paint()

  graphG.setAutoPaint(true)

});

graphG.on('combo:mouseleave', (e) => {

  graphG.setAutoPaint(false)

  graphG.getNodes().forEach(node => {

    graphG.clearItemStates(node)

  })

  graphG.getEdges().forEach(edge => {

    graphG.clearItemStates(edge)

  })

  graphG.getCombos().forEach(combo => {

    graphG.clearItemStates(combo)

  })

  graphG.paint()

  graphG.setAutoPaint(true)

})
如果仅采用自定义高亮节点,最终的渲染效果为:
自定义高亮时保持原始颜色
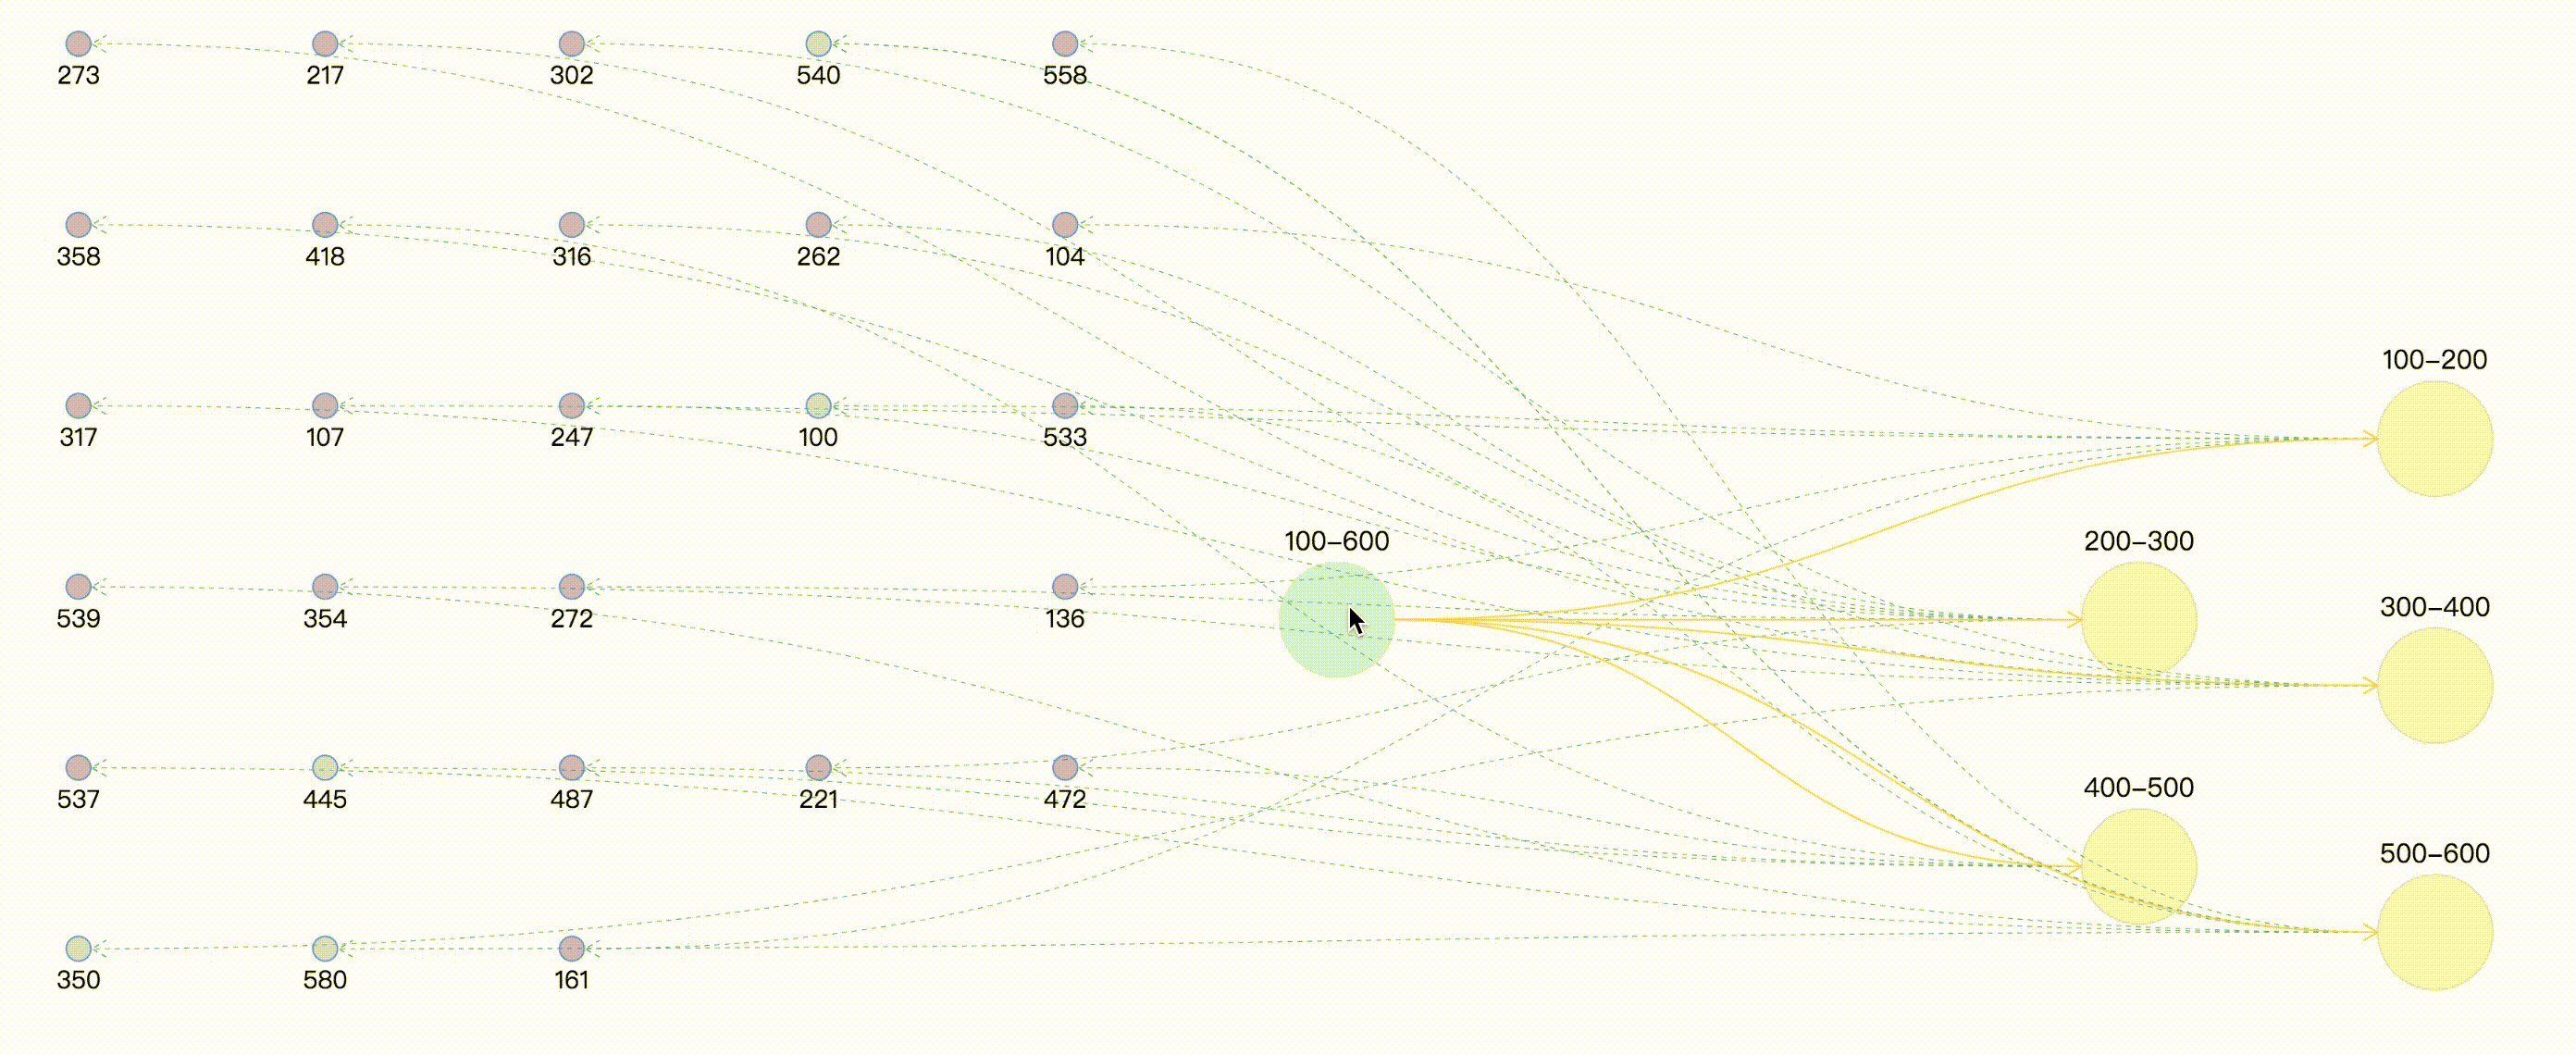
通过上面的案例,可以看出,combo:mouseenter时相关联的边和点全部高亮,并且统一了连线的颜色,此时可能会与我们的需求相违背,可能连线还是想要保持原来的颜色,因为不同的颜色描述两点之间的不同类型的指向关系。那么此时在处理鼠标事件时,需要获取要节点和连线 原始样式。
graphG.on("combo:mouseenter", (e) => {

        let comboItem = e.item;

        const originStyle = comboItem._cfg.originStyle["circle-combo"].fill;

        comboItem._cfg.styles.highlight.fill = originStyle;

        graphG.setItemState(comboItem, "highlight", true);

        comboItem.getEdges().forEach((edge) => {

          const originStyle = edge._cfg.originStyle["edge-shape"].stroke; // 获取边edge 原始颜色

          edge._cfg.styles.highlight.stroke = originStyle;

          let edgeSource = edge.getSource();

          let edgeTarget = edge.getTarget();

          if ( edgeSource._cfg.type === "combo" && edgeSource._cfg.model.id =="100-600" ) {

            const originStyle = edgeSource._cfg.originStyle["circle-combo"].fill; // 获取分组combo 原始颜色

            edgeSource._cfg.styles.highlight.fill = originStyle;

          }

          if ( edgeTarget._cfg.type === "combo" && edgeTarget._cfg.model.id =="100-600" ) {

            const originStyle = edgeTarget._cfg.originStyle["circle-combo"].fill;

            edgeTarget._cfg.styles.highlight.fill = originStyle;

          }

          graphG.setItemState(edgeSource, "highlight", true);

          graphG.setItemState(edgeTarget, "highlight", true);

          graphG.setItemState(edge, "highlight", true);

        });

      });
那么此时最终的效果为:

总结
其实两种方法与异曲同工之妙,都是进行状态的处理,只不过一个是帮我们处理了一部分状态与样式,可以直接拿来用,但往往内置的样式与我们实际使用时不相符,因此可以使用两者结合的方式,最终效果及完整demo,采用随机数来模拟实体与关系。
案例完整代码
<template>

  <div>

    <div id="drawGraph"></div>

  </div>

</template>

<script>

let graphG = null

export default {

  mounted() {

    this.initData();

  },

  methods: {

    initData() {

      let combos = [

        { id: '100-600', label: '100-600' },

        { id: '100-200', label: '100-200' },

        { id: '200-300', label: '200-300' },

        { id: '300-400', label: '300-400' },

        { id: '400-500', label: '400-500' },

        { id: '500-600', label: '500-600' },

      ]

      let edges = [

        { source: '100-600', target: '100-200' },

        { source: '100-600', target: '200-300' },

        { source: '100-600', target: '300-400' },

        { source: '100-600', target: '400-500' },

        { source: '100-600', target: '500-600' },

      ]

      // 生成(20-30)随机数 模拟节点node

      let randomCount = Math.floor(Math.random() * 10) + 20;

      let row_clo = Math.floor(Math.sqrt(randomCount));

      let origin = [-150, 50], row = 110, clo = 150;

      let nodes = []

      for (let i = 0; i < randomCount; i++) {

        let randomNum = String(Math.floor(Math.random() * 500) + 100);    // 生成100-600之间的随机数,并与combo进行连线

        let rowindex = Math.floor(i / row_clo);

        let cloindex = i % row_clo;

        let x = origin[0] + clo * cloindex

        let y = origin[1] + row * rowindex

        let node = {

          label: randomNum,

          id: randomNum,

          x,

          y,

          style: {

            fillOpacity: 0.5,

            cursor: "pointer",

            fill: randomNum % 5 == 0 ? "#81C7D4" : "#986DB2"

          }

        }

        let index = Math.floor(randomNum / 100)

        let edge = {

          source: combos[index].id,

          target: randomNum,

          lineWidth: 1,

          style: {

            lineDash: [3, 3],

            lineWidth: 0.5,

            stroke: "#00AA90"

          }

        }

        nodes.push(node)

        edges.push(edge)

      }

      let data = { combos, edges, nodes }

      console.log(data);

      this.makeRelationData(data);

    },

    // 分组 点 连线处理

    makeRelationData(data) {

      if (graphG) {

        graphG.destroy();

      }

      let drawGraph = document.getElementById("drawGraph");

      this.graphWidth = drawGraph.scrollWidth;

      this.graphHeight = drawGraph.scrollHeight || 1200;

      let origin = [this.graphWidth / 2, 100];

      let row = 150, clo = 180;

      let combos = data.combos

      let row_clo = Math.floor(Math.sqrt(combos.length));

      for (let i = 0; i < combos.length; i++) {

        let rowindex = Math.floor(i / row_clo) + 1;

        let cloindex = (i % row_clo) + 1;

        // 分组默认样式设置

        if (i === 0) {

          combos[i].x = this.graphWidth / 3

          combos[i].y = this.graphHeight / 3

          combos[i].style = {

            fill: "#a5e4f0",

            opacity: 0.5,

            cursor: "pointer",

          };

        } else {

          // 分组定位

          combos[i].x = origin[0] + clo * cloindex;

          combos[i].y = origin[1] + row * rowindex;

          if (i % 2 === 1) {

            combos[i].y += 40;

          }

          combos[i].style = {

            fill: "#f6cd6b",

            fillOpacity: 0.2,

          }

        }

      }

      this.drawQfast(data)

    },

    drawQfast(data) {

      graphG = new this.G6.Graph({

        container: "drawGraph",

        width: this.graphWidth,

        height: this.graphHeight,

        modes: {

          default: [

            { type: "zoom-canvas", enableOptimize: true, optimizeZoom: 0.2 },

            { type: "drag-canvas", enableOptimize: true },

            { type: "drag-node", enableOptimize: true, onlyChangeComboSize: true },

            { type: "drag-combo", enableOptimize: true, onlyChangeComboSize: true },

            { type: "activate-relations", activeState: 'active', inactiveState: 'inactive' },

          ],

        },

        defaultEdge: {

          type: 'cubic-horizontal',

          lineWidth: 1,

          style: {

            endArrow: true,

            stroke: "#FAD069",

          },

        },

       defaultNode: {

          type: "circle",

          size: 15,

          labelCfg: {

            position: "bottom",

            style: {

              fontSize: 15,

            },

          },

        },

        defaultCombo: {

          cursor: "pointer",

          opacity: 0,

          type: "circle",

          lineWidth: 1,

          collapsed: true,

          labelCfg: {

            position: "top",

            refY: 5,

            style: {

              fontSize: 16,

            },

          },

        },

        nodeStateStyles: {

          highlight: {

            fill: "#db4437",

            shadowColor: '#fff',

            stroke: "#db4437",

            cursor: "pointer",

            'text-shape': {

              lineWidth: 1,

              fill: "#db4437",

              stroke: "#db4437",

            },

          },

          inactive: {

            stroke: '#eee',

            lineWidth: 1,

            'text-shape': {

              fill: "#eee",

              stroke: "#eee",

            },

          },

        },

        edgeStateStyles: {

          hover: {

            lineWidth: 3,

          },

          highlight: {

            stroke: '#00AA90',

            lineWidth: 3,

          },

        },

        comboStateStyles: {

          highlight: {

            fill: "#f6cd6b",

            opacity: 0.7,

            cursor: "pointer",

            'text-shape': {

              fill: "#A5E4F0",

              stroke: "#A5E4F0",

              lineWidth: 1,

            },

          },

          inactive: {

            stroke: '#eee',

            lineWidth: 1,

            'text-shape': {

              fill: "#eee",

              stroke: "#eee",

            },

          },

        },

      });

      graphG.data(data);

      graphG.render(); // 渲染图

      graphG.on("edge:mouseenter", (e) => {

        graphG.setItemState(e.item, "hover", true);

      });

      graphG.on("edge:mouseleave", (e) => {

        graphG.setItemState(e.item, "hover", false);

      });

       graphG.on("combo:mouseenter", (e) => {

        let comboItem = e.item;

        const originStyle = comboItem._cfg.originStyle["circle-combo"].fill;

        comboItem._cfg.styles.highlight.fill = originStyle;

        graphG.setItemState(comboItem, "highlight", true);

        comboItem.getEdges().forEach((edge) => {

          const originStyle = edge._cfg.originStyle["edge-shape"].stroke; // 获取边edge 原始颜色

          edge._cfg.styles.highlight.stroke = originStyle;

          let edgeSource = edge.getSource();

          let edgeTarget = edge.getTarget();

          if ( edgeSource._cfg.type === "combo" && edgeSource._cfg.model.id =="100-600" ) {

            const originStyle = edgeSource._cfg.originStyle["circle-combo"].fill; // 获取分组combo 原始颜色

            edgeSource._cfg.styles.highlight.fill = originStyle;

          }

          if ( edgeTarget._cfg.type === "combo" && edgeTarget._cfg.model.id =="100-600" ) {

            const originStyle = edgeTarget._cfg.originStyle["circle-combo"].fill;

            edgeTarget._cfg.styles.highlight.fill = originStyle;

          }

          graphG.setItemState(edgeSource, "highlight", true);

          graphG.setItemState(edgeTarget, "highlight", true);

          graphG.setItemState(edge, "highlight", true);

        });

      });

      graphG.on('combo:mouseleave', () => {

        graphG.setAutoPaint(false)

        graphG.getNodes().forEach(node => {

          graphG.clearItemStates(node)

        })

        graphG.getEdges().forEach(edge => {

          graphG.clearItemStates(edge)

        })

        graphG.getCombos().forEach(combo => {

          graphG.clearItemStates(combo)

        })

        graphG.paint()

        graphG.setAutoPaint(true)

      })

    },

  }

};

</script>
可视化—AntV G6 高亮相邻节点的两种方式的更多相关文章
- 【C#表达式树 六】表达式树中创建节点的两种方式
创建表达式树节点的两种方式1.用expression的静态方法MakeBinary|MakeUnary(ExpressionType,参数)的方式创建表达式树节点: BinaryExpression ...
- jQuery 获取DOM节点的两种方式
jQuery中包裹后的DOM对象实际上是一个数组,要获得纯粹的DOM对象可以有两种方式: 1.使用数组索引方式访问,例如: var dom = $(dom)[0]; 如: $("#id&qu ...
- MongoDB添加secondary节点的两种方法
前段时间维护的一个事业群的其中一条业务线的开发找到运维,提出来了一个MongoDB的优化问题,那段时间MongoDB正在从op管理移交给db进行维护,整个部门都对MongoDB的运维经验缺乏,Mong ...
- Keras中间层输出的两种方式,即特征图可视化
训练好的模型,想要输入中间层的特征图,有两种方式: 1. 通过model.get_layer的方式.创建新的模型,输出为你要的层的名字. 创建模型,debug状态可以看到模型中,base_model/ ...
- 数据可视化之DAX篇(十)在PowerBI中累计求和的两种方式
https://zhuanlan.zhihu.com/p/64418286 假设有一组数据, 已知每一个产品贡献的利润,如果要计算前几名产品的贡献利润总和,或者每一个产品和利润更高产品的累计贡献占总体 ...
- System.Web.Http.Cors配置跨域访问的两种方式
System.Web.Http.Cors配置跨域访问的两种方式 使用System.Web.Http.Cors配置跨域访问,众多大神已经发布了很多文章,我就不在详细描述了,作为小白我只说一下自己的使用心 ...
- 简介C#读取XML的两种方式
简介C#读取XML的两种方式 作者: 字体:[增加 减小] 类型:转载 时间:2013-03-03 在程序中访问进而操作XML文件一般有两种模型,分别是使用DOM(文档对象模型)和流模型,使用DOM的 ...
- Log4Net日志记录两种方式
简介 log4net库是Apache log4j框架在Microsoft .NET平台的实现,是一个帮助程序员将日志信息输出到各种目标(控制台.文件.数据库等)的工具. log4net是Ap ...
- 【剑指offer】递归循环两种方式反转链表
转载请注明出处:http://blog.csdn.net/ns_code/article/details/25737023 本文分别用非递归和递归两种方式实现了链表的反转,在九度OJ上AC. 题目描写 ...
- jQuery中开发插件的两种方式
jQuery中开发插件的两种方式(附Demo) 做web开发的基本上都会用到jQuery,jQuery插件开发两种方式:一种是类扩展的方式开发插件,jQuery添加新的全局函数(jQuery的全局函数 ...
随机推荐
- Vue3 Vite3 状态管理 pinia 基本使用、持久化、在路由守卫中的使用
在<基于 vite 创建 vue3 项目>一文中整合了 pinia,有不少伙伴不知道 pinia 是什么,本文简单介绍 pinia.主要包括三方面: pinia 的基本用法,在<基于 ...
- 基于QT和C++实现的翻金币游戏
基于QT和C++的翻金币游戏 声明: QT翻金币项目可以说是每个新学QT的同学都会去写的一个项目,网上的源码也很多,我也是最近刚开始学QT,所以也参考了很多前辈的代码自己重新敲了一遍代码. 游戏介绍: ...
- 前端开发日常——CSS动画无限轮播
近来没有什么值得写的东西,空闲的时候帮前端的同学做了些大屏上的展示模块,就放在这里写写吧,手把手"需求->设计-> 实现",受众偏新手向. 为了直观便于理解, 直接把结 ...
- 齐博x1模型里边钩子的创建与使用
在模型里边的钩子创建与使用方法跟在控制器里边的钩子创建及使用方法是有所区别的在模型里边创建的钩子,你可以理解为执行一个函数,是无法调用模型里边的类的方法及属性的.比如系统文件\application\ ...
- 九、kubernetes命令行工具kubectl
为了方便在命令行下对集群.节点.pod进行管理,kubernetes官方提供了一个管理命令:kubectl kubectl作为客户端CLI工具,可以让用户通过命令行对Kubernetes集群进行操作. ...
- Log4shell漏洞研究及其挖矿案例分析
本文首发于云影实验室,为本人创作,现转载到个人博客,记录一下. 原文链接:https://mp.weixin.qq.com/s/O2xHr2OEHiga-qTnbWTxQg Apache Log4j是 ...
- vs自定义工程宏
[视图] ---->[其他窗口]----> [属性管理器 ]右键工程---->[添加新项目属性表]打开配置debug/release打开propertysheet找到用户宏即可添加
- mybatis-自定义映射resultMap
自定义映射resultMap resultMap处理字段和属性的映射关系 resultMap:设置自定义映射 属性: id:表示自定义映射的唯一标识,不能重复 type:查询的数据要映射的实体类的类型 ...
- 二叉搜索树 - C++ 实现
二叉搜索树 - C++ 实现 概述 Overview 二叉查找树(英语:Binary Search Tree, 后文中简称 BST), 也称为二叉搜索树.有序二叉树(ordered binary tr ...
- Appscan安全扫描问题-会话检测失败
在进行手动探索-使用浏览器记录时,在后续的继续探索中经常碰到会话检测失败的问题.然而在[配置-登录管理-自动]中记录账号密码后再继续探索仍然提示会话检测失败....网上查找了资料,从该博主的博文中成功 ...