MVVM框架(二)---生命周期
一、Vue 生命周期图解:
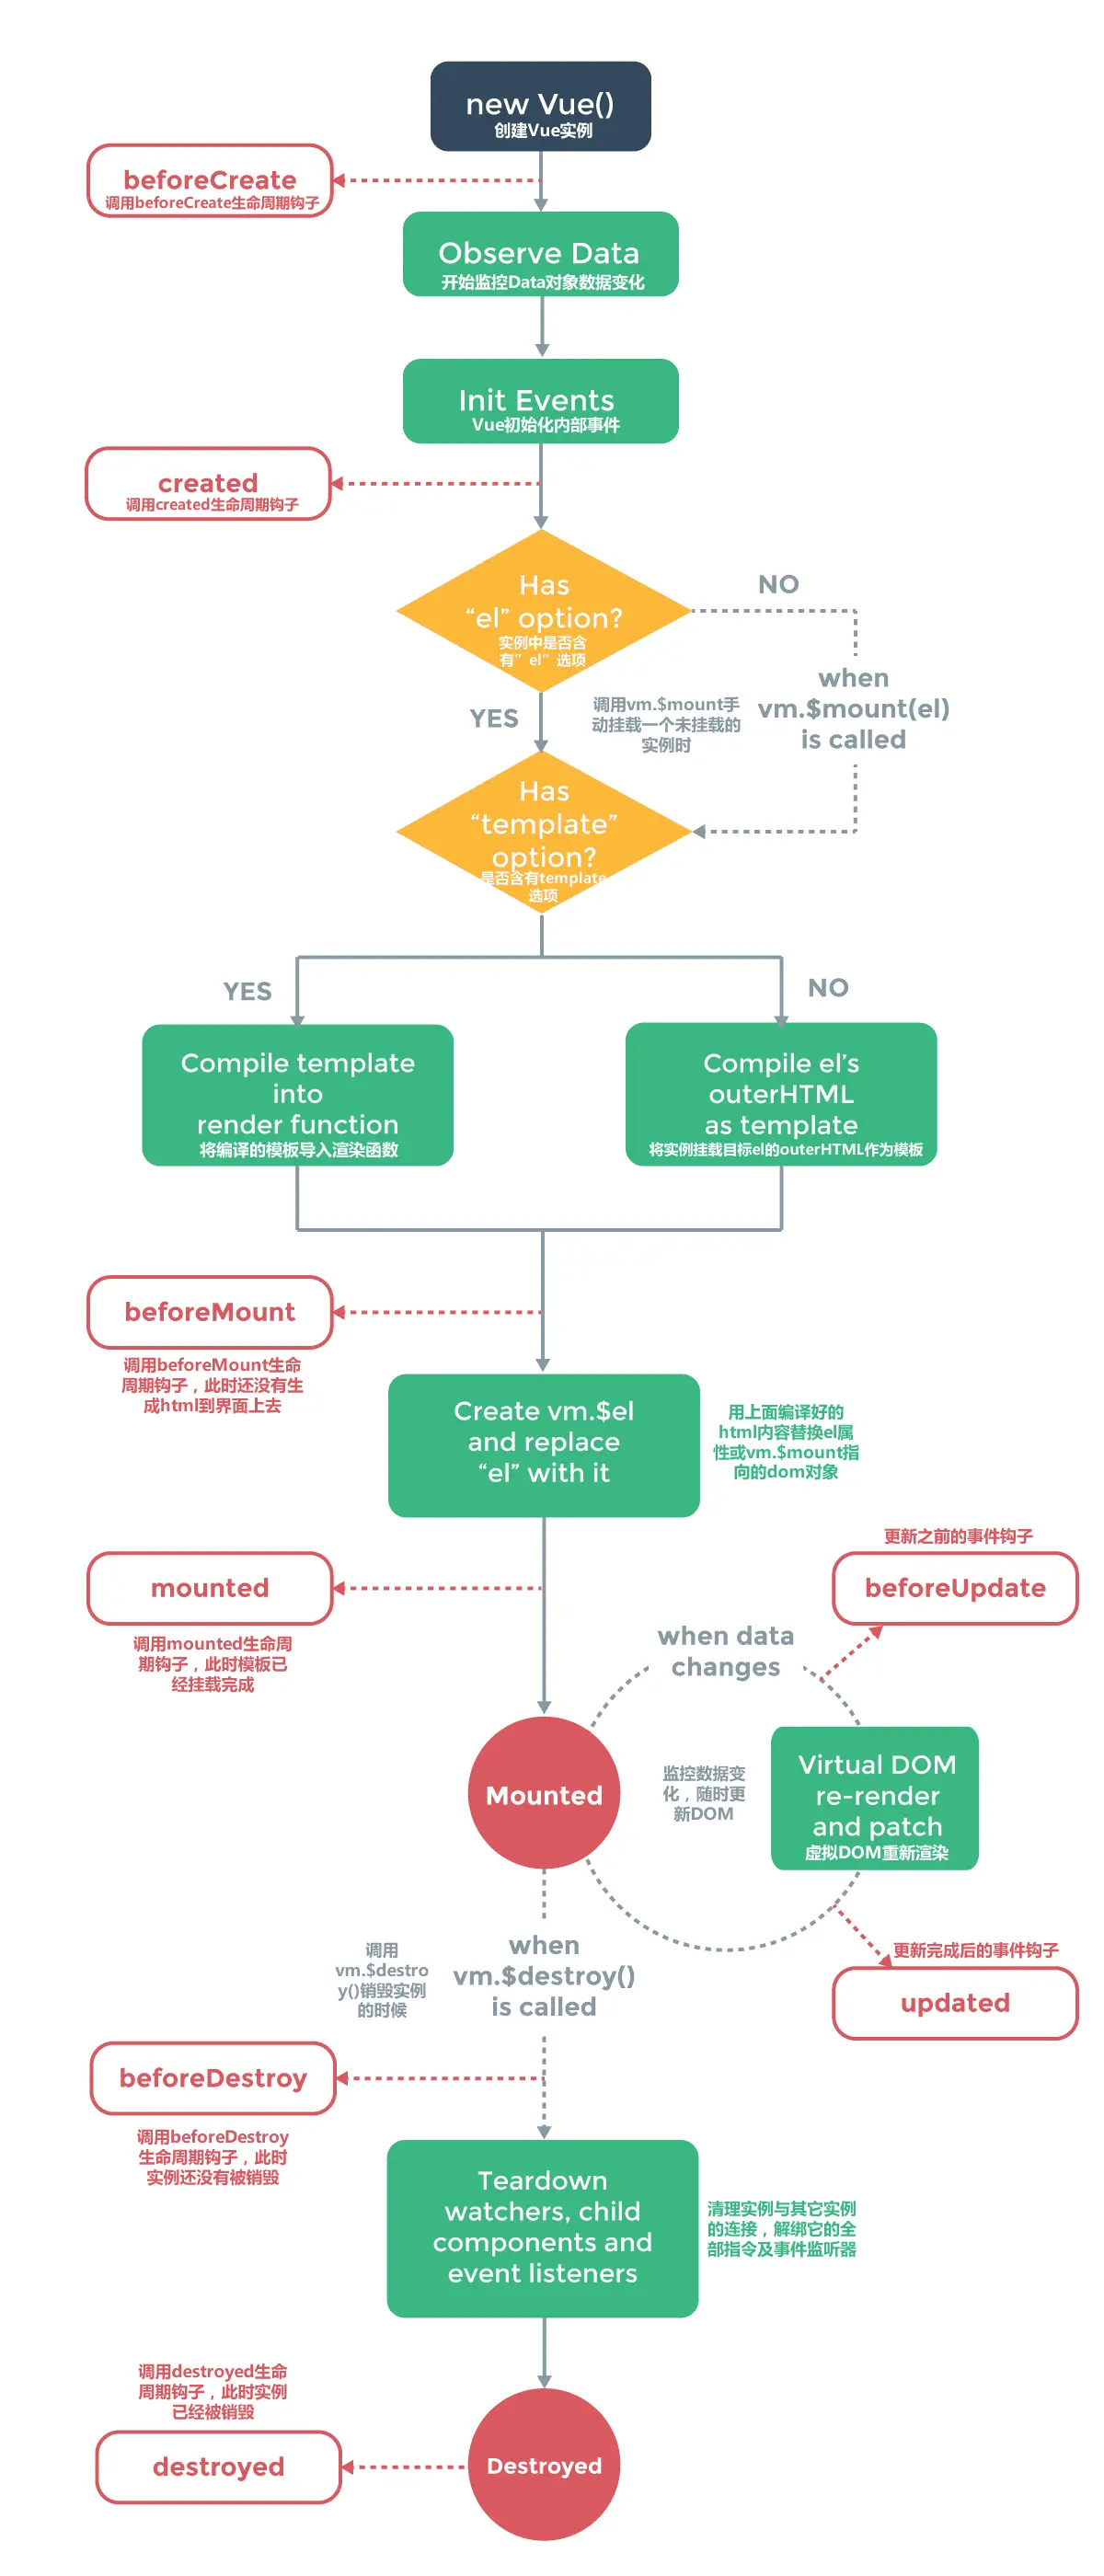
这张图是官方给出的,大家可能都看过。其中我们重点讲述以下几个钩子函数:
beforeCreate --> created
beforeMount --> mounted
beforeUpdate --> updated
beforeDesctroy --> destroyed
二、生命周期研究:
对于执行顺序和什么时候执行,看上面图基本有个理解。下面我们结合代码去看看钩子函数的执行。
<!DOCTYPE html>

<html>

<head>

    <title>钩子函数</title>

    <meta charset="utf-8">

    <script src="http://cdn.bootcss.com/vue/2.1.10/vue.js"></script>

<body>

<div id="app">

    <p>{{ message }}</p>

    <input type="button" @click="change" value="更新数据" />

    <input type="button" @click="destroy" value="销毁" />

</div>

<script type="text/javascript">

    var vm = new Vue({

        el: '#app',

        data: {

            message : "Welcome Vue"

        },

        methods:{

            change() {

                this.message = 'Datura is me';

            },

            destroy() {

                vm.$destroy();

            }

        },

        beforeCreate: function () {

            console.group('beforeCreate 创建前状态===============》');

            console.log("%c%s", "color:red","el     : " + this.$el); //undefined

            console.log("%c%s", "color:red","data   : " + this.$data); //undefined

            console.log("%c%s", "color:red","message: " + this.message);//undefined

        },

        created: function () {

            console.group('created 创建完毕状态===============》');

            console.log("%c%s", "color:red","el     : " + this.$el); //undefined

            console.log("%c%s", "color:green","data   : " + this.$data); //[object Object]  =>  已被初始化

            console.log("%c%s", "color:green","message: " + this.message); //Welcome Vue  =>  已被初始化

        },

        beforeMount: function () {

            console.group('beforeMount 挂载前状态===============》');

            console.log("%c%s", "color:green","el     : " + (this.$el)); //已被初始化

            console.log(this.$el); // 当前挂在的元素

            console.log("%c%s", "color:green","data   : " + this.$data); //已被初始化

            console.log("%c%s", "color:green","message: " + this.message); //已被初始化

        },

        mounted: function () {

            console.group('mounted 挂载结束状态===============》');

            console.log("%c%s", "color:green","el     : " + this.$el); //已被初始化

            console.log(this.$el);

            console.log("%c%s", "color:green","data   : " + this.$data); //已被初始化

            console.log("%c%s", "color:green","message: " + this.message); //已被初始化

        },

        beforeUpdate: function () {

            alert("更新前状态");

            console.group('beforeUpdate 更新前状态===============》'); //这里指的是页面渲染新数据之前

            console.log("%c%s", "color:green","el     : " + this.$el);

            console.log(this.$el);

            console.log("%c%s", "color:green","data   : " + this.$data);

            console.log("%c%s", "color:green","message: " + this.message);

            alert("更新前状态2");

        },

        updated: function () {

            console.group('updated 更新完成状态===============》');

            console.log("%c%s", "color:green","el     : " + this.$el);

            console.log(this.$el);

            console.log("%c%s", "color:green","data   : " + this.$data);

            console.log("%c%s", "color:green","message: " + this.message);

        },

        beforeDestroy: function () {

            console.group('beforeDestroy 销毁前状态===============》');

            console.log("%c%s", "color:red","el     : " + this.$el);

            console.log(this.$el);

            console.log("%c%s", "color:red","data   : " + this.$data);

            console.log("%c%s", "color:red","message: " + this.message);

        },

        destroyed: function () {

            console.group('destroyed 销毁完成状态===============》');

            console.log("%c%s", "color:red","el     : " + this.$el);

            console.log(this.$el);

            console.log("%c%s", "color:red","data   : " + this.$data);

            console.log("%c%s", "color:red","message: " + this.message)

        }

    })

</script>

</body>

</html>
1、create 和 mounted
beforeCreate: el 和 data 并未初始化
created: 完成了data 数据的初始化,el没有
beforeMount:完成了 el 和 data 初始化
mounted :完成挂载
通过代码结果我们还能发现beforeMount的el 中 <p>{{ message }}</p> 没变,这里就是应用的 Virtual DOM(虚拟Dom)技术,先把坑占住了。到后面mounted挂载的时候再把值渲染进去。
2、update
我们单击页面中的“更新数据”按钮,将数据更新。下面就能看到data里的值被修改后,将会触发update的操作。
ps: 注意beforeUpdate是指view层的数据变化前,不是data中的数据改变前触发。因为Vue是数据驱动的。注意观察弹窗就容易发现。
3、destory
销毁完成后,我们再重新改变message的值,vue不再对此动作进行响应了。但是原先生成的dom元素还存在,可以这么理解,
执行了destroy操作,后续就不再受vue控制了。因为这个Vue实例已经不存在了。
我们单击页面中的“销毁”按钮,将指定的Vue实例销毁。
三、生命周期总结:
beforecreate : 举个栗子:可以在这加个loading事件
created :在这结束loading,还做一些初始化,实现函数自执行
mounted : 在这发起后端请求,拿回数据,配合路由钩子做一些事情
beforeDestory: 你确认删除XX吗?
destoryed :当前组件已被删除,清空相关内容
MVVM框架(二)---生命周期的更多相关文章
- vue的MVVM模式和生命周期总结(一)
一.MVVM模式 MVVM 是Model-View-ViewModel 的缩写,它是一种基于前端开发的架构模式,其核心是提供对View 和 ViewModel 的双向数据绑定,这使得ViewModel ...
- 深入了解asp.net框架。生命周期以及事件处理机制
刚接触asp.net框架觉得很好奇.他的快速开发是怎么实现的.控件的状态又是怎么保持的.我们都知道http是无状态的.而且网上很多人都说使用asp.net框架使用服务器框架是非常慢的. 带着这些疑问我 ...
- Spring之bean二生命周期
上一博客主要学习了下bean的配置.注入.自定义属性编辑器,今天来熟悉bean的生命周期.在开发中生命周期是一个很常见的名词,基本每种编程语言都能找到与它关联的.关于bean的生命周期我在网上也找了好 ...
- react学习二 生命周期
转自:https://www.cnblogs.com/gdsblog/p/7348375.html react 中compent getDefaultProps object getDefaultPr ...
- Django框架请求生命周期
先看一张图吧! 1.请求生命周期 - wsgi, 他就是socket服务端,用于接收用户请求并将请求进行初次封装,然后将请求交给web框架(Flask.Django) - 中间件,帮助我们对请求进行校 ...
- Mybatis精讲(二)---生命周期
目录 回顾 SqlSessionFactoryBuilder SqlSessionFactory openSessionFromDataSource Executor SqlSession Mappe ...
- 【转】Django框架请求生命周期
https://www.cnblogs.com/gaoya666/p/9100626.html 先看一张图吧! 1.请求生命周期 - wsgi, 他就是socket服务端,用于接收用户请求并将请求进行 ...
- Kubernetes-Pod介绍(二)-生命周期
前言 本篇是Kubernetes第五篇,大家一定要把环境搭建起来,看是解决不了问题的,必须实战. Kubernetes系列文章: Kubernetes介绍 Kubernetes环境搭建 Kuberne ...
- Spring(二)-生命周期 + 自动装配(xml) +自动装配(注解)
1.生命周期 **Spring容器的 bean **的生命周期: 1.1 默认生命周期 1.1.1 生命周期 调用构造方法,创建实例对象: set方法,给实例对象赋值: init 初始化方法 初始化对 ...
- react基础学习 二——生命周期
生命周期mount: mounting装载创建 update更新 unmounting卸载 错误捕获 注意点:生命周期函数的 作用,什么之后用 只有类式组件有生命周期,函数式组件没有生命周期 moun ...
随机推荐
- zTree 节点勾选取消勾选 选中取消选中
zTreeObj.cancelSelectedNode function 举例 取消当前所有被选中节点的选中状态 var treeObj = $.fn.zTree.getZTreeObj(" ...
- 【转】Beyond compare4密钥
转:https://blog.csdn.net/lemontree1945/article/details/92963423 w4G-in5u3SH75RoB3VZIX8htiZgw4ELilwvPc ...
- axios封装的拦截器的应用
axios拦截器 页面发送http请求,很多情况我们要对请求和其响应进行特定的处理:如果请求数非常多,单独对每一个请求进行处理会变得非常麻烦,程序的优雅性也会大打折扣.好在强大的axios为开发者 ...
- 【Java基础总结】IO流
字节流 1. InputStream 字节输入流 代码演示 InputStream in = System.in; System.out.println("int read(byte b) ...
- ILSpy反编译工具之C#反汇编
1.下载ILspy工具 https://github.com/icsharpcode/ILSpy#ilspy------- 注意: ILspy需要在电脑上安装.NET Framework 4.0. ...
- Android学习进度一
在解决了电脑产生的一系列问题之后成功安装了Android Studio,并在其自带的手机模拟器上成功运行了第一个App(Hello World!),通过这个最简单的App研究了App基本的工程结构,为 ...
- 一个动态扩展表格控件列和行的 jQuery 插件
一个动态扩展表格控件列和行的 jQuery 插件 不过这并不影响使用鸭! 看这里:https://github.com/zhuwansu/table-ext.js 一个简单的示范 html <t ...
- Django框架初体验
前言 从今天开始学习测试开发知识,并会把每一次学习的过程和成果记录到博客,由于我也没怎么接触过python相关的开发框架,所以前期应该是艰难的,但是我相信努力就会有收获,如果你和我一样是个小白,那我们 ...
- C# 二分法的解读
注:一定是有序的数组,才可以使用这种算法,如果数组没有排序则先进行排序后再调用此方法. 1.二分法是做什么的呢? 当然是查找数组中的数据了,开个玩笑,哈哈哈. 2.为啥要用这种方式呢? 二分顾名思义, ...
- electron教程(番外篇二): 使用TypeScript版本的electron, VSCode调试TypeScript, TS版本的ESLint
我的electron教程系列 electron教程(一): electron的安装和项目的创建 electron教程(番外篇一): 开发环境及插件, VSCode调试, ESLint + Google ...